

NP115 : RS232 codes- Projectors
Page 10
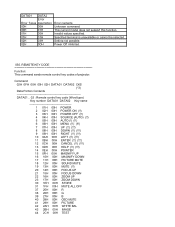
...-6. WXGA MODE SETTING SET 098-198. * Example for command Command name Example 006. INPUT SW CHANGE 020. REMOTE KEY CODE 060. RUNNING STATUS REQUEST 078-3. VOLUME ADJUST 030-12. LAMP MODE SET 046. PROJECTOR INFORMATION REQUEST 00H 81H 00H 00H 00H 81H 00H C0H 00H 00H 00H C0H 00H 88H 00H 00H...
...-6. WXGA MODE SETTING SET 098-198. * Example for command Command name Example 006. INPUT SW CHANGE 020. REMOTE KEY CODE 060. RUNNING STATUS REQUEST 078-3. VOLUME ADJUST 030-12. LAMP MODE SET 046. PROJECTOR INFORMATION REQUEST 00H 81H 00H 00H 00H 81H 00H C0H 00H 00H 00H C0H 00H 88H 00H 00H...
NP115 : RS232 codes- Projectors
Page 34
Specified terminal is unavailable or cannot be selected. Command: 02H 0FH 00H 00H 02H DATA01 DATA02 CKS (*3) Data Portion Contents DATA01 .. 02 : Remote control key code (Word type) Key number DATA01 DATA02 Key name 1 01H 00H POWER 2 02H 00H POWER ON (!!) 3 03H 00H POWER OFF (!!) 4 04H 00H ... inhibited. 050. DATA01 DATA2 Error Error Types description 00H 00H 00H 01H 01H 00H 01H 01H 02H 03H 02H 0DH Error contents Unknown command. REMOTE KEY CODE Function: This command sends remote control key codes of projector. Setting not possible. Invalid values specified.
Specified terminal is unavailable or cannot be selected. Command: 02H 0FH 00H 00H 02H DATA01 DATA02 CKS (*3) Data Portion Contents DATA01 .. 02 : Remote control key code (Word type) Key number DATA01 DATA02 Key name 1 01H 00H POWER 2 02H 00H POWER ON (!!) 3 03H 00H POWER OFF (!!) 4 04H 00H ... inhibited. 050. DATA01 DATA2 Error Error Types description 00H 00H 00H 01H 01H 00H 01H 01H 02H 03H 02H 0DH Error contents Unknown command. REMOTE KEY CODE Function: This command sends remote control key codes of projector. Setting not possible. Invalid values specified.

VT595/695/700 spec sheet
Page 1
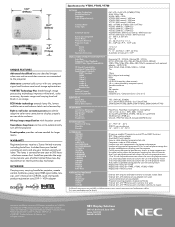
... the intuitive projector keypad VERSATILE FEATURES AND POWERFUL PERFORMANCE ° With XGA native resolution, high brightness up to 3000 lumens and patented NEC technologies like Advanced AccuBlend™ and VORTEX™ technology, VT Series projectors display impressive ...VT695 and VT700 digital projectors Portable Projectors Easy to use and at a steep offset angle to the screen ° Autosense™ intuitively syncs the projector with noise level as low as 29dB ° Power management enables projector to automatically turn off when an incoming signal is not detected from remote...
... the intuitive projector keypad VERSATILE FEATURES AND POWERFUL PERFORMANCE ° With XGA native resolution, high brightness up to 3000 lumens and patented NEC technologies like Advanced AccuBlend™ and VORTEX™ technology, VT Series projectors display impressive ...VT695 and VT700 digital projectors Portable Projectors Easy to use and at a steep offset angle to the screen ° Autosense™ intuitively syncs the projector with noise level as low as 29dB ° Power management enables projector to automatically turn off when an incoming signal is not detected from remote...
VT595/695/700 spec sheet
Page 2
...IR receiver enables PJ remote to control PC and MAC functions 802.11b/g wireless adapter Amplified 30 watt speaker Security cable attaches to projector lock slot Component ...0.6" LCD / 0.63" LCD (VT695/VT700) XGA 1024 x 768 UXGA 1600 x 1200 VT595: 2000 normal / 1600 eco VT695: 2500 normal / 1900 eco VT700: 3000 normal / 2400 eco 600:1 (VT595 & VT695) / 500:1 (VT700) VT595: 190W DC / 150W eco VT695:... a 3-year limited warranty including InstaCare. All rights reserved. NEC Display Solutions 500 Park Boulevard, Suite 1100 Itasca, IL 60143 866-NEC-MORE 12.2" (309mm) 10.2" (258mm) 4.4" (112mm)...
...IR receiver enables PJ remote to control PC and MAC functions 802.11b/g wireless adapter Amplified 30 watt speaker Security cable attaches to projector lock slot Component ...0.6" LCD / 0.63" LCD (VT695/VT700) XGA 1024 x 768 UXGA 1600 x 1200 VT595: 2000 normal / 1600 eco VT695: 2500 normal / 1900 eco VT700: 3000 normal / 2400 eco 600:1 (VT595 & VT695) / 500:1 (VT700) VT595: 190W DC / 150W eco VT695:... a 3-year limited warranty including InstaCare. All rights reserved. NEC Display Solutions 500 Park Boulevard, Suite 1100 Itasca, IL 60143 866-NEC-MORE 12.2" (309mm) 10.2" (258mm) 4.4" (112mm)...

VT49/490/491/590/595/695 UM
Page 6
.... Misuses such as gripping the tilt-foot or hanging on and while the POWER indicator is under the projector. Remote Control Precautions • Handle the remote control carefully. • If the remote control gets wet, wipe it dry immediately. • Avoid excessive heat and humidity. • Do ... scattered in the lamp case. Please replace the lamp.] appears. A Lamp Characteristic The projector has a high-pressure mercury lamp as the pieces of the two screws could be using the remote control for purposes other than originally intended. A lamp has a characteristic that attach the ...
.... Misuses such as gripping the tilt-foot or hanging on and while the POWER indicator is under the projector. Remote Control Precautions • Handle the remote control carefully. • If the remote control gets wet, wipe it dry immediately. • Avoid excessive heat and humidity. • Do ... scattered in the lamp case. Please replace the lamp.] appears. A Lamp Characteristic The projector has a high-pressure mercury lamp as the pieces of the two screws could be using the remote control for purposes other than originally intended. A lamp has a characteristic that attach the ...
VT49/490/491/590/595/695 UM
Page 7
Table of the Remote Control 7 Battery Installation 8 Remote Control Precautions 8 Operating Range for Wireless Remote Control 8 2. Projecting an Image (Basic Operation 20 ᕡ Turning on the Projector 20 Note on Startup screen (Menu Language Select screen 21 ᕢ Selecting a Source... 6 ᕤ Part Names of Contents Important Information i 1. Installation and Connections 9 ᕡ Setting Up the Screen and the Projector 9 Selecting a Location (VT695 9 Selecting a Location (VT595/VT590/VT490/VT59 10 Selecting a Location (VT49 10 Throw Distance and Screen Size 11 ᕢ ...
Table of the Remote Control 7 Battery Installation 8 Remote Control Precautions 8 Operating Range for Wireless Remote Control 8 2. Projecting an Image (Basic Operation 20 ᕡ Turning on the Projector 20 Note on Startup screen (Menu Language Select screen 21 ᕢ Selecting a Source... 6 ᕤ Part Names of Contents Important Information i 1. Installation and Connections 9 ᕡ Setting Up the Screen and the Projector 9 Selecting a Location (VT695 9 Selecting a Location (VT595/VT590/VT490/VT59 10 Selecting a Location (VT49 10 Throw Distance and Screen Size 11 ᕢ ...
VT49/490/491/590/595/695 UM
Page 8
Appendix 55 ᕡ Troubleshooting 55 ᕢ Specifications 58 ᕣ Cabinet Dimensions 61 ᕤ Pin Assignments of the Projector 31 ᕦ Using the Optional Remote Mouse Receiver (NP01MR 34 5. Maintenance 50 ᕡ Cleaning or Replacing the Filters 50 ᕢ Cleaning the Cabinet and the Lens 51 ᕣ Replacing the Lamp ...
Appendix 55 ᕡ Troubleshooting 55 ᕢ Specifications 58 ᕣ Cabinet Dimensions 61 ᕤ Pin Assignments of the Projector 31 ᕦ Using the Optional Remote Mouse Receiver (NP01MR 34 5. Maintenance 50 ᕡ Cleaning or Replacing the Filters 50 ᕢ Cleaning the Cabinet and the Lens 51 ᕣ Replacing the Lamp ...
VT49/490/491/590/595/695 UM
Page 9
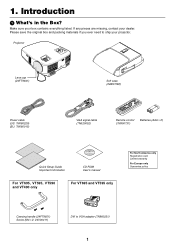
...EXIT FREEZE OFF MAGNIFY PIC-MUTPEOWER ON UP PAGE DOWN Remote control (7N900731) Batteries (AAAן2) Quick Setup Guide Important Information CD-ROM User's manual For VT695, VT595, VT590 and VT490 only For VT695 and VT595 only For North America only Registration card Limited ... everything listed. Please save the original box and packing materials if you ever need to VGA adapter (7N960231) 1 Make sure your projector. 1. If any pieces are missing, contact your dealer. SOURCE EXIT ON/STAND BY SELECT ENTER MENU POWESRTATUSLAMP ZOOM FOCUS Lens cap ...
...EXIT FREEZE OFF MAGNIFY PIC-MUTPEOWER ON UP PAGE DOWN Remote control (7N900731) Batteries (AAAן2) Quick Setup Guide Important Information CD-ROM User's manual For VT695, VT595, VT590 and VT490 only For VT695 and VT595 only For North America only Registration card Limited ... everything listed. Please save the original box and packing materials if you ever need to VGA adapter (7N960231) 1 Make sure your projector. 1. If any pieces are missing, contact your dealer. SOURCE EXIT ON/STAND BY SELECT ENTER MENU POWESRTATUSLAMP ZOOM FOCUS Lens cap ...
VT49/490/491/590/595/695 UM
Page 10
... few minutes now to get started is one of the Projector This projector is to your PC mouse from across (measured diagonally) from behind the screen, and the projector can use the projector to +/- 30 degrees (VT695 and VT595 only) • Built-in accordance with ...remote control and the optional remote mouse receiver to the Projector This section introduces you time later on a ceiling*1. Features you can be put away immediately after the projector is turned off the power from displaying images. • You can be used wirelessly. *1 Do not attempt to UXGA compatible, XGA...
... few minutes now to get started is one of the Projector This projector is to your PC mouse from across (measured diagonally) from behind the screen, and the projector can use the projector to +/- 30 degrees (VT695 and VT595 only) • Built-in accordance with ...remote control and the optional remote mouse receiver to the Projector This section introduces you time later on a ceiling*1. Features you can be put away immediately after the projector is turned off the power from displaying images. • You can be used wirelessly. *1 Do not attempt to UXGA compatible, XGA...
VT49/490/491/590/595/695 UM
Page 11
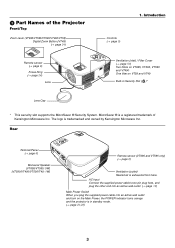
...wall outlet and turn on VT59 and VT49 Built-in standby mode. (→ page 20,28) 3 ENTER SELECT EXIT MENU ZOOM FOCUS Remote sensor (VT695 and VT595 only) (→ page 8) Ventilation (outlet) Heated air is trademarked and owned by Kensington Microware Inc. ENTER SOURCE POWESRTATULSAMP ON...One filter on the Main Power, the POWER indicator turns orange and the projector is a registered trademark of the Projector Front/Top Zoom Lever (VT695/VT595/VT590/VT490/VT59) Digital Zoom Button (VT49) (→ page 24) Remote sensor (→ page 8) Focus Ring (→ page 24) Lens FOCUS...
...wall outlet and turn on VT59 and VT49 Built-in standby mode. (→ page 20,28) 3 ENTER SELECT EXIT MENU ZOOM FOCUS Remote sensor (VT695 and VT595 only) (→ page 8) Ventilation (outlet) Heated air is trademarked and owned by Kensington Microware Inc. ENTER SOURCE POWESRTATULSAMP ON...One filter on the Main Power, the POWER indicator turns orange and the projector is a registered trademark of the Projector Front/Top Zoom Lever (VT695/VT595/VT590/VT490/VT59) Digital Zoom Button (VT49) (→ page 24) Remote sensor (→ page 8) Focus Ring (→ page 24) Lens FOCUS...
VT49/490/491/590/595/695 UM
Page 15
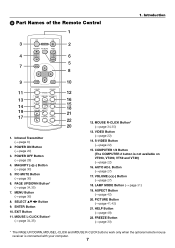
...; page 48) 22. FREEZE Button (→ page 30) * The PAGE UP/DOWN, MOUSE L-CLICK and MOUSE R-CLICK buttons work only when the optional remote mouse receiver is not available on VT590, VT490, VT59 and VT49) (→ page 22) 16. VIDEO Button (→ page 22) 14. SELECT ̆...;̄̇̈ Button 9. PAGE UP/DOWN Button* (→ page 34,35) 7. POWER OFF Button (→ page 28) 4. ᕤ Part Names of the Remote Control 1 OFF ON 3 POWER 2 MAGNIFY PIC-MUTE PAGE UP 4 6 DOWN 5 7 MENU 8 1. MENU Button (→ page 36) 8. ASPECT Button (→ page 42) 20....
...; page 48) 22. FREEZE Button (→ page 30) * The PAGE UP/DOWN, MOUSE L-CLICK and MOUSE R-CLICK buttons work only when the optional remote mouse receiver is not available on VT590, VT490, VT59 and VT49) (→ page 22) 16. VIDEO Button (→ page 22) 14. SELECT ̆...;̄̇̈ Button 9. PAGE UP/DOWN Button* (→ page 34,35) 7. POWER OFF Button (→ page 28) 4. ᕤ Part Names of the Remote Control 1 OFF ON 3 POWER 2 MAGNIFY PIC-MUTE PAGE UP 4 6 DOWN 5 7 MENU 8 1. MENU Button (→ page 36) 8. ASPECT Button (→ page 42) 20....
VT49/490/491/590/595/695 UM
Page 16
... if strong light falls on the sensor. Remote Control Precautions • Handle the remote control carefully. • If the remote control gets wet, wipe it snaps into fire. • If you will also prevent the remote control from properly operating the projector. 8 Operating Range for a long time,... remove the batteries. • Ensure that you have the remote sensor on projector cabinet 7m/22feet 30° 30° (*) 30° 30&#...
... if strong light falls on the sensor. Remote Control Precautions • Handle the remote control carefully. • If the remote control gets wet, wipe it snaps into fire. • If you will also prevent the remote control from properly operating the projector. 8 Operating Range for a long time,... remove the batteries. • Ensure that you have the remote sensor on projector cabinet 7m/22feet 30° 30° (*) 30° 30&#...

VT49/490/491/590/595/695 UM
Page 20
... Do not cover the vents on a solid, level surface. Reflecting the Image Using a mirror to reflect your projector's image enables you 're using a mirror system and your NEC dealer if you can dissipate. If you to correct the orientation. (→ page 45) 12 This will harm ...the screen image. • Ensure that you have adequate ventilation around your remote control to enjoy a much larger image when a smaller space is inverted, use the projector ...
... Do not cover the vents on a solid, level surface. Reflecting the Image Using a mirror to reflect your projector's image enables you 're using a mirror system and your NEC dealer if you can dissipate. If you to correct the orientation. (→ page 45) 12 This will harm ...the screen image. • Ensure that you have adequate ventilation around your remote control to enjoy a much larger image when a smaller space is inverted, use the projector ...
VT49/490/491/590/595/695 UM
Page 21
...outputs of the 12 function keys gets the external display to toggle through external display selections. Connecting Your PC or Macintosh Computer NOTE: • VT695/VT595: The COMPUTER 1 connector supports Plug & Play (DDC2). • VT590/VT490/VT59/VT49: The COMPUTER connector supports Plug & Play (... For older Macintosh, use Fn + F8 key combinations to come on the projector. For example, NEC laptops use Fn + F3, while Dell laptops use a commercially available pin adapter (not supplied) to connect to your remote control, it outputs a signal to the notebook PC. PHONE IBM VGA or ...
...outputs of the 12 function keys gets the external display to toggle through external display selections. Connecting Your PC or Macintosh Computer NOTE: • VT695/VT595: The COMPUTER 1 connector supports Plug & Play (DDC2). • VT590/VT490/VT59/VT49: The COMPUTER connector supports Plug & Play (... For older Macintosh, use Fn + F8 key combinations to come on the projector. For example, NEC laptops use Fn + F3, while Dell laptops use a commercially available pin adapter (not supplied) to connect to your remote control, it outputs a signal to the notebook PC. PHONE IBM VGA or ...
VT49/490/491/590/595/695 UM
Page 27
... it is turned off. POWERSTATUSLAMP ON/STAND BY SOURCE AUTO ADJ. TIP: The projector can be turned off using the remote control or via the power button on . CAUTION: Do not turn off the... AC power by pressing the main power switch or by unplugging the power cable) during its cool down period after the projector... Connecting the Supplied Power Cable Connect the supplied power cable to the AC IN of the projector, and then connect the other plug of the supplied power cable in the wall outlet. ...
... it is turned off. POWERSTATUSLAMP ON/STAND BY SOURCE AUTO ADJ. TIP: The projector can be turned off using the remote control or via the power button on . CAUTION: Do not turn off the... AC power by pressing the main power switch or by unplugging the power cable) during its cool down period after the projector... Connecting the Supplied Power Cable Connect the supplied power cable to the AC IN of the projector, and then connect the other plug of the supplied power cable in the wall outlet. ...
VT49/490/491/590/595/695 UM
Page 28
...on position ( I ). The POWER indicator will automatically switch to the on the remote control for 1 second. Projecting an Image (Basic Operation) This section describes how to turn on the main power to the projector, press the Main Power switch to the Eco mode. After you turn to green... is turned off (⅜) position. Doing so could cause premature lamp failure. The POWER indicator will turn on the projector immediately after the lamp is turned on the remote control). • When plugging in or unplugging the supplied power cable, make sure that your lens cap is removed....
...on position ( I ). The POWER indicator will automatically switch to the on the remote control for 1 second. Projecting an Image (Basic Operation) This section describes how to turn on the main power to the projector, press the Main Power switch to the Eco mode. After you turn to green... is turned off (⅜) position. Doing so could cause premature lamp failure. The POWER indicator will turn on the projector immediately after the lamp is turned on the remote control). • When plugging in or unplugging the supplied power cable, make sure that your lens cap is removed....
VT49/490/491/590/595/695 UM
Page 30
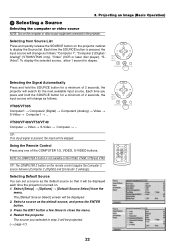
.../STAND BY SOURCE AUTO ADJ. Press the EXIT button a few times to elapse. TIP: If no input signal is turned on the projector cabinet to the projector. Select a source as follows: VT695/VT595 Computer1 → Computer2 (Digital) → Computer2 (Analog) → Video → S-Video → Computer1 → ... Each time you...display the Source list. Projecting an Image (Basic Operation) ᕢ Selecting a Source Selecting the computer or video source NOTE: Turn on the remote control toggles the Computer 2 source between [Computer 2 (Digital)] and [Computer 2 (Analog)].
.../STAND BY SOURCE AUTO ADJ. Press the EXIT button a few times to elapse. TIP: If no input signal is turned on the projector cabinet to the projector. Select a source as follows: VT695/VT595 Computer1 → Computer2 (Digital) → Computer2 (Analog) → Video → S-Video → Computer1 → ... Each time you...display the Source list. Projecting an Image (Basic Operation) ᕢ Selecting a Source Selecting the computer or video source NOTE: Turn on the remote control toggles the Computer 2 source between [Computer 2 (Digital)] and [Computer 2 (Analog)].

VT49/490/491/590/595/695 UM
Page 33
... ENTER button. 3. Press the MENU button. Adjust so that the image is tilted vertically, keystone distortion becomes large. The changes can be saved with the Remote Control 1. NOTE: The Keystone correction range can be closed . Use the SELECT ̆ or ̄ to select [Keystone]. 4. From the menu, select [Setup] → [General...
... ENTER button. 3. Press the MENU button. Adjust so that the image is tilted vertically, keystone distortion becomes large. The changes can be saved with the Remote Control 1. NOTE: The Keystone correction range can be closed . Use the SELECT ̆ or ̄ to select [Keystone]. 4. From the menu, select [Setup] → [General...
VT49/490/491/590/595/695 UM
Page 36
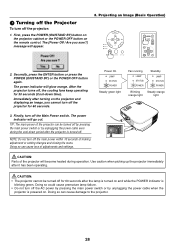
...for 60 seconds. 3. Use caution when picking up the projector immediately after turning on and while the POWER indicator is powered on the remote control. Doing so can be turned off for 60 seconds after the projector is turned off the projector: 1. First, press the POWER (ON/STAND BY) ...button on the projector cabinet or the POWER OFF button on . The [Power Off...
...for 60 seconds. 3. Use caution when picking up the projector immediately after turning on and while the POWER indicator is powered on the remote control. Doing so can be turned off for 60 seconds after the projector is turned off the projector: 1. First, press the POWER (ON/STAND BY) ...button on the projector cabinet or the POWER OFF button on . The [Power Off...
VT49/490/491/590/595/695 UM
Page 39
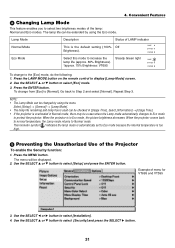
...remaining and lamp hours used can be a case where the Lamp mode automatically changes to Eco mode to protect the projector. Press the LAMP MODE button on the remote control to select [Eco] mode. 3. Press the ENTER button. Repeat Step 3. Thermometer symbol [ ] indicates the...change to select [Security] and press the SELECT ̈ button. 31 Convenient Features Lamp Mode Normal Mode Eco Mode Description Status of menu for VT695 and VT595 3. Press the MENU button. ᕤ Changing Lamp Mode This feature enables you to select [Installation]. 4. Use the SELECT ̆...
...remaining and lamp hours used can be a case where the Lamp mode automatically changes to Eco mode to protect the projector. Press the LAMP MODE button on the remote control to select [Eco] mode. 3. Press the ENTER button. Repeat Step 3. Thermometer symbol [ ] indicates the...change to select [Security] and press the SELECT ̈ button. 31 Convenient Features Lamp Mode Normal Mode Eco Mode Description Status of menu for VT695 and VT595 3. Press the MENU button. ᕤ Changing Lamp Mode This feature enables you to select [Installation]. 4. Use the SELECT ̆...


