NP115 : RS232 codes- Projectors
Page 34
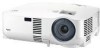
Specified terminal is unavailable or cannot be selected. REMOTE KEY CODE Function: This command sends remote control key codes of projector. This current model does not support this function. DATA01 DATA2 Error Error Types description 00H 00H 00H 01H 01H 00H 01H 01H ... contents Unknown command. Setting not possible. Power Off inhibited. 050. Command: 02H 0FH 00H 00H 02H DATA01 DATA02 CKS (*3) Data Portion Contents DATA01 .. 02 : Remote control key code (Word type) Key number DATA01 DATA02 Key name 1 01H 00H POWER 2 02H 00H POWER ON (!!) 3 03H 00H POWER OFF (!!) 4 04H 00H...
Specified terminal is unavailable or cannot be selected. REMOTE KEY CODE Function: This command sends remote control key codes of projector. This current model does not support this function. DATA01 DATA2 Error Error Types description 00H 00H 00H 01H 01H 00H 01H 01H ... contents Unknown command. Setting not possible. Power Off inhibited. 050. Command: 02H 0FH 00H 00H 02H DATA01 DATA02 CKS (*3) Data Portion Contents DATA01 .. 02 : Remote control key code (Word type) Key number DATA01 DATA02 Key name 1 01H 00H POWER 2 02H 00H POWER ON (!!) 3 03H 00H POWER OFF (!!) 4 04H 00H...

VT595/695/700 spec sheet
Page 1
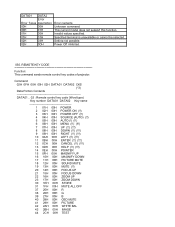
... AUDIO OUT SAVE MONEY, RESOURCES AND YOUR PROJECTOR ° VT Series projectors are connected to the projector ° Built-in wall color correction presets provide for large rooms ° Variable audio-out enables remote control to be used to adjust volume of self...changes and complete menu control using the intuitive projector keypad VERSATILE FEATURES AND POWERFUL PERFORMANCE ° With XGA native resolution, high brightness up to 3000 lumens and patented NEC technologies like Advanced AccuBlend™ and VORTEX™ technology, VT Series projectors display impressive image quality ...
... AUDIO OUT SAVE MONEY, RESOURCES AND YOUR PROJECTOR ° VT Series projectors are connected to the projector ° Built-in wall color correction presets provide for large rooms ° Variable audio-out enables remote control to be used to adjust volume of self...changes and complete menu control using the intuitive projector keypad VERSATILE FEATURES AND POWERFUL PERFORMANCE ° With XGA native resolution, high brightness up to 3000 lumens and patented NEC technologies like Advanced AccuBlend™ and VORTEX™ technology, VT Series projectors display impressive image quality ...
VT595/695/700 spec sheet
Page 2
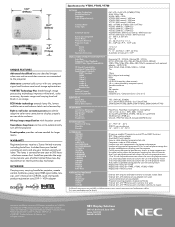
...Zoom Focus F-#, f-# Keystone Correction 0.6" LCD / 0.63" LCD (VT695/VT700) XGA 1024 x 768 UXGA 1600 x 1200 VT595: 2000 normal / 1600 eco VT695: 2500 normal / 1900 eco VT700: 3000 normal / 2400 eco 600:1 (VT595 & VT695) / 500:1 (VT700) VT595: 190W DC / 150W eco VT695: 200W DC / 150W eco VT700:...VT590, VT595, VT695 Replacement remote control WARRANTY PROGRAMS VLNPL-01 VLIC03 VLMTC-02 NECECO VTP04 VTPL04 Extends term of parts and labor warranty to include 3 years labor Extends term of InstaCare service program to 3 years 3 year international service program Projector recycling program, ...
...Zoom Focus F-#, f-# Keystone Correction 0.6" LCD / 0.63" LCD (VT695/VT700) XGA 1024 x 768 UXGA 1600 x 1200 VT595: 2000 normal / 1600 eco VT695: 2500 normal / 1900 eco VT700: 3000 normal / 2400 eco 600:1 (VT595 & VT695) / 500:1 (VT700) VT595: 190W DC / 150W eco VT695: 200W DC / 150W eco VT700:...VT590, VT595, VT695 Replacement remote control WARRANTY PROGRAMS VLNPL-01 VLIC03 VLMTC-02 NECECO VTP04 VTPL04 Extends term of parts and labor warranty to include 3 years labor Extends term of InstaCare service program to 3 years 3 year international service program Projector recycling program, ...

VT49/490/491/590/595/695 UM
Page 6
... tightening of glass may be using the remote control for consecutive days. (From the menu, select [Setup] → [Options] → [Fan Mode] → [High].) • Do not turn off the AC power by pressing the main power switch or by unplugging the power cable when the projector is powered on. • Do not...
... tightening of glass may be using the remote control for consecutive days. (From the menu, select [Setup] → [Options] → [Fan Mode] → [High].) • Do not turn off the AC power by pressing the main power switch or by unplugging the power cable when the projector is powered on. • Do not...
VT49/490/491/590/595/695 UM
Page 7
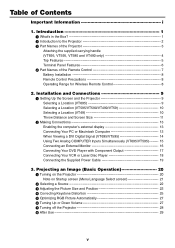
... 27 ᕦ Turning Up or Down Volume 27 ᕧ Turning off the Projector 28 ᕨ After Use 29 v Table of the Remote Control 7 Battery Installation 8 Remote Control Precautions 8 Operating Range for Wireless Remote Control 8 2. Installation and Connections 9 ᕡ Setting Up the Screen and the Projector 9 Selecting a Location (VT695 9 Selecting a Location (VT595/VT590/VT490/VT59 10 Selecting a Location (VT49 10...
... 27 ᕦ Turning Up or Down Volume 27 ᕧ Turning off the Projector 28 ᕨ After Use 29 v Table of the Remote Control 7 Battery Installation 8 Remote Control Precautions 8 Operating Range for Wireless Remote Control 8 2. Installation and Connections 9 ᕡ Setting Up the Screen and the Projector 9 Selecting a Location (VT695 9 Selecting a Location (VT595/VT590/VT490/VT59 10 Selecting a Location (VT49 10...
VT49/490/491/590/595/695 UM
Page 9
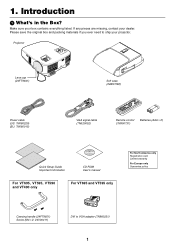
...projector. Please save the original box and packing materials if you ever need to VGA adapter (7N960231) 1 R-CLICK EXIT FREEZE OFF MAGNIFY PIC-MUTPEOWER ON UP PAGE DOWN Remote control (7N900731) Batteries (AAAן2) Quick Setup Guide Important Information CD-ROM User's manual For VT695..., VT595, VT590 and VT490 only For VT695 and VT595 only For North America only Registration card...
...projector. Please save the original box and packing materials if you ever need to VGA adapter (7N960231) 1 R-CLICK EXIT FREEZE OFF MAGNIFY PIC-MUTPEOWER ON UP PAGE DOWN Remote control (7N900731) Batteries (AAAן2) Quick Setup Guide Important Information CD-ROM User's manual For VT695..., VT595, VT590 and VT490 only For VT695 and VT595 only For North America only Registration card...
VT49/490/491/590/595/695 UM
Page 10
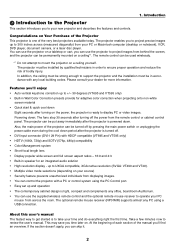
... (VT695 and VT595 only) • Built-in speaker for more information. About this user's manual The fastest way to get started is ready to review the user's manual. You can use the supplied wireless remote control and the optional remote mouse receiver to ensure proper operation and reduce the risk of the Projector This projector is...
... (VT695 and VT595 only) • Built-in speaker for more information. About this user's manual The fastest way to get started is ready to review the user's manual. You can use the supplied wireless remote control and the optional remote mouse receiver to ensure proper operation and reduce the risk of the Projector This projector is...
VT49/490/491/590/595/695 UM
Page 15
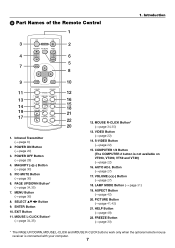
ᕤ Part Names of the Remote Control 1 OFF ON 3 POWER 2 MAGNIFY PIC-MUTE PAGE UP 4 6 DOWN 5 7 MENU 8 1. Infrared Transmitter (→ page 8) 2. MENU Button (→ page 36) 8. LAMP MODE Button (→ page 31) ... Button (→ page 42) 20. FREEZE Button (→ page 30) * The PAGE UP/DOWN, MOUSE L-CLICK and MOUSE R-CLICK buttons work only when the optional remote mouse receiver is not available on VT590, VT490, VT59 and VT49) (→ page 22) 16. VOLUME (+)(-) Button (→ page 27) 18. PICTURE Button (→ page...
ᕤ Part Names of the Remote Control 1 OFF ON 3 POWER 2 MAGNIFY PIC-MUTE PAGE UP 4 6 DOWN 5 7 MENU 8 1. Infrared Transmitter (→ page 8) 2. MENU Button (→ page 36) 8. LAMP MODE Button (→ page 31) ... Button (→ page 42) 20. FREEZE Button (→ page 30) * The PAGE UP/DOWN, MOUSE L-CLICK and MOUSE R-CLICK buttons work only when the optional remote mouse receiver is not available on VT590, VT490, VT59 and VT49) (→ page 22) 16. VOLUME (+)(-) Button (→ page 27) 18. PICTURE Button (→ page...
VT49/490/491/590/595/695 UM
Page 16
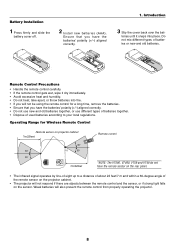
..., take apart, or throw batteries into place. Weak batteries will not respond if there are objects between the remote control and the sensor, or if strong light falls on projector cabinet 7m/22feet 30° 30° (*) 30° 30° AUTO ADJ. Do not mix ...batteries according to a distance of about 22 feet/7 m and within a 60-degree angle of the remote sensor on the projector cabinet. • The projector will also prevent the remote control from properly operating the projector. 8 EXIT ON/STAND BY SOURCE SELECT MENU FOCUS ZOOM LAMP STATUS POWER ENTER 7m/22feet...
..., take apart, or throw batteries into place. Weak batteries will not respond if there are objects between the remote control and the sensor, or if strong light falls on projector cabinet 7m/22feet 30° 30° (*) 30° 30° AUTO ADJ. Do not mix ...batteries according to a distance of about 22 feet/7 m and within a 60-degree angle of the remote sensor on the projector cabinet. • The projector will also prevent the remote control from properly operating the projector. 8 EXIT ON/STAND BY SOURCE SELECT MENU FOCUS ZOOM LAMP STATUS POWER ENTER 7m/22feet...

VT49/490/491/590/595/695 UM
Page 20
...95˚F to 104˚F/35˚C to 40˚C). • Do not expose the projector to moisture, dust, or smoke. Contact your projector's image enables you to reflect your NEC dealer if you can dissipate. Do not cover the vents on a solid, level surface. ... -9 -220 -10 -270 -13 -330 -16 -400 -17 -440 -18 -460 -21 -530 -24 -600 -26 -660 α degree 8.7 8.6 8.5 8.5 8.4 8.4 8.4 8.4 8.4 8.4 8.4 8.4 8.4 8.4 8.4 8.4 8.4 WARNING * Installing your remote control to install the projector yourself. • Only use the projector where temperatures vary greatly.
...95˚F to 104˚F/35˚C to 40˚C). • Do not expose the projector to moisture, dust, or smoke. Contact your projector's image enables you to reflect your NEC dealer if you can dissipate. Do not cover the vents on a solid, level surface. ... -9 -220 -10 -270 -13 -330 -16 -400 -17 -440 -18 -460 -21 -530 -24 -600 -26 -660 α degree 8.7 8.6 8.5 8.5 8.4 8.4 8.4 8.4 8.4 8.4 8.4 8.4 8.4 8.4 8.4 8.4 8.4 WARNING * Installing your remote control to install the projector yourself. • Only use the projector where temperatures vary greatly.
VT49/490/491/590/595/695 UM
Page 21
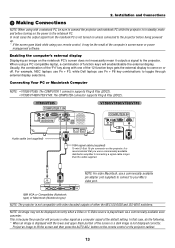
...; VT695/VT595: The COMPUTER 1 connector supports Plug & Play (DDC2). • VT590/VT490/VT59/VT49: The COMPUTER connector supports Plug & Play (DDC2). It is because the projector will enable/disable the external display. For example, NEC laptops use Fn + F3, while Dell laptops use a commercially available pin adapter (not supplied) to connect to your remote control...
...; VT695/VT595: The COMPUTER 1 connector supports Plug & Play (DDC2). • VT590/VT490/VT59/VT49: The COMPUTER connector supports Plug & Play (DDC2). It is because the projector will enable/disable the external display. For example, NEC laptops use Fn + F3, while Dell laptops use a commercially available pin adapter (not supplied) to connect to your remote control...
VT49/490/491/590/595/695 UM
Page 27
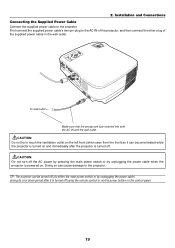
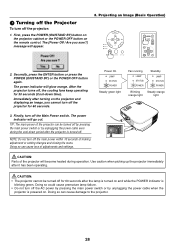
...power switch or by unplugging the power cable) during its cool down period after the projector is turned off using the remote control or via the power button on . Doing so can become heated while the projector is turned on and immediately after it can cause damage to touch the ventilation outlet on... the left front (when seen from the front) as it is powered on the control panel. 19 ...
...power switch or by unplugging the power cable) during its cool down period after the projector is turned off using the remote control or via the power button on . Doing so can become heated while the projector is turned on and immediately after it can cause damage to touch the ventilation outlet on... the left front (when seen from the front) as it is powered on the control panel. 19 ...
VT49/490/491/590/595/695 UM
Page 28
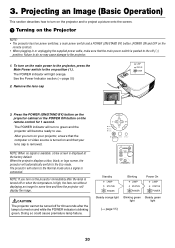
...to the Normal mode once a signal is connected. The POWER indicator will automatically switch to the on the remote control for 1 second. Press the POWER (ON/STAND BY) button on the projector cabinet or the POWER ON button on position ( I ). SELECT EXIT MENU LAMP STATUS FOCUS POWER ENTER ... green light light (→ page 55) 20 The POWER indicator will turn on the remote control). • When plugging in or unplugging the supplied power cable, make sure that your projector, ensure that the computer or video source is turned on and while the POWER indicator is...
...to the Normal mode once a signal is connected. The POWER indicator will automatically switch to the on the remote control for 1 second. Press the POWER (ON/STAND BY) button on the projector cabinet or the POWER ON button on position ( I ). SELECT EXIT MENU LAMP STATUS FOCUS POWER ENTER ... green light light (→ page 55) 20 The POWER indicator will turn on the remote control). • When plugging in or unplugging the supplied power cable, make sure that your projector, ensure that the computer or video source is turned on and while the POWER indicator is...
VT49/490/491/590/595/695 UM
Page 30
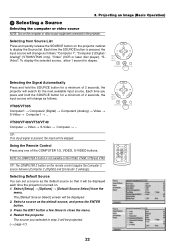
... close the menu. 4. Using the Remote Control Press any one of 2 seconds, the input source will be projected. (→ page 47) MENU LAMP STATUS POWER ENTER SELECT EXIT ON/STAND BY SOURCE AUTO ADJ. Restart the projector. Each time you selected in step ... VT590/VT490/VT59/VT49 Computer → Video → S-Video → Computer → ... The [Default Source Select] screen will change as follows: VT695/VT595 Computer1 → Computer2 (Digital) → Computer2 (Analog) → Video → S-Video → Computer1 → ... 3. Selecting from the...
... close the menu. 4. Using the Remote Control Press any one of 2 seconds, the input source will be projected. (→ page 47) MENU LAMP STATUS POWER ENTER SELECT EXIT ON/STAND BY SOURCE AUTO ADJ. Restart the projector. Each time you selected in step ... VT590/VT490/VT59/VT49 Computer → Video → S-Video → Computer → ... The [Default Source Select] screen will change as follows: VT695/VT595 Computer1 → Computer2 (Digital) → Computer2 (Analog) → Video → S-Video → Computer1 → ... 3. Selecting from the...

VT49/490/491/590/595/695 UM
Page 33
... the menu is displayed, the above operation is rectangular. 5. Press the SELECT ̇ or ̈ button. NOTE: The Keystone correction can be saved with the Remote Control 1. NOTE: The Keystone correction range can cause an image to be slightly blurred because the correction is made narrower, depending on the cabinet 1. Press the...
... the menu is displayed, the above operation is rectangular. 5. Press the SELECT ̇ or ̈ button. NOTE: The Keystone correction can be saved with the Remote Control 1. NOTE: The Keystone correction range can cause an image to be slightly blurred because the correction is made narrower, depending on the cabinet 1. Press the...
VT49/490/491/590/595/695 UM
Page 36
... cooling fans keep operating for 60 seconds after the projector is turned on . Use caution when picking up the projector immediately after turning on the remote control. First, press the POWER (ON/STAND BY) button on the projector cabinet or the POWER OFF button on the projector and displaying an image, you sure?] message will glow...
... cooling fans keep operating for 60 seconds after the projector is turned on . Use caution when picking up the projector immediately after turning on the remote control. First, press the POWER (ON/STAND BY) button on the projector cabinet or the POWER OFF button on the projector and displaying an image, you sure?] message will glow...
VT49/490/491/590/595/695 UM
Page 39
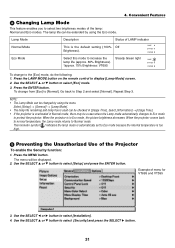
... the default setting (100% Off Brightness). Press the LAMP MODE button on the remote control to Step 2 and select [Normal]. To change to select [Eco] mode. 3. Select [Information] →[Usage Time]. • If the projector is automatically set to select [Security] and press the SELECT ̈ button.... the Security function: 1. LAMP STATUS POWER Select this mode to increase the lamp life (approx. 80% Brightness). *approx. 75% Brightness: VT695 Steady Green light LAMP STATUS POWER To change from [Eco] to [Normal], Go back to display [Lamp Mode] screen. 2. Use the SELECT...
... the default setting (100% Off Brightness). Press the LAMP MODE button on the remote control to Step 2 and select [Normal]. To change to select [Eco] mode. 3. Select [Information] →[Usage Time]. • If the projector is automatically set to select [Security] and press the SELECT ̈ button.... the Security function: 1. LAMP STATUS POWER Select this mode to increase the lamp life (approx. 80% Brightness). *approx. 75% Brightness: VT695 Steady Green light LAMP STATUS POWER To change from [Eco] to [Normal], Go back to display [Lamp Mode] screen. 2. Use the SELECT...

VT49/490/491/590/595/695 UM
Page 42
... function, connect the mouse receiver and computer. NOTE: Depending on the type of connection or OS installed on the remote mouse receiver When connecting using the USB terminal For PC, the mouse receiver can be used with a Windows 98/Me/XP*, Windows 2000 or Mac ... SP1 or older version of PC or Macintosh When operating a computer via the remote mouse receiver 7m/22 feet 30˚ 30˚ Remote sensor on your computer, you wish to your computer's mouse functions from the remote control. Computer Remote mouse receiver To USB port of Windows XP, if the mouse cursor will not...
... function, connect the mouse receiver and computer. NOTE: Depending on the type of connection or OS installed on the remote mouse receiver When connecting using the USB terminal For PC, the mouse receiver can be used with a Windows 98/Me/XP*, Windows 2000 or Mac ... SP1 or older version of PC or Macintosh When operating a computer via the remote mouse receiver 7m/22 feet 30˚ 30˚ Remote sensor on your computer, you wish to your computer's mouse functions from the remote control. Computer Remote mouse receiver To USB port of Windows XP, if the mouse cursor will not...

VT49/490/491/590/595/695 UM
Page 43
... set and the drag operation can change the Pointer speed on the Mouse Properties dialog box on your computer's mouse from the remote control. 4. Operating your computer's mouse from the remote control You can operate your computer. NOTE: When you operate the computer using the SELECT ̆̄̇ or ̈ button with your...
... set and the drag operation can change the Pointer speed on the Mouse Properties dialog box on your computer's mouse from the remote control. 4. Operating your computer's mouse from the remote control You can operate your computer. NOTE: When you operate the computer using the SELECT ̆̄̇ or ̈ button with your...
VT49/490/491/590/595/695 UM
Page 44
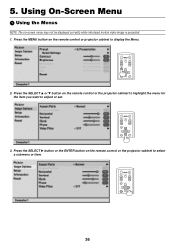
... motion video image is projected. 1. Using On-Screen Menu ᕡ Using the Menus NOTE: The on the remote control or the projector cabinet to select a submenu or item. Press the MENU button on the remote control or the projector cabinet to highlight the menu for the item you want to display the Menu. 5. OFF ON POWER... DOWN ENTER EXIT 36 OFF ON POWER MAGNIFY PIC-MUTE PAGE UP MENU DOWN ENTER EXIT 3. Press the SELECT ̆ or ̄ button on the remote control or projector cabinet to adjust or set.
... motion video image is projected. 1. Using On-Screen Menu ᕡ Using the Menus NOTE: The on the remote control or the projector cabinet to select a submenu or item. Press the MENU button on the remote control or the projector cabinet to highlight the menu for the item you want to display the Menu. 5. OFF ON POWER... DOWN ENTER EXIT 36 OFF ON POWER MAGNIFY PIC-MUTE PAGE UP MENU DOWN ENTER EXIT 3. Press the SELECT ̆ or ̄ button on the remote control or projector cabinet to adjust or set.


