
User Manual
Page 3
...Do not place heavy objects on a power supply of the projector. 7. The projector must be used for a prolonged period of the LCD panel. d. Please consult your projector in - Power Supply 1. The projector is turned off with a damp cloth. If the projector is turned on the ceiling: a. Doing so may cause ...operation and reduce the risk of the following circumstances. sage will disappear. CAUTION Do not put the projector on its side when the lamp is not to have the projector installed on . Please read them carefully and heed all warnings. Do not attempt to work for more...
...Do not place heavy objects on a power supply of the projector. 7. The projector must be used for a prolonged period of the LCD panel. d. Please consult your projector in - Power Supply 1. The projector is turned off with a damp cloth. If the projector is turned on the ceiling: a. Doing so may cause ...operation and reduce the risk of the following circumstances. sage will disappear. CAUTION Do not put the projector on its side when the lamp is not to have the projector installed on . Please read them carefully and heed all warnings. Do not attempt to work for more...

User Manual
Page 4
... this happens, contact your projector. Do not insert any metal objects such as a wire or screwdriver into your NEC dealer for lamp replacement. • Allow a minimum of 30 seconds to elapse after the lamp has reached the end of its usable life. Please replace the lamp."appears. Then disconnect the... that vents are unobstructed to prevent the build-up of heat inside your projector. • Do not look into your hands due to use the lamp after turning off the projector. Lamp Replacement • To replace the lamp, follow all instructions provided on page E-33. • Be sure to...
... this happens, contact your projector. Do not insert any metal objects such as a wire or screwdriver into your NEC dealer for lamp replacement. • Allow a minimum of 30 seconds to elapse after the lamp has reached the end of its usable life. Please replace the lamp."appears. Then disconnect the... that vents are unobstructed to prevent the build-up of heat inside your projector. • Do not look into your hands due to use the lamp after turning off the projector. Lamp Replacement • To replace the lamp, follow all instructions provided on page E-33. • Be sure to...
User Manual
Page 5
... E-38 Timing Chart E-39 PC Control Codes E-40 Cable Connection E-40 E-5 TABLE OF CONTENTS 1. INSTALLATION Setting Up Your Projector E-14 Selecting a Location E-14 Using a Tabletop or Cart E-14 Distance Chart E-15 Ceiling Installation E-16 Reflecting the Image...Confirmation E-32 Keystone Save E-32 Clear Lamp Hour Meter E-32 Help E-32 Contents E-32 Information E-32 4. E-23 3. INTRODUCTION Introduction to the MultiSync VT440/VT540 Projector E-6 Getting Started E-6 What's in the Box E-7 Getting to Know Your MultiSync VT440/VT540 Projector E-8 Front / Side Features E-8 ...
... E-38 Timing Chart E-39 PC Control Codes E-40 Cable Connection E-40 E-5 TABLE OF CONTENTS 1. INSTALLATION Setting Up Your Projector E-14 Selecting a Location E-14 Using a Tabletop or Cart E-14 Distance Chart E-15 Ceiling Installation E-16 Reflecting the Image...Confirmation E-32 Keystone Save E-32 Clear Lamp Hour Meter E-32 Help E-32 Contents E-32 Information E-32 4. E-23 3. INTRODUCTION Introduction to the MultiSync VT440/VT540 Projector E-6 Getting Started E-6 What's in the Box E-7 Getting to Know Your MultiSync VT440/VT540 Projector E-8 Front / Side Features E-8 ...
User Manual
Page 6
... set up and operation. • Front ventilation directs hot air away from in Eco mode) lamp. You can use the projector to take your new MultiSync VT440 (SVGA)/ VT540 (XGA) Projector and describes the features and controls. NOTE: Composite video standards are available for your source: "...is light, compact, easy to mount the projector on a ceiling yourself. At the beginning of each section of 50 to the MultiSync VT440/VT540 Projector This section introduces you time later on the ceiling. • NEC Technologies' exclusive Advanced AccuBlend intelligent pixel blending ...
... set up and operation. • Front ventilation directs hot air away from in Eco mode) lamp. You can use the projector to take your new MultiSync VT440 (SVGA)/ VT540 (XGA) Projector and describes the features and controls. NOTE: Composite video standards are available for your source: "...is light, compact, easy to mount the projector on a ceiling yourself. At the beginning of each section of 50 to the MultiSync VT440/VT540 Projector This section introduces you time later on the ceiling. • NEC Technologies' exclusive Advanced AccuBlend intelligent pixel blending ...
User Manual
Page 8
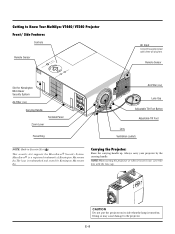
... Kensington Microware Inc. Doing so may cause damage to Know Your MultiSync VT440/VT540 Projector Front/ Side Features Controls Remote Sensor AC Input Connect the supplied power cable's three-pin plug here. E-8 ON/OFF CAN STATUS POWER ENTER SELECT AUTO ...ADJUST MENU CEL OUTPUT PC-CONTROL S-VIDEO VIDEO R IGNBPUT OUT SOURCE IN IN OUT AUD CAUTION Do not put the projector on its side when the lamp is not in Security Slot ( ) This security slot supports the MicroSaver® Security System. Remote Sensor ENTER ON/STAND BY SELECT CANCEL...
... Kensington Microware Inc. Doing so may cause damage to Know Your MultiSync VT440/VT540 Projector Front/ Side Features Controls Remote Sensor AC Input Connect the supplied power cable's three-pin plug here. E-8 ON/OFF CAN STATUS POWER ENTER SELECT AUTO ...ADJUST MENU CEL OUTPUT PC-CONTROL S-VIDEO VIDEO R IGNBPUT OUT SOURCE IN IN OUT AUD CAUTION Do not put the projector on its side when the lamp is not in Security Slot ( ) This security slot supports the MicroSaver® Security System. Remote Sensor ENTER ON/STAND BY SELECT CANCEL...

User Manual
Page 9
... the bottom of the lens hood. SOURCE HELP POWER Vol. E-9 Insert the card remote control STRAIGHT into place. Lens Cap AUTO ADJ. MUTE 2. Lamp Cover Screw Rear Foot Attaching the lens cap to eject the card remote control. 2. Thread the string through the hole on the lens cap and...Side Features Remote Sensor SOURCE AUTO ADJUST MENU SELECT ENTER STATPUOSWER CANCEL ON/STAND BY Remote Sensor Built-in Monaural Speaker (1W) Rear Foot Lamp Cover Card Remote Slot Slot for Card Remote Control The supplied card remote control can be stored in the cabinet. To store the card ...
... the bottom of the lens hood. SOURCE HELP POWER Vol. E-9 Insert the card remote control STRAIGHT into place. Lens Cap AUTO ADJ. MUTE 2. Lamp Cover Screw Rear Foot Attaching the lens cap to eject the card remote control. 2. Thread the string through the hole on the lens cap and...Side Features Remote Sensor SOURCE AUTO ADJUST MENU SELECT ENTER STATPUOSWER CANCEL ON/STAND BY Remote Sensor Built-in Monaural Speaker (1W) Rear Foot Lamp Cover Card Remote Slot Slot for Card Remote Control The supplied card remote control can be stored in the cabinet. To store the card ...

User Manual
Page 10
... the adjustments to the last condition while you that the lamp cover or filter cover is not attached properly or the projector is advisable to replace the projection lamp as soon as possible. (See page E-33). In addition the message "The lamp has reached the end of the ᮣ button executes ...the selection. See the Power / Status Light Messages on and off the projector, press and hold this button to adjust Position-H/V and Pixel Clock/Phase for an optimal picture....
... the adjustments to the last condition while you that the lamp cover or filter cover is not attached properly or the projector is advisable to replace the projection lamp as soon as possible. (See page E-33). In addition the message "The lamp has reached the end of the ᮣ button executes ...the selection. See the Power / Status Light Messages on and off the projector, press and hold this button to adjust Position-H/V and Pixel Clock/Phase for an optimal picture....
User Manual
Page 24
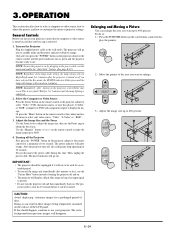
... control or the cabinet and use the Focus ring to 5 minutes until the lamp lighting is removed. 1. Enlarging and Moving a Picture You can result in High-Bright mode for a prolonged period of the LCD panel. SELECT Vol. 3) Adjust the image size up to be restarted. Only...the "Auto Start" feature. (See page E-32.) NOTE: Regardless of the lamp mode setting, the lamp always stays in these images being temporarily sustained on the Projector Plug the supplied power cable in 3 minutes. After the projector turns off, the cooling fans keep operating for an extended period. •...
... control or the cabinet and use the Focus ring to 5 minutes until the lamp lighting is removed. 1. Enlarging and Moving a Picture You can result in High-Bright mode for a prolonged period of the LCD panel. SELECT Vol. 3) Adjust the image size up to be restarted. Only...the "Auto Start" feature. (See page E-32.) NOTE: Regardless of the lamp mode setting, the lamp always stays in these images being temporarily sustained on the Projector Plug the supplied power cable in 3 minutes. After the projector turns off, the cooling fans keep operating for an extended period. •...

User Manual
Page 26
... Frequency Vertical Frequency Sync Polarity Signal Type Video Type Sync Type Interlace Resolution Aspect Ratio Gamma Correction Noise Reduction Color Matrix Matrix Type Lamp Remaining Time (%) Lamp Hour Meter (H) Projector Usage NOTE: Adjustable sources R=RGB V=Video/S-Video C=Component H=HDTV All=All sources E-26 MENU Tree Basic/ Advanced Menu Sub Menu (all) (all) (... NTSC3.58/ NTSC4.43/ PAL/ PAL60/ SECAM Auto Start On/ Off Power Management On/ Off Power Off Confirmation On/ Off Keystone Save On/ Off Clear Lamp Hour Meter Orientation Front/ Floor, Rear/Ceiling, Rear/Floor.
... Frequency Vertical Frequency Sync Polarity Signal Type Video Type Sync Type Interlace Resolution Aspect Ratio Gamma Correction Noise Reduction Color Matrix Matrix Type Lamp Remaining Time (%) Lamp Hour Meter (H) Projector Usage NOTE: Adjustable sources R=RGB V=Video/S-Video C=Component H=HDTV All=All sources E-26 MENU Tree Basic/ Advanced Menu Sub Menu (all) (all) (... NTSC3.58/ NTSC4.43/ PAL/ PAL60/ SECAM Auto Start On/ Off Power Management On/ Off Power Off Confirmation On/ Off Keystone Save On/ Off Clear Lamp Hour Meter Orientation Front/ Floor, Rear/Ceiling, Rear/Floor.

User Manual
Page 28
... distortion Normal Provides access to highlight the menu for Video and Component inputs (Not RGB). Press the "Select" button on the projector cabinet or LM buttons on your remote control to controls for RGB and Component). Video Selects what is 15 degrees upward and downward... the computer connected to adjust. This adjustment is connected to +/-blue. S-Video Selects what is used as Keystone Correction, Color Temperature and Lamp Mode. When you select Advanced Mode, the following options are available: Gamma Correction, Aspect Ratio, Noise Reduction, Color Matrix, White Balance,...
... distortion Normal Provides access to highlight the menu for Video and Component inputs (Not RGB). Press the "Select" button on the projector cabinet or LM buttons on your remote control to controls for RGB and Component). Video Selects what is 15 degrees upward and downward... the computer connected to adjust. This adjustment is connected to +/-blue. S-Video Selects what is used as Keystone Correction, Color Temperature and Lamp Mode. When you select Advanced Mode, the following options are available: Gamma Correction, Aspect Ratio, Noise Reduction, Color Matrix, White Balance,...

User Manual
Page 29
...16:9 image displayed in 4:3 mode All 4 sides stretched Left & right stretched NOTE: Aspect Ratio is not available for 3 minutes after the projector is available for HDTV or SDTV. Noise Reduction: Left and right stretched to 3000 hours by way of middle tones. First select an appropriate ... image position and stability. "Natural 2" for true reproduction of higher video bandwidth. DVD player), the following selections will change to increase the lamp life. NOTE: The lower the Noise Reduction level, the better the image quality by using the Eco mode. Color Matrix When you to ...
...16:9 image displayed in 4:3 mode All 4 sides stretched Left & right stretched NOTE: Aspect Ratio is not available for 3 minutes after the projector is available for HDTV or SDTV. Noise Reduction: Left and right stretched to 3000 hours by way of middle tones. First select an appropriate ... image position and stability. "Natural 2" for true reproduction of higher video bandwidth. DVD player), the following selections will change to increase the lamp life. NOTE: The lower the Noise Reduction level, the better the image quality by using the Eco mode. Color Matrix When you to ...
User Manual
Page 30
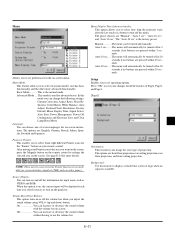
... Hours. (To reset the lamp usage time, see "Clear Lamp Hour Meter" on page E-32.) All Data: Current Signal: Reset all the signals to the factory preset. Auto Adjust: When "Auto Adjust" is set to "On", the projector automatically determines the best resolution for all... the adjustments and settings for the current RGB input signal to project an image using the ᮤ and ᮣ buttons. Horizontal/Vertical Position: Adjusts the image location horizontally and vertically using NEC's Advanced AccuBlend ...
... Hours. (To reset the lamp usage time, see "Clear Lamp Hour Meter" on page E-32.) All Data: Current Signal: Reset all the signals to the factory preset. Auto Adjust: When "Auto Adjust" is set to "On", the projector automatically determines the best resolution for all... the adjustments and settings for the current RGB input signal to project an image using the ᮤ and ᮣ buttons. Horizontal/Vertical Position: Adjusts the image location horizontally and vertically using NEC's Advanced AccuBlend ...
User Manual
Page 31
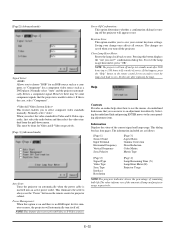
...different Pointer icons for the "Pointer" button on screen. Menu Display Time (Advanced mode): This option allows you to select how long the projector waits after the last touch of a button to select two menu modes: one of seven languages for on -screen menu. Auto 10 ..., Position/Clock, Resolution, Factory Default, Menu Display Time, Signal Select, Auto Start, Power Management, Power Off Confirmation and Keystone Save and Clear Lamp Hour Meter. E-31 The options are pressed within 3 seconds. Press "OK" to set operating options. a non-interlace signal at 15kHz such as...
...different Pointer icons for the "Pointer" button on screen. Menu Display Time (Advanced mode): This option allows you to select how long the projector waits after the last touch of a button to select two menu modes: one of seven languages for on -screen menu. Auto 10 ..., Position/Clock, Resolution, Factory Default, Menu Display Time, Signal Select, Auto Start, Power Management, Power Off Confirmation and Keystone Save and Clear Lamp Hour Meter. E-31 The options are pressed within 3 seconds. Press "OK" to set operating options. a non-interlace signal at 15kHz such as...
User Manual
Page 32
... Gamma Correction Noise Reduction Color Matrix Matrix Type [Page 2] Signal Type Video Type Sync Type Interlace Resolution [Page 4] Lamp Remaining Time (%) Lamp Hour Meter (H) Projector Usage NOTE:The progress indicator shows the percentage of remaining bulb life.The value informs you of the amount of... lamp and projector usage respectively. Normally select "Auto" and the projector automatically detects a component signal. To reset the lamp usage hour meter, press "OK". If this button displays the "Are you sure...
... Gamma Correction Noise Reduction Color Matrix Matrix Type [Page 2] Signal Type Video Type Sync Type Interlace Resolution [Page 4] Lamp Remaining Time (%) Lamp Hour Meter (H) Projector Usage NOTE:The progress indicator shows the percentage of remaining bulb life.The value informs you of the amount of... lamp and projector usage respectively. Normally select "Auto" and the projector automatically detects a component signal. To reset the lamp usage hour meter, press "OK". If this button displays the "Are you sure...

User Manual
Page 33
... section describes the simple maintenance procedures you should follow to replace the lamp, clean the filter, and replace the batteries in Eco mode) hours of use a lamp other than the NEC replacement lamp (VT40LP). You could receive an electric shock. • The projector will turn on and the message will appear. If you install a new...
... section describes the simple maintenance procedures you should follow to replace the lamp, clean the filter, and replace the batteries in Eco mode) hours of use a lamp other than the NEC replacement lamp (VT40LP). You could receive an electric shock. • The projector will turn on and the message will appear. If you install a new...

User Manual
Page 34
...replace the filter. MnO2-LiCELCLR2302VO5L Cleaning or Replacing the Filters The air-filter sponge keeps the inside of the cover until you replace the lamp, it detach. MnO2-LiCELCLR2302VO5L TS JAPAN H INRPGUBT AUD OUTPUT IN PC-CONTROL S-VIDEO OUT VID To replace the air-filter: 1. ...with a "+" is facing up on the catch of the MultiSync VT440/VT540 Projector free from the filter cover. Reinstall the new filter cover. E-34 If the filter is also wise to operate the projector without a filter cover. • Your projector will damage the the filter membrane. TS JAPAN H TS ...
...replace the filter. MnO2-LiCELCLR2302VO5L Cleaning or Replacing the Filters The air-filter sponge keeps the inside of the cover until you replace the lamp, it detach. MnO2-LiCELCLR2302VO5L TS JAPAN H INRPGUBT AUD OUTPUT IN PC-CONTROL S-VIDEO OUT VID To replace the air-filter: 1. ...with a "+" is facing up on the catch of the MultiSync VT440/VT540 Projector free from the filter cover. Reinstall the new filter cover. E-34 If the filter is also wise to operate the projector without a filter cover. • Your projector will damage the the filter membrane. TS JAPAN H TS ...
User Manual
Page 35
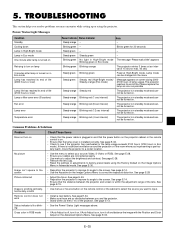
..."Please wait a little" appears Blinking green in Eco mode Blinking green Blinking orange The projector retries 3 times at High-Bright mode. Lamp mode can be turned on. Steady orange Blinking red (8 sec interval) The projector is in Advanced mode. See page E-33. • Check to factory preset levels using... page E-28. • Remove the lens cap. • Reset the settings or adjustments to see if the projector has overheated or the lamp usage exceeds 2100 hours (3150 hours in standby mode and cannot be turned on . Status indicator is scrolling vertically, horizontally or ...
..."Please wait a little" appears Blinking green in Eco mode Blinking green Blinking orange The projector retries 3 times at High-Bright mode. Lamp mode can be turned on. Steady orange Blinking red (8 sec interval) The projector is in Advanced mode. See page E-33. • Check to factory preset levels using... page E-28. • Remove the lens cap. • Reset the settings or adjustments to see if the projector has overheated or the lamp usage exceeds 2100 hours (3150 hours in standby mode and cannot be turned on . Status indicator is scrolling vertically, horizontally or ...
User Manual
Page 36
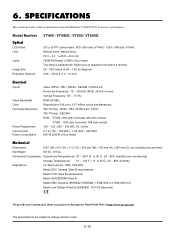
...LCD Panel Lens Lamp Image Size Projection Distance VT440 / VT440G / VT540 / VT540G 0.9" p-Si TFT active-matrix, 800ן600 dots (VT440) / 1024ן768 dots (VT540) Manual zoom, manual focus F2.0 - 2.3 f=35.8 - 43.0 mm 160W NSH lamp (130W in Eco mode) The lamp...to change without notice. SPECIFICATIONS This section provides technical information about our projectors through the World Wide Web at http://www.nec-pj.com/ The specifications are subject to 50˚C), 30 - 85... more information about the MultiSync VT440/VT540 Projector's performance. 6.
...LCD Panel Lens Lamp Image Size Projection Distance VT440 / VT440G / VT540 / VT540G 0.9" p-Si TFT active-matrix, 800ן600 dots (VT440) / 1024ן768 dots (VT540) Manual zoom, manual focus F2.0 - 2.3 f=35.8 - 43.0 mm 160W NSH lamp (130W in Eco mode) The lamp...to change without notice. SPECIFICATIONS This section provides technical information about our projectors through the World Wide Web at http://www.nec-pj.com/ The specifications are subject to 50˚C), 30 - 85... more information about the MultiSync VT440/VT540 Projector's performance. 6.

