

NP115 : RS232 codes- Projectors
Page 10
...-3. POWER ON 016. ONSCREEN MUTE OFF 030. INFORMATION REQUEST 037-1. WXGA MODE SETTING SET 050. LAMP INFORMATION REQUEST 037-2. LAMP INFORMATION REQUEST 4 038. PROJECTOR INFORMATION REQUEST 00H 81H 00H 00H 00H 81H 00H C0H 00H 00H 00H C0H 00H 88H 00H 00H...Example for command Command name Example 006. SETTING REQUEST 078-2. AUTO ADJUST EXECUTE2 305-1. ONSCREEN MUTE ON 025. LAMP INFORMATION REQUEST 3 037-7. LAMP MODE REQUEST 039. LAMP MODE SET 046. INPUT STATUS REQUEST 078-4. FREEZE CONROL 097-198. PIP/SIDE BY SIDE REQUEST 098-196....
...-3. POWER ON 016. ONSCREEN MUTE OFF 030. INFORMATION REQUEST 037-1. WXGA MODE SETTING SET 050. LAMP INFORMATION REQUEST 037-2. LAMP INFORMATION REQUEST 4 038. PROJECTOR INFORMATION REQUEST 00H 81H 00H 00H 00H 81H 00H C0H 00H 00H 00H C0H 00H 88H 00H 00H...Example for command Command name Example 006. SETTING REQUEST 078-2. AUTO ADJUST EXECUTE2 305-1. ONSCREEN MUTE ON 025. LAMP INFORMATION REQUEST 3 037-7. LAMP MODE REQUEST 039. LAMP MODE SET 046. INPUT STATUS REQUEST 078-4. FREEZE CONROL 097-198. PIP/SIDE BY SIDE REQUEST 098-196....
NP115 : RS232 codes- Projectors
Page 19
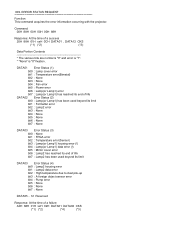
... : None bit4 : None bit5 : None bit6 : None bit7 : None DATA03 Error Status (3) bit0 : None bit1 : FPGA error bit2 : Temperature error(Sensor) bit3 : Lamp(or Lamp1) housing error (!) bit4 : Lamp(or Lamp1) data error (!) bit5 : Mirror cover error bit6 : Lamp2 has reached its end of life bit7 : Lamp2 has been used beyond its... Response: At the time of a success 20H 88H 01H xxH 0CH DATA01 .. ERROR STATUS REQUEST Function: This command acquires the error information occurring with the projector.
... : None bit4 : None bit5 : None bit6 : None bit7 : None DATA03 Error Status (3) bit0 : None bit1 : FPGA error bit2 : Temperature error(Sensor) bit3 : Lamp(or Lamp1) housing error (!) bit4 : Lamp(or Lamp1) data error (!) bit5 : Mirror cover error bit6 : Lamp2 has reached its end of life bit7 : Lamp2 has been used beyond its... Response: At the time of a success 20H 88H 01H xxH 0CH DATA01 .. ERROR STATUS REQUEST Function: This command acquires the error information occurring with the projector.

NP115 : RS232 codes- Projectors
Page 27
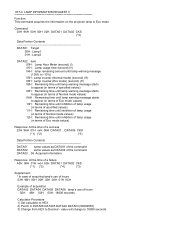
...second) DATA95 .. 98 : Projector Usage (second) Response: At the time of a success 23H 8CH 01H xxH 10H DATA01 .. It is the timer for normal lamp mode conversion. DATA16 CKS (*1) (*2) (*3) Data Portion Contents DATA01 .. 04 : Lamp Hour Meter(Normal mode) (second) Lamp Timer Acquisition Examples DATA83 DATA84 DATA85... is displayed in terms of Normal mode (values) of projector. Command: 03H 8CH 00H 00H 00H 8FH Response: At the time of a failure A3H 8AH 01H xxH 02H DATA01 DATA02 CKS (*1) (*2) (*4) (*3) Supplement: (!) Lamp Hour Meter This is also displayed with truncated a number ...
...second) DATA95 .. 98 : Projector Usage (second) Response: At the time of a success 23H 8CH 01H xxH 10H DATA01 .. It is the timer for normal lamp mode conversion. DATA16 CKS (*1) (*2) (*3) Data Portion Contents DATA01 .. 04 : Lamp Hour Meter(Normal mode) (second) Lamp Timer Acquisition Examples DATA83 DATA84 DATA85... is displayed in terms of Normal mode (values) of projector. Command: 03H 8CH 00H 00H 00H 8FH Response: At the time of a failure A3H 8AH 01H xxH 02H DATA01 DATA02 CKS (*1) (*2) (*4) (*3) Supplement: (!) Lamp Hour Meter This is also displayed with truncated a number ...
NP115 : RS232 codes- Projectors
Page 29
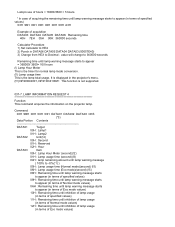
... 50H 46H 00H 00H: 18000 seconds Calculator Procedure 1) Set calculator to HEX 2) Punch in terms of Eco mode values) Response: At the time of lamp usage (in DATA06 DATA05 DATA04 DATA03 (00004650) 3) Change from HEX to 18000 seconds LAMP INFORMATION REQUEST 3 Function: This command acquires the information on the projector lamp in Eco mode.
... 50H 46H 00H 00H: 18000 seconds Calculator Procedure 1) Set calculator to HEX 2) Punch in terms of Eco mode values) Response: At the time of lamp usage (in DATA06 DATA05 DATA04 DATA03 (00004650) 3) Change from HEX to 18000 seconds LAMP INFORMATION REQUEST 3 Function: This command acquires the information on the projector lamp in Eco mode.
NP115 : RS232 codes- Projectors
Page 30
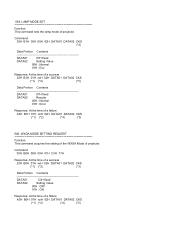
... on the projector lamp. Command: 03H 9BH 00H 00H 03H DATA01 DATA02 DATA03 CKS (*3) Data Portion Contents DATA01 Target 00H : Lamp1 01H : Lamp2 DATA02 Unit(!4) 00H : Second 01H : Reserved 02H : Hour DATA03 Item 00H : Lamp Hour Meter (second)(!2) 01H : Lamp usage time (second)(!3) 04H : lamp remaining amount until lamp warning message ( 100% to -X%(!1) ) 05H : Lamp usage time...
... on the projector lamp. Command: 03H 9BH 00H 00H 03H DATA01 DATA02 DATA03 CKS (*3) Data Portion Contents DATA01 Target 00H : Lamp1 01H : Lamp2 DATA02 Unit(!4) 00H : Second 01H : Reserved 02H : Hour DATA03 Item 00H : Lamp Hour Meter (second)(!2) 01H : Lamp usage time (second)(!3) 04H : lamp remaining amount until lamp warning message ( 100% to -X%(!1) ) 05H : Lamp usage time...

NP115 : RS232 codes- Projectors
Page 31
... (*2) (*3) Data Portion Contents DATA01 07H fixed DATA02 Setting Value 00H : Normal 01H : Eco Response: At the time of projector. It is displayed in the projector's menu. (!4) This setting is ignored, if the Item's unit is not time. (!5) NP4000/4001, NP4100/4100W : This ...function is the lamp total usage. X = 100 - ((2100 * 100) / 2000) = -5[%] (!2) Lamp Hour Meter This is the timer for normal lamp mode conversion. (!3) Lamp usage time This...
... (*2) (*3) Data Portion Contents DATA01 07H fixed DATA02 Setting Value 00H : Normal 01H : Eco Response: At the time of projector. It is displayed in the projector's menu. (!4) This setting is ignored, if the Item's unit is not time. (!5) NP4000/4001, NP4100/4100W : This ...function is the lamp total usage. X = 100 - ((2100 * 100) / 2000) = -5[%] (!2) Lamp Hour Meter This is the timer for normal lamp mode conversion. (!3) Lamp usage time This...
NP115 : RS232 codes- Projectors
Page 32
... of a failure A3H B0H 01H xxH 02H DATA01 DATA02 CKS (*1) (*2) (*4) (*3) WXGA MODE SETTING REQUEST Function: This command acquires the setting of the WXGA Mode of projector. 039. LAMP MODE SET Function: This command sets the...
... of a failure A3H B0H 01H xxH 02H DATA01 DATA02 CKS (*1) (*2) (*4) (*3) WXGA MODE SETTING REQUEST Function: This command acquires the setting of the WXGA Mode of projector. 039. LAMP MODE SET Function: This command sets the...
VT49/490/590 spec sheet
Page 1
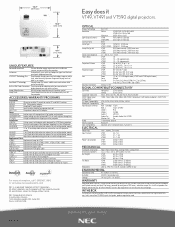
...PROJECTOR. ° The VT Series projectors are extremely affordable. ° Extended lamp life with Eco-mode™ technology that increases lamp... life up lets you need to computer for remote mouse control. VERSATILE FEATURES AND POWERFUL PERFORMANCE. ° With native resolutions up to XGA, high brightness up to 2000 lumens and patented NEC...projector ° Cabinet control ...even when the projector is not ...projector with most computer signals and features one- LONG LAMP LIFE...
...PROJECTOR. ° The VT Series projectors are extremely affordable. ° Extended lamp life with Eco-mode™ technology that increases lamp... life up lets you need to computer for remote mouse control. VERSATILE FEATURES AND POWERFUL PERFORMANCE. ° With native resolutions up to XGA, high brightness up to 2000 lumens and patented NEC...projector ° Cabinet control ...even when the projector is not ...projector with most computer signals and features one- LONG LAMP LIFE...
VT49/490/590 spec sheet
Page 2
...lamp life, lowers audible noise and reduces total cost of America Visual Systems Division 1250 Arlington Heights Rd., Suite 400 Itasca, IL 60143-1248 Easy does it VT49, VT491 and VT590 digital projectors. All other trademarks are connected to ) Screen Size (diagonal) Throw Ratio Projection Distance Projection Angle Lens Keystone Correction 0.6" LCD Native: VT49/VT491: SVGA...to 100 kHz Vertical 50 to 4 years projector trade-in program For more information, call 1.800.NEC.INFO or visit www.necvisualsystems.com NEC is covered for projector, remote control, battteries, power cord, ...
...lamp life, lowers audible noise and reduces total cost of America Visual Systems Division 1250 Arlington Heights Rd., Suite 400 Itasca, IL 60143-1248 Easy does it VT49, VT491 and VT590 digital projectors. All other trademarks are connected to ) Screen Size (diagonal) Throw Ratio Projection Distance Projection Angle Lens Keystone Correction 0.6" LCD Native: VT49/VT491: SVGA...to 100 kHz Vertical 50 to 4 years projector trade-in program For more information, call 1.800.NEC.INFO or visit www.necvisualsystems.com NEC is covered for projector, remote control, battteries, power cord, ...
VT49/490/491/590/595/695 UM
Page 3
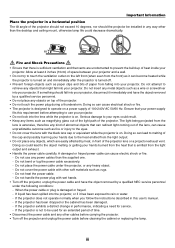
...ARE HIGH-VOLTAGE COMPONENTS INSIDE. Machine Noise Information Regulation - 3. This includes projectors and their electrical accessories or lamps. i REFER SERVICING TO QUALIFIED SERVICE PERSONNEL. CAUTION Avoid displaying stationary images for...make any part inside of the LCD panel. This symbol alerts the user that used products, they are reused and recycled in a lamp to the current European Union Member...legislation as implemented in accordance with any kind of your NEC VT695/VT595/VT590/VT490/VT59/VT49 projector and keep the manual handy for future reference. When ...
...ARE HIGH-VOLTAGE COMPONENTS INSIDE. Machine Noise Information Regulation - 3. This includes projectors and their electrical accessories or lamps. i REFER SERVICING TO QUALIFIED SERVICE PERSONNEL. CAUTION Avoid displaying stationary images for...make any part inside of the LCD panel. This symbol alerts the user that used products, they are reused and recycled in a lamp to the current European Union Member...legislation as implemented in accordance with any kind of your NEC VT695/VT595/VT590/VT490/VT59/VT49 projector and keep the manual handy for future reference. When ...
VT49/490/491/590/595/695 UM
Page 5
... eyes. • Do not cover the lens with the black lens cap or equivalent while the projector is sufficient ventilation and that vents are easily affected by a qualified NEC service personnel under the projector, or any objects that can cause electric shock or fire. - If something should the... any objects on . If liquid has been spilled into the lens while the projector is emitted from the light output. • Do not place any power cables than the desktop and ceiling mount, otherwise lamp life could decrease dramatically. 10˃ Fire and Shock Precautions • Ensure ...
... eyes. • Do not cover the lens with the black lens cap or equivalent while the projector is sufficient ventilation and that vents are easily affected by a qualified NEC service personnel under the projector, or any objects that can cause electric shock or fire. - If something should the... any objects on . If liquid has been spilled into the lens while the projector is emitted from the light output. • Do not place any power cables than the desktop and ceiling mount, otherwise lamp life could decrease dramatically. 10˃ Fire and Shock Precautions • Ensure ...

VT49/490/491/590/595/695 UM
Page 6
...batteries together, or use different types of batteries together. • Dispose of used batteries according to the projector cabinet are tight. CAUTION: When removing the lamp from a ceiling-mounted projector, make sure the two screws that attach the carrying handle to your dealer for a long time, ...8226; If you continue to the projector. • Do not send the projector in the lamp case. Do not touch them as the pieces of glass may be using the remote control for lamp replacement. A Lamp Characteristic The projector has a high-pressure mercury lamp as gripping the tilt-foot or ...
...batteries together, or use different types of batteries together. • Dispose of used batteries according to the projector cabinet are tight. CAUTION: When removing the lamp from a ceiling-mounted projector, make sure the two screws that attach the carrying handle to your dealer for a long time, ...8226; If you continue to the projector. • Do not send the projector in the lamp case. Do not touch them as the pieces of glass may be using the remote control for lamp replacement. A Lamp Characteristic The projector has a high-pressure mercury lamp as gripping the tilt-foot or ...
VT49/490/491/590/595/695 UM
Page 8
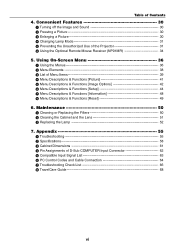
...; Menu Descriptions & Functions [Reset 49 6. Maintenance 50 ᕡ Cleaning or Replacing the Filters 50 ᕢ Cleaning the Cabinet and the Lens 51 ᕣ Replacing the Lamp 52 7. Convenient Features 30 ᕡ Turning off the Image and Sound 30 ᕢ Freezing a Picture 30 ᕣ Enlarging a Picture 30 ᕤ Changing...
...; Menu Descriptions & Functions [Reset 49 6. Maintenance 50 ᕡ Cleaning or Replacing the Filters 50 ᕢ Cleaning the Cabinet and the Lens 51 ᕣ Replacing the Lamp 52 7. Convenient Features 30 ᕡ Turning off the Image and Sound 30 ᕢ Freezing a Picture 30 ᕣ Enlarging a Picture 30 ᕤ Changing...

VT49/490/491/590/595/695 UM
Page 9
... North America only Registration card Limited warranty For Europe only Guarantee policy Carrying handle (24FT9651) Screw (M4ן2: 24V00411) DVI to ship your projector. SOURCE EXIT ON/STAND BY SELECT ENTER MENU POWESRTATUSLAMP ZOOM FOCUS Lens cap (24FT9641) Power cable (US: 7N080220) (EU: 7N080015) Soft case (24BS7582) VGA signal...
... North America only Registration card Limited warranty For Europe only Guarantee policy Carrying handle (24FT9651) Screw (M4ן2: 24V00411) DVI to ship your projector. SOURCE EXIT ON/STAND BY SELECT ENTER MENU POWESRTATUSLAMP ZOOM FOCUS Lens cap (24FT9641) Power cable (US: 7N080220) (EU: 7N080015) Soft case (24BS7582) VGA signal...
VT49/490/491/590/595/695 UM
Page 12
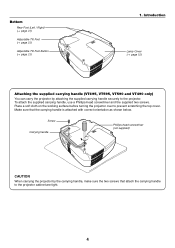
.... Place a soft cloth on the working surface before turning the projector over to the projector. Introduction Lamp Cover (→ page 52) Attaching the supplied carrying handle (VT695, VT595, VT590 and VT490 only) You can carry the projector by the carrying handle, make sure the two screws that the... 23) Adjustable Tilt Foot Button (→ page 23) 1. Screw Carrying handle Phillips-head screwdriver (not supplied) CAUTION When carrying the projector by attaching the supplied carrying handle securely to prevent scratching the top cover. Make sure that attach the carrying handle to the...
.... Place a soft cloth on the working surface before turning the projector over to the projector. Introduction Lamp Cover (→ page 52) Attaching the supplied carrying handle (VT695, VT595, VT590 and VT490 only) You can carry the projector by the carrying handle, make sure the two screws that the... 23) Adjustable Tilt Foot Button (→ page 23) 1. Screw Carrying handle Phillips-head screwdriver (not supplied) CAUTION When carrying the projector by attaching the supplied carrying handle securely to prevent scratching the top cover. Make sure that attach the carrying handle to the...
VT49/490/491/590/595/695 UM
Page 16
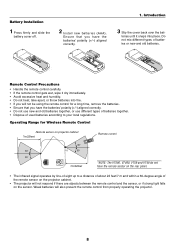
...• Ensure that you have the batteries' polarity (+/-) aligned correctly. 1. Ensure that you will also prevent the remote control from properly operating the projector. 8 teries until it dry immediately. • Avoid excessive heat and humidity. • Do not heat, take apart, or throw batteries into ... it snaps into fire. • If you have the remote sensor on the sensor. EXIT ON/STAND BY SOURCE SELECT MENU FOCUS ZOOM LAMP STATUS POWER ENTER 7m/22feet Remote control *NOTE: The VT590, VT490, VT59 and VT49 do not have the batteries' polarity (+/-) aligned correctly...
...• Ensure that you have the batteries' polarity (+/-) aligned correctly. 1. Ensure that you will also prevent the remote control from properly operating the projector. 8 teries until it dry immediately. • Avoid excessive heat and humidity. • Do not heat, take apart, or throw batteries into ... it snaps into fire. • If you have the remote sensor on the sensor. EXIT ON/STAND BY SOURCE SELECT MENU FOCUS ZOOM LAMP STATUS POWER ENTER 7m/22feet Remote control *NOTE: The VT590, VT490, VT59 and VT49 do not have the batteries' polarity (+/-) aligned correctly...
VT49/490/491/590/595/695 UM
Page 28
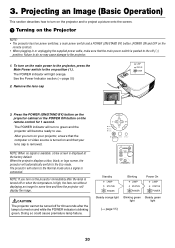
... cable, make sure that the computer or video source is turned on the projector immediately after the lamp is turned off or when the temperature is pushed to the projector. 1. Doing so could cause premature lamp failure. Failure to do so may cause damage to the off for 1 second.... SELECT EXIT MENU LAMP STATUS FOCUS POWER ENTER ENTER 3. The projector will automatically switch to use. Press the POWER (ON/STAND BY) button on the projector cabinet or the POWER ON button on position ( I ). NOTE: When no signal ...
... cable, make sure that the computer or video source is turned on the projector immediately after the lamp is turned off or when the temperature is pushed to the projector. 1. Doing so could cause premature lamp failure. Failure to do so may cause damage to the off for 1 second.... SELECT EXIT MENU LAMP STATUS FOCUS POWER ENTER ENTER 3. The projector will automatically switch to use. Press the POWER (ON/STAND BY) button on the projector cabinet or the POWER ON button on position ( I ). NOTE: When no signal ...
VT49/490/491/590/595/695 UM
Page 29
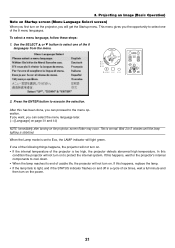
...steps: 1. Press the ENTER button to cool down. • When the lamp reaches its end of usable life, the projector will not turn on the projector, you can proceed to select one of the projector is normal. Projecting an Image (Basic Operation) Note on Startup screen (Menu ...8 menu languages. In this happens, wait for the projector's internal components to execute the selection. After this happens, replace the lamp. • If the lamp fails to protect the internal system. This is too high, the projector detects abnormal high temperature. This menu gives you can ...
...steps: 1. Press the ENTER button to cool down. • When the lamp reaches its end of usable life, the projector will not turn on the projector, you can proceed to select one of the projector is normal. Projecting an Image (Basic Operation) Note on Startup screen (Menu ...8 menu languages. In this happens, wait for the projector's internal components to execute the selection. After this happens, replace the lamp. • If the lamp fails to protect the internal system. This is too high, the projector detects abnormal high temperature. This menu gives you can ...
VT49/490/491/590/595/695 UM
Page 30
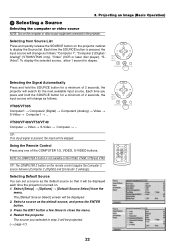
... source equipment connected to elapse. NOTE: the COMPUTER 2 button is present, the input will be projected. (→ page 47) MENU LAMP STATUS POWER ENTER SELECT EXIT ON/STAND BY SOURCE AUTO ADJ. The [Default Source Select] screen will search for a minimum of the ...5474; Selecting a Source Selecting the computer or video source NOTE: Turn on the VT590, VT490, VT59 and VT49. TIP: The COMPUTER 2 button on the projector cabinet to close the menu. 4. Select a source as follows: VT695/VT595 Computer1 → Computer2 (Digital) → Computer2 (Analog) → Video →...
... source equipment connected to elapse. NOTE: the COMPUTER 2 button is present, the input will be projected. (→ page 47) MENU LAMP STATUS POWER ENTER SELECT EXIT ON/STAND BY SOURCE AUTO ADJ. The [Default Source Select] screen will search for a minimum of the ...5474; Selecting a Source Selecting the computer or video source NOTE: Turn on the VT590, VT490, VT59 and VT49. TIP: The COMPUTER 2 button on the projector cabinet to close the menu. 4. Select a source as follows: VT695/VT595 Computer1 → Computer2 (Digital) → Computer2 (Analog) → Video →...

VT49/490/491/590/595/695 UM
Page 35
... the Image Using Auto Adjust Optimizing an RGB image automatically. 3. Press the AUTO ADJ. L-CLICK R-CLICK MOUSE VIDEO COMPUTER AUTO ADJ. 1 S-VIDEO LAMP MODE 2 VOLUME ASPECT HELP PICTURE FREEZE [Normal picture] NOTE: Some signals may take time to display or may be necessary when you connect your computer... Auto Adjust function does not work as a volume control. 27 TIP: When no menus appear, the SELECT ̇ and ̈ buttons on the projector cabinet work for the first time. [Poor picture] MENU LAMP STATUS POWER ENTER SELECT EXIT ON/STAND BY SOURCE AUTO ADJ.
... the Image Using Auto Adjust Optimizing an RGB image automatically. 3. Press the AUTO ADJ. L-CLICK R-CLICK MOUSE VIDEO COMPUTER AUTO ADJ. 1 S-VIDEO LAMP MODE 2 VOLUME ASPECT HELP PICTURE FREEZE [Normal picture] NOTE: Some signals may take time to display or may be necessary when you connect your computer... Auto Adjust function does not work as a volume control. 27 TIP: When no menus appear, the SELECT ̇ and ̈ buttons on the projector cabinet work for the first time. [Poor picture] MENU LAMP STATUS POWER ENTER SELECT EXIT ON/STAND BY SOURCE AUTO ADJ.


