

User Manual
Page 2
..., shipping cases, batteries, external cabinets, magnetic tapes, or any accessories used under the following terms. HOW LONG IS THE WARRANTY NEC Solutions' VT660K, VT560 and VT465 projectors are covered by anyone other than a NEC Solutions authorized service center. Printed on your product, consult the dealer from : a. In order to obtain warranty service, you purchased...
..., shipping cases, batteries, external cabinets, magnetic tapes, or any accessories used under the following terms. HOW LONG IS THE WARRANTY NEC Solutions' VT660K, VT560 and VT465 projectors are covered by anyone other than a NEC Solutions authorized service center. Printed on your product, consult the dealer from : a. In order to obtain warranty service, you purchased...

User Manual
Page 3
... subject to the following two conditions. (1) This device may cause undesired operation. No.: NEC Solutions (America), Inc. 1250 N. U.S. DECLARATION OF CONFORMITY This device complies with Part 15 of Product: LCD Projector Equipment Classification: Class B Peripheral Models: VT660K, VT560 and VT465 We hereby declare that may not cause harmful interference, and (2) this device must accept...
... subject to the following two conditions. (1) This device may cause undesired operation. No.: NEC Solutions (America), Inc. 1250 N. U.S. DECLARATION OF CONFORMITY This device complies with Part 15 of Product: LCD Projector Equipment Classification: Class B Peripheral Models: VT660K, VT560 and VT465 We hereby declare that may not cause harmful interference, and (2) this device must accept...
User Manual
Page 4
.... • Connect the equipment into an outlet on top of your projector. Place the projector on the bottom of the projector. 7. In addition, the ceiling must be determined by NEC Soluctions (America), Inc. Your serial number is not supplied with the ...to install the projector yourself. b. If this equipment. Please read them carefully and heed all requirements of the LCD panel. in - Handle your projector carefully. Important Information Safety Cautions Precautions Please read this manual carefully before using your NEC VT660K/VT560/ VT465 Projector and keep the ...
.... • Connect the equipment into an outlet on top of your projector. Place the projector on the bottom of the projector. 7. In addition, the ceiling must be determined by NEC Soluctions (America), Inc. Your serial number is not supplied with the ...to install the projector yourself. b. If this equipment. Please read them carefully and heed all requirements of the LCD panel. in - Handle your projector carefully. Important Information Safety Cautions Precautions Please read this manual carefully before using your NEC VT660K/VT560/ VT465 Projector and keep the ...
User Manual
Page 5
...cable and allow 60 minutes to elapse after turning off ). Make sure your VT660K/VT560/VT465 Projector. Please save the original box and packing materials if you ever need to the eyes. 6. The projector inside your dealer. Please replace the lamp." Do not insert any items such as the... path of the two screws could be damaged. (However, it immediately and have the object removed by a qualified NEC service personnel. 3. Do not look into your eyes could result. 5. The projector is not to prevent the build-up of abnormal objects that vents are missing, contact your...
...cable and allow 60 minutes to elapse after turning off ). Make sure your VT660K/VT560/VT465 Projector. Please save the original box and packing materials if you ever need to the eyes. 6. The projector inside your dealer. Please replace the lamp." Do not insert any items such as the... path of the two screws could be damaged. (However, it immediately and have the object removed by a qualified NEC service personnel. 3. Do not look into your eyes could result. 5. The projector is not to prevent the build-up of abnormal objects that vents are missing, contact your...

User Manual
Page 6
.......... TABLE OF CONTENTS Important Information E-2 Safety Cautions ...E-2 What's in the Box? ...E-3 INTRODUCTION E-5 Introduction to the Projector E-5 Part Names of the Projector E-6 Attaching the supplied carrying handle E-6 Top Features ...E-7 Terminal Panel Features E-8 Part Names of the Remote Control E-9...E-34 APPENDIX E-35 Cabinet Dimensions ...E-35 Pin Assignments of Image [Cinema Position](for Background [Background E-27 Selecting Projector Orientation [Orientation E-27 Advanced ...E-27 Security ...E-27 Disabling the Cabinet Buttons [Control Panel Key Lock E-28 Enabling ...
.......... TABLE OF CONTENTS Important Information E-2 Safety Cautions ...E-2 What's in the Box? ...E-3 INTRODUCTION E-5 Introduction to the Projector E-5 Part Names of the Projector E-6 Attaching the supplied carrying handle E-6 Top Features ...E-7 Terminal Panel Features E-8 Part Names of the Remote Control E-9...E-34 APPENDIX E-35 Cabinet Dimensions ...E-35 Pin Assignments of Image [Cinema Position](for Background [Background E-27 Selecting Projector Orientation [Orientation E-27 Advanced ...E-27 Security ...E-27 Disabling the Cabinet Buttons [Control Panel Key Lock E-28 Enabling ...

User Manual
Page 7
...project images from behind the screen, and the projector can be permanently mounted on a tabletop or cart, you 'll find an overview. offers a crisp image with UXGA (1600ן1200) resolution*2. • Supports most IBM VGA, SVGA, XGA , SXGA/UXGA(with Advanced AccuBlend)*2, ...used in remote mouse function. • You can control the projector with NEC's Advanced AccuBlend on Your Purchase of the very best projectors available today. PAL-M: TV standard used wirelessly. *1 Do not attempt to mount the projector on VT465. The remote control can skip it. • IBM is ...
...project images from behind the screen, and the projector can be permanently mounted on a tabletop or cart, you 'll find an overview. offers a crisp image with UXGA (1600ן1200) resolution*2. • Supports most IBM VGA, SVGA, XGA , SXGA/UXGA(with Advanced AccuBlend)*2, ...used in remote mouse function. • You can control the projector with NEC's Advanced AccuBlend on Your Purchase of the very best projectors available today. PAL-M: TV standard used wirelessly. *1 Do not attempt to mount the projector on VT465. The remote control can skip it. • IBM is ...

User Manual
Page 8
...Heated air is attached with correct orientation as shown below. Attaching the supplied carrying handle You can carry the projector by Kensington Microware Inc. CAUTION When carrying the projector by the carrying handle, make sure the two screws that the carrying handle is exhausted from here Adjustable Tilt... plug here, and plug the other end into an active wall outlet and turn on the working surface before turning the projector over to the projector cabinet are tight. To attach the supplied carrying handle, use the supplied flathead screwdriver and two screws. Place a soft cloth...
...Heated air is attached with correct orientation as shown below. Attaching the supplied carrying handle You can carry the projector by Kensington Microware Inc. CAUTION When carrying the projector by the carrying handle, make sure the two screws that the carrying handle is exhausted from here Adjustable Tilt... plug here, and plug the other end into an active wall outlet and turn on the working surface before turning the projector over to the projector cabinet are tight. To attach the supplied carrying handle, use the supplied flathead screwdriver and two screws. Place a soft cloth...

User Manual
Page 9
...occurred, the lamp cover is orange, it 's warning you are in standby mode. LAMP Indicator If this indicator is not attached properly or the projector has overheated. See the Lamp Indicator section on ; When no menus appear, these buttons work as possible (See page E-30). CANCEL Button Pressing...8. To turn the power on page E-32 for an optimal picture (See page E-20). 9. See the Power Indicator section on and off the projector, press this light appears, replace the lamp as soon as a volume control. STATUS Indicator If this is lit green continually, it indicates that you...
...occurred, the lamp cover is orange, it 's warning you are in standby mode. LAMP Indicator If this indicator is not attached properly or the projector has overheated. See the Lamp Indicator section on ; When no menus appear, these buttons work as possible (See page E-30). CANCEL Button Pressing...8. To turn the power on page E-32 for an optimal picture (See page E-20). 9. See the Power Indicator section on and off the projector, press this light appears, replace the lamp as soon as a volume control. STATUS Indicator If this is lit green continually, it indicates that you...

User Manual
Page 10
... equipment such as a DVD player. This enables you to connect a component video output of the internal speaker. Output sound level can operate your projector. S-VIDEO IN Connector (Mini DIN 4 Pin) Here is where you connect the audio output from the RGB input source. S-VIDEO AUDIO Input...is required. 3. If you are writing your computer or other analog RGB equipment such as a headphone jack. (When audio equipment is connected, the projector speaker is disabled.) When a cable mini-plug is where you connect the S-Video input from a Video source. 7. RGB IN / Component Input ...
... equipment such as a DVD player. This enables you to connect a component video output of the internal speaker. Output sound level can operate your projector. S-VIDEO IN Connector (Mini DIN 4 Pin) Here is where you connect the audio output from the RGB input source. S-VIDEO AUDIO Input...is required. 3. If you are writing your computer or other analog RGB equipment such as a headphone jack. (When audio equipment is connected, the projector speaker is disabled.) When a cable mini-plug is where you connect the S-Video input from a Video source. 7. RGB IN / Component Input ...

User Manual
Page 11
.... Button Use this button to decrease it. ASPECT Button Press this button to display the Picture adjustement screen such as the ENTER button on the projector cabinet. 2. FREEZE Button This button will freeze a picture. VOLUME (+)(-) Button Press (+) to increase the volume and (-) to display the Aspect ...these buttons work as a volume control. POWER OFF Button You can use the SELECT, CANCEL, and ENTER buttons as the CANCEL button on the projector, press and hold the POWER ON button for various settings and adjustments. 10. AUTO ADJ. When the POWER ON/ OFF, MENU, ASPECT, ...
.... Button Use this button to decrease it. ASPECT Button Press this button to display the Picture adjustement screen such as the ENTER button on the projector cabinet. 2. FREEZE Button This button will freeze a picture. VOLUME (+)(-) Button Press (+) to increase the volume and (-) to display the Aspect ...these buttons work as a volume control. POWER OFF Button You can use the SELECT, CANCEL, and ENTER buttons as the CANCEL button on the projector, press and hold the POWER ON button for various settings and adjustments. 10. AUTO ADJ. When the POWER ON/ OFF, MENU, ASPECT, ...

User Manual
Page 12
Remote sensor on projector cabinet Remote control • The infrared signal operates by line-of-sight up to work properly. Ensure that Operating Range for Wireless Remote Control you ... 1. Press firmly and slide the battery cover off. Do not mix different types of the remote sensor on the projector cabinet. • The projector will also prevent the remote control from properly operating the projector. Remote Control Precautions • Handle the remote control carefully. • If the remote control gets wet, wipe it...
Remote sensor on projector cabinet Remote control • The infrared signal operates by line-of-sight up to work properly. Ensure that Operating Range for Wireless Remote Control you ... 1. Press firmly and slide the battery cover off. Do not mix different types of the remote sensor on the projector cabinet. • The projector will also prevent the remote control from properly operating the projector. Remote Control Precautions • Handle the remote control carefully. • If the remote control gets wet, wipe it...

User Manual
Page 13
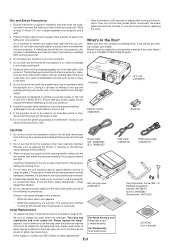
...E-13 - 16. 3 Connect the supplied power cable. The minimum size the image can be is approximately 21" (0.53 m) measured diagonally when the projector is not in use . See page E-16. 2 NOTE: Ensure that the power cable and any other cables are disconnected before you get started, ...you must first: 1 Set up a screen and the projector. 2 Connect your computer or video equipment to the projector. But before moving the projector or when it is roughly 27.6 inches (0.7 m) from the wall or screen. INSTALLATION AND CONNECTIONS This...
...E-13 - 16. 3 Connect the supplied power cable. The minimum size the image can be is approximately 21" (0.53 m) measured diagonally when the projector is not in use . See page E-16. 2 NOTE: Ensure that the power cable and any other cables are disconnected before you get started, ...you must first: 1 Set up a screen and the projector. 2 Connect your computer or video equipment to the projector. But before moving the projector or when it is roughly 27.6 inches (0.7 m) from the wall or screen. INSTALLATION AND CONNECTIONS This...

User Manual
Page 14
...buttons on the side or the front of the projector and screen. If you have adequate ventilation around your projector's image enables you can dissipate. fied technician. Do not cover the vents on your projector cabinet or your NEC dealer if you need a mirror. Tele Wide -...310 11.3 - 9.5 1470 7360 - 8830 350 11.3 - 9.5 1660 8290 - 9940 400 11.3 - 9.5 1840 9210 -11050 440 11.3 - 9.5 WARNING * Installing your projector on the ceiling must be done by a quali- Distance Chart Screen Height Screen Width Screen Diagonal Screen center B = Vertical distance between lens center and screen...
...buttons on the side or the front of the projector and screen. If you have adequate ventilation around your projector's image enables you can dissipate. fied technician. Do not cover the vents on your projector cabinet or your NEC dealer if you need a mirror. Tele Wide -...310 11.3 - 9.5 1470 7360 - 8830 350 11.3 - 9.5 1660 8290 - 9940 400 11.3 - 9.5 1840 9210 -11050 440 11.3 - 9.5 WARNING * Installing your projector on the ceiling must be done by a quali- Distance Chart Screen Height Screen Width Screen Diagonal Screen center B = Vertical distance between lens center and screen...
User Manual
Page 15
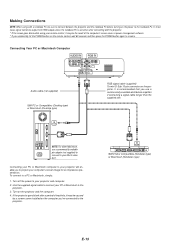
... a signal cable longer than the supplied one. RGB signal cable (supplied) To mini D-Sub 15-pin connector on the projector and the computer. 4. Turn on the projector. It is turned on after a period of the computer's screen-saver or power management software. * If you accidentally hit... 2. Turn off the power to your Mac's video port. Connecting your PC or Macintosh computer to your projector will enable you to project your PC or Macintosh to the projector. 3. Use the supplied signal cable to connect your computer's screen image for an impressive presentation. PHONE IBM...
... a signal cable longer than the supplied one. RGB signal cable (supplied) To mini D-Sub 15-pin connector on the projector and the computer. 4. Turn on the projector. It is turned on after a period of the computer's screen-saver or power management software. * If you accidentally hit... 2. Turn off the power to your Mac's video port. Connecting your PC or Macintosh computer to your projector will enable you to project your PC or Macintosh to the projector. 3. Use the supplied signal cable to connect your computer's screen image for an impressive presentation. PHONE IBM...
User Manual
Page 16
... Turn off the power to your video equipment. 3. E-14 Use the NEC ADP-SC1 SCART adapter and a commercially available SCART cable to connect the RGB input of your projector and a SCART output (RGB) of your projector, monitor and computer. 2. SCART is also referred to as DVD player ...exclusive SCART adapter (ADP-SC1) and a commercially available SCART cable are running immediately after turning on or off the power to the projector and your NEC dealer in Europe. Video equipment such as Euro-connector. Turn off the power. • Daisy chain connection is in the standby mode...
... Turn off the power to your video equipment. 3. E-14 Use the NEC ADP-SC1 SCART adapter and a commercially available SCART cable to connect the RGB input of your projector and a SCART output (RGB) of your projector, monitor and computer. 2. SCART is also referred to as DVD player ...exclusive SCART adapter (ADP-SC1) and a commercially available SCART cable are running immediately after turning on or off the power to the projector and your NEC dealer in Europe. Video equipment such as Euro-connector. Turn off the power. • Daisy chain connection is in the standby mode...

User Manual
Page 17
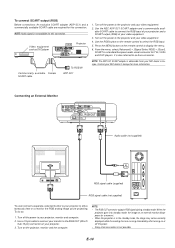
...simply: 1. NOTE: Refer to the RGB IN connector on the projector and DVD player. If your DVD player has the component video (Y,Cb,Cr) output, use common RCA cables (not provided) to connect a composite VIDEO output of the projector. 3. Turn off the power to the Video Input of the... DVD player to your projector to a DVD player with component output or Video output. Turn on the projector. For a DVD player without component video (Y,Cb,Cr) output, use...
...simply: 1. NOTE: Refer to the RGB IN connector on the projector and DVD player. If your DVD player has the component video (Y,Cb,Cr) output, use common RCA cables (not provided) to connect a composite VIDEO output of the projector. 3. Turn off the power to the Video Input of the... DVD player to your projector to a DVD player with component output or Video output. Turn on the projector. For a DVD player without component video (Y,Cb,Cr) output, use...
User Manual
Page 18
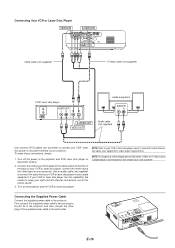
...not supplied) to connect the audio from your VCR or laser disc player to your audio equipment (if your projector. First connect the supplied power cable's two-pin plug to the projector and VCR, laser disc player or document camera. 2. NOTE: An image may not be displayed correctly when.... Connecting the Supplied Power Cable Connect the supplied power cable to keep your right and left channel connections correct for more information about your projector. E-16 Connecting Your VCR or Laser Disc Player Video cable (not supplied) S-Video cable (not supplied) VCR/ Laser disc player AUDIO...
...not supplied) to connect the audio from your VCR or laser disc player to your audio equipment (if your projector. First connect the supplied power cable's two-pin plug to the projector and VCR, laser disc player or document camera. 2. NOTE: An image may not be displayed correctly when.... Connecting the Supplied Power Cable Connect the supplied power cable to keep your right and left channel connections correct for more information about your projector. E-16 Connecting Your VCR or Laser Disc Player Video cable (not supplied) S-Video cable (not supplied) VCR/ Laser disc player AUDIO...
User Manual
Page 19
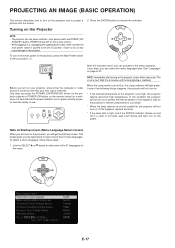
...mode is pushed to the off in or unplugging the supplied power cable, make sure that your projector, ensure that the computer or video source is turned on and that the main power switch is...to Eco, the Lamp indicator will not turn on your lens cap is too high, the projector detects abnormal high temperature. Before you will the power indicator turn on to protect the internal system.... If one of the 21 languages for the projector's internal components to cool down. * When the lamp reaches its end of the 21 menu languages...
...mode is pushed to the off in or unplugging the supplied power cable, make sure that your projector, ensure that the computer or video source is turned on and that the main power switch is...to Eco, the Lamp indicator will not turn on your lens cap is too high, the projector detects abnormal high temperature. Before you will the power indicator turn on to protect the internal system.... If one of the 21 languages for the projector's internal components to cool down. * When the lamp reaches its end of the 21 menu languages...

User Manual
Page 20
...MAGNIFY VOLUME Adjusting the Picture Size and Position Place your projector on a flat level surface and ensure that the projector is available, the projector will display a blue background (factory preset). Using the cabinet buttons Move the projector left sides of the projector to the desired height (max. 40mm/ 1.6") and ... for proper adjustment. Lift the front edge of the RGB, VIDEO or S-VIDEO buttons. E-18 Press any one of the projector. Lift the front edge of up the Adjustable Tilt Foot Levers on the screen. There is approximately 10 degrees of the...
...MAGNIFY VOLUME Adjusting the Picture Size and Position Place your projector on a flat level surface and ensure that the projector is available, the projector will display a blue background (factory preset). Using the cabinet buttons Move the projector left sides of the projector to the desired height (max. 40mm/ 1.6") and ... for proper adjustment. Lift the front edge of the RGB, VIDEO or S-VIDEO buttons. E-18 Press any one of the projector. Lift the front edge of up the Adjustable Tilt Foot Levers on the screen. There is approximately 10 degrees of the...

User Manual
Page 21
...that have a high resolution or frequency such as gripping the tilt-foot or hanging on the screen. NOTE: You can cause damage to the projector. 2. To do so: 1. The "Auto Keystone" will be displayed. 5. Use the SELECT F or E button to finely adjust the image... also correct the vertical keystone distortion manually. The menu will correct the vertical distortion of projector tilt from level. Press the SELECT E to obtain the best focus. Turn off the projector. Focus Use the FOCUS ring to select "Off". 3. Correcting the Vertical Keystone Distortion...
...that have a high resolution or frequency such as gripping the tilt-foot or hanging on the screen. NOTE: You can cause damage to the projector. 2. To do so: 1. The "Auto Keystone" will be displayed. 5. Use the SELECT F or E button to finely adjust the image... also correct the vertical keystone distortion manually. The menu will correct the vertical distortion of projector tilt from level. Press the SELECT E to obtain the best focus. Turn off the projector. Focus Use the FOCUS ring to select "Off". 3. Correcting the Vertical Keystone Distortion...

