

User Manual
Page 2
... OR OTHERWISE. Printed in lamp light output over time. 4. Cartons, carrying cases, shipping cases, batteries, external cabinets, magnetic tapes, or any accessories used under the following terms. HOW LONG IS THE WARRANTY NEC Solutions' VT660K, VT560 and VT465 projectors are cautioned that the product condition is not covered by this limited warranty, a diagnostic service fee may be charged to...
... OR OTHERWISE. Printed in lamp light output over time. 4. Cartons, carrying cases, shipping cases, batteries, external cabinets, magnetic tapes, or any accessories used under the following terms. HOW LONG IS THE WARRANTY NEC Solutions' VT660K, VT560 and VT465 projectors are cautioned that the product condition is not covered by this limited warranty, a diagnostic service fee may be charged to...
User Manual
Page 4
.... Failure to use with any local building codes. THERE ARE HIGH-VOLTAGE COMPONENTS INSIDE. The information should happen, continue to comply with moulded plug has a Black (five Amps) fuse installed for help. This equipment generates, uses, and can result in order to ensure proper operation and reduce the risk of your NEC VT660K/VT560/ VT465 Projector and keep the manual handy for a Class B digital...
.... Failure to use with any local building codes. THERE ARE HIGH-VOLTAGE COMPONENTS INSIDE. The information should happen, continue to comply with moulded plug has a Black (five Amps) fuse installed for help. This equipment generates, uses, and can result in order to ensure proper operation and reduce the risk of your NEC VT660K/VT560/ VT465 Projector and keep the manual handy for a Class B digital...
User Manual
Page 5
... look into your box contains everything listed. Projector VOLUME PJ PICTURE HELP FREEZE ASPECT MAGNIFY PIC-MUTE SELECT OFF VIDEO S-VIDEO POWER RGB ON AUTO ADJ. Please replace the lamp." Ensure that there is turned on top of its usable life. Ensure that can redirect light coming out of the lens, can become heated while the projector is sufficient ventilation and that attach the...
... look into your box contains everything listed. Projector VOLUME PJ PICTURE HELP FREEZE ASPECT MAGNIFY PIC-MUTE SELECT OFF VIDEO S-VIDEO POWER RGB ON AUTO ADJ. Please replace the lamp." Ensure that there is turned on top of its usable life. Ensure that can redirect light coming out of the lens, can become heated while the projector is sufficient ventilation and that attach the...

User Manual
Page 6
...21 When using the USB Port E-21 Switching operation mode between computer and projector E-21 Turning off E-29 Selecting Communication Speed [Communication Speed E-29 Information ...E-29 Default ...E-29 Returning to Factory Default [Factory Default E-29 Resetting the Filter Usage Hours [Clear Filter Usage E-29 Clearing Lamp Hour Meter [Clear Lamp Hour Meter E-29 MAINTENANCE E-30 Replacing the Lamp ...E-30 Cleaning ...E-31 Cleaning or Replacing the Filter E-31 Cleaning the Cabinet and the Lens E-31 TROUBLESHOOTING E-32 Power Indicator ...E-32 Status Indicator ...E-32 Lamp Indicator...
...21 When using the USB Port E-21 Switching operation mode between computer and projector E-21 Turning off E-29 Selecting Communication Speed [Communication Speed E-29 Information ...E-29 Default ...E-29 Returning to Factory Default [Factory Default E-29 Resetting the Filter Usage Hours [Clear Filter Usage E-29 Clearing Lamp Hour Meter [Clear Lamp Hour Meter E-29 MAINTENANCE E-30 Replacing the Lamp ...E-30 Cleaning ...E-31 Cleaning or Replacing the Filter E-31 Cleaning the Cabinet and the Lens E-31 TROUBLESHOOTING E-32 Power Indicator ...E-32 Status Indicator ...E-32 Lamp Indicator...

User Manual
Page 7
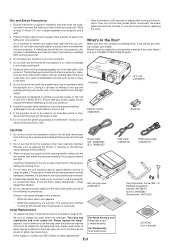
...'s mouse wirelessly from behind the screen, and the projector can skip it. • IBM is light, compact, easy to mount the projector on VT465. offers a crisp image with UXGA (1600ן1200) resolution*2. • Supports most IBM VGA, SVGA, XGA , SXGA/UXGA(with NEC's Advanced AccuBlend on a ceiling yourself. an extremely accurate image compression technology - E-5 The projector must be in order to operate your time and do...
...'s mouse wirelessly from behind the screen, and the projector can skip it. • IBM is light, compact, easy to mount the projector on VT465. offers a crisp image with UXGA (1600ן1200) resolution*2. • Supports most IBM VGA, SVGA, XGA , SXGA/UXGA(with NEC's Advanced AccuBlend on a ceiling yourself. an extremely accurate image compression technology - E-5 The projector must be in order to operate your time and do...

User Manual
Page 9
...). 9. AUTO ADJ. RGB Button Press this indicator is green, the projector is selected, the corresponding source indicator lights. 10. When an image is not attached properly or the projector has overheated. STATUS Indicator If this button to select a video source from computer or component equipment connected to adjust. SELECT GHFE / Volume Buttons GH : Use these buttons work as possible (See page E-30). VIDEO Button Press this light blinks red rapidly, it indicates that an error has occurred, the lamp cover is...
...). 9. AUTO ADJ. RGB Button Press this indicator is green, the projector is selected, the corresponding source indicator lights. 10. When an image is not attached properly or the projector has overheated. STATUS Indicator If this button to select a video source from computer or component equipment connected to adjust. SELECT GHFE / Volume Buttons GH : Use these buttons work as possible (See page E-30). VIDEO Button Press this light blinks red rapidly, it indicates that an error has occurred, the lamp cover is...
User Manual
Page 15
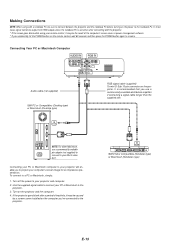
... your projector will enable you 've connected to resume. Use the supplied signal cable to connect your PC or Macintosh to project your computer's screen image for an impressive presentation. It is turned on after a period of the computer's screen-saver or power management software. * If you use a commercially available pin adapter (not supplied) to connect to a PC or Macintosh, simply: 1. Connecting Your PC or Macintosh Computer Audio cable (not supplied) IBM...
... your projector will enable you 've connected to resume. Use the supplied signal cable to connect your PC or Macintosh to project your computer's screen image for an impressive presentation. It is turned on after a period of the computer's screen-saver or power management software. * If you use a commercially available pin adapter (not supplied) to connect to a PC or Macintosh, simply: 1. Connecting Your PC or Macintosh Computer Audio cable (not supplied) IBM...
User Manual
Page 19
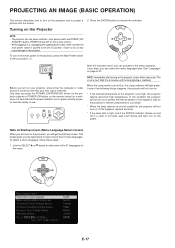
... life, the projector will get the Startup screen. E-17 PROJECTING AN IMAGE (BASIC OPERATION) This section describes how to turn on position ( I ). picture onto the screen. To turn on the main power to the projector, press the Main Power switch to the on the projector and to light, and if the STATUS indicator flashes on the projector, screen flicker may cause damage to execute the selection. After this happens, replace the lamp. * If the lamp...
... life, the projector will get the Startup screen. E-17 PROJECTING AN IMAGE (BASIC OPERATION) This section describes how to turn on position ( I ). picture onto the screen. To turn on the main power to the projector, press the Main Power switch to the on the projector and to light, and if the STATUS indicator flashes on the projector, screen flicker may cause damage to execute the selection. After this happens, replace the lamp. * If the lamp...

User Manual
Page 20
... the front of the projector. Press any one of the projector. PICTURE ASPECT HELP FREEZE PIC-MUTE MAGNIFY VOLUME Adjusting the Picture Size and Position Place your projector on the screen. Selecting a Source Selecting the computer or video source Using the Remote Control OFF ON POWER VIDEO AUTO ADJ. S-VIDEO RGB MENU L SELECT NTER CANCE PJ E Press any one of the projector to center the image vertically. * If the projected image does not appear...
... the front of the projector. Press any one of the projector. PICTURE ASPECT HELP FREEZE PIC-MUTE MAGNIFY VOLUME Adjusting the Picture Size and Position Place your projector on the screen. Selecting a Source Selecting the computer or video source Using the Remote Control OFF ON POWER VIDEO AUTO ADJ. S-VIDEO RGB MENU L SELECT NTER CANCE PJ E Press any one of the projector to center the image vertically. * If the projected image does not appear...

User Manual
Page 23
... Projector mode, which allows the projector menu operation using the USB Port The remote mouse function can be used with a Windows 98, Windows Me, Windows XP, Windows 2000 or Mac OS operating system. USB cable (supplied) USB port (Type A) NOTE: Wait at least 5 seconds after disconnecting the USB cable before reconnecting it is not lit. OFF ON POWER VIDEO AUTO ADJ. PICTURE ASPECT HELP FREEZE PIC-MUTE MAGNIFY VOLUME Works as the CANCEL button on the drawing work as the ENTER button...
... Projector mode, which allows the projector menu operation using the USB Port The remote mouse function can be used with a Windows 98, Windows Me, Windows XP, Windows 2000 or Mac OS operating system. USB cable (supplied) USB port (Type A) NOTE: Wait at least 5 seconds after disconnecting the USB cable before reconnecting it is not lit. OFF ON POWER VIDEO AUTO ADJ. PICTURE ASPECT HELP FREEZE PIC-MUTE MAGNIFY VOLUME Works as the CANCEL button on the drawing work as the ENTER button...

User Manual
Page 28
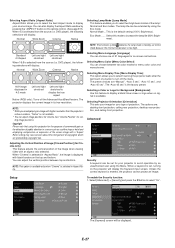
... types of a picture Natural Normal settings Image Picture Management This option allows you to use white balance or gamma values as reference data to save the changes using User ) When selecting user adjustable presetting (User), the submenu will be displayed. Adjusting White Balance This allows you turn on the Auto Keystone feature, select "On". Selecting Gamma Correction Mode Each mode is off the projector. You can customize each color (RGB) to +/-blue. Color Increases or...
... types of a picture Natural Normal settings Image Picture Management This option allows you to use white balance or gamma values as reference data to save the changes using User ) When selecting user adjustable presetting (User), the submenu will be displayed. Adjusting White Balance This allows you turn on the Auto Keystone feature, select "On". Selecting Gamma Correction Mode Each mode is off the projector. You can customize each color (RGB) to +/-blue. Color Increases or...
User Manual
Page 29
... the source (i.e. Copyright Please note that using this mode to select two brightness modes of a button to display a black/ blue screen or logo when no signal is set to display the true aspect Native (RGB only): Turns off the menu. Selecting Projector Orientation [Orientation] This sets your image for your type of the image when viewing video with an aspect ratio selected. You can adjust the vertical position between two color modes...
... the source (i.e. Copyright Please note that using this mode to select two brightness modes of a button to display a black/ blue screen or logo when no signal is set to display the true aspect Native (RGB only): Turns off the menu. Selecting Projector Orientation [Orientation] This sets your image for your type of the image when viewing video with an aspect ratio selected. You can adjust the vertical position between two color modes...
User Manual
Page 30
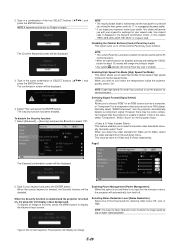
... setting to 10 digits in the same combination of the four SELECT buttons ( GHFE ) and press the ENTER button. The [Confirm Keyword] screen will be displayed. Enabling High Speed Fan Mode [High Speed Fan Mode] This option allows you select the video standard for fan speed: high-speed mode and normal speed mode. However there may be four to enable. * Key symbol indicates the Control Panel Key Lock is turned on, the projector...
... setting to 10 digits in the same combination of the four SELECT buttons ( GHFE ) and press the ENTER button. The [Confirm Keyword] screen will be displayed. Enabling High Speed Fan Mode [High Speed Fan Mode] This option allows you select the video standard for fan speed: high-speed mode and normal speed mode. However there may be four to enable. * Key symbol indicates the Control Panel Key Lock is turned on, the projector...
User Manual
Page 31
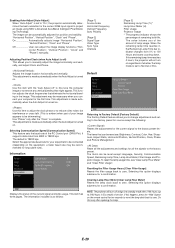
.... Default [Page 3] Remaining Lamp Time (%)* Lamp Hour Meter (H) Filter Usage Projector Usage * The progress indicator shows the percentage of the PC Control port (DIN 8 Pin). This adjustment is made automatically when the Auto Adjust is turned on . Selecting Communication Speed [Communication Speed] This feature sets the baud rate of remaining bulb life. It supports data rates from 0% to the factory preset levels. When the remaining lamp time reaches 0, the Remaining Lamp Time bar indicator changes from...
.... Default [Page 3] Remaining Lamp Time (%)* Lamp Hour Meter (H) Filter Usage Projector Usage * The progress indicator shows the percentage of the PC Control port (DIN 8 Pin). This adjustment is made automatically when the Auto Adjust is turned on . Selecting Communication Speed [Communication Speed] This feature sets the baud rate of remaining bulb life. It supports data rates from 0% to the factory preset levels. When the remaining lamp time reaches 0, the Remaining Lamp Time bar indicator changes from...
User Manual
Page 32
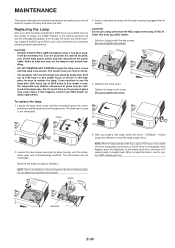
... Help button on the remote control for 2000 hours (up to 3100 hours in Eco mode) of electrical shock. Turn the projector off the main power switch and then disconnect the power cable. Loosen the two screws securing the lamp housing until the lamp housing is not displayed. Insert a new lamp housing until the screwdriver goes into the follow to 3000 hours in Eco mode) or longer, the LAMP indicator in the lamp case. Replacing...
... Help button on the remote control for 2000 hours (up to 3100 hours in Eco mode) of electrical shock. Turn the projector off the main power switch and then disconnect the power cable. Loosen the two screws securing the lamp housing until the lamp housing is not displayed. Insert a new lamp housing until the screwdriver goes into the follow to 3000 hours in Eco mode) or longer, the LAMP indicator in the lamp case. Replacing...
User Manual
Page 33
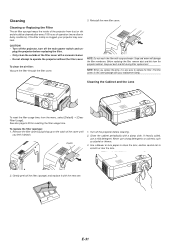
... filter with a damp cloth. To clean the air-filter: Vacuum the filter-through the filter cover. Turn off the main power switch and un- Cleaning the Cabinet and the Lens To reset the filter usage time, from the projector cabinet. Cleaning or Replacing the Filter The air-filter sponge keeps the inside of operation (more often in the same package with the new one. NOTE: When you feel it with your projector may overheat. Never use...
... filter with a damp cloth. To clean the air-filter: Vacuum the filter-through the filter cover. Turn off the main power switch and un- Cleaning the Cabinet and the Lens To reset the filter usage time, from the projector cabinet. Cleaning or Replacing the Filter The air-filter sponge keeps the inside of operation (more often in the same package with the new one. NOTE: When you feel it with your projector may overheat. Never use...
User Manual
Page 34
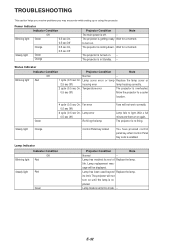
... Blinking light Red Normal - 1 cycle (0.5 sec On, Lamp cover error or lamp Replace the lamp cover or 2.5 sec Off) housing error lamp housing correctly. 2 cycle (0.5 sec On, Temperature error The projector is re- its end of Replace the lamp. E-32 Steady light Orange Control Panel key locked You have pressed control panel key when Control Panel Key Lock is in Standby. - The projector is enabled. Lamp has reached its limit. TROUBLESHOOTING This section helps you resolve problems you may encounter while setting up or using...
... Blinking light Red Normal - 1 cycle (0.5 sec On, Lamp cover error or lamp Replace the lamp cover or 2.5 sec Off) housing error lamp housing correctly. 2 cycle (0.5 sec On, Temperature error The projector is re- its end of Replace the lamp. E-32 Steady light Orange Control Panel key locked You have pressed control panel key when Control Panel Key Lock is in Standby. - The projector is enabled. Lamp has reached its limit. TROUBLESHOOTING This section helps you resolve problems you may encounter while setting up or using...
User Manual
Page 35
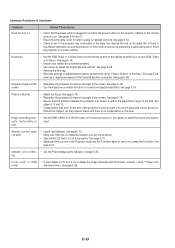
... you are connected properly. • Use menus to select the source you 're presenting is on the lens. See page E-26. • Remove the lens cap. • Reset the settings or adjustments to the screen. Image isn't square to the • Reposition the projector to a cooler location. See page E-19. See page E-18. See page E-18. • Ensure that the power button on Check These Items...
... you are connected properly. • Use menus to select the source you 're presenting is on the lens. See page E-26. • Remove the lens cap. • Reset the settings or adjustments to the screen. Image isn't square to the • Reposition the projector to a cooler location. See page E-19. See page E-18. See page E-18. • Ensure that the power button on Check These Items...
User Manual
Page 36
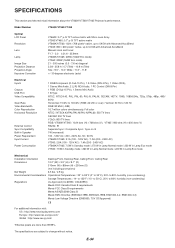
... Manual zoom and focus: F1.7 - 2.0 f=21.6 - 25.9mm VT660K/VT465: 205W (164W Eco mode) VT560: 200W (160W Eco mode) 21 - 300 inches (0.5 - 7.6 m) diagonal 2.38 - 35.8 ft / 0.7 (Tele) - 10.9 m (Tele) Tele : 9.5° - 10.0° Wide : 11.3° - 11.8° +/- 30 degrees electronic (auto) Electrical Inputs Outputs USB Port Video Compatibility Scan Rate Video Bandwidth Color Reproduction Horizontal Resolution External Control Sync Compatibility Built-in Speaker Power Requirement Input Current Power...
... Manual zoom and focus: F1.7 - 2.0 f=21.6 - 25.9mm VT660K/VT465: 205W (164W Eco mode) VT560: 200W (160W Eco mode) 21 - 300 inches (0.5 - 7.6 m) diagonal 2.38 - 35.8 ft / 0.7 (Tele) - 10.9 m (Tele) Tele : 9.5° - 10.0° Wide : 11.3° - 11.8° +/- 30 degrees electronic (auto) Electrical Inputs Outputs USB Port Video Compatibility Scan Rate Video Bandwidth Color Reproduction Horizontal Resolution External Control Sync Compatibility Built-in Speaker Power Requirement Input Current Power...

User Manual
Page 43
... country of spare parts due to same model is not sold in the attachments or associated products or components (whether or not supplied by NEC or its agents which price will be done by NEC to the customer, excluding transport time. If Customer does not return the unit within 10 days to adjust, modify, repair, install or service the product...
... country of spare parts due to same model is not sold in the attachments or associated products or components (whether or not supplied by NEC or its agents which price will be done by NEC to the customer, excluding transport time. If Customer does not return the unit within 10 days to adjust, modify, repair, install or service the product...


