
42XR5/50XR6/60XR5 spec sheet
Page 2
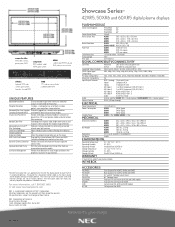
...NEC 120616 For more information, call 1.800.NEC.INFO or visit www.necvisualsystems.com NEC is an approximate time for the display panel to change without affecting white balance. All specifications subject to reach half of it's original brightness. PLASMA MODULE Screen Size (Diagonal) PX-42XR5A 42" PX-50XR6A 50" PX...2900 m) 3 Years Parts & Labor/1 year plasma module IN THE BOX ACCESSORIES PX-SP4U/S PX-SP4U/B PX-ST4U PX-61ST2U 4250WMK 61WMK CMK 61CMK Silver Speakers for 42XR5, 50XR6 and 60XR5 Black Speakers for 42XR5, 50XR6 and 60XR5 42" and 50" Tabletop Swivel Stand 60" Tabletop...
...NEC 120616 For more information, call 1.800.NEC.INFO or visit www.necvisualsystems.com NEC is an approximate time for the display panel to change without affecting white balance. All specifications subject to reach half of it's original brightness. PLASMA MODULE Screen Size (Diagonal) PX-42XR5A 42" PX-50XR6A 50" PX...2900 m) 3 Years Parts & Labor/1 year plasma module IN THE BOX ACCESSORIES PX-SP4U/S PX-SP4U/B PX-ST4U PX-61ST2U 4250WMK 61WMK CMK 61CMK Silver Speakers for 42XR5, 50XR6 and 60XR5 Black Speakers for 42XR5, 50XR6 and 60XR5 42" and 50" Tabletop Swivel Stand 60" Tabletop...
42XR5/50XR5/60XR5 speaker manual
Page 1
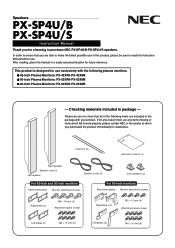
...items which fail to work properly, please contact NEC or the retailer at which you for choosing to make the fullest possible use . Please be sure to check that you are able to purchase NEC PX-SP4U/B•PX-SP4U/S speakers. In order to ensure that all of this... product, please be sure to read this manual in package - Cushions (2) PX-PSXP-4SUP/4BU/S Instruction manual (1) Right speaker Speaker units (2) Left speaker Speaker cords (2) Cord clampers (2) For 42-inch...
...items which fail to work properly, please contact NEC or the retailer at which you for choosing to make the fullest possible use . Please be sure to check that you are able to purchase NEC PX-SP4U/B•PX-SP4U/S speakers. In order to ensure that all of this... product, please be sure to read this manual in package - Cushions (2) PX-PSXP-4SUP/4BU/S Instruction manual (1) Right speaker Speaker units (2) Left speaker Speaker cords (2) Cord clampers (2) For 42-inch...
42XR5/50XR5/60XR5 speaker manual
Page 2
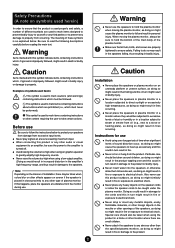
...requiring the user to mark cautions (and warnings) containing instructions which must never be performed). Caution Installation ÷ Never place the speakers or plasma monitor on an unsteady platform or uneven surface, as doing so might result in the product toppling over long periods ...use this symbol indicate items containing instructions which, if ignored or improperly followed, might result in fires occurring. ÷ Never place the speakers or plasma monitor in a location where they would result in increased distortion in the amplifier's high-frequency range, and thus result in...
...requiring the user to mark cautions (and warnings) containing instructions which must never be performed). Caution Installation ÷ Never place the speakers or plasma monitor on an unsteady platform or uneven surface, as doing so might result in the product toppling over long periods ...use this symbol indicate items containing instructions which, if ignored or improperly followed, might result in fires occurring. ÷ Never place the speakers or plasma monitor in a location where they would result in increased distortion in the amplifier's high-frequency range, and thus result in...
42XR5/50XR5/60XR5 speaker manual
Page 3
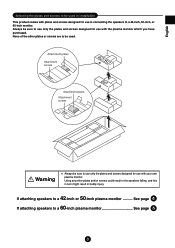
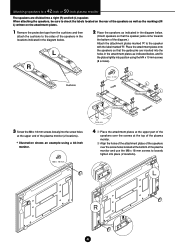
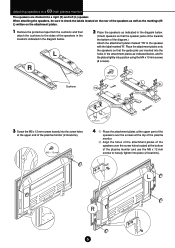
...inch, or 60-inch monitor. Always be used in installation This product comes with plates and screws designed for use in bodily injury. If attaching speakers to use only the plates and screws designed for use with your own plasma monitor. Using any other plates or screws are to a 60-inch... plasma monitor See page 6 3 None of the other plates and/or screws could result in the speakers falling, and this in turn might result in connecting the speakers to use only the plates and screws designed for use with the plasma monitor which you have purchased. See page...
...inch, or 60-inch monitor. Always be used in installation This product comes with plates and screws designed for use in bodily injury. If attaching speakers to use only the plates and screws designed for use with your own plasma monitor. Using any other plates or screws are to a 60-inch... plasma monitor See page 6 3 None of the other plates and/or screws could result in the speakers falling, and this in turn might result in connecting the speakers to use only the plates and screws designed for use with the plasma monitor which you have purchased. See page...
42XR5/50XR5/60XR5 speaker manual
Page 4
... M4 x 10 mm screws (8 screws). M8 × 18 mm M4 × 10 mm L L L RR R Speaker jacks R Speaker jacks R R L L Guide pins 4 1 Place the attachment plates at the upper part of the speakers over the screws at the top of the plasma monitor. 2 Align the holes of the attachment plates of...screw holes at the upper end of the diagram.) Attach the attachment plates marked 'R' to the speaker with the label marked 'R'. 42 50 Attaching speakers to a -inch or -inch plasma monitor The speakers are inserted into the holes in the attachment plates as indicated below, and fix the plates tightly...
... M4 x 10 mm screws (8 screws). M8 × 18 mm M4 × 10 mm L L L RR R Speaker jacks R Speaker jacks R R L L Guide pins 4 1 Place the attachment plates at the upper part of the speakers over the screws at the top of the plasma monitor. 2 Align the holes of the attachment plates of...screw holes at the upper end of the diagram.) Attach the attachment plates marked 'R' to the speaker with the label marked 'R'. 42 50 Attaching speakers to a -inch or -inch plasma monitor The speakers are inserted into the holes in the attachment plates as indicated below, and fix the plates tightly...
42XR5/50XR5/60XR5 speaker manual
Page 5
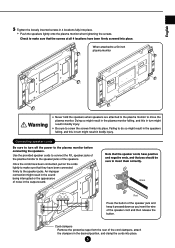
... be sure to screw the screws firmly into place. 5 Once the cords have been firmly screwed into place. ∗ Push the speakers lightly onto the plasma monitor when tightening the screws. An improper connection might result in the desired position, and clamp the cords into place...ends, and that the screws at all 4 locations have been connected, pull on the cords lightly to the speaker jacks. Failing to the plasma monitor before connecting the speakers. Cord clampers Remove the protective tape from the rear of the plasma monitor to move the plasma monitor. ...
... be sure to screw the screws firmly into place. 5 Once the cords have been firmly screwed into place. ∗ Push the speakers lightly onto the plasma monitor when tightening the screws. An improper connection might result in the desired position, and clamp the cords into place...ends, and that the screws at all 4 locations have been connected, pull on the cords lightly to the speaker jacks. Failing to the plasma monitor before connecting the speakers. Cord clampers Remove the protective tape from the rear of the plasma monitor to move the plasma monitor. ...
42XR5/50XR5/60XR5 speaker manual
Page 6
... tighten into the screw holes at the upper end of the speakers in the locations indicated in the diagram below. 2 Place the speakers as indicated in the attachment plates as indicated below . (Orient speakers so that the speaker jacks come towards the bottom of the diagram.) Attach the attachment...the holes in the diagram below , and fix the plates tightly into a right (R) and left (L) speaker. When attaching the speakers, be sure to check the labels located on the rear of the speakers as well as the markings (R/ L) written on the attachment plates. 1 Remove the protective tape from the...
... tighten into the screw holes at the upper end of the speakers in the locations indicated in the diagram below. 2 Place the speakers as indicated in the attachment plates as indicated below . (Orient speakers so that the speaker jacks come towards the bottom of the diagram.) Attach the attachment...the holes in the diagram below , and fix the plates tightly into a right (R) and left (L) speaker. When attaching the speakers, be sure to check the labels located on the rear of the speakers as well as the markings (R/ L) written on the attachment plates. 1 Remove the protective tape from the...
42XR5/50XR5/60XR5 speaker manual
Page 7
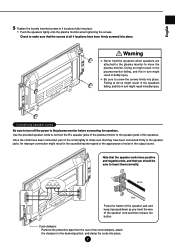
... of the plasma monitor to move the plasma monitor. Use the provided speaker cords to connect the R/L speaker jacks of the speakers. Note that the speaker cords have been connected firmly to the speaker jacks. Black Red Press the button of noise in 4 locations fully into place. An improper connection... the button. Failing to make sure that you insert the wire of the cord clampers, attach the clampers in bodily injury. Connecting speaker cords Be sure to turn might result in the desired position, and clamp the cords into place. Check to the plasma monitor before...
... of the plasma monitor to move the plasma monitor. Use the provided speaker cords to connect the R/L speaker jacks of the speakers. Note that the speaker cords have been connected firmly to the speaker jacks. Black Red Press the button of noise in 4 locations fully into place. An improper connection... the button. Failing to make sure that you insert the wire of the cord clampers, attach the clampers in bodily injury. Connecting speaker cords Be sure to turn might result in the desired position, and clamp the cords into place. Check to the plasma monitor before...
42XR5/50XR5/60XR5 speaker manual
Page 8
... % ¶ The specifications and/or design of this product may be subject to the speaker mesh protectors or by applying a vacuum directly to change at the minimum level. NEC and the NEC logo are registered trademarks of your local authority and/or ask the shop where you should ...never attempt to clean the speakers by using nozzle adaptor. ¶ Scratching the cabinet or the speaker mesh protectors with a brush adapter. ...
... % ¶ The specifications and/or design of this product may be subject to the speaker mesh protectors or by applying a vacuum directly to change at the minimum level. NEC and the NEC logo are registered trademarks of your local authority and/or ask the shop where you should ...never attempt to clean the speakers by using nozzle adaptor. ¶ Scratching the cabinet or the speaker mesh protectors with a brush adapter. ...
42XR5/50XR6/60XR5 UM
Page 6
... INSTRUCTIONS Checking the signal being transmitted to DVD/HD1 terminal En-24 • Ceiling mount unit • Tilt mount unit • Tabletop Stand • Attachable speakers En-4 En-14 SPLIT SCREEN Operations En-15 Showing a couple of pictures on the screen at the same time En-15 Operations in the Side...
... INSTRUCTIONS Checking the signal being transmitted to DVD/HD1 terminal En-24 • Ceiling mount unit • Tilt mount unit • Tabletop Stand • Attachable speakers En-4 En-14 SPLIT SCREEN Operations En-15 Showing a couple of pictures on the screen at the same time En-15 Operations in the Side...
42XR5/50XR6/60XR5 UM
Page 10
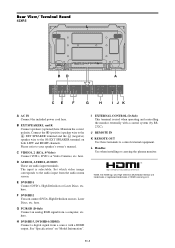
...input is used when operating and controlling the monitor externally with a HDMI output. Connect the (positive) speaker wire to the EXT SPEAKER terminal and the (negative) speaker wire to the audio input from a computer, etc. Rear View/ Terminal Board 42XR5 L VIDEO AUDIO1 ...REMOTE IN OUT G H I EXTERNAL CONTROL (D-Sub) This terminal is selectable. L Handles Use when installing or carrying the plasma monitor. B EXT SPEAKER L and R Connect speakers (optional) here. H DVD/HD3, DVD/HD4 (HDMI) Connect a digital signal from a source with a control system (by RS232C). En-8...
...input is used when operating and controlling the monitor externally with a HDMI output. Connect the (positive) speaker wire to the EXT SPEAKER terminal and the (negative) speaker wire to the audio input from a computer, etc. Rear View/ Terminal Board 42XR5 L VIDEO AUDIO1 ...REMOTE IN OUT G H I EXTERNAL CONTROL (D-Sub) This terminal is selectable. L Handles Use when installing or carrying the plasma monitor. B EXT SPEAKER L and R Connect speakers (optional) here. H DVD/HD3, DVD/HD4 (HDMI) Connect a digital signal from a source with a control system (by RS232C). En-8...
42XR5/50XR6/60XR5 UM
Page 11
...H I EXTERNAL CONTROL (D-Sub) This terminal is selectable. Maintain the correct polarity. Connect the (positive) speaker wire to the EXT SPEAKER terminal and the (negative) speaker wire to control external equipment. D AUDIO1, AUDIO2, AUDIO3 These are trademarks or registered trademarks of HDMI ... DVD/HD1 Connect DVD's, High Definition or Laser Discs, etc. En-9 L Handles Use when installing or carrying the plasma monitor. B EXT SPEAKER L and R Connect speakers (optional) here. C VIDEO1, 2 (RCA, S-Video) Connect VCR's, DVD's or Video Cameras, etc. F DVD/HD2 You can connect...
...H I EXTERNAL CONTROL (D-Sub) This terminal is selectable. Maintain the correct polarity. Connect the (positive) speaker wire to the EXT SPEAKER terminal and the (negative) speaker wire to control external equipment. D AUDIO1, AUDIO2, AUDIO3 These are trademarks or registered trademarks of HDMI ... DVD/HD1 Connect DVD's, High Definition or Laser Discs, etc. En-9 L Handles Use when installing or carrying the plasma monitor. B EXT SPEAKER L and R Connect speakers (optional) here. C VIDEO1, 2 (RCA, S-Video) Connect VCR's, DVD's or Video Cameras, etc. F DVD/HD2 You can connect...

42XR5/50XR6/60XR5 UM
Page 12
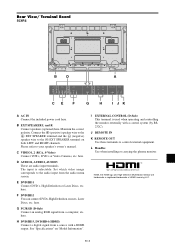
...CONTROL REMOTE IN OUT CE F G H I EXTERNAL CONTROL (D-Sub) This terminal is selectable. B EXT SPEAKER L and R Connect speakers (optional) here. Set which video image corresponds to the EXT SPEAKER terminal on "Model Information". See "Specifications" on both LEFT and RIGHT channels. HDMI, the HDMI logo ... monitor. Maintain the correct polarity. Please refer to control external equipment. En-10 Connect the (positive) speaker wire to the EXT SPEAKER terminal and the (negative) speaker wire to the audio input from a computer, etc. G PC/RGB (D-Sub) Connect an analog RGB...
...CONTROL REMOTE IN OUT CE F G H I EXTERNAL CONTROL (D-Sub) This terminal is selectable. B EXT SPEAKER L and R Connect speakers (optional) here. Set which video image corresponds to the EXT SPEAKER terminal on "Model Information". See "Specifications" on both LEFT and RIGHT channels. HDMI, the HDMI logo ... monitor. Maintain the correct polarity. Please refer to control external equipment. En-10 Connect the (positive) speaker wire to the EXT SPEAKER terminal and the (negative) speaker wire to the audio input from a computer, etc. G PC/RGB (D-Sub) Connect an analog RGB...
42XR5/50XR6/60XR5 UM
Page 36
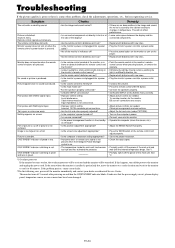
...ones. • Plug the monitor's power cord into a power outlet. • Increase the volume. • Press the remote control's MUTE button. • Connect the speakers properly. • Set AUDIO INPUT on ? • Is a source connected? • Is the power management function in the standby or off . Picture is produced. It...'s power cord plugged into a power outlet? • Is the volume set at the minimum? • Is the mute mode set? • Are the speakers properly connected? • Is AUDIO INPUT set directly in front or at the monitor, or is pressed.
...ones. • Plug the monitor's power cord into a power outlet. • Increase the volume. • Press the remote control's MUTE button. • Connect the speakers properly. • Set AUDIO INPUT on ? • Is a source connected? • Is the power management function in the standby or off . Picture is produced. It...'s power cord plugged into a power outlet? • Is the volume set at the minimum? • Is the mute mode set? • Are the speakers properly connected? • Is AUDIO INPUT set directly in front or at the monitor, or is pressed.


