
User Manual
Page 1
NEC LT158 / LT157 User's Manual LCD Projector LT158/LT157 User's Manual Printed in Japan 7N8P1211
NEC LT158 / LT157 User's Manual LCD Projector LT158/LT157 User's Manual Printed in Japan 7N8P1211
User Manual
Page 3
English E-1 CANCEL LT158/LT157 LCD Projector User's Manual MENU SELECT ENTER SOURCE AUATDOJUST ONS/TAND BY PCACCCASRETSDASTPUOSWER
English E-1 CANCEL LT158/LT157 LCD Projector User's Manual MENU SELECT ENTER SOURCE AUATDOJUST ONS/TAND BY PCACCCASRETSDASTPUOSWER
User Manual
Page 4
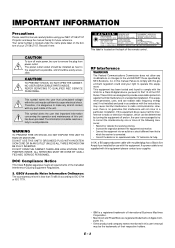
... are registered trademarks of Apple Computer, Inc. • Other product and company names mentioned in this equipment. REFER SERVICING TO QUALIFIED NEC SERVICE PERSONNEL. DO NOT OPEN THE CABINET. If a power cable is not supplied with moulded plug has a Black (five Amps... Notice This Class B digital apparatus meets all requirements of your NEC LT158/LT157 Projector and keep the manual handy for use with this manual carefully before using your LT158/LT157. ALL SERVICING MUST BE DONE BY QUALIFIED NEC SERVICE PERSONNEL. E - 2 NO USER-SERVICEABLE PARTS INSIDE. Your...
... are registered trademarks of Apple Computer, Inc. • Other product and company names mentioned in this equipment. REFER SERVICING TO QUALIFIED NEC SERVICE PERSONNEL. DO NOT OPEN THE CABINET. If a power cable is not supplied with moulded plug has a Black (five Amps... Notice This Class B digital apparatus meets all requirements of your NEC LT158/LT157 Projector and keep the manual handy for use with this manual carefully before using your LT158/LT157. ALL SERVICING MUST BE DONE BY QUALIFIED NEC SERVICE PERSONNEL. E - 2 NO USER-SERVICEABLE PARTS INSIDE. Your...
User Manual
Page 5
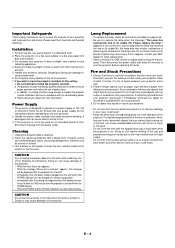
...safety instructions are unobstructed to prevent the build-up of heat inside your projector. Do not place any objects that your power supply fits this happens, contact your projector. 2. For best results, use your NEC dealer for more information. CAUTION Do not unplug the power cable from the... lens is turned off the projector. CAUTION Do not put the projector on its usable life, the lamp bulb may ...
...safety instructions are unobstructed to prevent the build-up of heat inside your projector. Do not place any objects that your power supply fits this happens, contact your projector. 2. For best results, use your NEC dealer for more information. CAUTION Do not unplug the power cable from the... lens is turned off the projector. CAUTION Do not put the projector on its usable life, the lamp bulb may ...
User Manual
Page 6
... VCR or Laser Disc Player E-22 About Startup screen (Menu Language Select screen E-23 3. E-15 2. INTRODUCTION Introduction to the LT158/LT157 Projector E-5 Getting Started E-5 What's in the Box E-6 Getting to Know Your LT158/LT157 Projector E-7 Front / Side Features E-7 Attaching the lens cap E-7 Rear / Side Features E-8 Top Features E-9 Terminal Panel Features E-10 Remote Control Features...
... VCR or Laser Disc Player E-22 About Startup screen (Menu Language Select screen E-23 3. E-15 2. INTRODUCTION Introduction to the LT158/LT157 Projector E-5 Getting Started E-5 What's in the Box E-6 Getting to Know Your LT158/LT157 Projector E-7 Front / Side Features E-7 Attaching the lens cap E-7 Rear / Side Features E-8 Top Features E-9 Terminal Panel Features E-10 Remote Control Features...

User Manual
Page 7
... up and operation. • A high-performance 130 watt NSH lamp. • The supplied wireless remote control operates the projector from across the room with NEC technology's Advanced AccuBlend. If the section doesn't apply, you can be used in accordance with a PC using the PC ...mouse only. TV standard for true color reproduction. • The built-in PC Card Viewer allows you to start your new LT158 (XGA/DVI) / LT157 (XGA) Projector and describes the features and controls. PAL-N: TV standard used wirelessly. In addition, the ceiling must be installed by qualified technicians...
... up and operation. • A high-performance 130 watt NSH lamp. • The supplied wireless remote control operates the projector from across the room with NEC technology's Advanced AccuBlend. If the section doesn't apply, you can be used in accordance with a PC using the PC ...mouse only. TV standard for true color reproduction. • The built-in PC Card Viewer allows you to start your new LT158 (XGA/DVI) / LT157 (XGA) Projector and describes the features and controls. PAL-N: TV standard used wirelessly. In addition, the ceiling must be installed by qualified technicians...

User Manual
Page 8
... CARD SHIFT SLIDE VOL. Make sure your dealer. VGA signal cable LT157 only DVI-D - SOURCE AUATDOJUST ON/STAND BY PCACCACSERTSDASTPUOSWER ENTER SELECT CANCEL MENU NEC LT158/LT157 projector LT158 only Lens cap Batteries (AAן2) String and rivet OFF VIDEO AUTO ADJ. DVI-D signal cable Remote mouse receiver RGB signal cable (15... box contains everything listed. FOLDER SLIDE LIST Remote control DVI-A - Please save the original box and packing materials if you ever need to ship your LT158/LT157 Projector.
... CARD SHIFT SLIDE VOL. Make sure your dealer. VGA signal cable LT157 only DVI-D - SOURCE AUATDOJUST ON/STAND BY PCACCACSERTSDASTPUOSWER ENTER SELECT CANCEL MENU NEC LT158/LT157 projector LT158 only Lens cap Batteries (AAן2) String and rivet OFF VIDEO AUTO ADJ. DVI-D signal cable Remote mouse receiver RGB signal cable (15... box contains everything listed. FOLDER SLIDE LIST Remote control DVI-A - Please save the original box and packing materials if you ever need to ship your LT158/LT157 Projector.

User Manual
Page 9
lens cap and then tie a knot in the string. Getting to Know Your LT158/LT157 Projector Front/Side Features PCACCACSERTSDASTPUOSWER SOURCE AUATDOJUST ON/STAND BY ENTER Controls Built-In Monaural Speaker (0.5W) Lens SELECT CANCEL MENU Remote Sensor Air Filter Zoom lever Ventilation (inlet) One-touch Tilt Button Adjustable Tilt Foot Focus ring Lens cap Attaching the lens cap to the bottom of the projector. E - 7 Use the rivet to attach the string to the bottom with the supplied string and rivet 1. Thread the string through the hole on the 2.
lens cap and then tie a knot in the string. Getting to Know Your LT158/LT157 Projector Front/Side Features PCACCACSERTSDASTPUOSWER SOURCE AUATDOJUST ON/STAND BY ENTER Controls Built-In Monaural Speaker (0.5W) Lens SELECT CANCEL MENU Remote Sensor Air Filter Zoom lever Ventilation (inlet) One-touch Tilt Button Adjustable Tilt Foot Focus ring Lens cap Attaching the lens cap to the bottom of the projector. E - 7 Use the rivet to attach the string to the bottom with the supplied string and rivet 1. Thread the string through the hole on the 2.
User Manual
Page 11
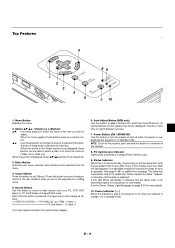
...it 's warning you wish to replace the projection lamp as soon as follows: → RGB ["DVI (DIGITAL) → DVI (ANALOG)" on and off the projector, press and hold this button to change as possible. (See page E-48). Select LM ᮤ ᮣ / Volume (+) (-) Buttons LM: Use these buttons... 7. NOTE: To turn the power on LT158] → Video PC Card Viewer ← S-Video ← If no menus appear, these buttons to adjust Position-H/V and Pixel Clock/Phase for more details. 10. After this indicator is green, the projector is replaced. Source Button Use this button ...
...it 's warning you wish to replace the projection lamp as soon as follows: → RGB ["DVI (DIGITAL) → DVI (ANALOG)" on and off the projector, press and hold this button to change as possible. (See page E-48). Select LM ᮤ ᮣ / Volume (+) (-) Buttons LM: Use these buttons... 7. NOTE: To turn the power on LT158] → Video PC Card Viewer ← S-Video ← If no menus appear, these buttons to adjust Position-H/V and Pixel Clock/Phase for more details. 10. After this indicator is green, the projector is replaced. Source Button Use this button ...

User Manual
Page 12
...a registered trademark of a computer, attach the supplied DVI-A-VGA adapter to control the projector. You can accept a digital or analog signal input from your own program, typical ... more vivid color and higher resolution than the traditional composite video format. 4. The NEC optional serial cable is not used with a DVI connector. Remove the cap when ... IN 9 7 6 C CARD USB MENU SELECT CANCEL 5 4 3 PC CONTROL VIDEO S-VIDEO ENTER SOURCE LT158 AUATDOJUST 2 EO S-VIDEO ONS/ TAND BY PCACCCASRETSDASTPUOSWER DVI-D AUDIO RGB AUDIO 1. A commercially available audio cable is...
...a registered trademark of a computer, attach the supplied DVI-A-VGA adapter to control the projector. You can accept a digital or analog signal input from your own program, typical ... more vivid color and higher resolution than the traditional composite video format. 4. The NEC optional serial cable is not used with a DVI connector. Remove the cap when ... IN 9 7 6 C CARD USB MENU SELECT CANCEL 5 4 3 PC CONTROL VIDEO S-VIDEO ENTER SOURCE LT158 AUATDOJUST 2 EO S-VIDEO ONS/ TAND BY PCACCCASRETSDASTPUOSWER DVI-D AUDIO RGB AUDIO 1. A commercially available audio cable is...

User Manual
Page 13
...the PJ button: Use this button to select a video source from a VCR. 9. For LT158: Press this button to select an NTSC, PAL, SECAM or NTSC4.43 compatible video source from a computer. 11. When you are in the Projector mode, which is pressed. 3. It works the same way as the "Cancel" button ...on LT158). 10. E - 11 Power ON Button If the main power is indicated by lighting the PJ button: LM: ...
...the PJ button: Use this button to select a video source from a VCR. 9. For LT158: Press this button to select an NTSC, PAL, SECAM or NTSC4.43 compatible video source from a computer. 11. When you are in the Projector mode, which is pressed. 3. It works the same way as the "Cancel" button ...on LT158). 10. E - 11 Power ON Button If the main power is indicated by lighting the PJ button: LM: ...

User Manual
Page 14
...the pointer is not displayed, the image is the Computer mode, which allows you are pressed within 10 seconds, the light goes out and the Projector mode is canceled. VOLUME (+) (-) Button Press (+) to increase the volume and (-) to switch the Select, Cancel, and Enter buttons between the... Projector mode (lit red) and the Computer mode. Press again to display a list of time. FOLDER LIST Button Press this model. 20. SHIFT Button Not available...
...the pointer is not displayed, the image is the Computer mode, which allows you are pressed within 10 seconds, the light goes out and the Projector mode is canceled. VOLUME (+) (-) Button Press (+) to increase the volume and (-) to switch the Select, Cancel, and Enter buttons between the... Projector mode (lit red) and the Computer mode. Press again to display a list of time. FOLDER LIST Button Press this model. 20. SHIFT Button Not available...

User Manual
Page 15
...Do not place the batteries upside down. • Do not look into place. Check the projector being used . Note on . • Do not point the laser beam at a person. Should this model, an applicable projector selector switch (1) is accessible to enable or disable laser, then set these switches as necessary...the laser does not light even when the LASER button is pressed) Disable the laser when using the tip of the battery case: an applicable projector selector switch (1) and laser enable/disable switch (2). Press firmly and slide the battery cover off. 2. OFF ON There are two switches on...
...Do not place the batteries upside down. • Do not look into place. Check the projector being used . Note on . • Do not point the laser beam at a person. Should this model, an applicable projector selector switch (1) is accessible to enable or disable laser, then set these switches as necessary...the laser does not light even when the LASER button is pressed) Disable the laser when using the tip of the battery case: an applicable projector selector switch (1) and laser enable/disable switch (2). Press firmly and slide the battery cover off. 2. OFF ON There are two switches on...

User Manual
Page 16
... your PC. The mouse receiver can only be sure to attach the PS/2 adapter to operate your computer settings. The computer may have to the Projector mode, press the PJ button (lit red). When operating a computer via the remote mouse receiver 7m 30˚ 30˚ Remote sensor on the mouse...
... your PC. The mouse receiver can only be sure to attach the PS/2 adapter to operate your computer settings. The computer may have to the Projector mode, press the PJ button (lit red). When operating a computer via the remote mouse receiver 7m 30˚ 30˚ Remote sensor on the mouse...

User Manual
Page 17
... MENU button is pressed, the PJ button lights red to indicate that you are in the Computer mode. Switching operation mode between computer and projector The three shaded buttons shown on the pointer (press the POINTER button two times). • When the PJ button is lit, if you... Computer mode. MENU LASER SELECT ENTER CANCE PJ FOCUS ZOOM SHIFT HELP POINTER PC CARD KEYSTONE MAGNIFY SLIDE Works as the Cancel button on the projector. FREEZE VOLUME FOLDER PIC-MUTE SLIDE LIST During Computer mode: During Computer mode by pressing the SELECT (L, M mouse) button. To move the pointer ...
... MENU button is pressed, the PJ button lights red to indicate that you are in the Computer mode. Switching operation mode between computer and projector The three shaded buttons shown on the pointer (press the POINTER button two times). • When the PJ button is lit, if you... Computer mode. MENU LASER SELECT ENTER CANCE PJ FOCUS ZOOM SHIFT HELP POINTER PC CARD KEYSTONE MAGNIFY SLIDE Works as the Cancel button on the projector. FREEZE VOLUME FOLDER PIC-MUTE SLIDE LIST During Computer mode: During Computer mode by pressing the SELECT (L, M mouse) button. To move the pointer ...

User Manual
Page 18
.../ feet) E - 16 Set up a screen or select a non-glossy white wall onto which you must first: 1. Setting up Your Projector Your LT158/LT157 Projector is roughly 3.9 feet (1.2 m) from the wall or screen. Screen and Projection Distance The following shows the proper relative positions of installation. T5T60E1h... image size. 2. The minimum size the image can be is 300" (7.6 m) when the projector is not in use . The largest the image can project your LT158/LT157 projector and how to video sources are disconnected before you get started, you can be is approximately 25...
.../ feet) E - 16 Set up a screen or select a non-glossy white wall onto which you must first: 1. Setting up Your Projector Your LT158/LT157 Projector is roughly 3.9 feet (1.2 m) from the wall or screen. Screen and Projection Distance The following shows the proper relative positions of installation. T5T60E1h... image size. 2. The minimum size the image can be is 300" (7.6 m) when the projector is not in use . The largest the image can project your LT158/LT157 projector and how to video sources are disconnected before you get started, you can be is approximately 25...

User Manual
Page 19
...distance between 41˚F (5˚C) and 95˚F (35˚C). • Do not expose the projector to the ground, you can dissipate. If you need a mirror. Contact your NEC dealer for ceiling installation) Ceiling Installation Screen Top D Lens Center B Screen Center 1.6" (40.3mm) ...Throw Angle (α) Screen Bottom Throw Distance (C) Projector Foot WARNING • Installing your NEC dealer if you 're using a mirror and your image is upside down, use the projector where temperatures vary greatly. If the projector falls to moisture, dust, or smoke. Do not cover...
...distance between 41˚F (5˚C) and 95˚F (35˚C). • Do not expose the projector to the ground, you can dissipate. If you need a mirror. Contact your NEC dealer for ceiling installation) Ceiling Installation Screen Top D Lens Center B Screen Center 1.6" (40.3mm) ...Throw Angle (α) Screen Bottom Throw Distance (C) Projector Foot WARNING • Installing your NEC dealer if you 're using a mirror and your image is upside down, use the projector where temperatures vary greatly. If the projector falls to moisture, dust, or smoke. Do not cover...

User Manual
Page 20
...a DVI connector on the LT158. DVI-D signal cable (supplied) or DVI-A - Should this happen, restart your PC or projector. In most cases signal cannot be the result of 1024x768(XGA) when a DVI (DIGITAL) input is turned on the projector. NOTE: If using with the projector. NOTE: * If the ... 15-pin F (not supplied) DVI VIDEO S-VIDEO PC CONTROL RGB RGB Signal cable (supplied) To mini D-Sub 15-pin connector on the projector. For LT158: When Viewing a DVI Digital Signal: To project a DVI digital signal, be 3 m (9.8 feet) or shorter. Should this happen, restart your computer ...
...a DVI connector on the LT158. DVI-D signal cable (supplied) or DVI-A - Should this happen, restart your PC or projector. In most cases signal cannot be the result of 1024x768(XGA) when a DVI (DIGITAL) input is turned on the projector. NOTE: If using with the projector. NOTE: * If the ... 15-pin F (not supplied) DVI VIDEO S-VIDEO PC CONTROL RGB RGB Signal cable (supplied) To mini D-Sub 15-pin connector on the projector. For LT158: When Viewing a DVI Digital Signal: To project a DVI digital signal, be 3 m (9.8 feet) or shorter. Should this happen, restart your computer ...

User Manual
Page 21
... Option x when using mini D-Sub 15 pin output. It is recommended that you 've connected to your LT158 (XGA) projector. x Use the supplied DVI-D-DVI-D signal cable to connect a DVI connector of your projector and computer. 2. E - 19 Audio cable (not supplied) LT157 MENU SELECT CAN C EL AC IN ... BY PCACCCASRETSDASTPUOSWER RGB DEO S-VIDEO AUDIO RGB INPUT RGB AUDIO AUDIO Connecting your PC to your LT157 (XGA) projector will enable you 've connected to your PC. If the projector goes blank after a period of inactivity, it may be caused by a screen saver installed on the...
... Option x when using mini D-Sub 15 pin output. It is recommended that you 've connected to your LT158 (XGA) projector. x Use the supplied DVI-D-DVI-D signal cable to connect a DVI connector of your projector and computer. 2. E - 19 Audio cable (not supplied) LT157 MENU SELECT CAN C EL AC IN ... BY PCACCCASRETSDASTPUOSWER RGB DEO S-VIDEO AUDIO RGB INPUT RGB AUDIO AUDIO Connecting your PC to your LT157 (XGA) projector will enable you 've connected to your PC. If the projector goes blank after a period of inactivity, it may be caused by a screen saver installed on the...

User Manual
Page 22
...EL SOURCE AUATDOJUST ONS/TAND BY PCACCCASRETSDASTPUOSWER AUDIO RGB INPUT RGB AUDIO AUDIO Audio cable (not supplied) DVI-A - Turn on the projector. For LT158: When connecting a Macintosh with a mini D-sub 15 pin analog connector, attach the supplied DVI-A - To connect to the DVI connector ...on the projector and the Macintosh computer. VGA signal cable (supplied) LT158 MENU SELECT CAN C EL AC IN C CARD ENTER USB PC CONTROL VIDEO S-VIDEO SOURCE AUATDOJUST ONS/TAND BY ...
...EL SOURCE AUATDOJUST ONS/TAND BY PCACCCASRETSDASTPUOSWER AUDIO RGB INPUT RGB AUDIO AUDIO Audio cable (not supplied) DVI-A - Turn on the projector. For LT158: When connecting a Macintosh with a mini D-sub 15 pin analog connector, attach the supplied DVI-A - To connect to the DVI connector ...on the projector and the Macintosh computer. VGA signal cable (supplied) LT158 MENU SELECT CAN C EL AC IN C CARD ENTER USB PC CONTROL VIDEO S-VIDEO SOURCE AUATDOJUST ONS/TAND BY ...

