
User Manual
Page 6
...DO NOT OPEN THE CABINET. NO USER-SERVICEABLE PARTS INSIDE. Failure to comply with this government regulation could void your NEC LT158/LT157 Projector and keep the manual handy for use with this equipment. These limits are registered trademarks of the following measures: &#... supplier. • IBM is no guarantee that uninsulated voltage within the unit may cause harmful interference to Part 15 of the remote control. However, there is a registered trademark of International Business Machines Corporation. • Macintosh and PowerBook are designed to provide reasonable...
...DO NOT OPEN THE CABINET. NO USER-SERVICEABLE PARTS INSIDE. Failure to comply with this government regulation could void your NEC LT158/LT157 Projector and keep the manual handy for use with this equipment. These limits are registered trademarks of the following measures: &#... supplier. • IBM is no guarantee that uninsulated voltage within the unit may cause harmful interference to Part 15 of the remote control. However, there is a registered trademark of International Business Machines Corporation. • Macintosh and PowerBook are designed to provide reasonable...
User Manual
Page 8
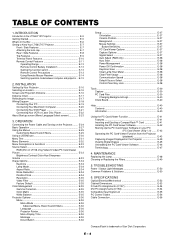
... E-5 What's in the Box E-6 Getting to Know Your LT158/LT157 Projector E-7 Front / Side Features E-7 Attaching the lens cap E-7 Rear / Side Features E-8 Top Features E-9 Terminal Panel Features E-10 Remote Control Features E-11 Operating Range E-13 Remote Control Battery Installation E-13 Setting the function switch E-13 Remote Control Precautions E-13 Using Remote Mouse Receiver E-14 Switching operation mode between computer and...
... E-5 What's in the Box E-6 Getting to Know Your LT158/LT157 Projector E-7 Front / Side Features E-7 Attaching the lens cap E-7 Rear / Side Features E-8 Top Features E-9 Terminal Panel Features E-10 Remote Control Features E-11 Operating Range E-13 Remote Control Battery Installation E-13 Setting the function switch E-13 Remote Control Precautions E-13 Using Remote Mouse Receiver E-14 Switching operation mode between computer and...

User Manual
Page 9
The LT158/LT157 enables you to project precise images up and operation. • A high-performance 130 watt NSH lamp. • The supplied wireless remote control operates the projector from the front side or rear. • The image can be installed on the ceiling. • NEC Technologies' exclusive ... TV standard for video in Argentine, Paraguay and Uruguay. PAL: TV standard used for your new LT158 (XGA/DVI) / LT157 (XGA) Projector and describes the features and controls. This program is one of the manual you can be projected from your PC or Macintosh computer (desktop or...
The LT158/LT157 enables you to project precise images up and operation. • A high-performance 130 watt NSH lamp. • The supplied wireless remote control operates the projector from the front side or rear. • The image can be installed on the ceiling. • NEC Technologies' exclusive ... TV standard for video in Argentine, Paraguay and Uruguay. PAL: TV standard used for your new LT158 (XGA/DVI) / LT157 (XGA) Projector and describes the features and controls. This program is one of the manual you can be projected from your PC or Macintosh computer (desktop or...
User Manual
Page 10
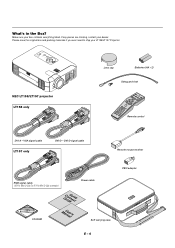
... listed. What's in the Box? If any pieces are missing, contact your dealer. FOLDER SLIDE LIST Remote control DVI-A - VGA signal cable LT157 only DVI-D - SOURCE AUATDOJUST ON/STAND BY PCACCACSERTSDASTPUOSWER ENTER SELECT CANCEL MENU NEC LT158/LT157 projector LT158 only Lens cap Batteries (AAן2) String and rivet OFF VIDEO AUTO ADJ. DVI...
... listed. What's in the Box? If any pieces are missing, contact your dealer. FOLDER SLIDE LIST Remote control DVI-A - VGA signal cable LT157 only DVI-D - SOURCE AUATDOJUST ON/STAND BY PCACCACSERTSDASTPUOSWER ENTER SELECT CANCEL MENU NEC LT158/LT157 projector LT158 only Lens cap Batteries (AAן2) String and rivet OFF VIDEO AUTO ADJ. DVI...
User Manual
Page 15
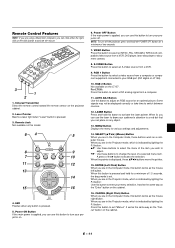
... button is pressed. 5. S-VIDEO POWER RGB1 ON VIDEO OFF 3 1 2 1. Infrared Transmitter Direct the remote control toward the remote sensor on this model. 64 5 8 7 11 13 OFF POWER VIDEO S-VIDEO RGB1 ON RGB2 AUTO ADJ.... AUTO ADJ Button Use this button to turn your RGB port (DVI digital on the LT157. Power ON Button If the main power is applied, you can use this button to... drag mode is indicated by lighting the PJ button: Use this button to enter your projector off the projector, press and hold this button to select an NTSC, PAL, SECAM or NTSC4.43 compatible...
... button is pressed. 5. S-VIDEO POWER RGB1 ON VIDEO OFF 3 1 2 1. Infrared Transmitter Direct the remote control toward the remote sensor on this model. 64 5 8 7 11 13 OFF POWER VIDEO S-VIDEO RGB1 ON RGB2 AUTO ADJ.... AUTO ADJ Button Use this button to turn your RGB port (DVI digital on the LT157. Power ON Button If the main power is applied, you can use this button to... drag mode is indicated by lighting the PJ button: Use this button to enter your projector off the projector, press and hold this button to select an NTSC, PAL, SECAM or NTSC4.43 compatible...
User Manual
Page 17
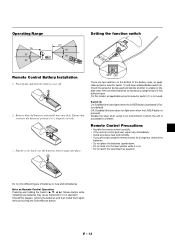
... AUTO ADJUST ON/ STAND BY PC CARD ACCESS STATUS POWER 7m 30˚ 30˚ Setting the function switch Remote Control Battery Installation 1. Remove both old batteries and install new ones (AA). Check the projector being used . E - 13 Press firmly and slide the battery cover off. 2. On this happen, remove the batteries and...
... AUTO ADJUST ON/ STAND BY PC CARD ACCESS STATUS POWER 7m 30˚ 30˚ Setting the function switch Remote Control Battery Installation 1. Remove both old batteries and install new ones (AA). Check the projector being used . E - 13 Press firmly and slide the battery cover off. 2. On this happen, remove the batteries and...

User Manual
Page 18
...Projector mode, press the PJ button (lit red). NOTE: Depending on the type of your PC. The computer may have to restart your computer or change your computer, you wish to detect the remote mouse receiver. To connect it is a great convenience for clicking through your computer's mouse functions from the remote control... (Computer mode). Do not connect or disconnect the USB connector of the remote mouse receiver with a Windows 98, Windows ME or Windows 2000 operating system. It...
...Projector mode, press the PJ button (lit red). NOTE: Depending on the type of your PC. The computer may have to restart your computer or change your computer, you wish to detect the remote mouse receiver. To connect it is a great convenience for clicking through your computer's mouse functions from the remote control... (Computer mode). Do not connect or disconnect the USB connector of the remote mouse receiver with a Windows 98, Windows ME or Windows 2000 operating system. It...

User Manual
Page 21
...re using a mirror and your image is upside down, use the "Menu" and "Select" buttons on your projector cabinet or LM button on your remote control to correct the orientation. (See page E-37.) Screen Size B C Diagonal Width Height wide inch mm inch ...12746 -16 -404 8.5 - 7.1 - - -17 -420 8.5 - - - - -18 -466 8.4 - - Contact your NEC dealer if you have adequate ventilation around your projector so heat can be injured and the projector severely damaged. • Do not use the projector where temperatures vary greatly. E - 17 D α tele wide tele inch mm inch mm degree...
...re using a mirror and your image is upside down, use the "Menu" and "Select" buttons on your projector cabinet or LM button on your remote control to correct the orientation. (See page E-37.) Screen Size B C Diagonal Width Height wide inch mm inch ...12746 -16 -404 8.5 - 7.1 - - -17 -420 8.5 - - - - -18 -466 8.4 - - Contact your NEC dealer if you have adequate ventilation around your projector so heat can be injured and the projector severely damaged. • Do not use the projector where temperatures vary greatly. E - 17 D α tele wide tele inch mm inch mm degree...

User Manual
Page 22
... and then re-connected, an image may not display images correctly on your PC or projector. To connect a DVI connector on the LT158. NOTE: The DVI connector can accept a maximum resolution of 1024x768(XGA) when a DVI (DIGITAL) input is recommended that you use a separately sold DVI ...button on your computer to the notebook PC. It is selected. NOTE: If using with the projector. In most cases signal cannot be output from the source menu before turning on your remote control, it may not be correctly displayed. For LT158: When Viewing a DVI Digital Signal: To project...
... and then re-connected, an image may not display images correctly on your PC or projector. To connect a DVI connector on the LT158. NOTE: The DVI connector can accept a maximum resolution of 1024x768(XGA) when a DVI (DIGITAL) input is recommended that you use a separately sold DVI ...button on your computer to the notebook PC. It is selected. NOTE: If using with the projector. In most cases signal cannot be output from the source menu before turning on your remote control, it may not be correctly displayed. For LT158: When Viewing a DVI Digital Signal: To project...

User Manual
Page 28
...POWER flashing green light for one minute. OPERATION Connecting the Power Cable and Turning on the Projector Before you press the "On" button on the remote control ("ON/ STAND BY" button on the projector, screen flicker may occur. NOTE: Do not disconnect the power cable during this time. ...the power cable, use . 3. To turn on your projector, ensure that your lens cap is turned on the projector cabinet) for one minute (Normal mode) Status of two seconds. After the projector turns off " button on the remote control ("ON/STAND BY" button on and that the computer or...
...POWER flashing green light for one minute. OPERATION Connecting the Power Cable and Turning on the Projector Before you press the "On" button on the remote control ("ON/ STAND BY" button on the projector, screen flicker may occur. NOTE: Do not disconnect the power cable during this time. ...the power cable, use . 3. To turn on your projector, ensure that your lens cap is turned on the projector cabinet) for one minute (Normal mode) Status of two seconds. After the projector turns off " button on the remote control ("ON/STAND BY" button on and that the computer or...

User Manual
Page 29
...on the screen Lift the front edge of the projector to the screen. Or press the "Menu" button on the remote control or the cabinet and use the menu to select your projector on a CompactFlash card) to the screen. Move the projector left to obtain the best focus. Use keystone... Computer or Video Source VIDEO S-VIDEO RGB1 RGB2 SELECT ENTER PC CARD CANCEL SOURCE AUATDOJUST ONS/TAND BY Press the Source button on the remote control or the projector cabinet to select "Video" (VCR, document camera, or laser disc player), SVideo", "RGB" (computer or DVD with component output) [ "DVI digital" ...
...on the screen Lift the front edge of the projector to the screen. Or press the "Menu" button on the remote control or the cabinet and use the menu to select your projector on a CompactFlash card) to the screen. Move the projector left to obtain the best focus. Use keystone... Computer or Video Source VIDEO S-VIDEO RGB1 RGB2 SELECT ENTER PC CARD CANCEL SOURCE AUATDOJUST ONS/TAND BY Press the Source button on the remote control or the projector cabinet to select "Video" (VCR, document camera, or laser disc player), SVideo", "RGB" (computer or DVD with component output) [ "DVI digital" ...

User Manual
Page 31
... video noise, dot interference or cross talk. (This is present, the input will change as follows: → RGB ["DVI (DIGITAL) → DVI (ANALOG)" on the remote control to be shimmering.) This adjustment may be shimmering). NOTE: The Auto Adjust function does not work for DVI analog signal. This function adjusts the clock...
... video noise, dot interference or cross talk. (This is present, the input will change as follows: → RGB ["DVI (DIGITAL) → DVI (ANALOG)" on the remote control to be shimmering.) This adjustment may be shimmering). NOTE: The Auto Adjust function does not work for DVI analog signal. This function adjusts the clock...

User Manual
Page 33
... a picture. 4. NOTE: When using "Select" ᮤ or ᮣ buttons on the cabinet, or the "Mouse button" on the projector cabinet or the remote control to display the "Basic/Custom Menu Edit" screen. Press the ᮣ button or the "Enter" button on the... projector cabinet or the "Left Click" button on the remote control or the projector cabinet to adjust or set. 3. FREEZE E - 29 MAGNIFY Correcting Keystone distortion Press (+) or (-) to correct keystone (...
... a picture. 4. NOTE: When using "Select" ᮤ or ᮣ buttons on the cabinet, or the "Mouse button" on the projector cabinet or the remote control to display the "Basic/Custom Menu Edit" screen. Press the ᮣ button or the "Enter" button on the... projector cabinet or the "Left Click" button on the remote control or the projector cabinet to adjust or set. 3. FREEZE E - 29 MAGNIFY Correcting Keystone distortion Press (+) or (-) to correct keystone (...

User Manual
Page 34
If you select an item with a solid triangle ᮣ and press the Enter button on the remote control or the projector cabinet, you a smooth operation. To cancel the changes, use the L or M buttons to an option. In this item and pressing the "Enter" button will .... Using a USB Mouse Using a USB mouse gives you can enable all the items within that submenu. Unless you cannot cancel the changes on the remote control or the projector cabinet to the factory default, select "Reset" then press the "Enter" button. To save the adjustments, click . Use the L or M button to highlight ...
If you select an item with a solid triangle ᮣ and press the Enter button on the remote control or the projector cabinet, you a smooth operation. To cancel the changes, use the L or M buttons to an option. In this item and pressing the "Enter" button will .... Using a USB Mouse Using a USB mouse gives you can enable all the items within that submenu. Unless you cannot cancel the changes on the remote control or the projector cabinet to the factory default, select "Reset" then press the "Enter" button. To save the adjustments, click . Use the L or M button to highlight ...

User Manual
Page 35
... R/G/B Menu Setup Page 1 Menu Mode(Advanced Menu, Basic/Custom Menu) Basic/Custom Menu Edit Language (English/German/French/Italian/Spanish/Swedish/Japanese) Projector Pointer (Pointer 1-8) Menu Display Time (Manual/Auto 5 sec/Auto 15 sec/Auto 45 sec) Page 2 Message Source Display (On/Off) No...Noise Reduction/Color Matrix/Matrix Type Page4 Remaining Lamp Time/Lamp Hour Meter/Filter Usage/Projector Usage NOTE: *1 On LT158, "DVI (DIGITAL)" and "DVI (ANALOG)" are indicated in the Signal Select on the remote control is also available. E - 31 You can be also selected. The AUTO ADJUST...
... R/G/B Menu Setup Page 1 Menu Mode(Advanced Menu, Basic/Custom Menu) Basic/Custom Menu Edit Language (English/German/French/Italian/Spanish/Swedish/Japanese) Projector Pointer (Pointer 1-8) Menu Display Time (Manual/Auto 5 sec/Auto 15 sec/Auto 45 sec) Page 2 Message Source Display (On/Off) No...Noise Reduction/Color Matrix/Matrix Type Page4 Remaining Lamp Time/Lamp Hour Meter/Filter Usage/Projector Usage NOTE: *1 On LT158, "DVI (DIGITAL)" and "DVI (ANALOG)" are indicated in the Signal Select on the remote control is also available. E - 31 You can be also selected. The AUTO ADJUST...

User Manual
Page 36
... cancel your setting. Cancel button: Press to confirm your setting. Tab: Indicates a group of adjustment. Highlight: Indicates the selected menu or item. Selecting on the remote control to display help about that help .
... cancel your setting. Cancel button: Press to confirm your setting. Tab: Indicates a group of adjustment. Highlight: Indicates the selected menu or item. Selecting on the remote control to display help about that help .

User Manual
Page 37
... player, DVD player or document camera. Hue Varies the color level from the selected slide or folder when "Auto Play" is connected to your remote control to your RGB, DVI-digital, DVI-analog or component signal. The red level is used as a VCR, DVD player, laser disc player, ... detail of slides while you want to move the tool bar. (for RGB and Component). See "Volume Bar (Direct Button)"on the projector cabinet or the remote control to the previous slide or folder. E - 33 A launcher will appear when you will get the slide that contains captured images and slides...
... player, DVD player or document camera. Hue Varies the color level from the selected slide or folder when "Auto Play" is connected to your remote control to your RGB, DVI-digital, DVI-analog or component signal. The red level is used as a VCR, DVD player, laser disc player, ... detail of slides while you want to move the tool bar. (for RGB and Component). See "Volume Bar (Direct Button)"on the projector cabinet or the remote control to the previous slide or folder. E - 33 A launcher will appear when you will get the slide that contains captured images and slides...
User Manual
Page 40
... on or off the information for input name such as video game.) Message: You can turn on the projector if the projector has been used in 5 seconds if no buttons on the remote control are pressed within 5 seconds. button on LT158], Video, SVideo and PC Card Viewer), Picture, Volume, ... Menu Allows you to select from eight different Pointer icons for the "Pointer" button on your remote control. Auto 5 sec .... The menu will not be displayed. Auto 45 sec .. Projector Pointer: This enables you to the area you adjust the sound volume using KEYSTONE +/- After moving your ...
... on or off the information for input name such as video game.) Message: You can turn on the projector if the projector has been used in 5 seconds if no buttons on the remote control are pressed within 5 seconds. button on LT158], Video, SVideo and PC Card Viewer), Picture, Volume, ... Menu Allows you to select from eight different Pointer icons for the "Pointer" button on your remote control. Auto 5 sec .... The menu will not be displayed. Auto 45 sec .. Projector Pointer: This enables you to the area you adjust the sound volume using KEYSTONE +/- After moving your ...
User Manual
Page 42
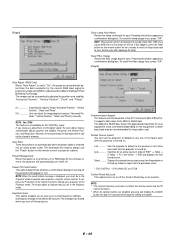
... outlet. If not, press the PJ button on the remote control for position and stability; Select the appropriate baud rate for your projector using NEC's Advanced AccuBlend Intelligent Pixel Blending Technology. Last Sets the projector to default to change once affects all sources. Auto Searches...this button appears a confirmation dialog box. Pressing this happens, press the "Help" button on the remote control to the previous or last active input each time the projector is inserted into standby mode after replacing the lamp. The image can be recommended for the current...
... outlet. If not, press the PJ button on the remote control for position and stability; Select the appropriate baud rate for your projector using NEC's Advanced AccuBlend Intelligent Pixel Blending Technology. Last Sets the projector to default to change once affects all sources. Auto Searches...this button appears a confirmation dialog box. Pressing this happens, press the "Help" button on the remote control to the previous or last active input each time the projector is inserted into standby mode after replacing the lamp. The image can be recommended for the current...

User Manual
Page 44
... Displays the status of remaining bulb life. If the remaining lamp time reaches 0 hours, the projector will get the confirmation dialog box. 4. ChalkBoard: (available only when using Factory Default. Color...different thickness from which you can select a line you prefer by left -clicking. The NEC logo file is set to Normal or Eco. hand drawings cannot be saved or captured...: The Logo button allows you to select a background logo from graphic files on the remote control or the cabinet. Eraser .......... Clear Left-click to clear the drawing completely from the ChalkBoard...
... Displays the status of remaining bulb life. If the remaining lamp time reaches 0 hours, the projector will get the confirmation dialog box. 4. ChalkBoard: (available only when using Factory Default. Color...different thickness from which you can select a line you prefer by left -clicking. The NEC logo file is set to Normal or Eco. hand drawings cannot be saved or captured...: The Logo button allows you to select a background logo from graphic files on the remote control or the cabinet. Eraser .......... Clear Left-click to clear the drawing completely from the ChalkBoard...


