42XM5/50XM6/60XM5 UM
Page 3
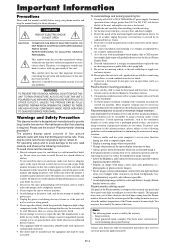
... turn off . Unplug the power cord during use with any phosphor-based display (like a CRT monitor, for future reference. This equipment shall be used over the life of a Plasma Display Panel. 8. Continued operation at line voltages greater than cleaning is the case with a computer input source....some cells that will best suit your dealer for 60 minutes to service or repair the unit. Plasma monitor driving sound The panel of the Plasma monitor is particularly hot, move the monitor to a cooler location, and wait for service. 2. You may be susceptible to image retention ...
... turn off . Unplug the power cord during use with any phosphor-based display (like a CRT monitor, for future reference. This equipment shall be used over the life of a Plasma Display Panel. 8. Continued operation at line voltages greater than cleaning is the case with a computer input source....some cells that will best suit your dealer for 60 minutes to service or repair the unit. Plasma monitor driving sound The panel of the Plasma monitor is particularly hot, move the monitor to a cooler location, and wait for service. 2. You may be susceptible to image retention ...
42XM5/50XM6/60XM5 UM
Page 4
...the minimum level. This Class B digital apparatus complies with a three-wire grounding (earthed) plug - This effort will help . To plasma monitor core En-3 If you use an RGB cable (not supplied), use an RGB cable including the ferrite core (not supplied) on ...supplied) WARNING This product equipped with Canadian ICES-003. Do not defeat the safety purpose of the grounding plug. This includes plasma monitors and their electrical accessories. After collecting the used product EU-wide legislation as the negative impact to provide reasonable protection against harmful...
...the minimum level. This Class B digital apparatus complies with a three-wire grounding (earthed) plug - This effort will help . To plasma monitor core En-3 If you use an RGB cable (not supplied), use an RGB cable including the ferrite core (not supplied) on ...supplied) WARNING This product equipped with Canadian ICES-003. Do not defeat the safety purpose of the grounding plug. This includes plasma monitors and their electrical accessories. After collecting the used product EU-wide legislation as the negative impact to provide reasonable protection against harmful...

42XM5/50XM6/60XM5 UM
Page 5
...the timer En-30 Setting the power on mode En-32 Enabling/disabling the front panel controls En-32 Enabling/disabling remote control wireless transmission En-33 Front View En-8 ... definition images to suit the movie En-26 Contents En-4 Contents of Signals Supported En-42 Adjusting the picture En-21 Setting the picture mode according to RGB1 terminal ... En-24...22 Making the Low Tone adjustments En-22 Adjusting the colors En-22 Contents of the Package Ⅺ Plasma monitor (ן1) Ⅺ Power cord (ן1, 3 m/9.8 feet) Audio Settings Menu ...
...the timer En-30 Setting the power on mode En-32 Enabling/disabling the front panel controls En-32 Enabling/disabling remote control wireless transmission En-33 Front View En-8 ... definition images to suit the movie En-26 Contents En-4 Contents of Signals Supported En-42 Adjusting the picture En-21 Setting the picture mode according to RGB1 terminal ... En-24...22 Making the Low Tone adjustments En-22 Adjusting the colors En-22 Contents of the Package Ⅺ Plasma monitor (ן1) Ⅺ Power cord (ן1, 3 m/9.8 feet) Audio Settings Menu ...
42XM5/50XM6/60XM5 UM
Page 6
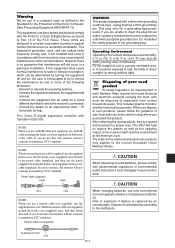
...; Make sure to move or install the device with the screen face down (See Drawing B). Lay the protective sheet, which was wrapped around the monitor when it was packaged, beneath the screen surface so as shown on its own. Wall 50 mm (2") 50 mm (2") 50 mm (2") En-5... Installation You can attach your optional mounts or stand to the plasma monitor in one person(s). * Use only a mounting kit or stand recommended by improper installation. CAUTION • Install the device following two ways: * While...
...; Make sure to move or install the device with the screen face down (See Drawing B). Lay the protective sheet, which was wrapped around the monitor when it was packaged, beneath the screen surface so as shown on its own. Wall 50 mm (2") 50 mm (2") 50 mm (2") En-5... Installation You can attach your optional mounts or stand to the plasma monitor in one person(s). * Use only a mounting kit or stand recommended by improper installation. CAUTION • Install the device following two ways: * While...

42XM5/50XM6/60XM5 UM
Page 7
... amplifier is particularly recommended when creating a 3ן3 (or greater) video wall. • When looping from another plasma display, set the LOOP OUT to the respective monitor INPUT terminals. • Being used for either INPUT or OUTPUT. Clampers are designed to be turned ON while signals are input...capability, you can be placed on the ends of q to another unit as it outward. Cables can be routed to the display. 42XM5 50XM6 60XM5 Back of the unit Back of the unit Back of the unit mounting holes mounting holes mounting holes To attach Insert q ...
... amplifier is particularly recommended when creating a 3ן3 (or greater) video wall. • When looping from another plasma display, set the LOOP OUT to the respective monitor INPUT terminals. • Being used for either INPUT or OUTPUT. Clampers are designed to be turned ON while signals are input...capability, you can be placed on the ends of q to another unit as it outward. Cables can be routed to the display. 42XM5 50XM6 60XM5 Back of the unit Back of the unit Back of the unit mounting holes mounting holes mounting holes To attach Insert q ...
42XM5/50XM6/60XM5 UM
Page 8
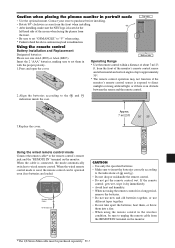
... RIGHT/ + / EXIT Bottom side Operating Range * Use the remote control within a distance of the screen when facing the plasma from the REMOTE IN terminal on the monitor. When the wired remote control mode is located at horizontal and vertical angles of and . • Do not drop or ... to purchase before installing. • Rotate 90° clockwise as seen from the front when installing. • After installing, make sure the NEC logo is used, the remote control can be purchased separately. Contact your store to wired remote control. Approx. 7 m/23 ft Using the wired...
... RIGHT/ + / EXIT Bottom side Operating Range * Use the remote control within a distance of the screen when facing the plasma from the REMOTE IN terminal on the monitor. When the wired remote control mode is located at horizontal and vertical angles of and . • Do not drop or ... to purchase before installing. • Rotate 90° clockwise as seen from the front when installing. • After installing, make sure the NEC logo is used, the remote control can be purchased separately. Contact your store to wired remote control. Approx. 7 m/23 ft Using the wired...
42XM5/50XM6/60XM5 UM
Page 9
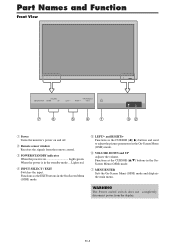
INPUT SELECT RIGHT/ + / EXIT 7 6 5 4 1 32 q Power Turns the monitor's power on Lights green. w Remote sensor window Receives the signals from the display. e POWER/STANDBY indicator When the power is in the On-Screen Menu (...
INPUT SELECT RIGHT/ + / EXIT 7 6 5 4 1 32 q Power Turns the monitor's power on Lights green. w Remote sensor window Receives the signals from the display. e POWER/STANDBY indicator When the power is in the On-Screen Menu (...
42XM5/50XM6/60XM5 UM
Page 10
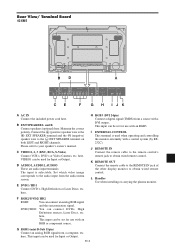
... wired remote control. I JK A AC IN Connect the included power cord here. This input can be used for Input or Output. Rear View/ Terminal Board 42XM5 L VIDEO AUDIO 1 DVD1 / HD1 AUDIO 2 RGB2 / DVD2 / HD2 L/R Y Cb/Pb Cr/Pr L/R R/Cr/Pr G/Y B/Cb/Pb HD VD RGB 1 (IN/OUT) AUDIO... from a source with an RGB3. D AUDIO1, AUDIO2, AUDIO3 These are audio input terminals. L Handles Use when installing or carrying the plasma monitor. Set which video image corresponds to the audio input from the audio menu screen. DVD2/ HD2: You can connect an analog RGB signal ...
... wired remote control. I JK A AC IN Connect the included power cord here. This input can be used for Input or Output. Rear View/ Terminal Board 42XM5 L VIDEO AUDIO 1 DVD1 / HD1 AUDIO 2 RGB2 / DVD2 / HD2 L/R Y Cb/Pb Cr/Pr L/R R/Cr/Pr G/Y B/Cb/Pb HD VD RGB 1 (IN/OUT) AUDIO... from a source with an RGB3. D AUDIO1, AUDIO2, AUDIO3 These are audio input terminals. L Handles Use when installing or carrying the plasma monitor. Set which video image corresponds to the audio input from the audio menu screen. DVD2/ HD2: You can connect an analog RGB signal ...
42XM5/50XM6/60XM5 UM
Page 11
... to the audio input from a computer, etc. This input can connect DVDs, High Definition sources, Laser Discs, etc. L Handles Use when installing or carrying the plasma monitor. En-10 B EXT SPEAKER L and R Connect speakers (optional) here. C VIDEO1, 2, 3 (BNC, RCA, S-Video) Connect VCR's, DVD's or Video ... This input can connect an analog RGB signal and the syncronization signal. This input can be used when operating and controlling the monitor externally with a DVI output. Maintain the correct polarity. VIDEO1 can be used for Input or Output. D AUDIO1, AUDIO2, ...
... to the audio input from a computer, etc. This input can connect DVDs, High Definition sources, Laser Discs, etc. L Handles Use when installing or carrying the plasma monitor. En-10 B EXT SPEAKER L and R Connect speakers (optional) here. C VIDEO1, 2, 3 (BNC, RCA, S-Video) Connect VCR's, DVD's or Video ... This input can connect an analog RGB signal and the syncronization signal. This input can be used when operating and controlling the monitor externally with a DVI output. Maintain the correct polarity. VIDEO1 can be used for Input or Output. D AUDIO1, AUDIO2, ...

42XM5/50XM6/60XM5 UM
Page 12
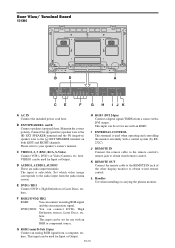
...set for use with an RGB3. This input can be used for Input or Output. L Handles Use when installing or carrying the plasma monitor. Connect the (positive) speaker wire to the EXT SPEAKER terminal and the (negative) speaker wire to obtain wired remote control. ...signal and the syncronization signal. En-11 Please refer to the audio input from a computer, etc. VIDEO1 can be used when operating and controlling the monitor externally with a DVI output. here. B EXT SPEAKER L and R Connect speakers (optional) here. here. Set which video image corresponds to your ...
...set for use with an RGB3. This input can be used for Input or Output. L Handles Use when installing or carrying the plasma monitor. Connect the (positive) speaker wire to the EXT SPEAKER terminal and the (negative) speaker wire to obtain wired remote control. ...signal and the syncronization signal. En-11 Please refer to the audio input from a computer, etc. VIDEO1 can be used when operating and controlling the monitor externally with a DVI output. here. B EXT SPEAKER L and R Connect speakers (optional) here. here. Set which video image corresponds to your ...
42XM5/50XM6/60XM5 UM
Page 13
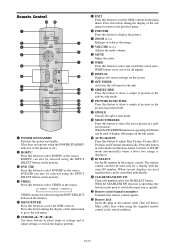
... settings on the screen. !4 OFF TIMER Activates the off .) w RGB/PC Press this button can also be selected using the INPUT SELECT button on the monitor. DVD/HD can also be selected using the supplied remote control in the wired condition. o ZOOM (+ /-) Enlarges or reduces the image. !0 VOLUME (+ /-) ... as the source. Remote Control q POWER ON/STANDBY Switches the power on/standby. (This does not operate when the POWER/STANDBY indicator of the plasma is displayed. @0 ID SELECT Set the ID number in the remote control. When several displays are used only for the unit. !5 SIDE BY ...
... settings on the screen. !4 OFF TIMER Activates the off .) w RGB/PC Press this button can also be selected using the INPUT SELECT button on the monitor. DVD/HD can also be selected using the supplied remote control in the wired condition. o ZOOM (+ /-) Enlarges or reduces the image. !0 VOLUME (+ /-) ... as the source. Remote Control q POWER ON/STANDBY Switches the power on/standby. (This does not operate when the POWER/STANDBY indicator of the plasma is displayed. @0 ID SELECT Set the ID number in the remote control. When several displays are used only for the unit. !5 SIDE BY ...

42XM5/50XM6/60XM5 UM
Page 14
... the unit) to increase to display the pointer. ( ) To change the picture position: Select the position with the remote control). press again to the monitor. The pointer will reduce the picture and return it reaches zero. A slight current is displayed, then turns off . → 30 → 60 ...OFF TIMER 0 Note: After the power is set (only when turning off timer ... Plug the power cord into an active AC power outlet. 2. The monitor's POWER/STANDBY indicator will be set , press the OFF TIMER button once. 2. Press the OFF TIMER button twice in a row. 2. Press and hold...
... the unit) to increase to display the pointer. ( ) To change the picture position: Select the position with the remote control). press again to the monitor. The pointer will reduce the picture and return it reaches zero. A slight current is displayed, then turns off . → 30 → 60 ...OFF TIMER 0 Note: After the power is set (only when turning off timer ... Plug the power cord into an active AC power outlet. 2. The monitor's POWER/STANDBY indicator will be set , press the OFF TIMER button once. 2. Press the OFF TIMER button twice in a row. 2. Press and hold...
42XM5/50XM6/60XM5 UM
Page 16
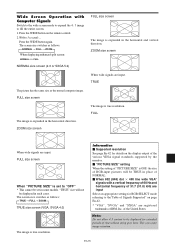
...size screen When "PICTURE SIZE" is expanded in the horizontal direction. Note: Do not allow 4:3 content to the"Table of Signals Supported" on page En-42. * "VGA", "SVGA" and "SXGA" are registered trademarks of time without using gray bars. The screen size switches as follows: → NORMAL &#...as the normal computer image. Information Ⅵ Supported resolution See page En-42 for extended periods of IBM, Inc. Press the WIDE button on the display output of the various VESA signal standards supported by the monitor. Ⅵ "PICTURE SIZE" setting When the setting of "PICTURE SIZE"...
...size screen When "PICTURE SIZE" is expanded in the horizontal direction. Note: Do not allow 4:3 content to the"Table of Signals Supported" on page En-42. * "VGA", "SVGA" and "SXGA" are registered trademarks of time without using gray bars. The screen size switches as follows: → NORMAL &#...as the normal computer image. Information Ⅵ Supported resolution See page En-42 for extended periods of IBM, Inc. Press the WIDE button on the display output of the various VESA signal standards supported by the monitor. Ⅵ "PICTURE SIZE" setting When the setting of "PICTURE SIZE"...
42XM5/50XM6/60XM5 UM
Page 18
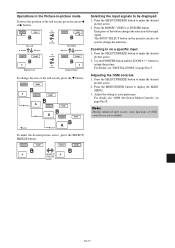
... B A ᮢ button VIDEO1 RGB1 ᮢ button B A VIDEO1 RGB1 ᮢ button ᮢ button B A To make the desired picture active. 2. For details, see "DIGITAL ZOOM" on the monitor can also be displayed 1. Press the MENU/ENTER button to make the desired picture active, press the SELECT/ FREEZE button. For details, see "OSM (On...
... B A ᮢ button VIDEO1 RGB1 ᮢ button B A VIDEO1 RGB1 ᮢ button ᮢ button B A To make the desired picture active. 2. For details, see "DIGITAL ZOOM" on the monitor can also be displayed 1. Press the MENU/ENTER button to make the desired picture active, press the SELECT/ FREEZE button. For details, see "OSM (On...
42XM5/50XM6/60XM5 UM
Page 27
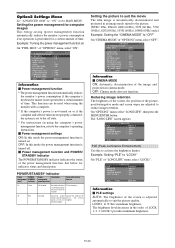
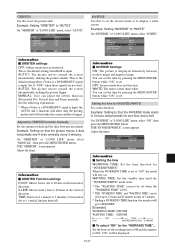
...2, 3: Sets maximum brightness. MGT." EXIT RETURN 2 / 4 Information Ⅵ Power management function * The power management function automatically reduces the monitor's power consumption if the computer's keyboard or mouse is performed for a certain amount of time. The "LONG LIFE" screen appears. ADJ. ...decreases in cinema mode. Setting the power management for computer images This energy-saving (power management) function automatically reduces the monitor's power consumption if no operation is not operated for a certain amount of time. See below for indicator status and...
...2, 3: Sets maximum brightness. MGT." EXIT RETURN 2 / 4 Information Ⅵ Power management function * The power management function automatically reduces the monitor's power consumption if the computer's keyboard or mouse is performed for a certain amount of time. The "LONG LIFE" screen appears. ADJ. ...decreases in cinema mode. Setting the power management for computer images This energy-saving (power management) function automatically reduces the monitor's power consumption if no operation is not operated for a certain amount of time. See below for indicator status and...
42XM5/50XM6/60XM5 UM
Page 28
... not function. Adjust the ORBITER function manually Set the amount of "LONG LIFE" menu, select "AUTO2". On "ORBITER" of 3 minutes. * Ending a WORKING TIME function, the monitor will not make the screen smaller or bigger. THE "ORBITER" screen appears. You can set . OFF: Inverse mode does not function. Adjust the times. ADJ...
... not function. Adjust the ORBITER function manually Set the amount of "LONG LIFE" menu, select "AUTO2". On "ORBITER" of 3 minutes. * Ending a WORKING TIME function, the monitor will not make the screen smaller or bigger. THE "ORBITER" screen appears. You can set . OFF: Inverse mode does not function. Adjust the times. ADJ...
42XM5/50XM6/60XM5 UM
Page 34
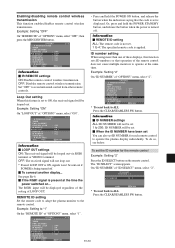
... see below. The "ID SELECT" screen appears. ADJ. OFF: Disables remote control wireless transmission. REMOTE ID setting Set the remote code to adapt the plasma monitor to avoid unwanted control from other remote controls. EXIT RETURN 3 / 4 * To reset back to ALL Press the CLEAR/SEAMLESS SW button. On "... ID NUMBER : ALL VIDEO WALL NEXT PAGE SEL. ADJ. Example: Setting "OFF" On "IR REMOTE" of the remote control does not cause multiple monitors to 4: The specified remote code is set . 1 to operate at the time the power switched on the remote control. ON MODE CONTROL LOCK : ...
... see below. The "ID SELECT" screen appears. ADJ. OFF: Disables remote control wireless transmission. REMOTE ID setting Set the remote code to adapt the plasma monitor to avoid unwanted control from other remote controls. EXIT RETURN 3 / 4 * To reset back to ALL Press the CLEAR/SEAMLESS SW button. On "... ID NUMBER : ALL VIDEO WALL NEXT PAGE SEL. ADJ. Example: Setting "OFF" On "IR REMOTE" of the remote control does not cause multiple monitors to 4: The specified remote code is set . 1 to operate at the time the power switched on the remote control. ON MODE CONTROL LOCK : ...
42XM5/50XM6/60XM5 UM
Page 36
...are the same functions as ID2, etc. In the case shown below . Example: Adjusting the vertical position Use this function is set "ON", connect your plasma displays with the remote cable (not supplied). MODE : SPLIT AUTO ID : OFF IMAGE ADJUST P. On "P. VIDEO WALL DIVIDER : 1 POSITION DISP. MODE2:...No.2 No.4 No.3 Display 4 REMOTE OUT REMOTE IN No.1 No.2 No.4 No.3 REMOTE IN Display 3 (Video wall modes other than 3 seconds, the monitor will automatically turn on . OFF: Turns on the main power of all displays at the same time. (Only for more delayed. REMOTE is set to...
...are the same functions as ID2, etc. In the case shown below . Example: Adjusting the vertical position Use this function is set "ON", connect your plasma displays with the remote cable (not supplied). MODE : SPLIT AUTO ID : OFF IMAGE ADJUST P. On "P. VIDEO WALL DIVIDER : 1 POSITION DISP. MODE2:...No.2 No.4 No.3 Display 4 REMOTE OUT REMOTE IN No.1 No.2 No.4 No.3 REMOTE IN Display 3 (Video wall modes other than 3 seconds, the monitor will automatically turn on . OFF: Turns on the main power of all displays at the same time. (Only for more delayed. REMOTE is set to...
42XM5/50XM6/60XM5 UM
Page 40
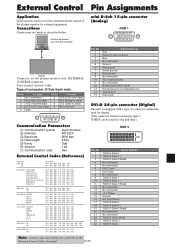
...sync or Composite sync Vertical sync Data clock DVI-D 24-pin connector (Digital) The unit is equipped with a type of the plasma monitor by external equipment. Use a crossed (reverse) cable. Note: Contact your local dealer for one link only.) Communication Parameters (1) Communication... 9 Pin No. 1 2 3 4 5 6 7 8 9 10 11 12 13 14 15 Signal (Analog) Red Green or sync-on the plasma monitor side: EXTERNAL CONTROL connector. Connections Connections are made as described below. Pin Name Pin No. External Control Pin Assignments Application These specifications cover the communications...
...sync or Composite sync Vertical sync Data clock DVI-D 24-pin connector (Digital) The unit is equipped with a type of the plasma monitor by external equipment. Use a crossed (reverse) cable. Note: Contact your local dealer for one link only.) Communication Parameters (1) Communication... 9 Pin No. 1 2 3 4 5 6 7 8 9 10 11 12 13 14 15 Signal (Analog) Red Green or sync-on the plasma monitor side: EXTERNAL CONTROL connector. Connections Connections are made as described below. Pin Name Pin No. External Control Pin Assignments Application These specifications cover the communications...
42XM5/50XM6/60XM5 UM
Page 41
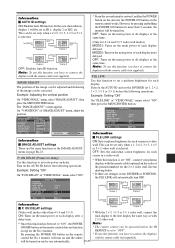
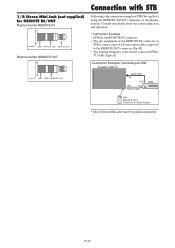
...the remote control of STB is the connection example of STB (Set-top Box) using the REMOTE IN/OUT connectors of the plasma monitor. Connection Example: Connecting an STB PLASMA DISPLAY Video cable IN OUT OUT IN Remote cable* STB STB Remote Control Carrier fHz: 37.9 kHz (Typical) * The ...1/8 Stereo Mini cable must be purchased separately. 1/8 Stereo Mini Jack (not supplied) for REMOTE IN/OUT Plasma monitor REMOTE IN GND DATA (DC +5 V) VDD (DC +3 V) Plasma monitor REMOTE OUT GND DATA (C-MOS DC +5 V) Connection with STB Following is 37.9 kHz (Typical).
...the remote control of STB is the connection example of STB (Set-top Box) using the REMOTE IN/OUT connectors of the plasma monitor. Connection Example: Connecting an STB PLASMA DISPLAY Video cable IN OUT OUT IN Remote cable* STB STB Remote Control Carrier fHz: 37.9 kHz (Typical) * The ...1/8 Stereo Mini cable must be purchased separately. 1/8 Stereo Mini Jack (not supplied) for REMOTE IN/OUT Plasma monitor REMOTE IN GND DATA (DC +5 V) VDD (DC +3 V) Plasma monitor REMOTE OUT GND DATA (C-MOS DC +5 V) Connection with STB Following is 37.9 kHz (Typical).


