42XM5/50XM6/60XM5 UM
Page 3
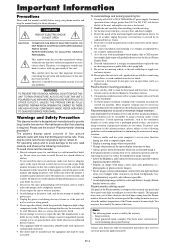
... use with many colors and color gradations (i.e. Note: The following guidelines and recommendations for example) light output will shorten the life of the ventilation areas must be turned off the power to the monitor and unplug the power cord. En-2 REFER SERVICING TO QUALIFIED SERVICE PERSONNEL. Therefore, it is designed and manufactured to provide long, trouble-free service. No maintenance other gas plasma displays, plasma monitors can result in image...
... use with many colors and color gradations (i.e. Note: The following guidelines and recommendations for example) light output will shorten the life of the ventilation areas must be turned off the power to the monitor and unplug the power cord. En-2 REFER SERVICING TO QUALIFIED SERVICE PERSONNEL. Therefore, it is designed and manufactured to provide long, trouble-free service. No maintenance other gas plasma displays, plasma monitors can result in image...

42XM5/50XM6/60XM5 UM
Page 5
... time En-13 To cancel the off timer En-13 WIDE Operations En-14 Wide Screen Operation (manual En-14 When viewing videos or digital video discs En-14 Wide Screen Operation with STB En-40 Troubleshooting En-41 Picture Settings Menu En-21 Table of Signals Supported En-42 Adjusting the picture En-21 Setting the picture mode according to the brightness of the room En-21 Specifications En-46 Limited Warranty Plasma Monitors...
... time En-13 To cancel the off timer En-13 WIDE Operations En-14 Wide Screen Operation (manual En-14 When viewing videos or digital video discs En-14 Wide Screen Operation with STB En-40 Troubleshooting En-41 Picture Settings Menu En-21 Table of Signals Supported En-42 Adjusting the picture En-21 Setting the picture mode according to the brightness of the room En-21 Specifications En-46 Limited Warranty Plasma Monitors...

42XM5/50XM6/60XM5 UM
Page 7
... cable). • If the image quality is poor, do not connect an OUTPUT signal from plasma to plasma, a 1 m to 2 m (3.3 feet to 6.6 feet) 15 pin male D-Sub - 5BNC conversion cable is required. To detach Using pliers, twist the clamper 90° and pull it may get damaged when removed. Video signal RGB/DVD/HD signal VIDEO Signal IN Remote control IN RGB signal/ DVD/HD signal IN Remote control IN RCA phono plug VIDEO 2 AUDIO 1 R DVD1 / HD1 AUDIO...
... cable). • If the image quality is poor, do not connect an OUTPUT signal from plasma to plasma, a 1 m to 2 m (3.3 feet to 6.6 feet) 15 pin male D-Sub - 5BNC conversion cable is required. To detach Using pliers, twist the clamper 90° and pull it may get damaged when removed. Video signal RGB/DVD/HD signal VIDEO Signal IN Remote control IN RGB signal/ DVD/HD signal IN Remote control IN RCA phono plug VIDEO 2 AUDIO 1 R DVD1 / HD1 AUDIO...
42XM5/50XM6/60XM5 UM
Page 10
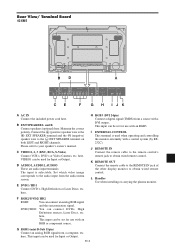
.... here. K REMOTE OUT Connect the remote cable to the REMOTE IN jack of the other display monitor to your speaker's owner's manual. G RGB1 (mini D-Sub 15pin) Connect an analog RGB signal from a source with an RGB3. here. C VIDEO1, 2, 3 (BNC, RCA, S-Video) Connect VCR's, DVD's or Video Cameras, etc. I JK A AC IN Connect the included power cord here. This input can be used for use with a control system (by RS232C). Rear View/ Terminal Board 42XM5 L VIDEO AUDIO 1 DVD1 / HD1 AUDIO 2 RGB2 / DVD2...
.... here. K REMOTE OUT Connect the remote cable to the REMOTE IN jack of the other display monitor to your speaker's owner's manual. G RGB1 (mini D-Sub 15pin) Connect an analog RGB signal from a source with an RGB3. here. C VIDEO1, 2, 3 (BNC, RCA, S-Video) Connect VCR's, DVD's or Video Cameras, etc. I JK A AC IN Connect the included power cord here. This input can be used for use with a control system (by RS232C). Rear View/ Terminal Board 42XM5 L VIDEO AUDIO 1 DVD1 / HD1 AUDIO 2 RGB2 / DVD2...
42XM5/50XM6/60XM5 UM
Page 11
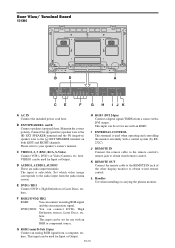
... and the (negative) speaker wire to obtain wired remote control. D AUDIO1, AUDIO2, AUDIO3 These are audio input terminals. H RGB3 (DVI 24pin) Connect a digital signal (TMDS) from a source with an RGB3. En-10 Please refer to obtain wired remote control. This input can be used for use with a DVI output. L Handles Use when installing or carrying the plasma monitor. here. VIDEO1 can be set for Input or Output. Rear View/ Terminal Board 50XM6 L VIDEO AUDIO 1 DVD1 / HD1 AUDIO 2 RGB2 / DVD2 / HD2...
... and the (negative) speaker wire to obtain wired remote control. D AUDIO1, AUDIO2, AUDIO3 These are audio input terminals. H RGB3 (DVI 24pin) Connect a digital signal (TMDS) from a source with an RGB3. En-10 Please refer to obtain wired remote control. This input can be used for use with a DVI output. L Handles Use when installing or carrying the plasma monitor. here. VIDEO1 can be set for Input or Output. Rear View/ Terminal Board 50XM6 L VIDEO AUDIO 1 DVD1 / HD1 AUDIO 2 RGB2 / DVD2 / HD2...

42XM5/50XM6/60XM5 UM
Page 12
... and RIGHT channels. F RGB2/ DVD2/ HD2 RGB2: You can connect DVDs, High Definition sources, Laser Discs, etc. C VIDEO1, 2, 3 (BNC, RCA, S-Video) Connect VCR's, DVD's or Video Cameras, etc. I JK A AC IN Connect the included power cord here. This input can be used for Input or Output. The input is used when operating and controlling the monitor externally with a DVI output. This input can be set for use with an RGB3. Rear View/ Terminal Board 60XM5 L VIDEO AUDIO 1 DVD1 / HD1 AUDIO 2 RGB2...
... and RIGHT channels. F RGB2/ DVD2/ HD2 RGB2: You can connect DVDs, High Definition sources, Laser Discs, etc. C VIDEO1, 2, 3 (BNC, RCA, S-Video) Connect VCR's, DVD's or Video Cameras, etc. I JK A AC IN Connect the included power cord here. This input can be used for Input or Output. The input is used when operating and controlling the monitor externally with a DVI output. This input can be set for use with an RGB3. Rear View/ Terminal Board 60XM5 L VIDEO AUDIO 1 DVD1 / HD1 AUDIO 2 RGB2...
42XM5/50XM6/60XM5 UM
Page 16
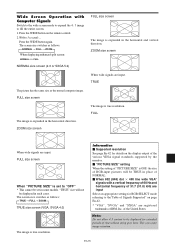
... Signals Switch to the wide screen mode to expand the 4 : 3 image to fill the entire screen. 1. Press the WIDE button again. Information Ⅵ Supported resolution See page En-42 for details on the display output of the various VESA signal standards supported by the monitor. Ⅵ "PICTURE SIZE" setting When the setting of "PICTURE SIZE" is expanded in the horizontal direction. TRUE The picture has the same size as the normal computer image. ZOOM size screen The image...
... Signals Switch to the wide screen mode to expand the 4 : 3 image to fill the entire screen. 1. Press the WIDE button again. Information Ⅵ Supported resolution See page En-42 for details on the display output of the various VESA signal standards supported by the monitor. Ⅵ "PICTURE SIZE" setting When the setting of "PICTURE SIZE" is expanded in the horizontal direction. TRUE The picture has the same size as the normal computer image. ZOOM size screen The image...
42XM5/50XM6/60XM5 UM
Page 21
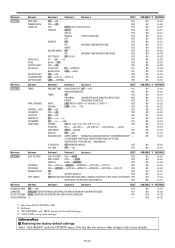
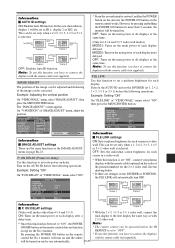
... the factory default settings Select "ALL RESET" under the OPTION1 menu. ON MODE CONTROL LOCK IR REMOTE LOOP OUT REMOTE ID ID NUMBER VIDEO WALL Sub menu 2 Sub menu 3 Sub menu 4 RESET PRESENT TIME DAYLIGHT SAVING TIME OFF←→ON NO DAY/HOUR/MINUTES NO TIMER OFF YES PROGRAM DAY/ON/OFF(HOUR, MINUTES)/INPUT/FUNC. CINEMA MODE LONG LIFE GRAY LEVEL S1/S2 PICTURE SIZE*3 DVI SET UP PROTOCOL SET CLOSECAPTION CAPTION CONT Sub menu 2 Sub menu 3 Sub menu 4 OFF...
... the factory default settings Select "ALL RESET" under the OPTION1 menu. ON MODE CONTROL LOCK IR REMOTE LOOP OUT REMOTE ID ID NUMBER VIDEO WALL Sub menu 2 Sub menu 3 Sub menu 4 RESET PRESENT TIME DAYLIGHT SAVING TIME OFF←→ON NO DAY/HOUR/MINUTES NO TIMER OFF YES PROGRAM DAY/ON/OFF(HOUR, MINUTES)/INPUT/FUNC. CINEMA MODE LONG LIFE GRAY LEVEL S1/S2 PICTURE SIZE*3 DVI SET UP PROTOCOL SET CLOSECAPTION CAPTION CONT Sub menu 2 Sub menu 3 Sub menu 4 OFF...

42XM5/50XM6/60XM5 UM
Page 22
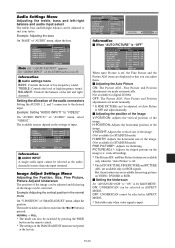
...: More blue Information Ⅵ Types of noise reduction. Setting the color temperature Use this to reset the picture to poor reception or when playing video tapes on which you are three types of picture modes THEAT. 1, 2: Set this mode when watching video in movie theaters. Picture Settings Menu Adjusting the picture The contrast, brightness, sharpness, color and tint can be adjusted when a computer signal is connected. Ⅵ Restoring the factory default settings Select "DEFAULT" under the "PICTURE MODE" settings.
...: More blue Information Ⅵ Types of noise reduction. Setting the color temperature Use this to reset the picture to poor reception or when playing video tapes on which you are three types of picture modes THEAT. 1, 2: Set this mode when watching video in movie theaters. Picture Settings Menu Adjusting the picture The contrast, brightness, sharpness, color and tint can be adjusted when a computer signal is connected. Ⅵ Restoring the factory default settings Select "DEFAULT" under the "PICTURE MODE" settings.
42XM5/50XM6/60XM5 UM
Page 24
... vertical size of the image. (Not available for STADIUM mode) H-WIDTH: Adjusts the horizontal size of the left /right balance can also be switched by pressing the WIDE button on the remote control. * The settings on the IMAGE ADJUST menu are available only when the "Auto Picture" is input. ON: UNDERSCAN can 't be selected as follows each time the ᮤ or ᮣ button is off . * TheAUTO PICTURE, FINE PICTURE and PICTURE ADJ. Audio Settings Menu Adjusting...
... vertical size of the image. (Not available for STADIUM mode) H-WIDTH: Adjusts the horizontal size of the left /right balance can also be switched by pressing the WIDE button on the remote control. * The settings on the IMAGE ADJUST menu are available only when the "Auto Picture" is input. ON: UNDERSCAN can 't be selected as follows each time the ᮤ or ᮣ button is off . * TheAUTO PICTURE, FINE PICTURE and PICTURE ADJ. Audio Settings Menu Adjusting...

42XM5/50XM6/60XM5 UM
Page 26
... Vision" signal format 1080A: Special Digital broadcasts (for the INPUT SELECT button on the unit. Resetting to the default values Use these operations to restore all signals. On "ALL RESET" of the signal, scan and display all the settings (PICTURE, AUDIO, IMAGE ADJUST, OPTION1~4, etc.) to "1035I" On "HD SELECT" of "OPTION1" menu, select "1035I". EXIT RETURN 1 / 4 Information Ⅵ HD SELECT modes These 3 modes are being transmitted will be displayed. This setting is...
... Vision" signal format 1080A: Special Digital broadcasts (for the INPUT SELECT button on the unit. Resetting to the default values Use these operations to restore all signals. On "ALL RESET" of the signal, scan and display all the settings (PICTURE, AUDIO, IMAGE ADJUST, OPTION1~4, etc.) to "1035I" On "HD SELECT" of "OPTION1" menu, select "1035I". EXIT RETURN 1 / 4 Information Ⅵ HD SELECT modes These 3 modes are being transmitted will be displayed. This setting is...
42XM5/50XM6/60XM5 UM
Page 28
... the MENU/ENTER button while "ON" is ON. * THE "WORKING TIME" and "WAITING TIME" can set for up to 12 hours and 45 minutes in the vertical direction. Adjust the times. WAITING TIME: Set the standby time until the "INVERSE/WHITE" mode starts. * The "WAITING TIME" can adjust the orbiter function (Horizontal Dot, Vertical Line and Time) manually. AUTO2: The picture moves around the screen intermittently, making the picture bigger. MANUAL: User can not be displayed. Adjust the...
... the MENU/ENTER button while "ON" is ON. * THE "WORKING TIME" and "WAITING TIME" can set for up to 12 hours and 45 minutes in the vertical direction. Adjust the times. WAITING TIME: Set the standby time until the "INVERSE/WHITE" mode starts. * The "WAITING TIME" can adjust the orbiter function (Horizontal Dot, Vertical Line and Time) manually. AUTO2: The picture moves around the screen intermittently, making the picture bigger. MANUAL: User can not be displayed. Adjust the...

42XM5/50XM6/60XM5 UM
Page 30
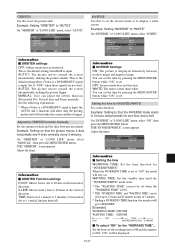
... "PLUG/PLAY" mode to the PC signal. BLACK LEVEL is used . Setting the Protocol set to "HIGH" automatically. Ⅵ BLACK LEVEL settings LOW: When connected to the PC signal. Example: Setting "ON" On "PROTOCOL SET" of "DVI SET UP" menu, select "STB/ DVD". OFF: When NEC protocol is set Use this procedure to switch the setting to the SET TOP BOX, DVD etc. MGT. : OFF CINEMA MODE : ON LONG LIFE GRAY LEVEL : 3 S1/S2 : AUTO PICTURE SIZE : ON DVI SET UP PROTOCOL SET...
... "PLUG/PLAY" mode to the PC signal. BLACK LEVEL is used . Setting the Protocol set to "HIGH" automatically. Ⅵ BLACK LEVEL settings LOW: When connected to the PC signal. Example: Setting "ON" On "PROTOCOL SET" of "DVI SET UP" menu, select "STB/ DVD". OFF: When NEC protocol is set Use this procedure to switch the setting to the SET TOP BOX, DVD etc. MGT. : OFF CINEMA MODE : ON LONG LIFE GRAY LEVEL : 3 S1/S2 : AUTO PICTURE SIZE : ON DVI SET UP PROTOCOL SET...

42XM5/50XM6/60XM5 UM
Page 35
... "VIDEO WALL POSITION" screen appears. EXIT RETURN Information Ⅵ VIDEO WALL POSITION settings 1 Screen: There is no need to each display. MODE" of emergency during video wall setup. ON DELAY : OFF PLE LINK : OFF SEL. AUTO ID 1 2 AUTO ID : ON 1 2 3 4 3 8 9 4 7 6 5 WIRED CABLE CONNECTION TURN ADJ. On "OPTION3" menu, select "VIDEO WALL", then press the MENU/ENTER button. ADJ. EXIT RETURN Note: A contingency method of shutting off the electric power should be used in cases of "VIDEO WALL" menu...
... "VIDEO WALL POSITION" screen appears. EXIT RETURN Information Ⅵ VIDEO WALL POSITION settings 1 Screen: There is no need to each display. MODE" of emergency during video wall setup. ON DELAY : OFF PLE LINK : OFF SEL. AUTO ID 1 2 AUTO ID : ON 1 2 3 4 3 8 9 4 7 6 5 WIRED CABLE CONNECTION TURN ADJ. On "OPTION3" menu, select "VIDEO WALL", then press the MENU/ENTER button. ADJ. EXIT RETURN Note: A contingency method of shutting off the electric power should be used in cases of "VIDEO WALL" menu...
42XM5/50XM6/60XM5 UM
Page 36
... DELAY" of "IMAGE ADJUST" menu, adjust the position. MODE : SPLIT AUTO ID : OFF IMAGE ADJUST P. By pressing the POWER ON button on the remote * To use this function, you have to connect the displays control the No.1 monitor will automatically turn on and the others with 2ן2 video wall. * Once this function, you have to connect the displays with the remote cable (not supplied). * From the second monitor onward, neither the POWER button on the...
... DELAY" of "IMAGE ADJUST" menu, adjust the position. MODE : SPLIT AUTO ID : OFF IMAGE ADJUST P. By pressing the POWER ON button on the remote * To use this function, you have to connect the displays control the No.1 monitor will automatically turn on and the others with 2ן2 video wall. * Once this function, you have to connect the displays with the remote cable (not supplied). * From the second monitor onward, neither the POWER button on the...

42XM5/50XM6/60XM5 UM
Page 42
...; Set an ID number with the ID SELECT button, or set the ID number to ALL. • Plug the monitor's power cord into a power outlet. • Increase the volume. • Press the remote control's MUTE button. • Connect the speakers properly. • Set AUDIO INPUT on the power. • Replace both batteries with VIDEO signal input. POWER/STANDBY indicator is blinking in the standby or off . Monitor's power does not turn on the AUDIO menu correctly. • Adjust picture control as needed . En-41 No sound or picture is blinking...
...; Set an ID number with the ID SELECT button, or set the ID number to ALL. • Plug the monitor's power cord into a power outlet. • Increase the volume. • Press the remote control's MUTE button. • Connect the speakers properly. • Set AUDIO INPUT on the power. • Replace both batteries with VIDEO signal input. POWER/STANDBY indicator is blinking in the standby or off . Monitor's power does not turn on the AUDIO menu correctly. • Adjust picture control as needed . En-41 No sound or picture is blinking...
42XM5/50XM6/60XM5 UM
Page 47
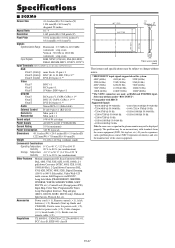
... change without notice. *1 HD/DVD/DTV input signals supported on the plasma monitor may be subject to 900 % Selectable), Video Wall 4-25 multi screens, Self Diagnosis via RS232C, Long Life Mode (PEAK BRIGHT, ORBITER, INVERSE, WHITE, SCREEN WIPER, SOFT FOCUS, etc.), Control Lock (Except power SW), Input Skip, Color Tune, Programmable Timer, Loop Throughout Interface, Plug and play (DDC1, DDC2b, RGB3: DDC2b only), Enhanced Split Screen, Protocol Set, etc. Accessories Power cord (ן1), Remote control...
... change without notice. *1 HD/DVD/DTV input signals supported on the plasma monitor may be subject to 900 % Selectable), Video Wall 4-25 multi screens, Self Diagnosis via RS232C, Long Life Mode (PEAK BRIGHT, ORBITER, INVERSE, WHITE, SCREEN WIPER, SOFT FOCUS, etc.), Control Lock (Except power SW), Input Skip, Color Tune, Programmable Timer, Loop Throughout Interface, Plug and play (DDC1, DDC2b, RGB3: DDC2b only), Enhanced Split Screen, Protocol Set, etc. Accessories Power cord (ן1), Remote control...
42XM5/50XM6/60XM5 UM
Page 48
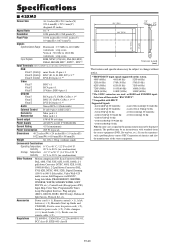
...;1 Sound output 9 W+9 W at 6 ohm Power Supply AC100 V to 240 V 50 Hz/60 Hz Current Rating 5.0 A (maximum) Power Consumption 340 W (typical) Dimensions 48.1 inches(W)ן29.0 inches(H)ן3.9 inches(D) 1222 mm(W)ן736 mm(H)ן99 mm(D) Weight 91.4 lbs / 41.5 kg (without notice. *1 HD/DVD/DTV input signals supported on the plasma monitor may be subject to change without stand) Environmental...
...;1 Sound output 9 W+9 W at 6 ohm Power Supply AC100 V to 240 V 50 Hz/60 Hz Current Rating 5.0 A (maximum) Power Consumption 340 W (typical) Dimensions 48.1 inches(W)ן29.0 inches(H)ן3.9 inches(D) 1222 mm(W)ן736 mm(H)ן99 mm(D) Weight 91.4 lbs / 41.5 kg (without notice. *1 HD/DVD/DTV input signals supported on the plasma monitor may be subject to change without stand) Environmental...

42XM5/50XM6/60XM5 UM
Page 49
... : step scan) Vertical : 50.0 Hz to 120.0 Hz (automatic : step scan) Input Signals RGB, NTSC (3.58/4.43), PAL (B,G,M,N), PAL60, SECAM, HD*1 , DVD*1 , DTV*1 Input Terminals (VIDEO1 and RGB1 can also be subject to 900 % Selectable), Video Wall 4-25 multi screens, Self Diagnosis via RS232C, Long Life Mode (PEAK BRIGHT, ORBITER, INVERSE, WHITE, SCREEN WIPER, SOFT FOCUS, etc.), Control Lock (Except power SW), Input Skip, Color Tune, Programmable Timer, Loop...
... : step scan) Vertical : 50.0 Hz to 120.0 Hz (automatic : step scan) Input Signals RGB, NTSC (3.58/4.43), PAL (B,G,M,N), PAL60, SECAM, HD*1 , DVD*1 , DTV*1 Input Terminals (VIDEO1 and RGB1 can also be subject to 900 % Selectable), Video Wall 4-25 multi screens, Self Diagnosis via RS232C, Long Life Mode (PEAK BRIGHT, ORBITER, INVERSE, WHITE, SCREEN WIPER, SOFT FOCUS, etc.), Control Lock (Except power SW), Input Skip, Color Tune, Programmable Timer, Loop...
42XM5/50XM6/60XM5 UM
Page 50
.... d. Removal or installation of America. e. Cartons, carrying cases, batteries, external cabinets, magnetic tapes, or any accessories used in any mailing your product, consult the dealer from whom the product was purchased. 3. HOW YOU CAN GET WARRANTY SERVICE 1. LIMITATIONS OF LIABILITY Except for the obligations specifically set forth in this warranty statement, we will meet specifications of the original parts...
.... d. Removal or installation of America. e. Cartons, carrying cases, batteries, external cabinets, magnetic tapes, or any accessories used in any mailing your product, consult the dealer from whom the product was purchased. 3. HOW YOU CAN GET WARRANTY SERVICE 1. LIMITATIONS OF LIABILITY Except for the obligations specifically set forth in this warranty statement, we will meet specifications of the original parts...


