
42XM5/50XM6/60XM5 UM
Page 3
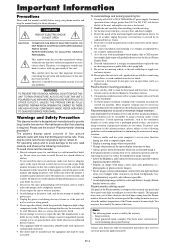
... THE RISK OF ELECTRIC SHOCK, DO NOT REMOVE COVER. REFRAIN FROM OPENING THE CABINET AS THERE ARE HIGH-VOLTAGE COMPONENTS INSIDE. The plasma display panel consists of contact with a protective earth-ground connection. 9. Do not open the back cover. The manufacturer is particularly hot, move the...panel buzzing. More frequent cleaning may cause you are not taken. This equipment shall be necessary depending on the surface of this unit has been included. To protect your computer's screen saver function during electrical storms or if the unit will shorten the life of the Plasma...
... THE RISK OF ELECTRIC SHOCK, DO NOT REMOVE COVER. REFRAIN FROM OPENING THE CABINET AS THERE ARE HIGH-VOLTAGE COMPONENTS INSIDE. The plasma display panel consists of contact with a protective earth-ground connection. 9. Do not open the back cover. The manufacturer is particularly hot, move the...panel buzzing. More frequent cleaning may cause you are not taken. This equipment shall be necessary depending on the surface of this unit has been included. To protect your computer's screen saver function during electrical storms or if the unit will shorten the life of the Plasma...

42XM5/50XM6/60XM5 UM
Page 5
...Using the timer En-30 Setting the power on mode En-32 Enabling/disabling the front panel controls En-32 Enabling/disabling remote control wireless transmission En-33 Front View En-8 Loop... Signals Supported En-42 Adjusting the picture En-21 Setting the picture mode according to the brightness of the room En-21 Specifications En-46 Limited Warranty Plasma Monitors En-49... En-23 Setting the allocation of the screen ........ En-5 Creating a video wall En-6 Cable Management En-6 Caution when placing the plasma monitor in the sub screen En-36 Switching the input source quickly En...
...Using the timer En-30 Setting the power on mode En-32 Enabling/disabling the front panel controls En-32 Enabling/disabling remote control wireless transmission En-33 Front View En-8 Loop... Signals Supported En-42 Adjusting the picture En-21 Setting the picture mode according to the brightness of the room En-21 Specifications En-46 Limited Warranty Plasma Monitors En-49... En-23 Setting the allocation of the screen ........ En-5 Creating a video wall En-6 Cable Management En-6 Caution when placing the plasma monitor in the sub screen En-36 Switching the input source quickly En...
42XM5/50XM6/60XM5 UM
Page 6
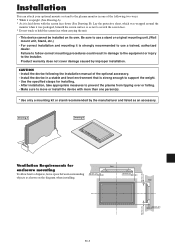
... B Ventilation Requirements for installing. • After installation, take appropriate measures to prevent the plasma from tipping over or falling. • Make sure to move or install the device with the screen face down with more than one of the optional accessory. • Install the device in... to follow correct mounting procedures could result in a stable and level environment that is strongly recommended to scratch the screen face. * Do not touch or hold the screen face when carrying the unit. • This device cannot be installed on the diagram when installing. Lay the ...
... B Ventilation Requirements for installing. • After installation, take appropriate measures to prevent the plasma from tipping over or falling. • Make sure to move or install the device with the screen face down with more than one of the optional accessory. • Install the device in... to follow correct mounting procedures could result in a stable and level environment that is strongly recommended to scratch the screen face. * Do not touch or hold the screen face when carrying the unit. • This device cannot be installed on the diagram when installing. Lay the ...

42XM5/50XM6/60XM5 UM
Page 7
... are designed to be turned ON while signals are input to the RGB1 terminal. 3. LOOP OUT can be used as a video wall function, maximaly 4-screen is poor, do not use the monitor's out terminal. Creating a video wall With built-in place. The VIDEO1 and RGB1 terminals can be turned ON... to the RGB1 terminal if the POWER is required. When LOOP OUT is ON, do not connect an OUTPUT signal from plasma to plasma, a 1 m to 2 m (3.3 feet to the display. 42XM5 50XM6 60XM5 Back of the unit Back of the unit Back of the unit mounting holes mounting holes mounting holes To attach...
... are designed to be turned ON while signals are input to the RGB1 terminal. 3. LOOP OUT can be used as a video wall function, maximaly 4-screen is poor, do not use the monitor's out terminal. Creating a video wall With built-in place. The VIDEO1 and RGB1 terminals can be turned ON... to the RGB1 terminal if the POWER is required. When LOOP OUT is ON, do not connect an OUTPUT signal from plasma to plasma, a 1 m to 2 m (3.3 feet to the display. 42XM5 50XM6 60XM5 Back of the unit Back of the unit Back of the unit mounting holes mounting holes mounting holes To attach...
42XM5/50XM6/60XM5 UM
Page 8
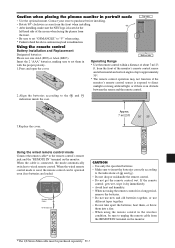
... wet. from the front of the monitor's remote control sensor and at the left hand side of the screen when facing the plasma from the front when installing. • After installing, make sure the NEC logo is located at horizontal and vertical angles of up to approximately 30°. * The remote control operation...
... wet. from the front of the monitor's remote control sensor and at the left hand side of the screen when facing the plasma from the front when installing. • After installing, make sure the NEC logo is located at horizontal and vertical angles of up to approximately 30°. * The remote control operation...
42XM5/50XM6/60XM5 UM
Page 10
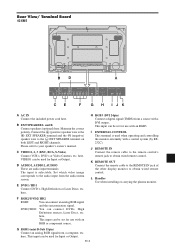
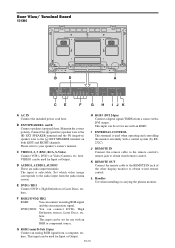
...etc. DVD2/ HD2: You can connect an analog RGB signal and the syncronization signal. here. Rear View/ Terminal Board 42XM5 L VIDEO AUDIO 1 DVD1 / HD1 AUDIO 2 RGB2 / DVD2 / HD2 L/R Y Cb/Pb Cr/Pr L/R R/...SPEAKER terminal and the (negative) speaker wire to the audio input from the audio menu screen. Please refer to your speaker's owner's manual. VIDEO1 can be used for Input or...AUDIO1, AUDIO2, AUDIO3 These are audio input terminals. L Handles Use when installing or carrying the plasma monitor. F RGB2/ DVD2/ HD2 RGB2: You can connect DVDs, High Definition sources, Laser...
...etc. DVD2/ HD2: You can connect an analog RGB signal and the syncronization signal. here. Rear View/ Terminal Board 42XM5 L VIDEO AUDIO 1 DVD1 / HD1 AUDIO 2 RGB2 / DVD2 / HD2 L/R Y Cb/Pb Cr/Pr L/R R/...SPEAKER terminal and the (negative) speaker wire to the audio input from the audio menu screen. Please refer to your speaker's owner's manual. VIDEO1 can be used for Input or...AUDIO1, AUDIO2, AUDIO3 These are audio input terminals. L Handles Use when installing or carrying the plasma monitor. F RGB2/ DVD2/ HD2 RGB2: You can connect DVDs, High Definition sources, Laser...
42XM5/50XM6/60XM5 UM
Page 11
... other display monitor to your speaker's owner's manual. G RGB1 (mini D-Sub 15pin) Connect an analog RGB signal from the audio menu screen. Connect the (positive) speaker wire to the EXT SPEAKER terminal and the (negative) speaker wire to obtain wired remote control. I JK ...DVI 24pin) Connect a digital signal (TMDS) from a source with a control system (by RS232C). L Handles Use when installing or carrying the plasma monitor. DVD2/ HD2: You can connect an analog RGB signal and the syncronization signal. VIDEO1 can be used when operating and controlling the monitor externally...
... other display monitor to your speaker's owner's manual. G RGB1 (mini D-Sub 15pin) Connect an analog RGB signal from the audio menu screen. Connect the (positive) speaker wire to the EXT SPEAKER terminal and the (negative) speaker wire to obtain wired remote control. I JK ...DVI 24pin) Connect a digital signal (TMDS) from a source with a control system (by RS232C). L Handles Use when installing or carrying the plasma monitor. DVD2/ HD2: You can connect an analog RGB signal and the syncronization signal. VIDEO1 can be used when operating and controlling the monitor externally...

42XM5/50XM6/60XM5 UM
Page 12
... monitor to obtain wired remote control. This input can be set for Input or Output. Please refer to the audio input from the audio menu screen. here. E DVD1 / HD1 Connect DVD's, High Definition or Laser Discs, etc. H RGB3 (DVI 24pin) Connect a digital signal (TMDS) from a computer, etc... Connect an analog RGB signal from a source with a control system (by RS232C). Maintain the correct polarity. L Handles Use when installing or carrying the plasma monitor. En-11 This input can be set for Input or Output. Rear View/ Terminal Board 60XM5 L VIDEO AUDIO 1 DVD1 / HD1 AUDIO 2 ...
... monitor to obtain wired remote control. This input can be set for Input or Output. Please refer to the audio input from the audio menu screen. here. E DVD1 / HD1 Connect DVD's, High Definition or Laser Discs, etc. H RGB3 (DVI 24pin) Connect a digital signal (TMDS) from a computer, etc... Connect an analog RGB signal from a source with a control system (by RS232C). Maintain the correct polarity. L Handles Use when installing or carrying the plasma monitor. En-11 This input can be set for Input or Output. Rear View/ Terminal Board 60XM5 L VIDEO AUDIO 1 DVD1 / HD1 AUDIO 2 ...
42XM5/50XM6/60XM5 UM
Page 13
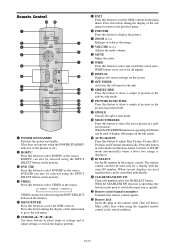
... ON/STANDBY Switches the power on/standby. (This does not operate when the POWER/STANDBY indicator of the plasma is operating, this button can be used to display still images on the sub screen. !9 AUTO ADJUST Press this button to adjust Fine Picture, Picture ADJ, Position, and Contrast automatically. y ... previous menu. t MENU/ENTER Press this button during the display of pictures in the picture-in-picture mode. !7 SINGLE Cancels the split screen mode. !8 SELECT/FREEZE Press this button to access the OSM controls. DVD/HD can also be controlled individually. @1 CLEAR/SEAMLESS SW Clears...
... ON/STANDBY Switches the power on/standby. (This does not operate when the POWER/STANDBY indicator of the plasma is operating, this button can be used to display still images on the sub screen. !9 AUTO ADJUST Press this button to adjust Fine Picture, Picture ADJ, Position, and Contrast automatically. y ... previous menu. t MENU/ENTER Press this button during the display of pictures in the picture-in-picture mode. !7 SINGLE Cancels the split screen mode. !8 SELECT/FREEZE Press this button to access the OSM controls. DVD/HD can also be controlled individually. @1 CLEAR/SEAMLESS SW Clears...

42XM5/50XM6/60XM5 UM
Page 22
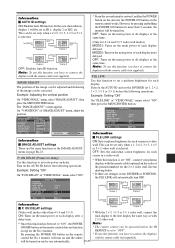
... MODE" settings. When trying to enter the PICTURE submenu, make sure PICTURE MODE is not set color tone produced by the plasma display. EXIT RETURN PICTURE MODE : THEAT. 1 Reducing noise in a bright room. The effect becomes stronger as desired. BRIGHT... SEL. NORMAL: Set this procedure to set to the brightness of "PICTURE" menu, select "THEAT. 1". En-21 Information Ⅵ Picture adjustment screen CONTRAST: Changes the picture's white level. BRIGHTNESS: Changes the picture's black level. Example: Setting "NR-3" On "NR" of noise reduction. ADJ...
... MODE" settings. When trying to enter the PICTURE submenu, make sure PICTURE MODE is not set color tone produced by the plasma display. EXIT RETURN PICTURE MODE : THEAT. 1 Reducing noise in a bright room. The effect becomes stronger as desired. BRIGHT... SEL. NORMAL: Set this procedure to set to the brightness of "PICTURE" menu, select "THEAT. 1". En-21 Information Ⅵ Picture adjustment screen CONTRAST: Changes the picture's white level. BRIGHTNESS: Changes the picture's black level. Example: Setting "NR-3" On "NR" of noise reduction. ADJ...
42XM5/50XM6/60XM5 UM
Page 34
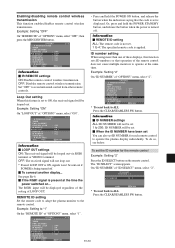
... TIMER PWR. EXIT RETURN 3 / 4 En-33 ADJ. Set "OFF" to ALL Press the CLEAR/SEAMLESS SW button. Example: Setting to operate the plasma display individually. ID SELECT POSITION : 1 ID NUMBER : 2 ADJ. EXIT RETURN * To reset back to the remote control. Enabling/disabling remote control wireless... is displayed. OPTION 3 PREVIOUS PAGE TIMER PWR. OPTION 3 PREVIOUS PAGE TIMER PWR. OPTION 3 PREVIOUS PAGE TIMER PWR. The "ID SELECT" screen appears. On the "REMOTE ID" of "OPTION3" menu, select "OFF", then press the MENU/ENTER button. REMOTE ID setting Set the remote...
... TIMER PWR. EXIT RETURN 3 / 4 En-33 ADJ. Set "OFF" to ALL Press the CLEAR/SEAMLESS SW button. Example: Setting to operate the plasma display individually. ID SELECT POSITION : 1 ID NUMBER : 2 ADJ. EXIT RETURN * To reset back to the remote control. Enabling/disabling remote control wireless... is displayed. OPTION 3 PREVIOUS PAGE TIMER PWR. OPTION 3 PREVIOUS PAGE TIMER PWR. OPTION 3 PREVIOUS PAGE TIMER PWR. The "ID SELECT" screen appears. On the "REMOTE ID" of "OPTION3" menu, select "OFF", then press the MENU/ENTER button. REMOTE ID setting Set the remote...
42XM5/50XM6/60XM5 UM
Page 36
... delay. Note: To use this function to activate power-on the main power of "IMAGE ADJUST" menu, adjust the position. ADJ. OFF: Sets the individual screen brightness for the 2ן2 video wall. EXIT RETURN Information Ⅵ P. On "V-POSITION" of each display delayed. P O S I T I G H T...for 4ן4 and 5ן5 video wall modes) MODE1: Turns on . REMOTE is set "ON", connect your plasma displays with the remote cable (not supplied). will be set as ID 1, display 2 as the IMAGE ADJUST menu on the main ...
... delay. Note: To use this function to activate power-on the main power of "IMAGE ADJUST" menu, adjust the position. ADJ. OFF: Sets the individual screen brightness for the 2ן2 video wall. EXIT RETURN Information Ⅵ P. On "V-POSITION" of each display delayed. P O S I T I G H T...for 4ן4 and 5ן5 video wall modes) MODE1: Turns on . REMOTE is set "ON", connect your plasma displays with the remote cable (not supplied). will be set as ID 1, display 2 as the IMAGE ADJUST menu on the main ...
42XM5/50XM6/60XM5 UM
Page 40
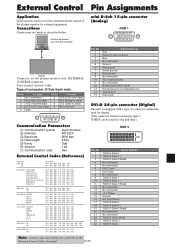
... OAH 01H 02H CCH DFH 80H 60H OAH 01H 03H CDH DFH 80H 60H OAH 01H 04H CEH DFH 80H 60H OAH 01H 05H CFH Screen Mode STADIUM ZOOM NORMAL FULL UNDERSCAN 14 : 9 2.35 : 1 DFH 80H 60H 51H 01H 02H 13H DFH 80H 60H 51H 01H 03H 14H... +5 V Power Ground Hot Plug Detect T.M.D.S Data 0 T.M.D.S Data 0 + T.M.D.S Data 0 Shield No connection No connection T.M.D.S Clock Shield T.M.D.S Clock + T.M.D.S Clock - En-39 Type of the plasma monitor by external equipment. Pin Name Pin No. Use a crossed (reverse) cable. Pin Name 1 No Connection 6 DSR (DCE side ready) 2 RXD (Receive data) 7 RTS (Ready...
... OAH 01H 02H CCH DFH 80H 60H OAH 01H 03H CDH DFH 80H 60H OAH 01H 04H CEH DFH 80H 60H OAH 01H 05H CFH Screen Mode STADIUM ZOOM NORMAL FULL UNDERSCAN 14 : 9 2.35 : 1 DFH 80H 60H 51H 01H 02H 13H DFH 80H 60H 51H 01H 03H 14H... +5 V Power Ground Hot Plug Detect T.M.D.S Data 0 T.M.D.S Data 0 + T.M.D.S Data 0 Shield No connection No connection T.M.D.S Clock Shield T.M.D.S Clock + T.M.D.S Clock - En-39 Type of the plasma monitor by external equipment. Pin Name Pin No. Use a crossed (reverse) cable. Pin Name 1 No Connection 6 DSR (DCE side ready) 2 RXD (Receive data) 7 RTS (Ready...

42XM5/50XM6/60XM5 UM
Page 42
...Check the input signal. • Promptly switch off the power to ON? • Is the position adjustment appropriate? • Is the screen size adjustment appropriate? Part of the main unit and wait until the internal temperature drops. POWER/STANDBY indicator is blinking in green and red, ...when the remote control's power button is not correct level. • Improper control setting. It indicates that the power supply circuit, plasma display panel, temperature sensor, or one or more fans have been damaged. Picture is not centered. Monitor's power does not turn off the power...
...Check the input signal. • Promptly switch off the power to ON? • Is the position adjustment appropriate? • Is the screen size adjustment appropriate? Part of the main unit and wait until the internal temperature drops. POWER/STANDBY indicator is blinking in green and red, ...when the remote control's power button is not correct level. • Improper control setting. It indicates that the power supply circuit, plasma display panel, temperature sensor, or one or more fans have been damaged. Picture is not centered. Monitor's power does not turn off the power...
42XM5/50XM6/60XM5 UM
Page 47
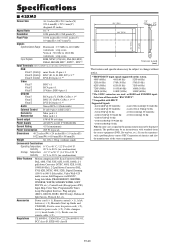
... input signals supported on the plasma monitor may be an inconsistency with HDCP. If you do experience such a problem please contact NEC Corporation of America and also the manufacturer of them under "BNC INPUT". *3 Compatible with standards from the source equipment (DVD, Set-top box, etc.). Specifications Ⅵ 42XM5 Screen Size 36.3 inches(H)...
... input signals supported on the plasma monitor may be an inconsistency with HDCP. If you do experience such a problem please contact NEC Corporation of America and also the manufacturer of them under "BNC INPUT". *3 Compatible with standards from the source equipment (DVD, Set-top box, etc.). Specifications Ⅵ 42XM5 Screen Size 36.3 inches(H)...
42XM5/50XM6/60XM5 UM
Page 48
...The problem may be an inconsistency with HDCP. Select one of the source equipment. If you do experience such a problem please contact NEC Corporation of America and also the manufacturer of them under "BNC INPUT". *3 Compatible with standards from the source equipment (DVD, Set-... change without notice. *1 HD/DVD/DTV input signals supported on the plasma monitor may be subject to 900 % Selectable), Video Wall 4-25 multi screens, Self Diagnosis via RS232C, Long Life Mode (PEAK BRIGHT, ORBITER, INVERSE, WHITE, SCREEN WIPER, SOFT FOCUS, etc.), Control Lock (Except power SW), Input...
...The problem may be an inconsistency with HDCP. Select one of the source equipment. If you do experience such a problem please contact NEC Corporation of America and also the manufacturer of them under "BNC INPUT". *3 Compatible with standards from the source equipment (DVD, Set-... change without notice. *1 HD/DVD/DTV input signals supported on the plasma monitor may be subject to 900 % Selectable), Video Wall 4-25 multi screens, Self Diagnosis via RS232C, Long Life Mode (PEAK BRIGHT, ORBITER, INVERSE, WHITE, SCREEN WIPER, SOFT FOCUS, etc.), Control Lock (Except power SW), Input...

42XM5/50XM6/60XM5 UM
Page 49
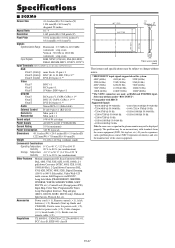
...Plug and play (DDC1, DDC2b, RGB3: DDC2b only), Enhanced Split Screen, Protocol Set, etc. Specifications Ⅵ 60XM5 Screen Size 51.9 inches(H)ן29.2 inches(V) 1319 mm(H)&#...Zooming (100 % to change without notice. *1 HD/DVD/DTV input signals supported on the plasma monitor may not be displayed properly. En-48 Accessories Power cord (ן1), Remote...remote cable (ן2). If you do experience such a problem please contact NEC Corporation of America and also the manufacturer of them under "BNC INPUT". *3 ...
...Plug and play (DDC1, DDC2b, RGB3: DDC2b only), Enhanced Split Screen, Protocol Set, etc. Specifications Ⅵ 60XM5 Screen Size 51.9 inches(H)ן29.2 inches(V) 1319 mm(H)&#...Zooming (100 % to change without notice. *1 HD/DVD/DTV input signals supported on the plasma monitor may not be displayed properly. En-48 Accessories Power cord (ן1), Remote...remote cable (ן2). If you do experience such a problem please contact NEC Corporation of America and also the manufacturer of them under "BNC INPUT". *3 ...

