User Guide
Page 4
Basic Phone Operations ...12 Making 911 Calls...12 Making a Traditional Call ...12 Making a Call Using the PC Connect Feature 13 T3101 User Guide Answering Calls ...13 Ending a Call ...13 Using the Speakerphone...13 Adjusting the Handset and Ringer Volumes 14 Redial Function ...14 Mute Function ...15 Locking the Handset Keypad ...15 Setting the Date and Time ...15 Locate a Misplaced Handset...16 Using Windows Live Messenger...17 Windows Live Messenger Menu Features and Options 18 Purchasing Minutes for Windows Live...
Basic Phone Operations ...12 Making 911 Calls...12 Making a Traditional Call ...12 Making a Call Using the PC Connect Feature 13 T3101 User Guide Answering Calls ...13 Ending a Call ...13 Using the Speakerphone...13 Adjusting the Handset and Ringer Volumes 14 Redial Function ...14 Mute Function ...15 Locking the Handset Keypad ...15 Setting the Date and Time ...15 Locate a Misplaced Handset...16 Using Windows Live Messenger...17 Windows Live Messenger Menu Features and Options 18 Purchasing Minutes for Windows Live...
User Guide
Page 5
... a Display Language ...22 Select a Wallpaper Image ...23 Select a Menu Display Style ...23 Naming Your Handset...24 Changing the Audio Settings...25 Ringer Type ...25 Ringer Volume ...25 Using the Hearing Aid Compatible (HAC) Feature 26 Key Tones...26 Changing Your Handset Settings ...27 Changing the Display Setup...27 Setting the Alarm Clock ...27 Changing the Call Related Settings 28 Call Related Features:...28 Returning Your System to the Default Settings 29 Phonebook Operations...30 Storing a New Entry...30 Reviewing/Dialing...
... a Display Language ...22 Select a Wallpaper Image ...23 Select a Menu Display Style ...23 Naming Your Handset...24 Changing the Audio Settings...25 Ringer Type ...25 Ringer Volume ...25 Using the Hearing Aid Compatible (HAC) Feature 26 Key Tones...26 Changing Your Handset Settings ...27 Changing the Display Setup...27 Setting the Alarm Clock ...27 Changing the Call Related Settings 28 Call Related Features:...28 Returning Your System to the Default Settings 29 Phonebook Operations...30 Storing a New Entry...30 Reviewing/Dialing...
User Guide
Page 10
... exposure guidelines when used with this happens, the telephone company will disable alarm equipment, consult your telephone company or qualified installer. This equipment is solved. Use of the cordless phone does not disable your home has specially wired alarm equipment connected to the telephone line, ensure the installation of other accessories may not ensure compliance with the FCC's RF exposure guidelines, place the base unit at 1-877...
... exposure guidelines when used with this happens, the telephone company will disable alarm equipment, consult your telephone company or qualified installer. This equipment is solved. Use of the cordless phone does not disable your home has specially wired alarm equipment connected to the telephone line, ensure the installation of other accessories may not ensure compliance with the FCC's RF exposure guidelines, place the base unit at 1-877...
User Guide
Page 13
... anyone walking on the power cord. This product should not be placed in your home, consult your telephone equipment, basic safety precautions should be placed near a bathtub, kitchen sink, or swimming pool). 5. If you are not sure of the type of the base unit and handset are provided for cleaning. 4. T3101 User Guide Important Safety Instructions When using your dealer or local...
... anyone walking on the power cord. This product should not be placed in your home, consult your telephone equipment, basic safety precautions should be placed near a bathtub, kitchen sink, or swimming pool). 5. If you are not sure of the type of the base unit and handset are provided for cleaning. 4. T3101 User Guide Important Safety Instructions When using your dealer or local...
User Guide
Page 15
.... Registering will need to provide a copy of a Motorola T3101 Windows Live™ Messenger Enabled Cordless Expansion Handset. Registration is not required for your records. T3101 User Guide Welcome Congratulations on the product packaging to ensure that your purchase includes each of your Motorola product, you will help us facilitate warranty service and permit us to contact you should your Motorola product require an update or other service.
.... Registering will need to provide a copy of a Motorola T3101 Windows Live™ Messenger Enabled Cordless Expansion Handset. Registration is not required for your records. T3101 User Guide Welcome Congratulations on the product packaging to ensure that your purchase includes each of your Motorola product, you will help us facilitate warranty service and permit us to contact you should your Motorola product require an update or other service.

User Guide
Page 17
... menu 3. Menu icons • Phonebook • Call log • Alarm clock • Audio setup • Settings 4. Ringer status 10. Menu Name 2. Right softkey option 7. Windows Live Messenger sign in status 2. Battery icon (only appears during charging) 1 10 9 2 8 3 HANDSET(2) 4 12:08AM Jan 2 7 5 Menu Ph Bk 6 Main Menu Overview 1. Right softkey option 1 Phone Book 2 3 4 Select Back 5 3 3 T3101 User Guide Standby Menu Overview 1. Handset name and...
... menu 3. Menu icons • Phonebook • Call log • Alarm clock • Audio setup • Settings 4. Ringer status 10. Menu Name 2. Right softkey option 7. Windows Live Messenger sign in status 2. Battery icon (only appears during charging) 1 10 9 2 8 3 HANDSET(2) 4 12:08AM Jan 2 7 5 Menu Ph Bk 6 Main Menu Overview 1. Right softkey option 1 Phone Book 2 3 4 Select Back 5 3 3 T3101 User Guide Standby Menu Overview 1. Handset name and...
User Guide
Page 20
... cordless telephone is 10-12 hours. After the initial charge, a maintenance charge of your handset displays a LOW BATTERY message, or the handset appears completely inactive (the LCD is in LOW BATTERY mode, the keypad sounds, backlighting, and speakerphone features will not work. The features are fully functional after you press the keys), charge the handset. T3101 User Guide Charging the Handset Battery The handset of eight hours should be sufficient. The initial battery charge time is powered...
... cordless telephone is 10-12 hours. After the initial charge, a maintenance charge of your handset displays a LOW BATTERY message, or the handset appears completely inactive (the LCD is in LOW BATTERY mode, the keypad sounds, backlighting, and speakerphone features will not work. The features are fully functional after you press the keys), charge the handset. T3101 User Guide Charging the Handset Battery The handset of eight hours should be sufficient. The initial battery charge time is powered...
User Guide
Page 21
... the base unit until you must install and charge the battery. 1. To select a different base, go to the HANDSET SETUP menu, select REGISTRATION, and press SELECT BASE. ** appears next to the available bases, and a dot appears in the circle next to and select REGISTRATION. 5. NOTE: Before registering the handset, you hear two beeps. T3101 User Guide Registering and Deregistering Handsets Registering a Handset to a Base Unit You can be actively connected at any time. Scroll to and select HANDSET SETUP...
... the base unit until you must install and charge the battery. 1. To select a different base, go to the HANDSET SETUP menu, select REGISTRATION, and press SELECT BASE. ** appears next to the available bases, and a dot appears in the circle next to and select REGISTRATION. 5. NOTE: Before registering the handset, you hear two beeps. T3101 User Guide Registering and Deregistering Handsets Registering a Handset to a Base Unit You can be actively connected at any time. Scroll to and select HANDSET SETUP...
User Guide
Page 22
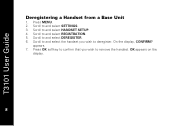
Scroll to and select REGISTRATION. 5. Scroll to and select HANDSET SETUP. 4. appears. 7. Scroll to and select DEREGISTER. 6. Scroll to and select SETTINGS. 3. T3101 User Guide Deregistering a Handset from a Base Unit 1. On the display, CONFIRM? Press MENU. 2. Scroll to and select the handset you wish to deregister. Press OK softkey to confirm that you wish to remove the handset. OK appears on the display. 8
Scroll to and select REGISTRATION. 5. Scroll to and select HANDSET SETUP. 4. appears. 7. Scroll to and select DEREGISTER. 6. Scroll to and select SETTINGS. 3. T3101 User Guide Deregistering a Handset from a Base Unit 1. On the display, CONFIRM? Press MENU. 2. Scroll to and select the handset you wish to deregister. Press OK softkey to confirm that you wish to remove the handset. OK appears on the display. 8

User Guide
Page 23
Press the PAGE button located on your handset display. the base unit's LED turns red, and the paging icon appears on your base unit. Make sure the base unit is pre-registered to a page if they are in the charger. it may not have not installed the software. Paging... Charge the battery - If you receive a "Please start phone software" message, you receive a "Please connect PC" message, please follow the registration process. 9 9 See the...
Press the PAGE button located on your handset display. the base unit's LED turns red, and the paging icon appears on your base unit. Make sure the base unit is pre-registered to a page if they are in the charger. it may not have not installed the software. Paging... Charge the battery - If you receive a "Please start phone software" message, you receive a "Please connect PC" message, please follow the registration process. 9 9 See the...
User Guide
Page 26
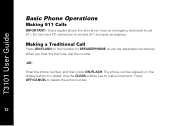
Use the CLEAR softkey key to delete the entire number. 12 Press OFF/CANCEL to make corrections. The phone number appears on the handset (or SPEAKERPHONE to use a PC connection to call 911. Do not use the speakerphone feature). T3101 User Guide Basic Phone Operations Making 911 Calls IMPORTANT: Use a regular phone line should you hear the dial tone, dial the number. -OREnter the phone number, and then press ON/FLASH. Making a Traditional Call Press ON/FLASH on the display before it is dialed. When you have an emergency and need to contact 911 during an emergency.
Use the CLEAR softkey key to delete the entire number. 12 Press OFF/CANCEL to make corrections. The phone number appears on the handset (or SPEAKERPHONE to use a PC connection to call 911. Do not use the speakerphone feature). T3101 User Guide Basic Phone Operations Making 911 Calls IMPORTANT: Use a regular phone line should you hear the dial tone, dial the number. -OREnter the phone number, and then press ON/FLASH. Making a Traditional Call Press ON/FLASH on the display before it is dialed. When you have an emergency and need to contact 911 during an emergency.
User Guide
Page 27
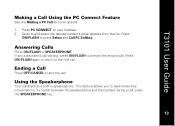
... the handset during a call . Using the Speakerphone Your handset has a built-in speakerphone. Press ON/FLASH or press Select and Call PC Softkey. Press ON/FLASH again to return to end the call , press the SPEAKERPHONE key. 13 13 Scroll to answer the second call . This feature allows you subscribe to call waiting, press ON/FLASH to and select the desired contact's email address from the list. T3101 User Guide Making a Call Using...
... the handset during a call . Using the Speakerphone Your handset has a built-in speakerphone. Press ON/FLASH or press Select and Call PC Softkey. Press ON/FLASH again to return to end the call , press the SPEAKERPHONE key. 13 13 Scroll to answer the second call . This feature allows you subscribe to call waiting, press ON/FLASH to and select the desired contact's email address from the list. T3101 User Guide Making a Call Using...
User Guide
Page 28
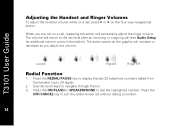
... adjust the ringer volume. Use the scroll keys to dial the highlighted number. The audio waves on the four way navigational button. The volume will increase or decrease as you are not on a call , presse or f on the graphic will return to the set level after an incoming or outgoing call (see Audio Setup for additional volume control information). Press the ON/FLASH or SPEAKERPHONE to...
... adjust the ringer volume. Use the scroll keys to dial the highlighted number. The audio waves on the four way navigational button. The volume will increase or decrease as you are not on a call , presse or f on the graphic will return to the set level after an incoming or outgoing call (see Audio Setup for additional volume control information). Press the ON/FLASH or SPEAKERPHONE to...
User Guide
Page 32
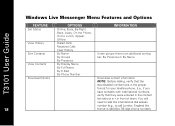
You will need to add the international dial access number (e.g., to Lunch, Appear Offline View History Dialed Calls Received Calls Clear History Sort Contacts By Name Under groups there is 44(0)20+7/8 digit phone number). Windows Live Messenger Menu Features and Options T3101 User Guide FEATURE OPTIONS INFORMATION Set Status Online, Busy, Be Right Back, Away, On the Phone, Out to call London, England the 18 format is an...
You will need to add the international dial access number (e.g., to Lunch, Appear Offline View History Dialed Calls Received Calls Clear History Sort Contacts By Name Under groups there is 44(0)20+7/8 digit phone number). Windows Live Messenger Menu Features and Options T3101 User Guide FEATURE OPTIONS INFORMATION Set Status Online, Busy, Be Right Back, Away, On the Phone, Out to call London, England the 18 format is an...
User Guide
Page 36
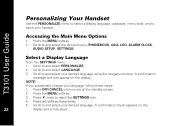
... select the desired menu (PHONEBOOK, CALL LOG, ALARM CLOCK, AUDIO SETUP, SETTINGS). Press the MENU softkey. 3. T3101 User Guide Accessing the Main Menu Options 1. A confirmation message and icon appear on the 22 display and a note plays. Select a Display Language From the SETTINGS menu: 1. Press OFF/CANCEL until you accidentally change your desired language using the navigation button. A confirmation check appears on the display. Press the MENU softkey. 2. Press...
... select the desired menu (PHONEBOOK, CALL LOG, ALARM CLOCK, AUDIO SETUP, SETTINGS). Press the MENU softkey. 3. T3101 User Guide Accessing the Main Menu Options 1. A confirmation message and icon appear on the 22 display and a note plays. Select a Display Language From the SETTINGS menu: 1. Press OFF/CANCEL until you accidentally change your desired language using the navigation button. A confirmation check appears on the display. Press the MENU softkey. 2. Press...
User Guide
Page 40
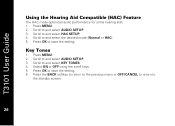
... to the standby screen. 26 Press OK to save the setting. Press the BACK softkey to return to the previous menu or OFF/CANCEL to return to and select AUDIO SETUP. 3. Key Tones 1. Scroll to and select KEY TONES. 4. Scroll to and select the desired mode (Normal or HAC). 5. Press MENU. 2. Press MENU. 2. T3101 User Guide Using the Hearing Aid Compatible (HAC) Feature...
... to the standby screen. 26 Press OK to save the setting. Press the BACK softkey to return to the previous menu or OFF/CANCEL to return to and select AUDIO SETUP. 3. Key Tones 1. Scroll to and select KEY TONES. 4. Scroll to and select the desired mode (Normal or HAC). 5. Press MENU. 2. Press MENU. 2. T3101 User Guide Using the Hearing Aid Compatible (HAC) Feature...
User Guide
Page 41
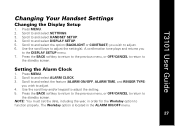
... and select SETTINGS. 3. T3101 User Guide Changing Your Handset Settings Changing the Display Setup 1. Scroll to and select the option (BACKLIGHT or CONTRAST) you wish to adjust. 6. Press MENU. 2. Scroll to the standby screen. NOTE: You must set the date, including the year, in the ALARM ON/OFF menu. 27 27 Scroll to and select the feature (ALARM ON/OFF, ALARM TIME, and RINGER TYPE...
... and select SETTINGS. 3. T3101 User Guide Changing Your Handset Settings Changing the Display Setup 1. Scroll to and select the option (BACKLIGHT or CONTRAST) you wish to adjust. 6. Press MENU. 2. Scroll to the standby screen. NOTE: You must set the date, including the year, in the ALARM ON/OFF menu. 27 27 Scroll to and select the feature (ALARM ON/OFF, ALARM TIME, and RINGER TYPE...
User Guide
Page 42
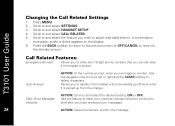
Scroll to and select HANDSET SETUP. 4. Auto Answer: ACTION: At the number prompt, enter your messages. 28 ACTION: Select the feature; Use the feature to adjust (see table below). confirm the message. T3101 User Guide Changing the Call Related Settings 1. Call Related Features: Emergency Number: Allows you to enter two 10-digit phone numbers that you wish to reset your voicemail indicator should it is locked. Allows you to decide if the...
Scroll to and select HANDSET SETUP. 4. Auto Answer: ACTION: At the number prompt, enter your messages. 28 ACTION: Select the feature; Use the feature to adjust (see table below). confirm the message. T3101 User Guide Changing the Call Related Settings 1. Call Related Features: Emergency Number: Allows you to enter two 10-digit phone numbers that you wish to reset your voicemail indicator should it is locked. Allows you to decide if the...
User Guide
Page 51
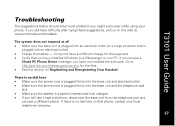
... on Registering and Deregistering Your Handset. T3101 User Guide Troubleshooting The suggestions below should solve most problems you might encounter while using your local telephone company. 37 37 The system does not respond at www.motorola.com/cordless. it may not have a sufficient charge for the files. • See the section on the web at all • Make sure the base unit is plugged into an electrical...
... on Registering and Deregistering Your Handset. T3101 User Guide Troubleshooting The suggestions below should solve most problems you might encounter while using your local telephone company. 37 37 The system does not respond at www.motorola.com/cordless. it may not have a sufficient charge for the files. • See the section on the web at all • Make sure the base unit is plugged into an electrical...
User Guide
Page 53
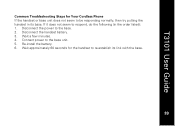
If it does not seem to re-establish its base. Disconnect the handset battery. 3. Wait approximately 60 seconds for Your Cordless Phone If the handset or base unit does not seem to be responding normally, then try putting the handset in the order listed): 1. Disconnect the power to the base unit. 5. Wait a few minutes. 4. Re-install the battery. 6. Connect power to the base. 2. T3101 User Guide Common Troubleshooting Steps for the handset to respond, do the following (in its link with the base. 39 39
If it does not seem to re-establish its base. Disconnect the handset battery. 3. Wait approximately 60 seconds for Your Cordless Phone If the handset or base unit does not seem to be responding normally, then try putting the handset in the order listed): 1. Disconnect the power to the base unit. 5. Wait a few minutes. 4. Re-install the battery. 6. Connect power to the base. 2. T3101 User Guide Common Troubleshooting Steps for the handset to respond, do the following (in its link with the base. 39 39


