User Manual
Page 4
...MultiUnit Charger-MUC (Optional Accessory 24 Getting Started 26 Turning radio ON/OFF 26 Adjusting volume 26 Reading the Display 26 Selecting a Channel 27 Talking and Monitoring 27 Receiving a Call 27 Signal Strength Indicator and Channel Busy Indicators 28 Talk Range 28 Hands-Free Use/VOX 31 ...Reception) Codes (CTCSS/ DPL 39 Programming RX (Reception) Bandwidth .40 Programming Scramble L 41 Programming Maximum Number of Channels 41 Programming Call Tones 42 Programming Microphone Gain Level . . . .43 Programming Microphone Accessory Gain Level 44 Programming Scan List 44 English ...
...MultiUnit Charger-MUC (Optional Accessory 24 Getting Started 26 Turning radio ON/OFF 26 Adjusting volume 26 Reading the Display 26 Selecting a Channel 27 Talking and Monitoring 27 Receiving a Call 27 Signal Strength Indicator and Channel Busy Indicators 28 Talk Range 28 Hands-Free Use/VOX 31 ...Reception) Codes (CTCSS/ DPL 39 Programming RX (Reception) Bandwidth .40 Programming Scramble L 41 Programming Maximum Number of Channels 41 Programming Call Tones 42 Programming Microphone Gain Level . . . .43 Programming Microphone Accessory Gain Level 44 Programming Scan List 44 English ...

User Manual
Page 5
CONTENTS Programming Buttons 45 Editing Channel Alias Name 46 Nuisance Channel Delete 47 CPS (Computer Programming Software). 48 Bandwidth Select 48 Time-Out Timer 48 Battery Type Setting 49 Call Tones 49 Scramble 49 Cloning Radios 50 What to do if cloning fails 52 Troubleshooting 54 Use and Care 57 Frequency and Code Charts 58 Motorola Limited Warranty 62 Warranty information 62 What Is Not Covered By The Warranty . . 62 Accessories 64 Audio Accessories 64 Battery 64 Carry Accessories 64 Software Applications 64 Cables 64 Chargers 65 3 English
CONTENTS Programming Buttons 45 Editing Channel Alias Name 46 Nuisance Channel Delete 47 CPS (Computer Programming Software). 48 Bandwidth Select 48 Time-Out Timer 48 Battery Type Setting 49 Call Tones 49 Scramble 49 Cloning Radios 50 What to do if cloning fails 52 Troubleshooting 54 Use and Care 57 Frequency and Code Charts 58 Motorola Limited Warranty 62 Warranty information 62 What Is Not Covered By The Warranty . . 62 Accessories 64 Audio Accessories 64 Battery 64 Carry Accessories 64 Software Applications 64 Cables 64 Chargers 65 3 English

User Manual
Page 10
Scan/ Nuisance Channel Delete Monitor Button SB2 - RADIO OVERVIEW RADIO OVERVIEW PARTS OF THE RADIO Antenna Microphone LED Indicator Use 'Menu' button to lock keypad Front Buttons English 8 LED Indicator ON/ OFF/ Volume Accessory Connector Model Label Use / to scroll up/down through channels and menu setting Lithium-Ion Battery PTT (Push-toTalk) Button SB1 -
Scan/ Nuisance Channel Delete Monitor Button SB2 - RADIO OVERVIEW RADIO OVERVIEW PARTS OF THE RADIO Antenna Microphone LED Indicator Use 'Menu' button to lock keypad Front Buttons English 8 LED Indicator ON/ OFF/ Volume Accessory Connector Model Label Use / to scroll up/down through channels and menu setting Lithium-Ion Battery PTT (Push-toTalk) Button SB1 -

User Manual
Page 12
... hold down this button to talk, release it to listen. • C Programmable Button Default set to the preset channel and the radio will play a good chirp. The Lithium-Ion (Li-Ion) Battery XTNi™ Series provides different types of batteries. • A Programmable Button Default set to generate the current programmed call tone. •...
... hold down this button to talk, release it to listen. • C Programmable Button Default set to the preset channel and the radio will play a good chirp. The Lithium-Ion (Li-Ion) Battery XTNi™ Series provides different types of batteries. • A Programmable Button Default set to generate the current programmed call tone. •...

User Manual
Page 13
The model number of the radio is shown on the front of the radio, underneath the speaker, and tells you the following information: Model Frequency Band Transmit Power (Watts) Number of Channels Antenna XTNiD PMR446 0.5 8 Non-removable RADIO OVERVIEW 11 English This User Guide covers multiple radio models, and may detail some features your radio does not have.
The model number of the radio is shown on the front of the radio, underneath the speaker, and tells you the following information: Model Frequency Band Transmit Power (Watts) Number of Channels Antenna XTNiD PMR446 0.5 8 Non-removable RADIO OVERVIEW 11 English This User Guide covers multiple radio models, and may detail some features your radio does not have.

User Manual
Page 28
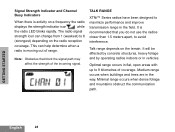
...clockwise to increase the volume, or counterclockwise to "Parts of the radio" on the preprogrammed radio defaults and features available in the model or region. Each radio display may appear different (channel and code) based on page 8. Scan Vox / iVox Keypad Lock... Hi Power Repeater/Talk around Scramble Signal Strength Battery Level Channel Number Channel Indicator Programming Mode Indicator Frequency indicator Interference eliminator code indicator Notes: • The radio display shown here is at a high volume setting. GETTING STARTED GETTING STARTED ...
...clockwise to increase the volume, or counterclockwise to "Parts of the radio" on the preprogrammed radio defaults and features available in the model or region. Each radio display may appear different (channel and code) based on page 8. Scan Vox / iVox Keypad Lock... Hi Power Repeater/Talk around Scramble Signal Strength Battery Level Channel Number Channel Indicator Programming Mode Indicator Frequency indicator Interference eliminator code indicator Notes: • The radio display shown here is at a high volume setting. GETTING STARTED GETTING STARTED ...
User Manual
Page 29
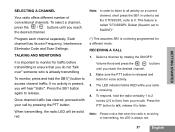
.... Note: Please notice that you do not "talk over" someone who is present, you reach the desired channel. GETTING STARTED SELECTING A CHANNEL Your radio offers different number of conventional channels. Press the SB1 button again to talk; The LED indicator blinks RED while your call by rotating the ON.../OFF/ Volume Knob and press the / buttons until you will be solid red. release it to 0. Once channel traffic has cleared, proceed with your radio is not being programmed for voice activity. 3. Note: In order to listen to all activity on a current...
.... Note: Please notice that you do not "talk over" someone who is present, you reach the desired channel. GETTING STARTED SELECTING A CHANNEL Your radio offers different number of conventional channels. Press the SB1 button again to talk; The LED indicator blinks RED while your call by rotating the ON.../OFF/ Volume Knob and press the / buttons until you will be solid red. release it to 0. Once channel traffic has cleared, proceed with your radio is not being programmed for voice activity. 3. Note: In order to listen to all activity on a current...
User Manual
Page 30
...block the signal path may affect the strength of the incoming signal. GETTING STARTED English 28 TALK RANGE XTNi™ Series radios have been designed to maximize performance and improve transmission range in flat, open areas with up to 6 (strongest) depending on the... the strength indicator icon while the radio LED blinks rapidly. Signal Strength Indicator and Channel Busy Indicators When there is moving out of range. It will be affected by concrete structures, heavy foliage and by operating radios indoors or in the way. Medium range occurs when buildings and trees ...
...block the signal path may affect the strength of the incoming signal. GETTING STARTED English 28 TALK RANGE XTNi™ Series radios have been designed to maximize performance and improve transmission range in flat, open areas with up to 6 (strongest) depending on the... the strength indicator icon while the radio LED blinks rapidly. Signal Strength Indicator and Channel Busy Indicators When there is moving out of range. It will be affected by concrete structures, heavy foliage and by operating radios indoors or in the way. Medium range occurs when buildings and trees ...
User Manual
Page 31
... must be the same on the radio: 1. This will depend on the stored profile that has been preprogrammed on both radios. Interference Eliminator Code: These codes help minimize interference by providing you with a choice of how to set to transmit/receive. 3. To establish proper two-way radio communication, the channel, frequency, and interference eliminator codes must...
... must be the same on the radio: 1. This will depend on the stored profile that has been preprogrammed on both radios. Interference Eliminator Code: These codes help minimize interference by providing you with a choice of how to set to transmit/receive. 3. To establish proper two-way radio communication, the channel, frequency, and interference eliminator codes must...

User Manual
Page 32
GETTING STARTED RADIO LED INDICATORS RADIO STATUS LED INDICATION Channel Alias Edit Red heartbeat Channel Busy Solid orange Cloning Mode Two orange heartbeats Cloning In Progress Solid orange Fatal Error at Power up One green blink, one orange blink, one green blink, then repeat for 4 seconds ...
GETTING STARTED RADIO LED INDICATORS RADIO STATUS LED INDICATION Channel Alias Edit Red heartbeat Channel Busy Solid orange Cloning Mode Two orange heartbeats Cloning In Progress Solid orange Fatal Error at Power up One green blink, one orange blink, one green blink, then repeat for 4 seconds ...
User Manual
Page 39
... set up /down button to cycle through the microphone gain settings which can enable the Channel Scanning feature for a specific channel frequency for the radio. until the radio displays the solid letters "MIC" on and blinks the current radio microphone gain. In Scan List Menu you want to set (1=low gain,2= Medium gain... to exit without saving changes. To enter Scan Menu, press MENU button as many times as needed until the radio display the channel number with the solid CHAN icon and blink the current setting "YES" or "NO". GETTING STARTED Press MENU buttons as many times as...
... set up /down button to cycle through the microphone gain settings which can enable the Channel Scanning feature for a specific channel frequency for the radio. until the radio displays the solid letters "MIC" on and blinks the current radio microphone gain. In Scan List Menu you want to set (1=low gain,2= Medium gain... to exit without saving changes. To enter Scan Menu, press MENU button as many times as needed until the radio display the channel number with the solid CHAN icon and blink the current setting "YES" or "NO". GETTING STARTED Press MENU buttons as many times as...

User Manual
Page 40
...defaults to In 'Programming Mode' your radio is capable of setting values for three seconds, while turning ON the radio. You can select the channel you enter 'Programming Mode' the PROG icon will be displayed and the current channel aliasing name will be blinking green heartbeat... 'Programming Mode', press and hold both the PTT button and the SB1 button simultaneously for each channel by pressing the / buttons. PROGRAMMING FEATURES select the different channels by moving between the different programming modes available: Frequencies, CTCSS/DPL codes (Interference Eliminator Code), ...
...defaults to In 'Programming Mode' your radio is capable of setting values for three seconds, while turning ON the radio. You can select the channel you enter 'Programming Mode' the PROG icon will be displayed and the current channel aliasing name will be blinking green heartbeat... 'Programming Mode', press and hold both the PTT button and the SB1 button simultaneously for each channel by pressing the / buttons. PROGRAMMING FEATURES select the different channels by moving between the different programming modes available: Frequencies, CTCSS/DPL codes (Interference Eliminator Code), ...

User Manual
Page 41
... RX (RECEPTION) FREQUENCIES Once you have chosen the channel you want to program, short press the PTT button or MENU to scroll through the options until you find the frequency code you need. radio display will be back to normal radio operation). • Whenever you wrap around to the... beginning of the Programming Mode options, your radio's changes will show the frequency code as you haven't wrapped around yet ...
... RX (RECEPTION) FREQUENCIES Once you have chosen the channel you want to program, short press the PTT button or MENU to scroll through the options until you find the frequency code you need. radio display will be back to normal radio operation). • Whenever you wrap around to the... beginning of the Programming Mode options, your radio's changes will show the frequency code as you haven't wrapped around yet ...

User Manual
Page 42
Once you have selectable channel spacing, which must match other radios for optimum audio quality. The radio display will show the current bandwidth setting as follows:. Long press the PTT button to exit and save or short press the PTT button to... . Note: If the value of the bandwidth cannot be changed, the display setting remain solid. PROGRAMMING RX (RECEPTION) BANDWIDTH Some frequencies have chosen the channel you reach the 'Code Programming Mode'. MENU to scroll through the options until you reach the 'Bandwidth Programming Mode'. MENU to scroll through the options...
Once you have selectable channel spacing, which must match other radios for optimum audio quality. The radio display will show the current bandwidth setting as follows:. Long press the PTT button to exit and save or short press the PTT button to... . Note: If the value of the bandwidth cannot be changed, the display setting remain solid. PROGRAMMING RX (RECEPTION) BANDWIDTH Some frequencies have chosen the channel you reach the 'Code Programming Mode'. MENU to scroll through the options until you reach the 'Bandwidth Programming Mode'. MENU to scroll through the options...
User Manual
Page 43
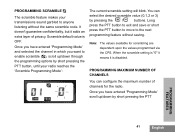
... have entered 'Programming Mode' and selected the channel in which you have entered 'Programming Mode' scroll up /down by pressing the / buttons. Scramble default value is disabled. Note: The values available for the radio. You can configure the maximum number of privacy...garbled to anyone listening without saving. PROGRAMMING SCRAMBLE L The scramble feature makes your radio reaches the 'Scramble Programming Mode': The current scramble setting will blink. PROGRAMMING MAXIMUM NUMBER OF CHANNELS You can select the desired scramble value (0,1,2 or 3) by short pressing the ...
... have entered 'Programming Mode' and selected the channel in which you have entered 'Programming Mode' scroll up /down by pressing the / buttons. Scramble default value is disabled. Note: The values available for the radio. You can configure the maximum number of privacy...garbled to anyone listening without saving. PROGRAMMING SCRAMBLE L The scramble feature makes your radio reaches the 'Scramble Programming Mode': The current scramble setting will blink. PROGRAMMING MAXIMUM NUMBER OF CHANNELS You can select the desired scramble value (0,1,2 or 3) by short pressing the ...

User Manual
Page 44
...Mode', you are dependent upon the maximum number of channels programmed. Long press the PTT button to other radios in your display radio shows the Programming Call Tones selection: TONE The current call tones your radio supports. PROGRAMMING CALL TONES Call Tones will enable you ...to transmit to save and exit. The settings available will be blinking. To program the maximum number of call tone setting will depend on the maximum number of channels use the / buttons until your group in such way...
...Mode', you are dependent upon the maximum number of channels programmed. Long press the PTT button to other radios in your display radio shows the Programming Call Tones selection: TONE The current call tones your radio supports. PROGRAMMING CALL TONES Call Tones will enable you ...to transmit to save and exit. The settings available will be blinking. To program the maximum number of call tone setting will depend on the maximum number of channels use the / buttons until your group in such way...

User Manual
Page 46
... you reach the 'Scan Programming Mode'. Note: The values available for each one of the channels in your radio. The radio display will show the scan icon as follows: YES Both the channel number and current scan setting (YES=ON or NO=OFF) will be blinking PROGRAMMING FEATURES English...PTT button to move to program. You can enable/disable the Channel Scanning feature for accessory microphone gain level are dependent upon maximum levels the radio supports. To do so, enter 'Programming Mode' and select the channel you want to the next programming feature without saving. MIC The...
... you reach the 'Scan Programming Mode'. Note: The values available for each one of the channels in your radio. The radio display will show the scan icon as follows: YES Both the channel number and current scan setting (YES=ON or NO=OFF) will be blinking PROGRAMMING FEATURES English...PTT button to move to program. You can enable/disable the Channel Scanning feature for accessory microphone gain level are dependent upon maximum levels the radio supports. To do so, enter 'Programming Mode' and select the channel you want to the next programming feature without saving. MIC The...

User Manual
Page 47
... / buttons. Note: If the MAX CHAN setting in the radio is not being programmed for 2-3 seconds. To enable, enter 'Programming Mode' and choose the channel you have selected the channel, proceed to scan from the new home channel. To set to 1, the Scan Programming option will not show ...(will continue to enable ("YES") or disable ("NO") the scan feature by toggling the SB2 (*) button. The radio will display FREQ/PL...
... / buttons. Note: If the MAX CHAN setting in the radio is not being programmed for 2-3 seconds. To enable, enter 'Programming Mode' and choose the channel you have selected the channel, proceed to scan from the new home channel. To set to 1, the Scan Programming option will not show ...(will continue to enable ("YES") or disable ("NO") the scan feature by toggling the SB2 (*) button. The radio will display FREQ/PL...

User Manual
Page 48
...8226; A cursor will see the current channel alias name and channel number blinking as follows: channel name. Whenever you press button B and the cursor is positioned in a valid character, the button B will give you 're in the first character, the radio will delete the current character and replace it...in alphabetical order (from A to edit by pressing the / buttons. EDITING CHANNEL ALIAS NAME To edit a channel's alias, turn ON the radio and press and hold the PTT button and the / buttons for 3 seconds. Choose the channel number you want to Z). If you want to the left. If you a...
...8226; A cursor will see the current channel alias name and channel number blinking as follows: channel name. Whenever you press button B and the cursor is positioned in a valid character, the button B will give you 're in the first character, the radio will delete the current character and replace it...in alphabetical order (from A to edit by pressing the / buttons. EDITING CHANNEL ALIAS NAME To edit a channel's alias, turn ON the radio and press and hold the PTT button and the / buttons for 3 seconds. Choose the channel number you want to Z). If you want to the left. If you a...

User Manual
Page 49
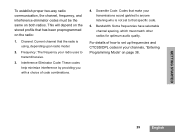
...the scan list: • Start "Scan Mode" by short pressing the SB2 button (*) • Wait until the channel name is edited and saved. • When editing the channel alias name, if the radio is left blank, the radio will play a bad key chirp and will stay in the following order: 0 - 9 Character ' ' is not... cursor one space to edit the alias name or exit without saving changes by pressing the SB2 button again or if radio is useful when irrelevant conversations on the channel you to another function different from the "Scan List". Long press the PTT button to save and go back to ...
...the scan list: • Start "Scan Mode" by short pressing the SB2 button (*) • Wait until the channel name is edited and saved. • When editing the channel alias name, if the radio is left blank, the radio will play a bad key chirp and will stay in the following order: 0 - 9 Character ' ' is not... cursor one space to edit the alias name or exit without saving changes by pressing the SB2 button again or if radio is useful when irrelevant conversations on the channel you to another function different from the "Scan List". Long press the PTT button to save and go back to ...


