
User Manual
Page 3
... 1 Computer Software Copyrights 4 Safety 5 Product Safety and RF Exposure Compliance 5 Batteries and Chargers Safety Information 6 Operational Safety Guidelines 7 Radio Overview 8 Parts of the radio 8 ON/OFF/Volume Knob 9 Microphone 9 Antenna 9 Accessory Connector 9 Model Label 9 LED Indicator 9 Side Buttons 10 The Lithium-....13 Installing the Lithium-Ion (Li-Ion) Battery 14 Removing the Lithium-Ion (Li-Ion) Battery 14 Alkaline Battery Pack (optional accessory 15 Installing Alkaline Battery 15 Removing Alkaline Batteries 15 Power Supply, Adaptors and Drop-in Tray Charger 16 ...
... 1 Computer Software Copyrights 4 Safety 5 Product Safety and RF Exposure Compliance 5 Batteries and Chargers Safety Information 6 Operational Safety Guidelines 7 Radio Overview 8 Parts of the radio 8 ON/OFF/Volume Knob 9 Microphone 9 Antenna 9 Accessory Connector 9 Model Label 9 LED Indicator 9 Side Buttons 10 The Lithium-....13 Installing the Lithium-Ion (Li-Ion) Battery 14 Removing the Lithium-Ion (Li-Ion) Battery 14 Alkaline Battery Pack (optional accessory 15 Installing Alkaline Battery 15 Removing Alkaline Batteries 15 Power Supply, Adaptors and Drop-in Tray Charger 16 ...
User Manual
Page 16
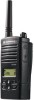
... Li-Ion Battery Life features, refer to "About the Li-Ion Battery" on the battery pack, fit the tabs at the bottom of the battery into the slots at the bottom of the battery towards the radio until a click is heard. Push down the battery latch and hold it depressed while removing... Installing the Lithium-Ion (Li-Ion) Battery Removing the Lithium-Ion (Li-Ion) Battery battery latch battery latch slots 1. Pull the battery away from the radio. Turn OFF the radio. 2. Turn OFF the radio. 2. With the Motorola logo side up on page 12. 1. Press the top part of the...
... Li-Ion Battery Life features, refer to "About the Li-Ion Battery" on the battery pack, fit the tabs at the bottom of the battery into the slots at the bottom of the battery towards the radio until a click is heard. Push down the battery latch and hold it depressed while removing... Installing the Lithium-Ion (Li-Ion) Battery Removing the Lithium-Ion (Li-Ion) Battery battery latch battery latch slots 1. Pull the battery away from the radio. Turn OFF the radio. 2. Turn OFF the radio. 2. With the Motorola logo side up on page 12. 1. Press the top part of the...
User Manual
Page 17
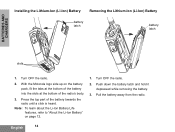
...1. Remove Li-Ion battery 3. Remove battery door from the radio's body. 15 English Turn OFF the radio, if it is turned ON. 2. Assemble alkaline battery pack (optional accessory) in the same steps as installing the Li-Ion battery pack. 4. Pull the top of the battery, downwards. 3. Slide... the battery latches, on both sides of the battery away from the radio's body, and lift the battery from alkaline battery pack. 5. Alkaline Battery Pack (optional accessory) Removing Alkaline Batteries ...
...1. Remove Li-Ion battery 3. Remove battery door from the radio's body. 15 English Turn OFF the radio, if it is turned ON. 2. Assemble alkaline battery pack (optional accessory) in the same steps as installing the Li-Ion battery pack. 4. Pull the top of the battery, downwards. 3. Slide... the battery latches, on both sides of the battery away from the radio's body, and lift the battery from alkaline battery pack. 5. Alkaline Battery Pack (optional accessory) Removing Alkaline Batteries ...
User Manual
Page 19
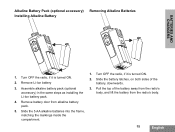
... 2. Slide the spring action belt clip rails into the belt clip grooves on page 65. To remove, pull back the metal release tab on the radio model and/or region the battery capacity will be longer. 1. When the Battery Save feature is ON (enabled by default) the battery life will determine... Action Belt Clip Depending on the belt clip tab and push the spring action belt clip upward to "Chargers" on the back of the battery pack and slide it down until the belt clip tab snaps into place. 17 English
... 2. Slide the spring action belt clip rails into the belt clip grooves on page 65. To remove, pull back the metal release tab on the radio model and/or region the battery capacity will be longer. 1. When the Battery Save feature is ON (enabled by default) the battery life will determine... Action Belt Clip Depending on the belt clip tab and push the spring action belt clip upward to "Chargers" on the back of the battery pack and slide it down until the belt clip tab snaps into place. 17 English
User Manual
Page 25
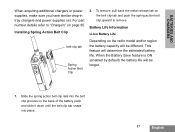
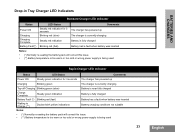
... charger is currently charging Battery is fully charged Battery had a fault when battery was inserted Notes: • (*) Normally re-seating the battery pack will correct this issue. • (**) Battery temperature is too warm or too cold or wrong power supply is being used Rapid Charger LED... Battery is fully charged Battery has a fault when battery was inserted Battery charging conditions not suitable • (*) Normally re-seating the battery pack will correct this issue. • (**) Battery temperature is too warm or too cold or wrong power supply is being used 23 English BATTERIES...
... charger is currently charging Battery is fully charged Battery had a fault when battery was inserted Notes: • (*) Normally re-seating the battery pack will correct this issue. • (**) Battery temperature is too warm or too cold or wrong power supply is being used Rapid Charger LED... Battery is fully charged Battery has a fault when battery was inserted Battery charging conditions not suitable • (*) Normally re-seating the battery pack will correct this issue. • (**) Battery temperature is too warm or too cold or wrong power supply is being used 23 English BATTERIES...

User Manual
Page 27
... information is fully charged Battery had a fault when battery was inserted * Normally reseating the battery pack will also allow you to clone up to 3 radios (3 "Source" radios and 3 "Target" radios). • When cloning, the MUC does not need to clone units are explained in order ...section in the Instructions Sheet provided with the MUC operation instructions leaflet. BATTERIES AND CHARGERS 5. Insert the radio or battery into a power source, but all radios require charged batteries. Further details on MUC's operation are explained in order to identify the part number ...
... information is fully charged Battery had a fault when battery was inserted * Normally reseating the battery pack will also allow you to clone up to 3 radios (3 "Source" radios and 3 "Target" radios). • When cloning, the MUC does not need to clone units are explained in order ...section in the Instructions Sheet provided with the MUC operation instructions leaflet. BATTERIES AND CHARGERS 5. Insert the radio or battery into a power source, but all radios require charged batteries. Further details on MUC's operation are explained in order to identify the part number ...

User Manual
Page 37
... GETTING STARTED LITHIUM Use the / buttons to the next step or turn 35 English Battery Type can also be shown as needed until the radio flashes the current battery type (either Lithium-Ion or Alkaline. To change the setting, press the MENU button as many times as follows: OFF... radio to the battery type setting from either "LITHIUM" or "ALKALINE"). Battery Type Menu Only if the battery pack is not detected, the radio will be programmed using the CPS. A full battery icon will allow changes to exit...
... GETTING STARTED LITHIUM Use the / buttons to the next step or turn 35 English Battery Type can also be shown as needed until the radio flashes the current battery type (either Lithium-Ion or Alkaline. To change the setting, press the MENU button as many times as follows: OFF... radio to the battery type setting from either "LITHIUM" or "ALKALINE"). Battery Type Menu Only if the battery pack is not detected, the radio will be programmed using the CPS. A full battery icon will allow changes to exit...

User Manual
Page 51
...HELP file in either Alkaline, Lithium-Ion cells or battery pack. For more capabilities that this software offers. The battery pack can be detected at power-up and the corresponding battery level will vary depending on the radio's display. There are just some of the features available ... disabled. "OFF" in the CPS. • Some of the features CPS has. PROGRAMMING FEATURES 49 English Battery Type Setting The XTNi™ series radio can also be powered by either 60, 120 or 180 seconds. Call Tones See "Programming Call Tones" on page 41. Scramble See "Programming ...
...HELP file in either Alkaline, Lithium-Ion cells or battery pack. For more capabilities that this software offers. The battery pack can be detected at power-up and the corresponding battery level will vary depending on the radio's display. There are just some of the features available ... disabled. "OFF" in the CPS. • Some of the features CPS has. PROGRAMMING FEATURES 49 English Battery Type Setting The XTNi™ series radio can also be powered by either 60, 120 or 180 seconds. Call Tones See "Programming Call Tones" on page 41. Scramble See "Programming ...