User Guide
Page 3
... TTY (Text Telephone) On the Web: www.motorola.com/cordless MOTOROLA and the Stylized M Logo are the property of this guide, or for your records. All other service. Registering helps us facilitate warranty service and permits us to contact you will need to confirm warranty status. Registration is an important step. Welcome Congratulations on your purchase of your dated sales receipt to...
... TTY (Text Telephone) On the Web: www.motorola.com/cordless MOTOROLA and the Stylized M Logo are the property of this guide, or for your records. All other service. Registering helps us facilitate warranty service and permits us to contact you will need to confirm warranty status. Registration is an important step. Welcome Congratulations on your purchase of your dated sales receipt to...
User Guide
Page 5
... disable alarm equipment, consult your telephone company or a qualified installer. • Notice must : 1. Rights of the Telephone Company Should your equipment cause trouble on your line which may temporarily disconnect service immediately. If this cordless phone does not disable your alarm equipment. If you have questions about what will provide advance notice in order for you connect your cordless telephone to maintain uninterrupted service...
... disable alarm equipment, consult your telephone company or a qualified installer. • Notice must : 1. Rights of the Telephone Company Should your equipment cause trouble on your line which may temporarily disconnect service immediately. If this cordless phone does not disable your alarm equipment. If you have questions about what will provide advance notice in order for you connect your cordless telephone to maintain uninterrupted service...
User Guide
Page 8
... water. 3. Do not set the phone on the power cord. Do not use while wet or while standing in fire or shock. 6. If service or repair work is provided at the installation site. 2. Do not use this user's guide. 8. Ensure that it will not be walked on. 5. Important Safety Instructions Important Safety Instructions Follow these safety precautions when using during an electrical storm. Do not allow...
... water. 3. Do not set the phone on the power cord. Do not use while wet or while standing in fire or shock. 6. If service or repair work is provided at the installation site. 2. Do not use this user's guide. 8. Ensure that it will not be walked on. 5. Important Safety Instructions Important Safety Instructions Follow these safety precautions when using during an electrical storm. Do not allow...
User Guide
Page 9
... to normal operation. 7. Operate this phone. 7 Clean this product with your home, consult with a soft, damp cloth. Do not retrieve the handset or base until after you are covered by the unplugged cords. • The product has been dropped or the cabinet has been damaged. • The product exhibits a distinct change in damage and will often require extensive work to restore...
... to normal operation. 7. Operate this phone. 7 Clean this product with your home, consult with a soft, damp cloth. Do not retrieve the handset or base until after you are covered by the unplugged cords. • The product has been dropped or the cabinet has been damaged. • The product exhibits a distinct change in damage and will often require extensive work to restore...
User Guide
Page 10
.... Use only the power supply that power this unit. Caution: To maintain compliance with the FCC's RF exposure guidelines, place the base unit at least one phone in your home that could result in explosion. • The rechargeable batteries that came with your phone or an authorized replacement recommended by the manufacturer. • Keep batteries out of the reach of children. • Remove batteries if...
.... Use only the power supply that power this unit. Caution: To maintain compliance with the FCC's RF exposure guidelines, place the base unit at least one phone in your home that could result in explosion. • The rechargeable batteries that came with your phone or an authorized replacement recommended by the manufacturer. • Keep batteries out of the reach of children. • Remove batteries if...
User Guide
Page 11
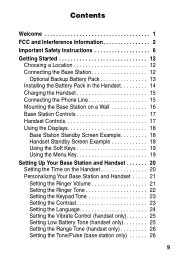
... Base Station 12 Optional Backup Battery Pack 13 Installing the Battery Pack in the Handset 14 Charging the Handset 15 Connecting the Phone Line 15 Mounting the Base Station on a Wall 16 Base Station Controls 17 Handset Controls 17 Using the Displays 18 Base Station Standby Screen Example 18 Handset Standby Screen Example 18 Using the Soft Keys 19 Using the Menu Key 19 Setting Up Your Base Station and Handset 20 Setting the Time on the Handset 20 Personalizing Your Base Station and Handset . . . . . 21 Setting the Ringer Volume 21 Setting the Ringer Tone...
... Base Station 12 Optional Backup Battery Pack 13 Installing the Battery Pack in the Handset 14 Charging the Handset 15 Connecting the Phone Line 15 Mounting the Base Station on a Wall 16 Base Station Controls 17 Handset Controls 17 Using the Displays 18 Base Station Standby Screen Example 18 Handset Standby Screen Example 18 Using the Soft Keys 19 Using the Menu Key 19 Setting Up Your Base Station and Handset 20 Setting the Time on the Handset 20 Personalizing Your Base Station and Handset . . . . . 21 Setting the Ringer Volume 21 Setting the Ringer Tone...
User Guide
Page 12
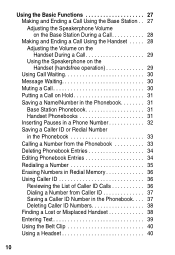
... Base Station During a Call 28 Making and Ending a Call Using the Handset . . . . . 28 Adjusting the Volume on the Handset During a Call 29 Using the Speakerphone on the Handset (handsfree operation 29 Using Call Waiting 30 Message Waiting 30 Muting a Call 30 Putting a Call on Hold 31 Saving a Name/Number in the Phonebook 31 Base Station Phonebook 31 Handset Phonebooks 31 Inserting Pauses in a Phone Number 32 Saving a Caller ID or Redial Number in the Phonebook 33 Calling a Number from the Phonebook 33 Deleting...
... Base Station During a Call 28 Making and Ending a Call Using the Handset . . . . . 28 Adjusting the Volume on the Handset During a Call 29 Using the Speakerphone on the Handset (handsfree operation 29 Using Call Waiting 30 Message Waiting 30 Muting a Call 30 Putting a Call on Hold 31 Saving a Name/Number in the Phonebook 31 Base Station Phonebook 31 Handset Phonebooks 31 Inserting Pauses in a Phone Number 32 Saving a Caller ID or Redial Number in the Phonebook 33 Calling a Number from the Phonebook 33 Deleting...

User Guide
Page 13
... Charging Bases and Expansion Handsets 41 Registering an Expansion Handset 42 Personalizing and Using Expansion Handsets . . . . . 43 Advanced Features 44 Using Conference Calling 45 Using the Intercom 46 From the Base Station to All Handsets 46 From the Base Station to a Specific Handset . . . . 46 From a Handset to the Base Station 47 From a Handset to a Handset 47 From a Handset to All Handsets and Base Station 47 Answering a Base Station to Handset Intercom Call 48 Transferring Calls 48 Unannounced Transfer from the Base Station or a Handset 48 Announced Transfer 49 Motorola...
... Charging Bases and Expansion Handsets 41 Registering an Expansion Handset 42 Personalizing and Using Expansion Handsets . . . . . 43 Advanced Features 44 Using Conference Calling 45 Using the Intercom 46 From the Base Station to All Handsets 46 From the Base Station to a Specific Handset . . . . 46 From a Handset to the Base Station 47 From a Handset to a Handset 47 From a Handset to All Handsets and Base Station 47 Answering a Base Station to Handset Intercom Call 48 Transferring Calls 48 Unannounced Transfer from the Base Station or a Handset 48 Announced Transfer 49 Motorola...
User Guide
Page 14
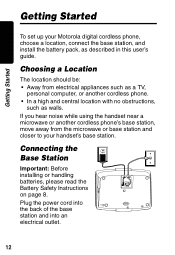
... user's guide. Plug the power cord into the back of the base station and into an electrical outlet. 12 Connecting the Base Station Important: Before installing or handling batteries, please read the Battery Safety Instructions on page 8. Getting Started Getting Started To set up your handset's base station. Choosing a Location The location should be: • Away from the microwave or base station and closer to your Motorola digital cordless phone, choose a location, connect the base station, and install...
... user's guide. Plug the power cord into the back of the base station and into an electrical outlet. 12 Connecting the Base Station Important: Before installing or handling batteries, please read the Battery Safety Instructions on page 8. Getting Started Getting Started To set up your handset's base station. Choosing a Location The location should be: • Away from the microwave or base station and closer to your Motorola digital cordless phone, choose a location, connect the base station, and install...

User Guide
Page 23
... base station and/or handset does not ring when you set to another option. 21 Note: When setting options on the handset, select HANDSET SETTINGS from the MENU. When setting options on the base station, select BASE SETTINGS from the MENU. Setting Up Your Base Station and Handset Personalizing Your Base Station and Handset You can personalize the base station and handset by setting unique ringer tones, adjusting the ringer volume, and setting the language (English, Spanish, Portuguese, or French). Setting the Ringer Volume...
... base station and/or handset does not ring when you set to another option. 21 Note: When setting options on the handset, select HANDSET SETTINGS from the MENU. When setting options on the base station, select BASE SETTINGS from the MENU. Setting Up Your Base Station and Handset Personalizing Your Base Station and Handset You can personalize the base station and handset by setting unique ringer tones, adjusting the ringer volume, and setting the language (English, Spanish, Portuguese, or French). Setting the Ringer Volume...
User Guide
Page 31
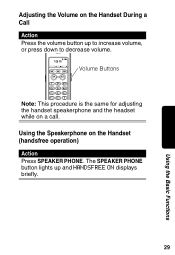
Using the Speakerphone on the Handset During a Call Action Press the volume button up and HANDSFREE ON displays briefly. 29 Using the Basic Functions The SPEAKER PHONE button lights up to increase volume, or press down to decrease volume. Adjusting the Volume on the Handset (handsfree operation) Action Press SPEAKER PHONE. Volume Buttons Note: This procedure is the same for adjusting the handset speakerphone and the headset while on a call.
Using the Speakerphone on the Handset During a Call Action Press the volume button up and HANDSFREE ON displays briefly. 29 Using the Basic Functions The SPEAKER PHONE button lights up to increase volume, or press down to decrease volume. Adjusting the Volume on the Handset (handsfree operation) Action Press SPEAKER PHONE. Volume Buttons Note: This procedure is the same for adjusting the handset speakerphone and the headset while on a call.

User Guide
Page 32
... on the second call, f displays. 2 Press again to end the second call and return to the first call . Using Call Waiting If you can put a call "on hold", to answer a second call. Action 1 Press ON from the handset or FLASH from your telephone company, the VOICEMAIL LED on the base station blinks when you have call waiting service from the base station to answer a second call . Message Waiting If you have voice mail service from your telephone company, you have a new message.
... on the second call, f displays. 2 Press again to end the second call and return to the first call . Using Call Waiting If you can put a call "on hold", to answer a second call. Action 1 Press ON from the handset or FLASH from your telephone company, the VOICEMAIL LED on the base station blinks when you have call waiting service from the base station to answer a second call . Message Waiting If you have voice mail service from your telephone company, you have a new message.

User Guide
Page 33
... handset. After 5 minutes, CALL ON HOLD RING BACK! You can remain on the handset. v on the base station flashes and CALL ON HOLD displays on Hold Action 1 Press HOLD (a). If Clock Mode is not accessible by other handsets or the base station. 31 Using the Basic Functions Saving a Name/Number in the Phonebook Saving names and numbers in the phonebook makes it is not accessible by any handset. Handset Phonebooks Each handset...
... handset. After 5 minutes, CALL ON HOLD RING BACK! You can remain on the handset. v on the base station flashes and CALL ON HOLD displays on Hold Action 1 Press HOLD (a). If Clock Mode is not accessible by other handsets or the base station. 31 Using the Basic Functions Saving a Name/Number in the Phonebook Saving names and numbers in the phonebook makes it is not accessible by any handset. Handset Phonebooks Each handset...
User Guide
Page 34
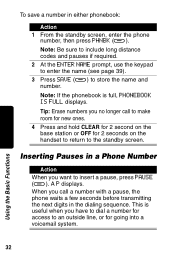
... call a number with a pause, the phone waits a few seconds before transmitting the next digits in a Phone Number Action When you have to dial a number for access to store the name and number. A P displays. Note: If the phonebook is useful when you want to the standby screen. Inserting Pauses in the dialing sequence. When you call to make room for new ones. 4 Press and hold CLEAR for 2 second on the handset...
... call a number with a pause, the phone waits a few seconds before transmitting the next digits in a Phone Number Action When you have to dial a number for access to store the name and number. A P displays. Note: If the phonebook is useful when you want to the standby screen. Inserting Pauses in the dialing sequence. When you call to make room for new ones. 4 Press and hold CLEAR for 2 second on the handset...
User Guide
Page 38
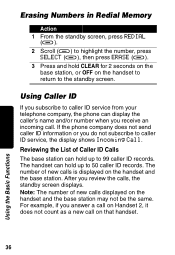
... (a), then press ERASE (a). 3 Press and hold up to 99 caller ID records. Using Caller ID If you subscribe to 50 caller ID records. The handset can hold up to caller ID service from your telephone company, the phone can display the caller's name and/or number when you answer a call on Handset 2, it does not count as a new call . The number of Caller ID Calls The base station can hold CLEAR for 2 seconds on the base station, or...
... (a), then press ERASE (a). 3 Press and hold up to 99 caller ID records. Using Caller ID If you subscribe to 50 caller ID records. The handset can hold up to caller ID service from your telephone company, the phone can display the caller's name and/or number when you answer a call on Handset 2, it does not count as a new call . The number of Caller ID Calls The base station can hold CLEAR for 2 seconds on the base station, or...

User Guide
Page 40
... displayed. Finding a Lost or Misplaced Handset Action 1 Press INTERCOM from the base station or handset. 2 Scroll (a) to highlight the handset number or GLOBAL PAGE (to page all entries. Scroll to another entry, or press and hold OFF for 2 seconds to return to delete all entries. or Press YES to the standby screen. displays. The selected handset rings. 3 Press CLEAR on the base station, or press any key...
... displayed. Finding a Lost or Misplaced Handset Action 1 Press INTERCOM from the base station or handset. 2 Scroll (a) to highlight the handset number or GLOBAL PAGE (to page all entries. Scroll to another entry, or press and hold OFF for 2 seconds to return to delete all entries. or Press YES to the standby screen. displays. The selected handset rings. 3 Press CLEAR on the base station, or press any key...
User Guide
Page 41
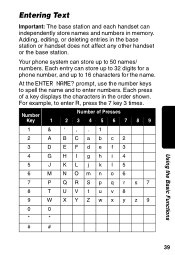
... the name. Adding, editing, or deleting entries in memory. Entering Text Important: The base station and each handset can independently store names and numbers in the base station or handset does not affect any other handset or the base station. At the ENTER NAME? prompt, use the number keys to spell the name and to enter R, press the 7 key 3 times. Number Key 1 Number of a key displays the characters in the order shown.
... the name. Adding, editing, or deleting entries in memory. Entering Text Important: The base station and each handset can independently store names and numbers in the base station or handset does not affect any other handset or the base station. At the ENTER NAME? prompt, use the number keys to spell the name and to enter R, press the 7 key 3 times. Number Key 1 Number of a key displays the characters in the order shown.
User Guide
Page 44
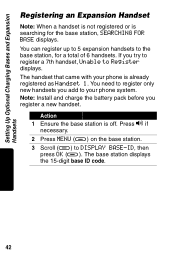
... your phone system. You need to register only new handsets you add to Register displays. If you register a new handset. Action 1 Ensure the base station is already registered as Handset 1. Press v if necessary. 2 Press MENU (a) on the base station. 3 Scroll (a) to the base station, for the base station, SEARCHING FOR BASE displays. You can register up to 5 expansion handsets to DISPLAY BASE-ID, then press OK (a). Note: Install and charge the battery pack before you try to register a 7th handset, Unable to your phone is...
... your phone system. You need to register only new handsets you add to Register displays. If you register a new handset. Action 1 Ensure the base station is already registered as Handset 1. Press v if necessary. 2 Press MENU (a) on the base station. 3 Scroll (a) to the base station, for the base station, SEARCHING FOR BASE displays. You can register up to 5 expansion handsets to DISPLAY BASE-ID, then press OK (a). Note: Install and charge the battery pack before you try to register a 7th handset, Unable to your phone is...

User Guide
Page 45
Setting Up Optional Charging Bases and Expansion Handsets Action 4 Press NEW (a) on the handset, enter the 15-digit base ID code, then press OK (a). The ENTER BASE ID screen displays. 5 Using the keys on the handset. If you make a mistake while entering the code, press the left soft key (
Setting Up Optional Charging Bases and Expansion Handsets Action 4 Press NEW (a) on the handset, enter the 15-digit base ID code, then press OK (a). The ENTER BASE ID screen displays. 5 Using the keys on the handset. If you make a mistake while entering the code, press the left soft key (

User Guide
Page 47
... base station can be on the base station. 45 Advanced Features When a second handset joins the call , the displays on other handset displays j and 2 or more extension numbers. To disconnect from a conference call, press OFF on the handset, or press v on a conference call at the same time. To join a conference call from the base station, press v. Action To join a conference call from a handset, press ON or SPEAKER PHONE. Using Conference Calling If 1 handset is on a call , the other handsets registered to the same base station display LINE...
... base station can be on the base station. 45 Advanced Features When a second handset joins the call , the displays on other handset displays j and 2 or more extension numbers. To disconnect from a conference call, press OFF on the handset, or press v on a conference call at the same time. To join a conference call from the base station, press v. Action To join a conference call from a handset, press ON or SPEAKER PHONE. Using Conference Calling If 1 handset is on a call , the other handsets registered to the same base station display LINE...


