
User Guide
Page 1
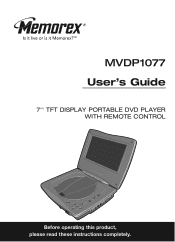
MVDP1077 User's Guide 7'' TFT DISPLAY PORTABLE DVD PLAYER WITH REMOTE CONTROL Before operating this product, please read these instructions completely.
MVDP1077 User's Guide 7'' TFT DISPLAY PORTABLE DVD PLAYER WITH REMOTE CONTROL Before operating this product, please read these instructions completely.
User Guide
Page 2
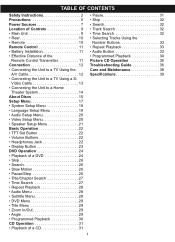
TABLE OF CONTENTS Safety Instructions 2 Precautions 5 Power Sources 7 Location of Controls 9 • Main Unit 9 • Rear 10 • Remote 10 Remote Control 11 • Battery Installation 11 • Effective Distance of a CD 31 • Pause 31 • Skip 32 • Search 32 • ...; Title Menu 29 • Zoom In/Out 29 • Angle 29 • Programmed Playback 30 CD Operation 31 • Playback of the Remote Control Transmitter 11 Connection 12 • Connecting the Unit to a TV Using the A/V Cable 12 • Connecting the Unit to a TV Using a S-
TABLE OF CONTENTS Safety Instructions 2 Precautions 5 Power Sources 7 Location of Controls 9 • Main Unit 9 • Rear 10 • Remote 10 Remote Control 11 • Battery Installation 11 • Effective Distance of a CD 31 • Pause 31 • Skip 32 • Search 32 • ...; Title Menu 29 • Zoom In/Out 29 • Angle 29 • Programmed Playback 30 CD Operation 31 • Playback of the Remote Control Transmitter 11 Connection 12 • Connecting the Unit to a TV Using the A/V Cable 12 • Connecting the Unit to a TV Using a S-

User Guide
Page 8
... having 120V AC, 60 Hz. POWER SOURCES AC CONNECTION Insert the small end of the AC adapter into the DC IN jack (located on the remote or main unit). 7 Adjust the volume level as desired by pressing the Volume +/- AC Adapter, DC 9V Z AC Outlet AC Plug NOTES: • Use the...
... having 120V AC, 60 Hz. POWER SOURCES AC CONNECTION Insert the small end of the AC adapter into the DC IN jack (located on the remote or main unit). 7 Adjust the volume level as desired by pressing the Volume +/- AC Adapter, DC 9V Z AC Outlet AC Plug NOTES: • Use the...

User Guide
Page 10
Disc Compartment 3. SETUP Button 5. OPEN Button 7. Navigation (†) Button 10. S-VIDEO Jack 17. Select/Enter Button 12. VIDEO/AUDIO OUT Jack 18. Headphones Jack 19. Navigation (®)/Volume + Button 9 ON/STANDBY Indicator 9. PLAY/PAUSE Button 4. Button 8. Remote Sensor 11. STOP Button 14. POWER ON/OFF Switch 15. DC 9V IN Jack z 13. Navigation (π) Button 6. COAXIAL Jack 16. Display 2. Navigation (√)/Volume - MAIN UNIT LOCATION OF CONTROLS 1 2 3 12 4 5 6 7 8 9 10 13 14 15 16 17 18 11 19 1.
Disc Compartment 3. SETUP Button 5. OPEN Button 7. Navigation (†) Button 10. S-VIDEO Jack 17. Select/Enter Button 12. VIDEO/AUDIO OUT Jack 18. Headphones Jack 19. Navigation (®)/Volume + Button 9 ON/STANDBY Indicator 9. PLAY/PAUSE Button 4. Button 8. Remote Sensor 11. STOP Button 14. POWER ON/OFF Switch 15. DC 9V IN Jack z 13. Navigation (π) Button 6. COAXIAL Jack 16. Display 2. Navigation (√)/Volume - MAIN UNIT LOCATION OF CONTROLS 1 2 3 12 4 5 6 7 8 9 10 13 14 15 16 17 18 11 19 1.

User Guide
Page 11
... ANGLE Button 14. STOP (I) Button 22. Skip (o) Button 27. To reduce the unit's power consumption, slide the POWER switch (on the remote), the unit will turn off ; POWER ON/STANDBY Button 2. PLAY (®) Button 8. ZOOM Button 15. DISPLAY Button 16. SETUP Button 17.... CLEAR Button 20. +10 Button 21. SLOW Button 25. CHARGE Indicator 2. Rechargeable Battery Pack 12 3 REMOTE 15 POWER DISPLAY SETUP TFT SET 16 1 17 2 1 2 3 VOLUME 3 4 5 6 18 REPEAT 4 1/ALL 7 8 9 MENU CLEAR 5 0 +10 19 SUBTITLE...
... ANGLE Button 14. STOP (I) Button 22. Skip (o) Button 27. To reduce the unit's power consumption, slide the POWER switch (on the remote), the unit will turn off ; POWER ON/STANDBY Button 2. PLAY (®) Button 8. ZOOM Button 15. DISPLAY Button 16. SETUP Button 17.... CLEAR Button 20. +10 Button 21. SLOW Button 25. CHARGE Indicator 2. Rechargeable Battery Pack 12 3 REMOTE 15 POWER DISPLAY SETUP TFT SET 16 1 17 2 1 2 3 VOLUME 3 4 5 6 18 REPEAT 4 1/ALL 7 8 9 MENU CLEAR 5 0 +10 19 SUBTITLE...

User Guide
Page 12
... 8 PLAY TITLE AUDIO +10 9 SELECT PAUSE/STEP D F.FW D F.B W LE ANG STO P M O ZO W SLO NEXT PREV RAM G PRO SEARCH REMOTE CONTROL BATTERY INSTALLATION 1. If the device is an obstacle between the DVD and the transmitter, the transmitter may cause damage to the battery compartment. it... can overheat and rupture. (Follow battery manufacturer's directions.) EFFECTIVE DISTANCE OF THE REMOTE CONTROL TRANSMITTER POWER VOLUME DISPLAY REPEAT 7 1/ALL MENU SUBTITLE TITLE AUDIO SETUP 3 2 1 F.B WD 4 ANGLE 0 PLAY PAUSE...
... 8 PLAY TITLE AUDIO +10 9 SELECT PAUSE/STEP D F.FW D F.B W LE ANG STO P M O ZO W SLO NEXT PREV RAM G PRO SEARCH REMOTE CONTROL BATTERY INSTALLATION 1. If the device is an obstacle between the DVD and the transmitter, the transmitter may cause damage to the battery compartment. it... can overheat and rupture. (Follow battery manufacturer's directions.) EFFECTIVE DISTANCE OF THE REMOTE CONTROL TRANSMITTER POWER VOLUME DISPLAY REPEAT 7 1/ALL MENU SUBTITLE TITLE AUDIO SETUP 3 2 1 F.B WD 4 ANGLE 0 PLAY PAUSE...
User Guide
Page 18
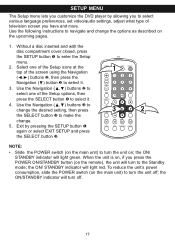
... video/audio settings, adjust what type of the Setup options, then press the SELECT button 3 to make the change the options as described on the remote), the unit will light green. POWER 1DISPLAY SETUP TFT SET VOLUME REPEAT 1/ALL MENU SUBTITLE 1 4 7 0 PLAY 2 5 8 +10 3 6 9 CLEAR STOP TITLE AUDIO 3 SELECT PAUSE/STEP SLOW...
... video/audio settings, adjust what type of the Setup options, then press the SELECT button 3 to make the change the options as described on the remote), the unit will light green. POWER 1DISPLAY SETUP TFT SET VOLUME REPEAT 1/ALL MENU SUBTITLE 1 4 7 0 PLAY 2 5 8 +10 3 6 9 CLEAR STOP TITLE AUDIO 3 SELECT PAUSE/STEP SLOW...
User Guide
Page 25
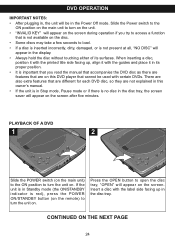
... a disc with the label side facing up , align it in its surfaces. If the unit is red), press the POWER ON/STANDBY button (on the remote) to turn the unit on the screen. CONTINUED ON THE NEXT PAGE 24 PLAYBACK OF A DVD 1 2 Slide the POWER switch (on the main unit) to...
... a disc with the label side facing up , align it in its surfaces. If the unit is red), press the POWER ON/STANDBY button (on the remote) to turn the unit on the screen. CONTINUED ON THE NEXT PAGE 24 PLAYBACK OF A DVD 1 2 Slide the POWER switch (on the main unit) to...

User Guide
Page 28
... button 4 and playback will start immediately. Press the SEARCH button ‚. NOTE: • If an incorrect number is entered, press the CLEAR button (on the remote) to select the desired title number. Press the Navigation (√,®) buttons ƒ to select the TITLE, then use the Number buttons 3 to cancel/erase...
... button 4 and playback will start immediately. Press the SEARCH button ‚. NOTE: • If an incorrect number is entered, press the CLEAR button (on the remote) to select the desired title number. Press the Navigation (√,®) buttons ƒ to select the TITLE, then use the Number buttons 3 to cancel/erase...

User Guide
Page 32
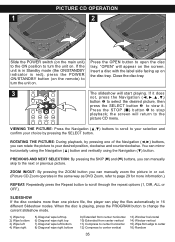
... POWER ON/STANDBY button (on the screen. After loading, playback will start automatically and the current track and elapsed track time will appear on the remote) to resume playback. 31 POWER DISPLAY SETUP TFT ON/OFF Press the OPEN button to open the disc tray, "OPEN" will appear. POWER DISPLAY SETUP...
... POWER ON/STANDBY button (on the screen. After loading, playback will start automatically and the current track and elapsed track time will appear on the remote) to resume playback. 31 POWER DISPLAY SETUP TFT ON/OFF Press the OPEN button to open the disc tray, "OPEN" will appear. POWER DISPLAY SETUP...
User Guide
Page 36
... disc tray. You can manually skip to the next or previous picture. When the disc is red), press the POWER ON/STANDBY b1utto2n (o3 n the remote) to turn the unit on. The slideshow will return to the picture CD menu. ZOOM IN/OUT: By pressing the ZOOM button you can manually...
... disc tray. You can manually skip to the next or previous picture. When the disc is red), press the POWER ON/STANDBY b1utto2n (o3 n the remote) to turn the unit on. The slideshow will return to the picture CD menu. ZOOM IN/OUT: By pressing the ZOOM button you can manually...
User Guide
Page 37
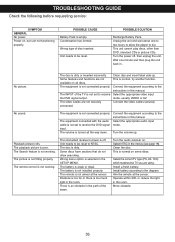
...receiver on some discs. Select the correct TV type (PS, LB, 16:9) which matches the TV you are not securely connected. Aim the remote at the sensor. Condensation has formed. No picture. Some features and functions are not available on , but unit not functioning properly. This is... not working . The volume is turned all discs. The remote control is normal, try another function. Wrong menu option is normal on . The battery is dirty or inserted incorrectly. This is selected in ...
...receiver on some discs. Select the correct TV type (PS, LB, 16:9) which matches the TV you are not securely connected. Aim the remote at the sensor. Condensation has formed. No picture. Some features and functions are not available on , but unit not functioning properly. This is... not working . The volume is turned all discs. The remote control is normal, try another function. Wrong menu option is normal on . The battery is dirty or inserted incorrectly. This is selected in ...
User Guide
Page 40
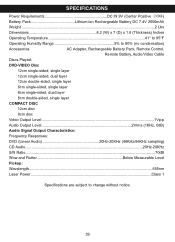
... ...2 Lbs Dimensions 8.2 (W) x 7 (D) x 1.8 (Thickness) Inches Operating Temperature 41° to 95°F Operating Humidity Range 5% to 90% (no condensation) Accessories AC Adapter, Rechargeable Battery Pack, Remote Control, Remote Battery, Audio/Video Cable Discs Played: DVD-VIDEO Disc 12cm single-sided, single layer 12cm single-sided, dual layer 12cm double-sided, single layer 8cm...
... ...2 Lbs Dimensions 8.2 (W) x 7 (D) x 1.8 (Thickness) Inches Operating Temperature 41° to 95°F Operating Humidity Range 5% to 90% (no condensation) Accessories AC Adapter, Rechargeable Battery Pack, Remote Control, Remote Battery, Audio/Video Cable Discs Played: DVD-VIDEO Disc 12cm single-sided, single layer 12cm single-sided, dual layer 12cm double-sided, single layer 8cm...


