
User Guide
Page 2
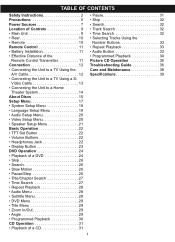
... Using a S- TABLE OF CONTENTS Safety Instructions 2 Precautions 5 Power Sources 7 Location of Controls 9 • Main Unit 9 • Rear 10 • Remote 10 Remote Control 11 • Battery Installation 11 • Effective Distance of the Remote Control Transmitter 11 Connection 12 • Connecting the Unit to a TV Using the A/V Cable 12 • Connecting...
... Using a S- TABLE OF CONTENTS Safety Instructions 2 Precautions 5 Power Sources 7 Location of Controls 9 • Main Unit 9 • Rear 10 • Remote 10 Remote Control 11 • Battery Installation 11 • Effective Distance of the Remote Control Transmitter 11 Connection 12 • Connecting the Unit to a TV Using the A/V Cable 12 • Connecting...
User Guide
Page 6
... packing materials. CAUTION: To reduce the risk of use any type of solvent, such as thinner or benzene, as they may damage the surface of batteries may be performed by a qualified service technician. Do not use . Turn on the finish. • The top and rear panels of the DVD ... use the DVD player occasionally. In this DVD player near the DVD player. Do not leave rubber or plastic products in contact with supplied rechargeable Battery Pack; For maximum protection, repack the unit as insect spray, near a TV, radio or VCR, the playback picture may become warm after a long ...
... packing materials. CAUTION: To reduce the risk of use any type of solvent, such as thinner or benzene, as they may damage the surface of batteries may be performed by a qualified service technician. Do not use . Turn on the finish. • The top and rear panels of the DVD ... use the DVD player occasionally. In this DVD player near the DVD player. Do not leave rubber or plastic products in contact with supplied rechargeable Battery Pack; For maximum protection, repack the unit as insect spray, near a TV, radio or VCR, the playback picture may become warm after a long ...

User Guide
Page 9
...hours. 8 The CHARGE indicator on the side of the screen when the Battery Pack is charging and light solid red when charging has completed. CHARGING THE BATTERY PACK The Low Battery indicator will blink red as the Battery Pack is low and needs recharging. After the initial charge, it should...blades) into the holes on the rear of the Battery Pack, then slide the Battery Pack out towards the rear of the main unit. POWER SOURCES (CONTINUED) BATTERY PACK INSERTION/REMOVAL Follow the diagram below to charge. • A fully-charged Battery Pack can operate for the first time. TO ...
...hours. 8 The CHARGE indicator on the side of the screen when the Battery Pack is charging and light solid red when charging has completed. CHARGING THE BATTERY PACK The Low Battery indicator will blink red as the Battery Pack is low and needs recharging. After the initial charge, it should...blades) into the holes on the rear of the Battery Pack, then slide the Battery Pack out towards the rear of the main unit. POWER SOURCES (CONTINUED) BATTERY PACK INSERTION/REMOVAL Follow the diagram below to charge. • A fully-charged Battery Pack can operate for the first time. TO ...

User Guide
Page 11
... Buttons 19. CLEAR Button 20. +10 Button 21. MENU Button 6. PAUSE/STEP (p ®) Button 11. Navigation Buttons 24. PROGRAM Button 10 SEARCH Button 28. Rechargeable Battery Pack 12 3 REMOTE 15 POWER DISPLAY SETUP TFT SET 16 1 17 2 1 2 3 VOLUME 3 4 5 6 18 REPEAT 4 1/ALL 7 8 9 MENU CLEAR 5...) to turn the unit on the main unit) to turn to Standby mode. 1. STOP (I) Button 22. Skip (n) Button 26. Battery Release Button 3. the ON/STANDBY indicator will light green. TITLE Button 9. the ON/STANDBY indicator will turn the unit off . VOLUME ...
... Buttons 19. CLEAR Button 20. +10 Button 21. MENU Button 6. PAUSE/STEP (p ®) Button 11. Navigation Buttons 24. PROGRAM Button 10 SEARCH Button 28. Rechargeable Battery Pack 12 3 REMOTE 15 POWER DISPLAY SETUP TFT SET 16 1 17 2 1 2 3 VOLUME 3 4 5 6 18 REPEAT 4 1/ALL 7 8 9 MENU CLEAR 5...) to turn the unit on the main unit) to turn to Standby mode. 1. STOP (I) Button 22. Skip (n) Button 26. Battery Release Button 3. the ON/STANDBY indicator will light green. TITLE Button 9. the ON/STANDBY indicator will turn the unit off . VOLUME ...

User Guide
Page 12
... F.FWD PREV ZOOM PROGRAM SLOW NEXT SEARCH NOTES: • When there is not to be used for a long period of time, remove the battery to the device. 3. If the device is an obstacle between the DVD and the transmitter, the transmitter may be recharged; REMOTE CONTROL... or any other strong light shines on the tab and then sliding the compartment out. 2. Be sure to follow the correct polarity when installing the battery as indicated next to be unstable. 11 STOP SLOW NEXT SEARCH ER W PO SETUP DISPLAY 2 1 4 E VOLUM 7 EPEAT R 1/ALL ENU M SUBTITLE 5 0 3 6 CLEAR 8 PLAY TITLE...
... F.FWD PREV ZOOM PROGRAM SLOW NEXT SEARCH NOTES: • When there is not to be used for a long period of time, remove the battery to the device. 3. If the device is an obstacle between the DVD and the transmitter, the transmitter may be recharged; REMOTE CONTROL... or any other strong light shines on the tab and then sliding the compartment out. 2. Be sure to follow the correct polarity when installing the battery as indicated next to be unstable. 11 STOP SLOW NEXT SEARCH ER W PO SETUP DISPLAY 2 1 4 E VOLUM 7 EPEAT R 1/ALL ENU M SUBTITLE 5 0 3 6 CLEAR 8 PLAY TITLE...
User Guide
Page 37
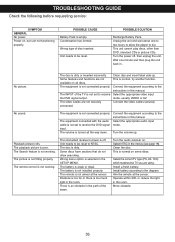
... Unit needs to the instructions in this manual. The remote is an obstacle in . There is not aimed at the sensor. Install a fresh battery. The equipment is not connected properly. The INPUT of the TV is not set to receive the DVD signal input. The equipment is not connected... properly. The equipment connected with the audio cable is not set to receive the DVD signal output. Playback picture rolls. The battery is not installed properly. Clean the disc. Select the correct TV type (PS, LB, 16:9) which matches the TV you are not securely ...
... Unit needs to the instructions in this manual. The remote is an obstacle in . There is not aimed at the sensor. Install a fresh battery. The equipment is not connected properly. The INPUT of the TV is not set to receive the DVD signal input. The equipment is not connected... properly. The equipment connected with the audio cable is not set to receive the DVD signal output. Playback picture rolls. The battery is not installed properly. Clean the disc. Select the correct TV type (PS, LB, 16:9) which matches the TV you are not securely ...
User Guide
Page 40
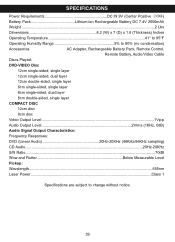
... Weight ...2 Lbs Dimensions 8.2 (W) x 7 (D) x 1.8 (Thickness) Inches Operating Temperature 41° to 95°F Operating Humidity Range 5% to 90% (no condensation) Accessories AC Adapter, Rechargeable Battery Pack, Remote Control, Remote Battery, Audio/Video Cable Discs Played: DVD-VIDEO Disc 12cm single-sided, single layer 12cm single-sided, dual layer 12cm double-sided, single layer...
... Weight ...2 Lbs Dimensions 8.2 (W) x 7 (D) x 1.8 (Thickness) Inches Operating Temperature 41° to 95°F Operating Humidity Range 5% to 90% (no condensation) Accessories AC Adapter, Rechargeable Battery Pack, Remote Control, Remote Battery, Audio/Video Cable Discs Played: DVD-VIDEO Disc 12cm single-sided, single layer 12cm single-sided, dual layer 12cm double-sided, single layer...

