
User Guide
Page 2
...; Rear 10 • Remote 10 Remote Control 11 • Battery Installation 11 • Effective Distance of the Remote Control Transmitter 11 Connection 12 • Connecting the Unit to a TV Using the A/V Cable 12 • Connecting the Unit to a Home Theater System 14 About Discs 15 Setup Menu 17 • System Setup Menu 18 • Language Setup Menu 19 • Audio Setup Menu 20 • Video Setup Menu 20 • Speaker Setup Menu 21 Basic Operation 22 • TFT Set Button 22 • Volume Buttons 22...
...; Rear 10 • Remote 10 Remote Control 11 • Battery Installation 11 • Effective Distance of the Remote Control Transmitter 11 Connection 12 • Connecting the Unit to a TV Using the A/V Cable 12 • Connecting the Unit to a Home Theater System 14 About Discs 15 Setup Menu 17 • System Setup Menu 18 • Language Setup Menu 19 • Audio Setup Menu 20 • Video Setup Menu 20 • Speaker Setup Menu 21 Basic Operation 22 • TFT Set Button 22 • Volume Buttons 22...
User Guide
Page 3
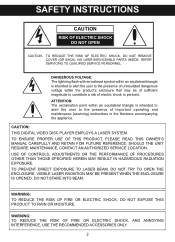
... triangle is intended to alert the user to the presence of important operating and maintenance (servicing) instructions in the literature accompanying the appliance. TO PREVENT DIRECT EXPOSURE TO LASER BEAM, DO NOT TRY TO OPEN THE ENCLOSURE. CAUTION: THIS DIGITAL VIDEO DISC PLAYER EMPLOYS A LASER SYSTEM. TO ENSURE PROPER USE OF THIS PRODUCT, PLEASE READ THIS OWNER'S MANUAL CAREFULLY AND RETAIN FOR FUTURE REFERENCE...
... triangle is intended to alert the user to the presence of important operating and maintenance (servicing) instructions in the literature accompanying the appliance. TO PREVENT DIRECT EXPOSURE TO LASER BEAM, DO NOT TRY TO OPEN THE ENCLOSURE. CAUTION: THIS DIGITAL VIDEO DISC PLAYER EMPLOYS A LASER SYSTEM. TO ENSURE PROPER USE OF THIS PRODUCT, PLEASE READ THIS OWNER'S MANUAL CAREFULLY AND RETAIN FOR FUTURE REFERENCE...

User Guide
Page 4
.... Lightning and power surges ARE NOT covered under warranty for AC connection. However, there is no guarantee that to which can radiate radio frequency energy and, if not installed and used in a residential installation. SAFETY INSTRUCTIONS (CONT.) SURGE PROTECTORS: It is recommended to use only shielded cables when connecting to other devices. Only qualified service personnel should attempt to operate the equipment.
.... Lightning and power surges ARE NOT covered under warranty for AC connection. However, there is no guarantee that to which can radiate radio frequency energy and, if not installed and used in a residential installation. SAFETY INSTRUCTIONS (CONT.) SURGE PROTECTORS: It is recommended to use only shielded cables when connecting to other devices. Only qualified service personnel should attempt to operate the equipment.
User Guide
Page 6
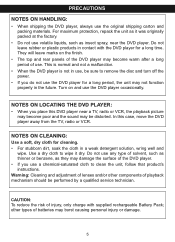
... the DVD player away from the TV, radio or VCR. Warning: Cleaning and adjustment of lenses and/or other types of playback mechanism should be distorted. NOTES ON CLEANING: Use a soft, dry cloth for a long time. For maximum protection, repack the unit as insect spray, near a TV, radio or VCR, the playback picture may become poor and the sound may not function...
... the DVD player away from the TV, radio or VCR. Warning: Cleaning and adjustment of lenses and/or other types of playback mechanism should be distorted. NOTES ON CLEANING: Use a soft, dry cloth for a long time. For maximum protection, repack the unit as insect spray, near a TV, radio or VCR, the playback picture may become poor and the sound may not function...

User Guide
Page 11
... 2 1 2 3 VOLUME 3 4 5 6 18 REPEAT 4 1/ALL 7 8 9 MENU CLEAR 5 0 +10 19 SUBTITLE PLAY STOP 20 6 21 7 TITLE SELECT 22 8 23 AUDIO PAUSE/STEP SLOW 9 24 10 F.B WD F.FWD PREV NEXT 11 25 12 ANGLE ZOOM PROGRAM SEARCH 26 13 27 14 28 NOTE: Slide the POWER switch (on the main unit) to the Standby mode; TFT SET Button 18. CHARGE Indicator 2. AUDIO Button 10. REAR LOCATION OF CONTROLS (CONTINUED) 1. Battery...
... 2 1 2 3 VOLUME 3 4 5 6 18 REPEAT 4 1/ALL 7 8 9 MENU CLEAR 5 0 +10 19 SUBTITLE PLAY STOP 20 6 21 7 TITLE SELECT 22 8 23 AUDIO PAUSE/STEP SLOW 9 24 10 F.B WD F.FWD PREV NEXT 11 25 12 ANGLE ZOOM PROGRAM SEARCH 26 13 27 14 28 NOTE: Slide the POWER switch (on the main unit) to the Standby mode; TFT SET Button 18. CHARGE Indicator 2. AUDIO Button 10. REAR LOCATION OF CONTROLS (CONTINUED) 1. Battery...

User Guide
Page 12
... NEXT PREV RAM G PRO SEARCH it can overheat and rupture. (Follow battery manufacturer's directions.) EFFECTIVE DISTANCE OF THE REMOTE CONTROL TRANSMITTER POWER VOLUME DISPLAY REPEAT 7 1/ALL MENU SUBTITLE TITLE AUDIO SETUP 3 2 1 F.B WD 4 ANGLE 0 PLAY PAUSE/STEP F.FWD 5 ZOOM TFT ON/OFF 9 8 CLEAR +10 SELECT PREV 6 PROGRAM /OFF N O TFT POWER DISPLAY SETUP TFT ON/OFF VOLUME 1 2 REPEAT 1/ALL MENU 4 7 5 8 3 6 SUBTITLE 0 PLAY +10 9 CLEAR TITLE STOP AUDIO PAUSE/STEP SELECT F.B WD ANGLE F.FWD PREV ZOOM...
... NEXT PREV RAM G PRO SEARCH it can overheat and rupture. (Follow battery manufacturer's directions.) EFFECTIVE DISTANCE OF THE REMOTE CONTROL TRANSMITTER POWER VOLUME DISPLAY REPEAT 7 1/ALL MENU SUBTITLE TITLE AUDIO SETUP 3 2 1 F.B WD 4 ANGLE 0 PLAY PAUSE/STEP F.FWD 5 ZOOM TFT ON/OFF 9 8 CLEAR +10 SELECT PREV 6 PROGRAM /OFF N O TFT POWER DISPLAY SETUP TFT ON/OFF VOLUME 1 2 REPEAT 1/ALL MENU 4 7 5 8 3 6 SUBTITLE 0 PLAY +10 9 CLEAR TITLE STOP AUDIO PAUSE/STEP SELECT F.B WD ANGLE F.FWD PREV ZOOM...
User Guide
Page 14
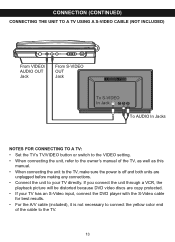
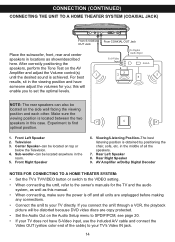
... through a VCR, the playback picture will be distorted because DVD video discs are copy protected. • If your TV has an S-Video input, connect the DVD player with the S-Video cable for best results. • For the A/V cable (included), it is off and both units are unplugged before making any connections. • Connect the unit to the TV. 13 CONNECTION (CONTINUED) CONNECTING THE UNIT TO A TV USING A S-VIDEO CABLE (NOT INCLUDED) From VIDEO/ AUDIO OUT...
... through a VCR, the playback picture will be distorted because DVD video discs are copy protected. • If your TV has an S-Video input, connect the DVD player with the S-Video cable for best results. • For the A/V cable (included), it is off and both units are unplugged before making any connections. • Connect the unit to the TV. 13 CONNECTION (CONTINUED) CONNECTING THE UNIT TO A TV USING A S-VIDEO CABLE (NOT INCLUDED) From VIDEO/ AUDIO OUT...
User Guide
Page 15
... distorted because DVD video discs are copy protected. • Set the Audio Out on the AV Amplifier and adjust the Volume control(s) until the desired sound is obtained by positioning the chair, sofa, etc. Front Right Speaker 6. Rear Right Speaker 9. this case. NOTE: The rear speakers can be located anywhere in the viewing position and have S-Video input, use the included A/V cable and connect the Video OUT (yellow color end...
... distorted because DVD video discs are copy protected. • Set the Audio Out on the AV Amplifier and adjust the Volume control(s) until the desired sound is obtained by positioning the chair, sofa, etc. Front Right Speaker 6. Rear Right Speaker 9. this case. NOTE: The rear speakers can be located anywhere in the viewing position and have S-Video input, use the included A/V cable and connect the Video OUT (yellow color end...
User Guide
Page 17
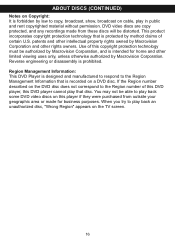
.... Region Management Information: This DVD Player is designed and manufactured to respond to the Region Management Information that disc. DVD video discs are copy protected, and any recordings made from outside your geographic area or made for home and other rights owners. If the Region number described on a DVD disc. You may not be able to play back some DVD video discs on cable, play back an unauthorized disc, "Wrong Region" appears on the TV screen. 16...
.... Region Management Information: This DVD Player is designed and manufactured to respond to the Region Management Information that disc. DVD video discs are copy protected, and any recordings made from outside your geographic area or made for home and other rights owners. If the Region number described on a DVD disc. You may not be able to play back some DVD video discs on cable, play back an unauthorized disc, "Wrong Region" appears on the TV screen. 16...
User Guide
Page 18
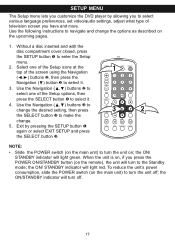
... To reduce the unit's power consumption, slide the POWER switch (on ; Without a disc inserted and with the disc compartment cover closed, press the SETUP button 1 to select various language preferences, set video/audio settings, adjust what type of television screen you press the POWER ON/STANDBY button (on the upcoming pages. 1. the ON/STANDBY indicator will turn off ; SETUP MENU The Setup menu lets you customize the DVD player by pressing the SETUP button 1 again or select...
... To reduce the unit's power consumption, slide the POWER switch (on ; Without a disc inserted and with the disc compartment cover closed, press the SETUP button 1 to select various language preferences, set video/audio settings, adjust what type of television screen you press the POWER ON/STANDBY button (on the upcoming pages. 1. the ON/STANDBY indicator will turn off ; SETUP MENU The Setup menu lets you customize the DVD player by pressing the SETUP button 1 again or select...

User Guide
Page 19
... NTSC LCD MODE PAL TV TYPE AUTO DEFAULT SYSTEM SETUP EXIT SETUP TV SYSTEM NTSC LCD MODE PAL TV TYPE AUTO DEFAULT EXIT SETUP SYSTEM SETUP LCD MODTLCVEDSYMSOTDEME 4:3 1 TV TYPE DEFAULT 16:9 EXIT SETUP SYSTEM SETUP TV SYSTEM LCD MODE 4:3 TV TYPE 16:9 DEFAULT EXIT SETUP NTSC: Select when using the Navigation (√,®) buttons, then press the Navigation (†) button to a wide- PAL: SelecStYSwTEhMeSnETuUPsing a PAL TV. TV TYPE DEFAULT 4:3PS 4:3LB 16:9: SeleEXcItTfSoErTUsPtandar1d6:9LCD wide format viewing. Select when the unit is connected...
... NTSC LCD MODE PAL TV TYPE AUTO DEFAULT SYSTEM SETUP EXIT SETUP TV SYSTEM NTSC LCD MODE PAL TV TYPE AUTO DEFAULT EXIT SETUP SYSTEM SETUP LCD MODTLCVEDSYMSOTDEME 4:3 1 TV TYPE DEFAULT 16:9 EXIT SETUP SYSTEM SETUP TV SYSTEM LCD MODE 4:3 TV TYPE 16:9 DEFAULT EXIT SETUP NTSC: Select when using the Navigation (√,®) buttons, then press the Navigation (†) button to a wide- PAL: SelecStYSwTEhMeSnETuUPsing a PAL TV. TV TYPE DEFAULT 4:3PS 4:3LB 16:9: SeleEXcItTfSoErTUsPtandar1d6:9LCD wide format viewing. Select when the unit is connected...

User Guide
Page 21
... signal output for the disk; the output and coaxial output port of the device will output digital EXIT SETUP VIDEO SETUP BRIGHTNESS CONTRAST VIDEO SETHSUAUTPEURMATEIONNU: 12 10 8 6 4 2 (source code SPDIF/PCM: format. The higher the number, the brighter the picture. The higher Set to select it. Set to the desired saturation (0 to the desired brightness. AUDIO SETUP AUDIO OUTPUT SPDIF/OFF SPDIF/RAW SPDIF/PCM SPDIF/RAW: Select when Dolby Digital, MPEG recording systems are used...
... signal output for the disk; the output and coaxial output port of the device will output digital EXIT SETUP VIDEO SETUP BRIGHTNESS CONTRAST VIDEO SETHSUAUTPEURMATEIONNU: 12 10 8 6 4 2 (source code SPDIF/PCM: format. The higher the number, the brighter the picture. The higher Set to select it. Set to the desired saturation (0 to the desired brightness. AUDIO SETUP AUDIO OUTPUT SPDIF/OFF SPDIF/RAW SPDIF/PCM SPDIF/RAW: Select when Dolby Digital, MPEG recording systems are used...

User Guide
Page 23
... adjusted while playing a disc.F.BWD F.FWD PREV NEXT ANGLE ZOOM PROGRAM SEARCH HEADPHONES JACK 1 For private listening, plug headphones into the Headphones jack. Repeatedly press theTFT SET button to set the (COL) Color and (BRI) Brightness, then use the Navigation (√,®) buttons 2 to access the on -screen setting will be disconnected when headphones are connected. 22 TFT SET BUTTON VOLUME BUTTONS 1 POWER DISPLAY 1SETUP TFT SET VOLUME REPEAT 1/ALL MENU SUBTITLE 1 4 7 0 PLAY 2 5 8 +10 3 6 9 CLEAR STOP TITLE SELECT AUDIO...
... adjusted while playing a disc.F.BWD F.FWD PREV NEXT ANGLE ZOOM PROGRAM SEARCH HEADPHONES JACK 1 For private listening, plug headphones into the Headphones jack. Repeatedly press theTFT SET button to set the (COL) Color and (BRI) Brightness, then use the Navigation (√,®) buttons 2 to access the on -screen setting will be disconnected when headphones are connected. 22 TFT SET BUTTON VOLUME BUTTONS 1 POWER DISPLAY 1SETUP TFT SET VOLUME REPEAT 1/ALL MENU SUBTITLE 1 4 7 0 PLAY 2 5 8 +10 3 6 9 CLEAR STOP TITLE SELECT AUDIO...
User Guide
Page 24
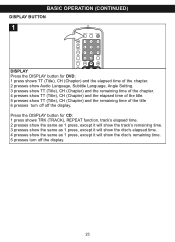
... show the disc's remaining time. 5 presses turn off off the display. 23 Press the DISPLAY button for DVD: F.B WD F.FWD PREV NEXT 1 press shows TT (Title), CH (Chapter) and the elapsed time of the chapter. BASIC OPERATION (CONTINUED) DISPLAY BUTTON 1 POWER DISPLAY SETUP TFT SET VOLUME REPEAT 1/ALL MENU SUBTITLE 1 4 7 0 PLAY 2 5 8 +10 3 6 9 CLEAR STOP TITLE SELECT DISPLAY AUDIO PAUSE/STEP SLOW Press the DISPLAY button for CD: 1 press shows TRK (TRACK), REPEAT function, track's elapsed time. 2 presses...
... show the disc's remaining time. 5 presses turn off off the display. 23 Press the DISPLAY button for DVD: F.B WD F.FWD PREV NEXT 1 press shows TT (Title), CH (Chapter) and the elapsed time of the chapter. BASIC OPERATION (CONTINUED) DISPLAY BUTTON 1 POWER DISPLAY SETUP TFT SET VOLUME REPEAT 1/ALL MENU SUBTITLE 1 4 7 0 PLAY 2 5 8 +10 3 6 9 CLEAR STOP TITLE SELECT DISPLAY AUDIO PAUSE/STEP SLOW Press the DISPLAY button for CD: 1 press shows TRK (TRACK), REPEAT function, track's elapsed time. 2 presses...

User Guide
Page 28
... a specific Time. 1 POWER DISPLAY SETUP TFT ON/OFF VOLUME 3REPEAT 1/ALL MENU SUBTITLE 1 4 7 0 PLAY 2 5 8 +10 3 6 9 CLEAR STOP 2TITLE AUDIO SELECT PAUSE/STEP 4 SLOW F.B WD F.FWD PREV NEXT ANGLE ZOOM PROGRAM SEARCH 1 Press the SEARCH button 1. Press the SEARCH button ‚. Press the SELECT button 4 and playback will start immediately. Press the Navigation (√,®) buttons ƒ to select the TITLE, then use the Number buttons 3 to cancel/erase the number. 27 DVD OPERATION...
... a specific Time. 1 POWER DISPLAY SETUP TFT ON/OFF VOLUME 3REPEAT 1/ALL MENU SUBTITLE 1 4 7 0 PLAY 2 5 8 +10 3 6 9 CLEAR STOP 2TITLE AUDIO SELECT PAUSE/STEP 4 SLOW F.B WD F.FWD PREV NEXT ANGLE ZOOM PROGRAM SEARCH 1 Press the SEARCH button 1. Press the SEARCH button ‚. Press the SELECT button 4 and playback will start immediately. Press the Navigation (√,®) buttons ƒ to select the TITLE, then use the Number buttons 3 to cancel/erase the number. 27 DVD OPERATION...
User Guide
Page 29
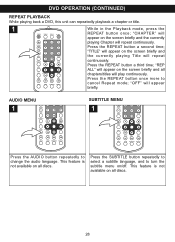
... available on all discs. 28 DVD OPERATION (CONTINUED) REPEAT PLAYBACK While playing back a DVD, this unit can repeatedly playback a chapter or title. 1 POWER DISPLAY SETUP TFT SET VOLUME REPEAT 1/ALL MENU SUBTITLE 1 4 7 0 PLAY 2 5 8 +10 3 6 9 CLEAR STOP TITLE SELECT AUDIO PAUSE/STEP SLOW F.B WD F.FWD PREV NEXT ANGLE ZOOM PROGRAM SEARCH POWER DISPLAY SETUP TFT ON/OFF While in the Playback mode, press the REPEAT button once; Press the SUBTITLE button repeatedly to select a subtitle language, and to turn the subtitle menu on the screen briefly and...
... available on all discs. 28 DVD OPERATION (CONTINUED) REPEAT PLAYBACK While playing back a DVD, this unit can repeatedly playback a chapter or title. 1 POWER DISPLAY SETUP TFT SET VOLUME REPEAT 1/ALL MENU SUBTITLE 1 4 7 0 PLAY 2 5 8 +10 3 6 9 CLEAR STOP TITLE SELECT AUDIO PAUSE/STEP SLOW F.B WD F.FWD PREV NEXT ANGLE ZOOM PROGRAM SEARCH POWER DISPLAY SETUP TFT ON/OFF While in the Playback mode, press the REPEAT button once; Press the SUBTITLE button repeatedly to select a subtitle language, and to turn the subtitle menu on the screen briefly and...

User Guide
Page 34
... +10 button, followed by the Number button (0-9) for the second digit. ANGLE ZOOM PROGRAM SEARCH Press the REPEAT button a second time; MONO L: Select this to set the sound output to left mono mode, meaning it will repeat continuously. "OFF" will appear on the screen briefly and the currently F.BWD F.FWD playing PREV NEXT track will reproduce the right mono signal to Stereo mode. POWER DISPLAY SETUP TFT ON/OFF AUDIO BUTTON 1 VOLUME REPEAT 1/ALL MENU SUBTITLE 1 4 7 0 PLAY...
... +10 button, followed by the Number button (0-9) for the second digit. ANGLE ZOOM PROGRAM SEARCH Press the REPEAT button a second time; MONO L: Select this to set the sound output to left mono mode, meaning it will repeat continuously. "OFF" will appear on the screen briefly and the currently F.BWD F.FWD playing PREV NEXT track will reproduce the right mono signal to Stereo mode. POWER DISPLAY SETUP TFT ON/OFF AUDIO BUTTON 1 VOLUME REPEAT 1/ALL MENU SUBTITLE 1 4 7 0 PLAY...
User Guide
Page 36
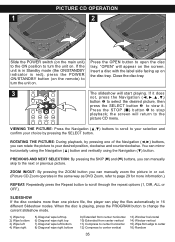
... using the Navigation (†) button. PICTURE CD OPERATION 1 2 Slide the POWER switch (on the main unit) to the ON position to scroll through the repeat options (1, DIR, ALL or OFF). The slideshow will appear on the disc tray. VOLUME 4 5 6 3 REPEAT 1/ALL MENU SUBTITLE 7 8 0 +10 3 PLAY 9 CLEAR STOP TITLE AUDIO 2 SELECT PAUSE/STEP SLOW 1 F.B WD F.FWD PREV NEXT ANGLE ZOOM PROGRAM SEARCH Press the OPEN button to open the disc tray, "OPEN" will start playing...
... using the Navigation (†) button. PICTURE CD OPERATION 1 2 Slide the POWER switch (on the main unit) to the ON position to scroll through the repeat options (1, DIR, ALL or OFF). The slideshow will appear on the disc tray. VOLUME 4 5 6 3 REPEAT 1/ALL MENU SUBTITLE 7 8 0 +10 3 PLAY 9 CLEAR STOP TITLE AUDIO 2 SELECT PAUSE/STEP SLOW 1 F.B WD F.FWD PREV NEXT ANGLE ZOOM PROGRAM SEARCH Press the OPEN button to open the disc tray, "OPEN" will start playing...
User Guide
Page 37
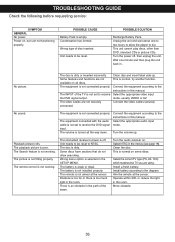
... video cables are using. Connect the equipment according to NTSC. Select the appropriate audio input mode. The disc is dirty or inserted incorrectly. The battery is turned all discs. There is an obstacle in this manual. Install battery according to receive the DVD signal input. Wrong type of the beam. Unit needs to be reset to the instructions in the path of disc inserted. This unit cannot play discs, other than DVD, standard CDs or picture CDs...
... video cables are using. Connect the equipment according to NTSC. Select the appropriate audio input mode. The disc is dirty or inserted incorrectly. The battery is turned all discs. There is an obstacle in this manual. Install battery according to receive the DVD signal input. Wrong type of the beam. Unit needs to be reset to the instructions in the path of disc inserted. This unit cannot play discs, other than DVD, standard CDs or picture CDs...
User Guide
Page 40
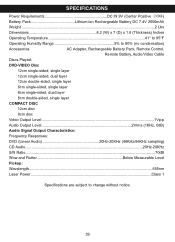
...;F Operating Humidity Range 5% to 90% (no condensation) Accessories AC Adapter, Rechargeable Battery Pack, Remote Control, Remote Battery, Audio/Video Cable Discs Played: DVD-VIDEO Disc 12cm single-sided, single layer 12cm single-sided, dual layer 12cm double-sided, single layer 8cm single-sided, single layer 8cm single-sided, dual layer 8cm double-sided, single layer COMPACT DISC 12cm disc 8cm disc Video Output Level ...1Vp-p Audio Output Level 2Vrms (1KHz, 0dB) Audio Signal Output Characteristics...
...;F Operating Humidity Range 5% to 90% (no condensation) Accessories AC Adapter, Rechargeable Battery Pack, Remote Control, Remote Battery, Audio/Video Cable Discs Played: DVD-VIDEO Disc 12cm single-sided, single layer 12cm single-sided, dual layer 12cm double-sided, single layer 8cm single-sided, single layer 8cm single-sided, dual layer 8cm double-sided, single layer COMPACT DISC 12cm disc 8cm disc Video Output Level ...1Vp-p Audio Output Level 2Vrms (1KHz, 0dB) Audio Signal Output Characteristics...


