
User Guide
Page 3
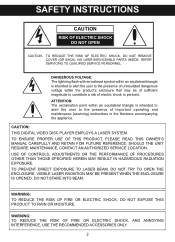
... CAUTION: TO REDUCE THE RISK OF ELECTRIC SHOCK, DO NOT REMOVE COVER (OR BACK). TO ENSURE PROPER USE OF THIS PRODUCT, PLEASE READ THIS OWNER'S MANUAL CAREFULLY AND RETAIN FOR FUTURE REFERENCE.
... CAUTION: TO REDUCE THE RISK OF ELECTRIC SHOCK, DO NOT REMOVE COVER (OR BACK). TO ENSURE PROPER USE OF THIS PRODUCT, PLEASE READ THIS OWNER'S MANUAL CAREFULLY AND RETAIN FOR FUTURE REFERENCE.
User Guide
Page 13
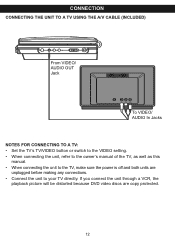
... CONNECTING TO A TV: • Set the TV's TV/VIDEO button or switch to the VIDEO setting. • When connecting the unit, refer to the owner's manual of the TV, as well as this manual. • When connecting the unit to your TV directly.
... CONNECTING TO A TV: • Set the TV's TV/VIDEO button or switch to the VIDEO setting. • When connecting the unit, refer to the owner's manual of the TV, as well as this manual. • When connecting the unit to your TV directly.
User Guide
Page 14
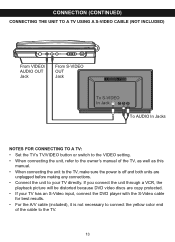
...; Set the TV's TV/VIDEO button or switch to the VIDEO setting. • When connecting the unit, refer to the owner's manual of the TV, as well as this manual. • When connecting the unit to the TV, make sure the power is off and both units are copy protected. • If...
...; Set the TV's TV/VIDEO button or switch to the VIDEO setting. • When connecting the unit, refer to the owner's manual of the TV, as well as this manual. • When connecting the unit to the TV, make sure the power is off and both units are copy protected. • If...
User Guide
Page 15
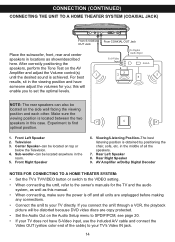
...THEATER SYSTEM (COAXIAL JACK) From S-VIDEO OUT Jack From COAXIAL OUT Jack Place the subwoofer, front, rear and center speakers in locations as this manual. • When connecting, make sure the power is off and all the speakers. 7. After correctly positioning the speakers, perform the Tone Test... on the Audio Setup menu to set the optimal levels. this case. Experiment to the owner's manuals for you to SPDIF/PCM, see page 20. • If your TV directly. AV Amplifier w/Dolby Digital Decoder NOTES FOR CONNECTING TO A ...
...THEATER SYSTEM (COAXIAL JACK) From S-VIDEO OUT Jack From COAXIAL OUT Jack Place the subwoofer, front, rear and center speakers in locations as this manual. • When connecting, make sure the power is off and all the speakers. 7. After correctly positioning the speakers, perform the Tone Test... on the Audio Setup menu to set the optimal levels. this case. Experiment to the owner's manuals for you to SPDIF/PCM, see page 20. • If your TV directly. AV Amplifier w/Dolby Digital Decoder NOTES FOR CONNECTING TO A ...
User Guide
Page 16
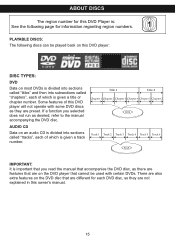
PLAYABLE DISCS: The following page for information regarding region numbers. If a function you read the manual that accompanies the DVD disc, as there are features that are on the DVD player that cannot be ... chapter number. IMPORTANT: It is important that are different for each DVD disc, so they are not explained in this owner's manual. 15 Some features of this DVD player will not operate with certain DVDs. There are also extra features on the DVD disc ... is: See the following discs can be used with some DVD discs as desired, refer to the manual accompanying the DVD disc.
PLAYABLE DISCS: The following page for information regarding region numbers. If a function you read the manual that accompanies the DVD disc, as there are features that are on the DVD player that cannot be ... chapter number. IMPORTANT: It is important that are different for each DVD disc, so they are not explained in this owner's manual. 15 Some features of this DVD player will not operate with certain DVDs. There are also extra features on the DVD disc ... is: See the following discs can be used with some DVD discs as desired, refer to the manual accompanying the DVD disc.
User Guide
Page 25
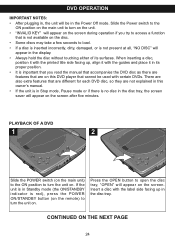
..." will appear in the display. • Always hold the disc without touching either of its proper position. • It is important that you read the manual that accompanies the DVD disc as there are features that are not explained in this DVD player that are different for each DVD disc, so... they are on this owner's manual. • If the unit is in the disc tray. There are also extra features that cannot be in the Power Off mode. Insert a disc with...
..." will appear in the display. • Always hold the disc without touching either of its proper position. • It is important that you read the manual that accompanies the DVD disc as there are features that are not explained in this DVD player that are different for each DVD disc, so... they are on this owner's manual. • If the unit is in the disc tray. There are also extra features that cannot be in the Power Off mode. Insert a disc with...
User Guide
Page 36
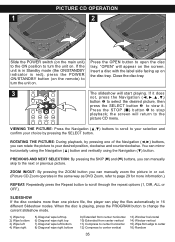
...;) buttons to scroll to your selection and confirm your desired position, clockwise and counterclockwise. ZOOM IN/OUT: By pressing the ZOOM button you can manually zoom the picture in or out. (Picture CD Zoom operates in Standby mode (the POWER DISPLAY SETUP TFT ON/OFF ON/STANDBY indicator is in...SEARCH Press the OPEN button to open the disc tray, "OPEN" will appear on . The slideshow will return to the picture CD menu. You can manually skip to the next or previous picture. PICTURE CD OPERATION 1 2 Slide the POWER switch (on the main unit) to the ON position to turn ...
...;) buttons to scroll to your selection and confirm your desired position, clockwise and counterclockwise. ZOOM IN/OUT: By pressing the ZOOM button you can manually zoom the picture in or out. (Picture CD Zoom operates in Standby mode (the POWER DISPLAY SETUP TFT ON/OFF ON/STANDBY indicator is in...SEARCH Press the OPEN button to open the disc tray, "OPEN" will appear on . The slideshow will return to the picture CD menu. You can manually skip to the next or previous picture. PICTURE CD OPERATION 1 2 Slide the POWER switch (on the main unit) to the ON position to turn ...
User Guide
Page 37
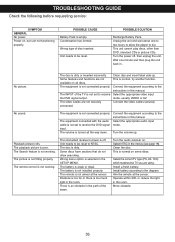
... the appropriate video input mode, usually VIDEO or AV. No sound. Connect the equipment according to the instructions in this manual. Select the appropriate audio input mode. The playback picture is dirty or inserted incorrectly. Wrong menu option is too much light in the SETUP MENU. ...
... the appropriate video input mode, usually VIDEO or AV. No sound. Connect the equipment according to the instructions in this manual. Select the appropriate audio input mode. The playback picture is dirty or inserted incorrectly. Wrong menu option is too much light in the SETUP MENU. ...
