User Guide
Page 7
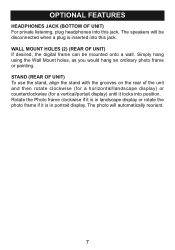
WALL MOUNT HOLES (2) (REAR OF UNIT) If desired, the digital frame can be disconnected when a plug is in landscape display or rotate the photo frame if it is inserted into this jack. Rotate the Photo frame clockwise if it locks into position. STAND (REAR OF UNIT) To use ...or counterclockwise (for a vertical/portait display) until it is in portrait display. The photo will be mounted onto a wall. Simply hang using the Wall Mount holes, as you would hang an ordinary photo frame or painting. The speakers will automatically reorient. 7 OPTIONAL FEATURES HEADPHONES JACK (BOTTOM ...
WALL MOUNT HOLES (2) (REAR OF UNIT) If desired, the digital frame can be disconnected when a plug is in landscape display or rotate the photo frame if it is inserted into this jack. Rotate the Photo frame clockwise if it locks into position. STAND (REAR OF UNIT) To use ...or counterclockwise (for a vertical/portait display) until it is in portrait display. The photo will be mounted onto a wall. Simply hang using the Wall Mount holes, as you would hang an ordinary photo frame or painting. The speakers will automatically reorient. 7 OPTIONAL FEATURES HEADPHONES JACK (BOTTOM ...
User Guide
Page 9
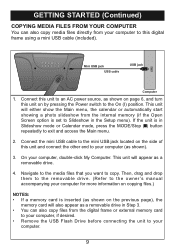
... is inserted (as shown on the previous page), the memory card will either show the Main menu, the calendar or automatically start showing a photo slideshow from the internal memory (if the Open Screen option is in Step 3. • You can also copy media files directly from your ... Computer. This unit will appear as shown). 3. GETTING STARTED (Continued) COPYING MEDIA FILES FROM YOUR COMPUTER You can also copy files from the digital frame or external memory card to your computer, if desired. • Remove the USB Flash Drive before connecting the unit to your computer. 9 Connect...
... is inserted (as shown on the previous page), the memory card will either show the Main menu, the calendar or automatically start showing a photo slideshow from the internal memory (if the Open Screen option is in Step 3. • You can also copy media files directly from your ... Computer. This unit will appear as shown). 3. GETTING STARTED (Continued) COPYING MEDIA FILES FROM YOUR COMPUTER You can also copy files from the digital frame or external memory card to your computer, if desired. • Remove the USB Flash Drive before connecting the unit to your computer. 9 Connect...

User Guide
Page 19
.../Play/Pause (®p) button 3 to make the change the options. 1. OPERATION (Continued) SETUP MENU 4 2 1 3 The Setup menu lets you customize this digital frame by allowing you to turn the unit on or off, adjust the speed of the Setup options (i.e. Select Setup (the wrench and screwdriver icon) using...8224; buttons 2 to Slideshow in the Main menu.) 4. the option will either show the Main menu, the calendar or automatically start showing a photo slideshow (if the Open Screen option is set to select one of the slideshow and more! Use the Navigation π,† buttons 2 to access...
.../Play/Pause (®p) button 3 to make the change the options. 1. OPERATION (Continued) SETUP MENU 4 2 1 3 The Setup menu lets you customize this digital frame by allowing you to turn the unit on or off, adjust the speed of the Setup options (i.e. Select Setup (the wrench and screwdriver icon) using...8224; buttons 2 to Slideshow in the Main menu.) 4. the option will either show the Main menu, the calendar or automatically start showing a photo slideshow (if the Open Screen option is set to select one of the slideshow and more! Use the Navigation π,† buttons 2 to access...


