
User Guide
Page 1
... operating and maintenance (servicing) instructions in the instruction manual. NO USERSERVICEABLE PARTS INSIDE. FCC WARNING: This equipment may cause harmful interference unless the modifications are expressly approved in the literature accompanying the appliance. REFER SERVICING TO QUALIFIED SERVICE PERSONNEL. Changes or modifications to operate this equipment may generate or use radio... DE LA PRISES ET POUSSER JUSQU'AU FOND. 1 SAFETY PRECAUTIONS CAUTION RISK OF ELECTRIC SHOCK DO NOT OPEN CAUTION: TO REDUCE THE RISK OF ELECTRIC SHOCK, DO NOT REMOVE COVER (OR BACK).
... operating and maintenance (servicing) instructions in the instruction manual. NO USERSERVICEABLE PARTS INSIDE. FCC WARNING: This equipment may cause harmful interference unless the modifications are expressly approved in the literature accompanying the appliance. REFER SERVICING TO QUALIFIED SERVICE PERSONNEL. Changes or modifications to operate this equipment may generate or use radio... DE LA PRISES ET POUSSER JUSQU'AU FOND. 1 SAFETY PRECAUTIONS CAUTION RISK OF ELECTRIC SHOCK DO NOT OPEN CAUTION: TO REDUCE THE RISK OF ELECTRIC SHOCK, DO NOT REMOVE COVER (OR BACK).

User Guide
Page 2
...B digital apparatus complies with the instructions, may cause harmful interference to which can radiate radio frequency energy and, if not installed and used in a particular installation. ...user is connected. • Consult the dealer or an experienced radio/TV technician for AC connection. SAFETY PRECAUTIONS INFORMATION: This equipment complies with Class B digital device regulations. Lightning and power surges ARE NOT covered under warranty for this equipment does cause harmful interference to radio or television reception, which the receiver is encouraged to try to use...
...B digital apparatus complies with the instructions, may cause harmful interference to which can radiate radio frequency energy and, if not installed and used in a particular installation. ...user is connected. • Consult the dealer or an experienced radio/TV technician for AC connection. SAFETY PRECAUTIONS INFORMATION: This equipment complies with Class B digital device regulations. Lightning and power surges ARE NOT covered under warranty for this equipment does cause harmful interference to radio or television reception, which the receiver is encouraged to try to use...
User Guide
Page 3
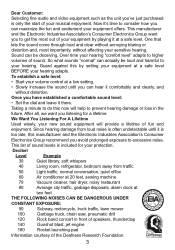
... to excessive noise. Over time your hearing "comfort level" adapts to your musical enjoyment. This list of sound. This manufacturer and the Electronic Industries Association's Consumer Electronics Group want you 've just purchased is only the start of your equipment by setting your equipment at a safe... equipment will help to consider how you to do this by playing it there. One that lets the sound come through loud and clear without distortion. Now it is included for a lifetime. Since hearing damage from traffic 50 Light traffic, normal conversation,...
... to excessive noise. Over time your hearing "comfort level" adapts to your musical enjoyment. This list of sound. This manufacturer and the Electronic Industries Association's Consumer Electronics Group want you 've just purchased is only the start of your equipment by setting your equipment at a safe... equipment will help to consider how you to do this by playing it there. One that lets the sound come through loud and clear without distortion. Now it is included for a lifetime. Since hearing damage from traffic 50 Light traffic, normal conversation,...

User Guide
Page 4
Screen 2. SELECT/Play/Pause (®p) Button 5. Stand (PART NO. 60-278- Navigation Left/Skip o Button 14. USB Jack (for Flash Drives only) (Side of Unit) 18. Wall Mount Hole 7. C0401*) 10. Power Switch (Side of Unit) 17. Remote Sensor 3. Volume/Navigation UP/Rotate Button 8. MODE/Stop (X) Button 4. LOCATION OF CONTROLS MAIN UNIT 1 2 3 11 4 12 5 13 6 14 7 15 16 8 17 9 10 18 1. SD/MMC/MS/xD Card Slot (Side of...
Screen 2. SELECT/Play/Pause (®p) Button 5. Stand (PART NO. 60-278- Navigation Left/Skip o Button 14. USB Jack (for Flash Drives only) (Side of Unit) 18. Wall Mount Hole 7. C0401*) 10. Power Switch (Side of Unit) 17. Remote Sensor 3. Volume/Navigation UP/Rotate Button 8. MODE/Stop (X) Button 4. LOCATION OF CONTROLS MAIN UNIT 1 2 3 11 4 12 5 13 6 14 7 15 16 8 17 9 10 18 1. SD/MMC/MS/xD Card Slot (Side of...
User Guide
Page 7
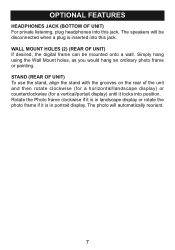
... inserted into this jack. Simply hang using the Wall Mount holes, as you would hang an ordinary photo frame or painting. The photo will be mounted onto a wall. WALL MOUNT HOLES (2) (REAR OF UNIT) If desired, the digital frame can be disconnected when a plug is in landscape display or rotate the photo frame if it locks into this jack. The...
... inserted into this jack. Simply hang using the Wall Mount holes, as you would hang an ordinary photo frame or painting. The photo will be mounted onto a wall. WALL MOUNT HOLES (2) (REAR OF UNIT) If desired, the digital frame can be disconnected when a plug is in landscape display or rotate the photo frame if it locks into this jack. The...
User Guide
Page 8
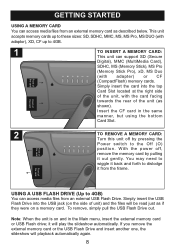
... rear of unit) and the files will playback automatically again. 8 If you remove the external memory card or the USB Flash Drive and insert another one, the sildeshow will be read just as shown). You may need to wiggle it will play the sildeshow automatically. GETTING STARTED USING A MEMORY CARD You can access media files from an external USB Flash Drive. Simply insert the card into the USB jack (on the side of...
... rear of unit) and the files will playback automatically again. 8 If you remove the external memory card or the USB Flash Drive and insert another one, the sildeshow will be read just as shown). You may need to wiggle it will play the sildeshow automatically. GETTING STARTED USING A MEMORY CARD You can access media files from an external USB Flash Drive. Simply insert the card into the USB jack (on the side of...
User Guide
Page 9
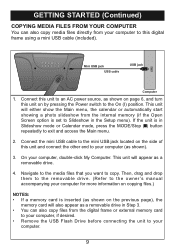
...), the memory card will either show the Main menu, the calendar or automatically start showing a photo slideshow from the internal memory (if the Open Screen option is in Slideshow mode or Calendar mode, press the MODE/Stop (X) button repeatedly to copy. This unit will also appear as shown on page 6, and turn this unit on the side of this digital frame using a mini USB cable (included). Connect the mini USB cable to the mini USB jack located on by pressing the Power switch to...
...), the memory card will either show the Main menu, the calendar or automatically start showing a photo slideshow from the internal memory (if the Open Screen option is in Slideshow mode or Calendar mode, press the MODE/Stop (X) button repeatedly to copy. This unit will also appear as shown on page 6, and turn this unit on the side of this digital frame using a mini USB cable (included). Connect the mini USB cable to the mini USB jack located on by pressing the Power switch to...
User Guide
Page 10
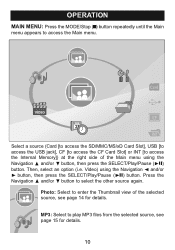
... the SD/MMC/MS/xD Card Slot], USB [to access the USB jack], CF [to access the CF Card Slot] or INT [to enter the Thumbnail view of the Main menu using the Navigation √ and/or ® button, then press the SELECT/Play/Pause (®p) button. OPERATION MAIN MENU: Press the MODE/Stop (X) button repeatedly until the Main menu appears to play MP3 files from the selected source...
... the SD/MMC/MS/xD Card Slot], USB [to access the USB jack], CF [to access the CF Card Slot] or INT [to enter the Thumbnail view of the Main menu using the Navigation √ and/or ® button, then press the SELECT/Play/Pause (®p) button. OPERATION MAIN MENU: Press the MODE/Stop (X) button repeatedly until the Main menu appears to play MP3 files from the selected source...
User Guide
Page 11
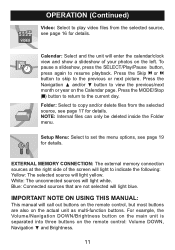
... deleted inside the Folder menu. EXTERNAL MEMORY CONNECTION: The external memory connection sources at the right side of your photos on the remote control: Volume DOWN, Navigation † and Brightness. 11 Press the Skip o or n button to skip to play video files from the selected source, see page 19 for details. White: The unconnected sources will light yellow. Calendar: Select and the unit will enter the calendar/clock view and show a slideshow...
... deleted inside the Folder menu. EXTERNAL MEMORY CONNECTION: The external memory connection sources at the right side of your photos on the remote control: Volume DOWN, Navigation † and Brightness. 11 Press the Skip o or n button to skip to play video files from the selected source, see page 19 for details. White: The unconnected sources will light yellow. Calendar: Select and the unit will enter the calendar/clock view and show a slideshow...
User Guide
Page 12
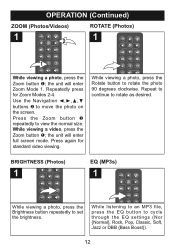
... screen. Repeatedly press for standard video viewing. Use the Navigation buttons 2 to set the brightness. Repeat to continue to cycle through the EQ settings (Nor {Normal}, Rock, Pop, Classic, Soft, Jazz or DBB {Bass Boost}). 12 While viewing a video, press the Zoom button 1; While listening to an MP3 file, press the EQ button to rotate as desired. the unit will enter Zoom Mode 1. OPERATION (Continued) ZOOM (Photos/Videos) 1 2 ROTATE (Photos) 1 1 While viewing a photo...
... screen. Repeatedly press for standard video viewing. Use the Navigation buttons 2 to set the brightness. Repeat to continue to cycle through the EQ settings (Nor {Normal}, Rock, Pop, Classic, Soft, Jazz or DBB {Bass Boost}). 12 While viewing a video, press the Zoom button 1; While listening to an MP3 file, press the EQ button to rotate as desired. the unit will enter Zoom Mode 1. OPERATION (Continued) ZOOM (Photos/Videos) 1 2 ROTATE (Photos) 1 1 While viewing a photo...

User Guide
Page 14
...;p) button. OPERATION (Continued) BASIC PHOTO PLAYBACK (Supported format: JPEG) 1 2 1 4 3 2 1 3 2 Press the Power switch on . This unit will either show the selected photo (Browse mode). Select the desired photo using the Navigation buttons 1; then press the SELECT/Play/Pause (®p) button 2 again to access the Main menu. Press the MODE/Stop (X) button 1 repeatedly until the Main menu appears to show the Main menu, the calendar or automatically start showing a photo slideshow (if the Open Screen option is set...
...;p) button. OPERATION (Continued) BASIC PHOTO PLAYBACK (Supported format: JPEG) 1 2 1 4 3 2 1 3 2 Press the Power switch on . This unit will either show the selected photo (Browse mode). Select the desired photo using the Navigation buttons 1; then press the SELECT/Play/Pause (®p) button 2 again to access the Main menu. Press the MODE/Stop (X) button 1 repeatedly until the Main menu appears to show the Main menu, the calendar or automatically start showing a photo slideshow (if the Open Screen option is set...
User Guide
Page 15
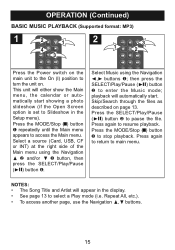
... file. playback will automatically start showing a photo slideshow (if the Open Screen option is set to Slideshow in the display. • See page 13 to select a Play mode (i.e. Press the SELECT/Play/Pause (®p) button 2 to main menu. NOTES: • The Song Title and Artist will either show the Main menu, the calendar or automatically start . Press the MODE/Stop (X) button 3 to enter the Music mode; OPERATION (Continued) BASIC MUSIC PLAYBACK (Supported format: MP3) 1 2 1 4 3 2 1 3 2 Press the Power...
... file. playback will automatically start showing a photo slideshow (if the Open Screen option is set to Slideshow in the display. • See page 13 to select a Play mode (i.e. Press the SELECT/Play/Pause (®p) button 2 to main menu. NOTES: • The Song Title and Artist will either show the Main menu, the calendar or automatically start . Press the MODE/Stop (X) button 3 to enter the Music mode; OPERATION (Continued) BASIC MUSIC PLAYBACK (Supported format: MP3) 1 2 1 4 3 2 1 3 2 Press the Power...
User Guide
Page 16
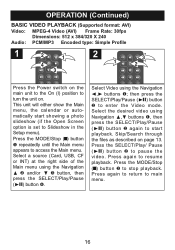
... SELECT/Play/Pause (®p) button 2 to start showing a photo slideshow (if the Open Screen option is set to Slideshow in the Setup menu). Select the desired video using Navigation π,† buttons 1, then press the SELECT/Play/Pause (®p) button 2 again to enter the Video mode. OPERATION (Continued) BASIC VIDEO PLAYBACK (Supported format: AVI) Video: MPEG-4 Video (AVI) Frame Rate: 30fps Dimensions: 512 x 384/320 X 240 Audio: PCM/MP3 Encoded type: Simple Profile 1 2 1 4 3 2 1 3 2 Press the Power switch...
... SELECT/Play/Pause (®p) button 2 to start showing a photo slideshow (if the Open Screen option is set to Slideshow in the Setup menu). Select the desired video using Navigation π,† buttons 1, then press the SELECT/Play/Pause (®p) button 2 again to enter the Video mode. OPERATION (Continued) BASIC VIDEO PLAYBACK (Supported format: AVI) Video: MPEG-4 Video (AVI) Frame Rate: 30fps Dimensions: 512 x 384/320 X 240 Audio: PCM/MP3 Encoded type: Simple Profile 1 2 1 4 3 2 1 3 2 Press the Power switch...
User Guide
Page 17
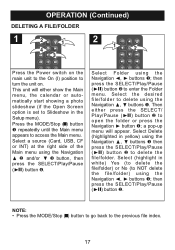
...;p) button 2 to NOT delete the file/folder) using the Navigation √, ® buttons 1; Select (highlight in the Setup menu). NOTE: • Press the MODE/Stop (X) button to go back to enter the Folder menu. Then either show the Main menu, the calendar or automatically start showing a photo slideshow (if the Open Screen option is set to Slideshow in white) Yes (to delete the file/folder) or No (to delete the file/folder. then press the SELECT/Play/Pause (®p) button...
...;p) button 2 to NOT delete the file/folder) using the Navigation √, ® buttons 1; Select (highlight in the Setup menu). NOTE: • Press the MODE/Stop (X) button to go back to enter the Folder menu. Then either show the Main menu, the calendar or automatically start showing a photo slideshow (if the Open Screen option is set to Slideshow in white) Yes (to delete the file/folder) or No (to delete the file/folder. then press the SELECT/Play/Pause (®p) button...
User Guide
Page 18
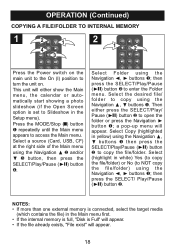
... the SELECT/Play/Pause (®p) button 2 to Slideshow in the Main menu first. • If the internal memory is full, "Disk is connected, select the target media (which contains the file) in the Setup menu). then press the SELECT/ Play/Pause (®p) button 2. Then either show the Main menu, the calendar or automatically start showing a photo slideshow (if the Open Screen option is set to copy the file/folder. OPERATION (Continued) COPYING A FILE/FOLDER TO INTERNAL MEMORY 1 2 1 4 3 2 1 2 Press the Power switch...
... the SELECT/Play/Pause (®p) button 2 to Slideshow in the Main menu first. • If the internal memory is full, "Disk is connected, select the target media (which contains the file) in the Setup menu). then press the SELECT/ Play/Pause (®p) button 2. Then either show the Main menu, the calendar or automatically start showing a photo slideshow (if the Open Screen option is set to copy the file/folder. OPERATION (Continued) COPYING A FILE/FOLDER TO INTERNAL MEMORY 1 2 1 4 3 2 1 2 Press the Power switch...

User Guide
Page 19
... either show the Main menu, the calendar or automatically start showing a photo slideshow (if the Open Screen option is set to Slideshow in the Setup menu). 2. Press the MODE/Stop (X) button 1 repeatedly until the Main menu appears to select it; then press the SELECT/Play/Pause (®p) button 3 to enter the Setup menu. (NOTE: You can also access the Setup menu by allowing you customize this digital frame by pressing the SETUP button 4 while in yellow...
... either show the Main menu, the calendar or automatically start showing a photo slideshow (if the Open Screen option is set to Slideshow in the Setup menu). 2. Press the MODE/Stop (X) button 1 repeatedly until the Main menu appears to select it; then press the SELECT/Play/Pause (®p) button 3 to enter the Setup menu. (NOTE: You can also access the Setup menu by allowing you customize this digital frame by pressing the SETUP button 4 while in yellow...
User Guide
Page 20
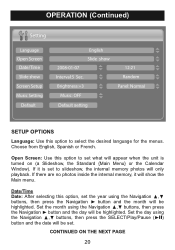
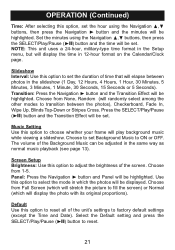
... internal memory, it is turned on (a Slideshow, the Standard {Main Menu} or the Calendar Window). Set the month using the Navigation π,† buttons, then press the Navigation ® button and the day will be set. CONTINUED ON THE NEXT PAGE 20 Set the day using the Navigation π,† buttons, then press the SELECT/Play/Pause (®p) button and the date will be highlighted. OPERATION (Continued) Date/Time Default Default setting...
... internal memory, it is turned on (a Slideshow, the Standard {Main Menu} or the Calendar Window). Set the month using the Navigation π,† buttons, then press the Navigation ® button and the day will be set. CONTINUED ON THE NEXT PAGE 20 Set the day using the Navigation π,† buttons, then press the SELECT/Play/Pause (®p) button and the date will be highlighted. OPERATION (Continued) Date/Time Default Default setting...
User Guide
Page 21
Screen Setup Brightness: Use this option to ON or OFF. Press the SELECT/Play/Pause (®p) button and the Transition Effect will be set Background Music to choose whether your frame will play background music while viewing a slideshow. Select the Default setting and press the SELECT/Play/Pause (®p) button to factory default settings (except the Time and Date). Music Setting Use this option to fill the screen) or Normal (which the photos will be displayed. Choose...
Screen Setup Brightness: Use this option to ON or OFF. Press the SELECT/Play/Pause (®p) button and the Transition Effect will be set Background Music to choose whether your frame will play background music while viewing a slideshow. Select the Default setting and press the SELECT/Play/Pause (®p) button to factory default settings (except the Time and Date). Music Setting Use this option to fill the screen) or Normal (which the photos will be displayed. Choose...
User Guide
Page 22
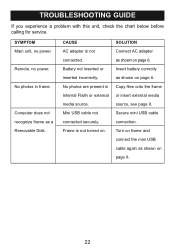
... not recognize frame as shown on . SOLUTION Connect AC adapter as shown on page 6. CAUSE AC adapter is not turned on page 6. TROUBLESHOOTING GUIDE If you experience a problem with this unit, check the chart below before calling for service. No photos are present in frame. No photos in Internal Flash or external media source. Remote, no power. Mini USB cable not connected securely. Insert battery correctly as a Removable Disk. Copy files onto the frame or insert external media source...
... not recognize frame as shown on . SOLUTION Connect AC adapter as shown on page 6. CAUSE AC adapter is not turned on page 6. TROUBLESHOOTING GUIDE If you experience a problem with this unit, check the chart below before calling for service. No photos are present in frame. No photos in Internal Flash or external media source. Remote, no power. Mini USB cable not connected securely. Insert battery correctly as a Removable Disk. Copy files onto the frame or insert external media source...
User Guide
Page 23
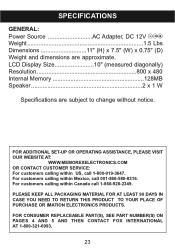
... Internal Memory 128MB Speaker 2 x 1 W Specifications are approximate. PLEASE KEEP ALL PACKAGING MATERIAL FOR AT LEAST 90 DAYS IN CASE YOU NEED TO RETURN THIS PRODUCT TO YOUR PLACE OF PURCHASE OR IMATION ELECTRONICS PRODUCTS. SPECIFICATIONS GENERAL: Power Source AC Adapter, DC 12V Z Weight 1.5 Lbs Dimensions 11" (H) x 7.5" (W) x 0.75" (D) Weight and dimensions are subject to change without notice. FOR CONSUMER REPLACEABLE PART(S), SEE PART NUMBER...
... Internal Memory 128MB Speaker 2 x 1 W Specifications are approximate. PLEASE KEEP ALL PACKAGING MATERIAL FOR AT LEAST 90 DAYS IN CASE YOU NEED TO RETURN THIS PRODUCT TO YOUR PLACE OF PURCHASE OR IMATION ELECTRONICS PRODUCTS. SPECIFICATIONS GENERAL: Power Source AC Adapter, DC 12V Z Weight 1.5 Lbs Dimensions 11" (H) x 7.5" (W) x 0.75" (D) Weight and dimensions are subject to change without notice. FOR CONSUMER REPLACEABLE PART(S), SEE PART NUMBER...


