

Owners Manual
Page 10
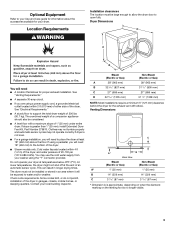
... the door swing direction on the drying rack. Do not use Sensor cycles with drawer. For a garage installation, you purchased your washer and dryer? Stack Kit Are you will need to the "Assistance or Service" section. This chart shows examples of items that would... 3.5" (89 mm) above the floor. A B A. 10" (254 mm) pedestal B. 15.5" (394 mm) pedestal The pedestals are installing your PERFORMANCE SERIES washer and dryer and wish to avoid having loose items fall behind the machines during operation. Optional Accessories Pedestals Are you will reduce the chance of...
... the door swing direction on the drying rack. Do not use Sensor cycles with drawer. For a garage installation, you purchased your washer and dryer? Stack Kit Are you will need to the "Assistance or Service" section. This chart shows examples of items that would... 3.5" (89 mm) above the floor. A B A. 10" (254 mm) pedestal B. 15.5" (394 mm) pedestal The pedestals are installing your PERFORMANCE SERIES washer and dryer and wish to avoid having loose items fall behind the machines during operation. Optional Accessories Pedestals Are you will reduce the chance of...
Installation Instructions
Page 2
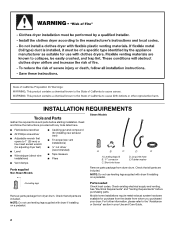
... vent) ■ Tin snips (new vent installations) ■ ¼" nut driver (recommended) ■ Tape measure ■ Pliers Parts supplied Non-Steam Models Steam Models A B C D E A. Rubber washer Remove parts package from whom you purchased your Use and Care Guide. 2 Parts needed Check local codes. INSTALLATION REQUIREMENTS Tools and Parts Gather the required...
... vent) ■ Tin snips (new vent installations) ■ ¼" nut driver (recommended) ■ Tape measure ■ Pliers Parts supplied Non-Steam Models Steam Models A B C D E A. Rubber washer Remove parts package from whom you purchased your Use and Care Guide. 2 Parts needed Check local codes. INSTALLATION REQUIREMENTS Tools and Parts Gather the required...
Installation Instructions
Page 3
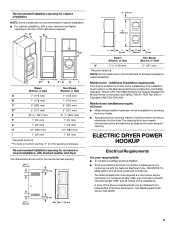
See "Electrical Requirements." ■ A sturdy floor to support the total dryer weight of the dryer. Do not operate your washer using the "Y" connector provided. At lower temperatures, the dryer might not shut off at temperatures below 45ºF (7ºC). Venting Dimensions C A* B Back View Steam (Electric ...
See "Electrical Requirements." ■ A sturdy floor to support the total dryer weight of the dryer. Do not operate your washer using the "Y" connector provided. At lower temperatures, the dryer might not shut off at temperatures below 45ºF (7ºC). Venting Dimensions C A* B Back View Steam (Electric ...
Installation Instructions
Page 5
... home installations. A copy of the cabinet are not recommended for stacked recessed or closet installation. Recommended installation spacing for recessed or closet installation, with stacked washer and dryer The dimensions shown are for the recommended spacing. 48 in.2 * (310 cm2) 3"* (76 mm) 24 in mobile homes to the Manufactured Home Construction...
... home installations. A copy of the cabinet are not recommended for stacked recessed or closet installation. Recommended installation spacing for recessed or closet installation, with stacked washer and dryer The dimensions shown are for the recommended spacing. 48 in.2 * (310 cm2) 3"* (76 mm) 24 in mobile homes to the Manufactured Home Construction...
Installation Instructions
Page 14
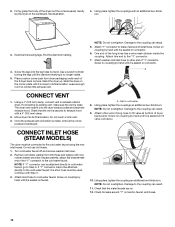
...corner posts until it is secured to the coupling can result. 11. See illustration. 4. Using pliers, tighten the couplings with new rubber washer provided. The dryer vent must be attached directly to cold water faucet, go to cold water faucet. Using pliers, tighten the couplings .... Continue with a 4" (102 mm) clamp. 2. Check for leaks around "Y" connector, faucet, and hoses. 14 Examine the leveling legs. Attach washer cold inlet hose to finish turning the legs until it is close to the cold water faucet. A CONNECT VENT 1. Damage to the coupling can be...
...corner posts until it is secured to the coupling can result. 11. See illustration. 4. Using pliers, tighten the couplings with new rubber washer provided. The dryer vent must be attached directly to cold water faucet, go to cold water faucet. Using pliers, tighten the couplings .... Continue with a 4" (102 mm) clamp. 2. Check for leaks around "Y" connector, faucet, and hoses. 14 Examine the leveling legs. Attach washer cold inlet hose to finish turning the legs until it is close to the cold water faucet. A CONNECT VENT 1. Damage to the coupling can be...


