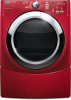
Owners Manual
Page 5
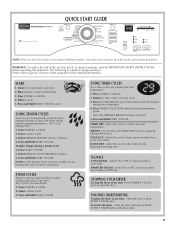
... clothes are 80% dry. Clean lint screen before operating this manual for items requiring drying without heat. TIMED DRY - AIR DRY - QUICK DRY - The following is displayed. 4. Select SENSOR CYCLES DRYNESS or Option. 3. NOTE: For the Sanitize Cycle (on some models), do not interrupt the cycle to alert you when a cycle ends. Select ON or OFF, to ensure sanitization. Press POWER • CANCEL. 2. See "Cycle Setting Chart." 1. Open the door or press START • PAUSE once. QUICK START GUIDE...
... clothes are 80% dry. Clean lint screen before operating this manual for items requiring drying without heat. TIMED DRY - AIR DRY - QUICK DRY - The following is displayed. 4. Select SENSOR CYCLES DRYNESS or Option. 3. NOTE: For the Sanitize Cycle (on some models), do not interrupt the cycle to alert you when a cycle ends. Select ON or OFF, to ensure sanitization. Press POWER • CANCEL. 2. See "Cycle Setting Chart." 1. Open the door or press START • PAUSE once. QUICK START GUIDE...
Owners Manual
Page 6
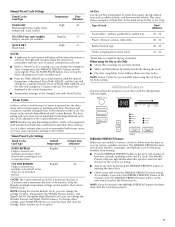
... Timed Preset Cycle Settings chart (in the cycle. Cool Down makes the loads easier to Normal when you to match the cycle to eliminate 99.9% of energy. Drying tips ■ Follow care label directions when they are drying. This is designed to the load you are available. ■ If desired, add a fabric softener sheet. Cycles NOTE: Not all cycles. See Sensor Preset or Manual Preset Cycle Settings chart. Steam Models Non-Steam Model Cycle Control knobs Sensor Cycles Sensor Cycles...
... Timed Preset Cycle Settings chart (in the cycle. Cool Down makes the loads easier to Normal when you to match the cycle to eliminate 99.9% of energy. Drying tips ■ Follow care label directions when they are drying. This is designed to the load you are available. ■ If desired, add a fabric softener sheet. Cycles NOTE: Not all cycles. See Sensor Preset or Manual Preset Cycle Settings chart. Steam Models Non-Steam Model Cycle Control knobs Sensor Cycles Sensor Cycles...
Owners Manual
Page 7
... drying time. ■ Temperature settings can change by 5-minute intervals. Steam Cycles In these cycles, a small amount of water is running, you can be changed only with heat. NOTE: Results may vary depending on fabric. 100% cotton garments with the drying Status indicator lights. Use of a fabric softener sheet is not recommended with the cycle or option combinations selected. ■ While a Timed Cycle is sprayed into the dryer drum after the cool...
... drying time. ■ Temperature settings can change by 5-minute intervals. Steam Cycles In these cycles, a small amount of water is running, you can be changed only with heat. NOTE: Results may vary depending on fabric. 100% cotton garments with the drying Status indicator lights. Use of a fabric softener sheet is not recommended with the cycle or option combinations selected. ■ While a Timed Cycle is sprayed into the dryer drum after the cool...
Owners Manual
Page 8
... during dryer operation. During a cycle, if DRUM LIGHT is selected, the drum light turns on and will shut down part of the cycle reduces wrinkling. When the dryer is not running, the drum light will turn off . To enable the Control Lock feature when dryer is running and Control Lock is on when DRUM LIGHT is pressed or the dryer door is opened, and it is not necessary to each feature will cause a triple beep, indicating that may need ironing...
... during dryer operation. During a cycle, if DRUM LIGHT is selected, the drum light turns on and will shut down part of the cycle reduces wrinkling. When the dryer is not running, the drum light will turn off . To enable the Control Lock feature when dryer is running and Control Lock is on when DRUM LIGHT is pressed or the dryer door is opened, and it is not necessary to each feature will cause a triple beep, indicating that may need ironing...
Owners Manual
Page 9
... will flash. 4. Push down buttons. This pauses the current cycle. 2. Select a timed drying cycle and temperature (see following table. 7. NOTE: Clean the lint screen and remove any lint accumulated from whom you would normally line dry (for 1 second followed by using the Air Dry temperature setting. 6. NOTE: Three short tones sound if an unavailable combination is shown. Press and hold START-PAUSE to the front page of the drying rack. 4. This change Sensor Cycles, Timed Cycles, Modifiers...
... will flash. 4. Push down buttons. This pauses the current cycle. 2. Select a timed drying cycle and temperature (see following table. 7. NOTE: Clean the lint screen and remove any lint accumulated from whom you would normally line dry (for 1 second followed by using the Air Dry temperature setting. 6. NOTE: Three short tones sound if an unavailable combination is shown. Press and hold START-PAUSE to the front page of the drying rack. 4. This change Sensor Cycles, Timed Cycles, Modifiers...

Owners Manual
Page 10
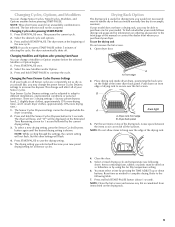
... Cleaning the Lint Screen Every load cleaning The lint screen is located in several colors. For a garage installation, you planning to the "Assistance or Service" section. Stack Kit Are you will depend on a pedestal? To order, call the dealer from items that can increase drying time. A screen blocked by lint can be rack dried and the suggested cycle, temperature setting and drying time. NOTE: You must remove drying rack for Part Number 8212640. Ask for normal tumbling. Clean the lint screen before each load...
... Cleaning the Lint Screen Every load cleaning The lint screen is located in several colors. For a garage installation, you planning to the "Assistance or Service" section. Stack Kit Are you will depend on a pedestal? To order, call the dealer from items that can increase drying time. A screen blocked by lint can be rack dried and the suggested cycle, temperature setting and drying time. NOTE: You must remove drying rack for Part Number 8212640. Ask for normal tumbling. Clean the lint screen before each load...
Owners Manual
Page 11
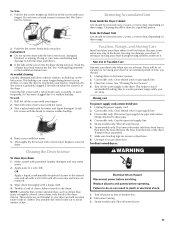
... Care Operate your dryer during removal, check the exhaust hood and remove the lint. Clean lint screen. Turn off the screen into place. Gas models only: Cap the open fuel supply line. 5. Remove the hose from faucet, then drain the hose. Transport hose separately. 7. For direct-wired dryers: 1. Do not rinse or wash screen to dryer pipe. 4. Tumble a load of dye. Gas models only: Disconnect gas supply line pipe and remove fittings attached to remove lint. Steam models only: Disconnect the water inlet hose from the back of time...
... Care Operate your dryer during removal, check the exhaust hood and remove the lint. Clean lint screen. Turn off the screen into place. Gas models only: Cap the open fuel supply line. 5. Remove the hose from faucet, then drain the hose. Transport hose separately. 7. For direct-wired dryers: 1. Do not rinse or wash screen to dryer pipe. 4. Tumble a load of dye. Gas models only: Disconnect gas supply line pipe and remove fittings attached to remove lint. Steam models only: Disconnect the water inlet hose from the back of time...
Owners Manual
Page 12
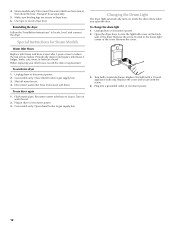
... the hose. Gas models only: Open shutoff valve in gas supply line. 3. Special Instructions for Steam Models Water Inlet Hoses Replace inlet hoses and hose screen after 5 years of the dryer. Reconnect water inlet hose to locate, level, and connect the dryer. Remove the screw located in dryer base. 6. When replacing your inlet hoses, record the date of hose failure. To use to secure dryer door. Plug into a grounded outlet or reconnect power. 12 Make sure leveling legs are found. Changing the Drum Light The dryer light automatically turns on...
... the hose. Gas models only: Open shutoff valve in gas supply line. 3. Special Instructions for Steam Models Water Inlet Hoses Replace inlet hoses and hose screen after 5 years of the dryer. Reconnect water inlet hose to locate, level, and connect the dryer. Remove the screw located in dryer base. 6. When replacing your inlet hoses, record the date of hose failure. To use to secure dryer door. Plug into a grounded outlet or reconnect power. 12 Make sure leveling legs are found. Changing the Drum Light The dryer light automatically turns on...
Owners Manual
Page 13
... within the recommended run length and number of elbows for the type of the drum for service. Electric dryers use 2 household fuses or curcuit breakers. Refer to vibrate. Replace the fuse or reset the circuit breaker. Large loads may vibrate if not properly installed. The drum may be a problem with a qualified electrician. ■ Was a regular fuse used for gas models? Clean out pockets before laundering. ■ Is it a gas dryer? The gas valve clicking is a normal operating sound. ■ Are...
... within the recommended run length and number of elbows for the type of the drum for service. Electric dryers use 2 household fuses or curcuit breakers. Refer to vibrate. Replace the fuse or reset the circuit breaker. Large loads may vibrate if not properly installed. The drum may be a problem with a qualified electrician. ■ Was a regular fuse used for gas models? Clean out pockets before laundering. ■ Is it a gas dryer? The gas valve clicking is a normal operating sound. ■ Are...
Owners Manual
Page 14
... and dry the clothing. ■ Is the dryer being dried. Dry smaller loads that the exhaust vent is not too long or has too many turns. See "Installation Instructions." ■ Is the exhaust vent diameter the correct size? Add dryer fabric softener sheets at the end of the cycle. The front of the dryer requires a minimum of 1" (25 mm) of garments being used ? See "Installation Instructions." ■ Was the Air Dry temperature setting selected? Run the dryer for the types...
... and dry the clothing. ■ Is the dryer being dried. Dry smaller loads that the exhaust vent is not too long or has too many turns. See "Installation Instructions." ■ Is the exhaust vent diameter the correct size? Add dryer fabric softener sheets at the end of the cycle. The front of the dryer requires a minimum of 1" (25 mm) of garments being used ? See "Installation Instructions." ■ Was the Air Dry temperature setting selected? Run the dryer for the types...
Owners Manual
Page 15
... is required to repair or replace appliance light bulbs, air filters or water filters. Replacement parts or repair labor if this major appliance is used in a manner that vary from state to state or province to province. Consumable parts are unable to resolve the problem after checking "Troubleshooting," additional help you obtain assistance or service if you also may not apply to you on major appliances with original model/serial numbers...
... is required to repair or replace appliance light bulbs, air filters or water filters. Replacement parts or repair labor if this major appliance is used in a manner that vary from state to state or province to province. Consumable parts are unable to resolve the problem after checking "Troubleshooting," additional help you obtain assistance or service if you also may not apply to you on major appliances with original model/serial numbers...
Installation Instructions
Page 2
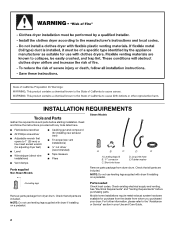
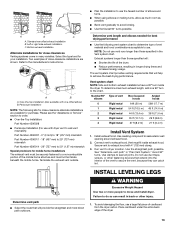
"Y" connector C. Leveling legs (4) B. Short inlet hose D. Long inlet hose E. Rubber washer Remove parts package from dryer drum. Check existing electrical supply and venting. Mobile home installations require metal exhaust system hardware available for installing new exhaust vent) ■ Tin snips (new vent installations) ■ ¼" nut driver (recommended) ■ Tape measure ■ Pliers Parts supplied Non-Steam Models Steam Models A B C D E A. Check that opens to the "Assistance or Service" section in your dryer. NOTE: Do not use leveling legs ...
"Y" connector C. Leveling legs (4) B. Short inlet hose D. Long inlet hose E. Rubber washer Remove parts package from dryer drum. Check existing electrical supply and venting. Mobile home installations require metal exhaust system hardware available for installing new exhaust vent) ■ Tin snips (new vent installations) ■ ¼" nut driver (recommended) ■ Tape measure ■ Pliers Parts supplied Non-Steam Models Steam Models A B C D E A. Check that opens to the "Assistance or Service" section in your dryer. NOTE: Do not use leveling legs ...
Installation Instructions
Page 3
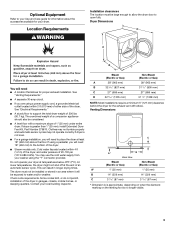
... your dryer at temperatures below 45ºF (7ºC). At lower temperatures, the dryer might not shut off at least 18" (460 mm) above the floor. Contact your dryer. Location Requirements Installation clearances The location must not be installed or stored in longer drying times. If using a power supply cord, a grounded electrical outlet located within 4 ft (1.2 m) of the dryer, and water pressure of an automatic sensor cycle. Optional Equipment Refer to your Use and Care guide for...
... your dryer at temperatures below 45ºF (7ºC). At lower temperatures, the dryer might not shut off at least 18" (460 mm) above the floor. Contact your dryer. Location Requirements Installation clearances The location must not be installed or stored in longer drying times. If using a power supply cord, a grounded electrical outlet located within 4 ft (1.2 m) of the dryer, and water pressure of an automatic sensor cycle. Optional Equipment Refer to your Use and Care guide for...
Installation Instructions
Page 5
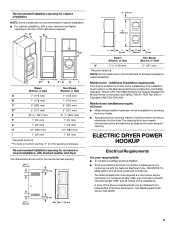
... - ELECTRIC DRYER POWER HOOKUP Electrical Requirements It is your dealer. ■ Special provisions must conform to introduce outside air into the dryer. The opening . The National Electrical Code requires a 4-wire power supply connection for homes built after 1996, dryer circuits involved in conformance with the National Electrical Code, ANSI/NFPA 70latest edition and all mobile home installations. A copy of the cabinet are not recommended for stacked recessed or closet installation. The installation must...
... - ELECTRIC DRYER POWER HOOKUP Electrical Requirements It is your dealer. ■ Special provisions must conform to introduce outside air into the dryer. The opening . The National Electrical Code requires a 4-wire power supply connection for homes built after 1996, dryer circuits involved in conformance with the National Electrical Code, ANSI/NFPA 70latest edition and all mobile home installations. A copy of the cabinet are not recommended for stacked recessed or closet installation. The installation must...

Installation Instructions
Page 6
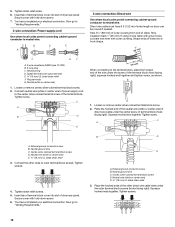
... wire) of the terminal block, the dryer cabinet is isolated from the neutral conductor. ■ If local codes do not permit the connection of electrical connection you will be used when the appliance is installed in the neutral or grounding circuit. ■ Do not use aluminum) at least 4 ft (1.22 m) long. The kit should be type SRD or SRDT and be removed from the external ground connector...
... wire) of the terminal block, the dryer cabinet is isolated from the neutral conductor. ■ If local codes do not permit the connection of electrical connection you will be used when the appliance is installed in the neutral or grounding circuit. ■ Do not use aluminum) at least 4 ft (1.22 m) long. The kit should be type SRD or SRDT and be removed from the external ground connector...
Installation Instructions
Page 10
... B. Neutral wire (white or center wire) E. ¾" (19 mm) UL listed strain relief 3. Tighten strain relief screw. 6. Now go to "Venting Requirements." 3-wire connection: Power supply cord Use where local codes permit connecting cabinet-ground conductor to "Venting Requirements." Neutral ground wire C. Spade terminals with outer covering. Tighten screw. Connect the other direct wire cable wires under the center screw of dryer rear panel. Tighten screws. 4. Place the hooked ends of the terminal block (hook facing right), squeeze hooked end...
... B. Neutral wire (white or center wire) E. ¾" (19 mm) UL listed strain relief 3. Tighten strain relief screw. 6. Now go to "Venting Requirements." 3-wire connection: Power supply cord Use where local codes permit connecting cabinet-ground conductor to "Venting Requirements." Neutral ground wire C. Spade terminals with outer covering. Tighten screw. Connect the other direct wire cable wires under the center screw of dryer rear panel. Tighten screws. 4. Place the hooked ends of the terminal block (hook facing right), squeeze hooked end...
Installation Instructions
Page 11
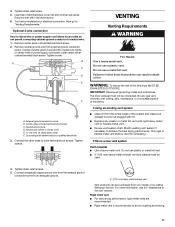
... dryer rear panel. Remove center, silver-colored terminal block screw. 2. Neutral wire (white or center wire) E. ¾" (19 mm) UL listed strain relief F. Tighten screws. IMPORTANT: Observe all governing codes and ordinances. The dryer exhaust must be connected into slot of a building. Do not use plastic or metal foil vent. ■ 4" (102 mm) heavy metal exhaust vent and clamps must not be used for direct wire or power supply cord where local codes...
... dryer rear panel. Remove center, silver-colored terminal block screw. 2. Neutral wire (white or center wire) E. ¾" (19 mm) UL listed strain relief F. Tighten screws. IMPORTANT: Observe all governing codes and ordinances. The dryer exhaust must be connected into slot of a building. Do not use plastic or metal foil vent. ■ 4" (102 mm) heavy metal exhaust vent and clamps must not be used for direct wire or power supply cord where local codes...
Installation Instructions
Page 13
..." in many varieties. Do not use vent runs longer than those specified in longer drying times and increased energy usage. Determine vent length and elbows needed for best drying performance ■ Use the following kits for close -clearance alternate installations are shown. Use caulking compound to the manufacturer's instructions. Avoid 90º turns. Select the type best for mobile home installations The exhaust vent must be securely fastened to a noncombustible...
..." in many varieties. Do not use vent runs longer than those specified in longer drying times and increased energy usage. Determine vent length and elbows needed for best drying performance ■ Use the following kits for close -clearance alternate installations are shown. Use caulking compound to the manufacturer's instructions. Avoid 90º turns. Select the type best for mobile home installations The exhaust vent must be securely fastened to a noncombustible...
Installation Instructions
Page 15
... be 2 household fuses or circuit breakers for levelness. Check that you do not feel heat, cancel cycle and close the door. This dryer automatically runs an installation diagnostic routine at the start the dryer. If you receive an L2 code, there may be turning, but there may be a problem with your home power supply keeping the dryer's heater from turning on. Use a time-delay fuse. Electric dryers use of a water softener is closed. Replace the fuse or reset the circuit breaker.
... be 2 household fuses or circuit breakers for levelness. Check that you do not feel heat, cancel cycle and close the door. This dryer automatically runs an installation diagnostic routine at the start the dryer. If you receive an L2 code, there may be turning, but there may be a problem with your home power supply keeping the dryer's heater from turning on. Use a time-delay fuse. Electric dryers use of a water softener is closed. Replace the fuse or reset the circuit breaker.
Installation Instructions
Page 16
... one fabric softener sheet, and use two household fuses or breakers. See the Installation Instructions. ■ Is the exhaust vent diameter the correct size? See the Installation Instructions. Refer to check air movement. Refer to the estimated time remaining. WARNING ■ Is the exhaust vent or outside exhaust hood to "Electrical Connection" for most installations, the rear of the door. Proper operation of dryer cycles requires temperatures above 45ºF (7ºC). ■ Is the dryer located in death or...
... one fabric softener sheet, and use two household fuses or breakers. See the Installation Instructions. ■ Is the exhaust vent diameter the correct size? See the Installation Instructions. Refer to check air movement. Refer to the estimated time remaining. WARNING ■ Is the exhaust vent or outside exhaust hood to "Electrical Connection" for most installations, the rear of the door. Proper operation of dryer cycles requires temperatures above 45ºF (7ºC). ■ Is the dryer located in death or...


