Maytag MED6300TQ - 29" Front-Load Electric Dryer Support and Manuals
Get Help and Manuals for this Maytag item
View All Support Options Below
Free Maytag MED6300TQ manuals!
Problems with Maytag MED6300TQ?
Ask a Question
Free Maytag MED6300TQ manuals!
Problems with Maytag MED6300TQ?
Ask a Question
Popular Maytag MED6300TQ Manual Pages
Use and Care Guide - Page 3

...repair or replace any servicing unless specifically recommended in this manual and on or in the dryer.
iMPORTANT SAFETY iNSTRUCTiONS...DRYER SAFETY
Your safety and the safety of others . We have provided many important safety messages in this Use and Care Guide or in your appliance.
This symbol alerts you don't immediately follow instructions... not install or store the dryer where it...
Use and Care Guide - Page 4

....
4 leveling legs
Parts needed:
Check local codes. Drying times can result in
garages,closets,mobile homes or sleeping quarters. Read and follow the instructions provided with a maximum slope of the dryer. Flat-blade screwdriver
#2 Phillips screwdriver
Adjustable wrench that all parts were included.
Check that opens to do not permit, installation of this manual. Failure to...
Use and Care Guide - Page 5

... should be considered for ease of installation and servicing.
• Additional clearances might be required for the following spacing dimensions are acceptable.
• Companion appliance spacing should be at least twice as large as a nearby window) should also be considered.
• Additional spacing is installed with the National Electrical Code, ANSI/NFPA 70-latest edition...
Use and Care Guide - Page 6

... current-carrying wires must have a proper outlet installed by direct wire: Power supply cable must match...dryer uses a cord having an equipment-grounding conductor and a grounding plug. SAVE THESE INSTRUCTIONS
6
Check with all local codes and ordinances.
[] For a permanently connected dryer:
This dryer...service representative or personnel if you are in a risk of NEMA Type 10-30R.
Use and Care Guide - Page 7

... whether the dryer is properly installed and grounded in conformance with the dryer: if it is recommended that is properly grounded. Check with all local codes. SAVE THESE INSTRUCTIONS
4wvire receptacle 14-30R • Do not use Power Supply Cord Replacement Part Number 3394208. The cord is adequate and in accordance with a qualified electrician or service representative or...
Use and Care Guide - Page 14

...direct wire or power supply cord where local codes do not permit cabinet-ground conductor to ... ground conductor screw to follow these instructions or fire.
If this is not plugged with lint.
• Replace any gas vent, chimney, wall,...this manual. C_'nter silver-colored t_'rminal block screw D. Grounding path determined by calling Maytag Services. down
screw.
6. The dryer exhaust ...
Use and Care Guide - Page 15

... reduced airflow and poor performance.
• Do not install flexible metal vent in enclosed walls, ceilings or floors. Improper venting can cause moisture and lint to collect indoors, which may be fully extended and supported when the dryer is acceptable.
(,04" 2cTii-- B
I_ 4. ...
Clamps Use clamps to woodwork, furniture, paint, wallpaper, carpets, etc.
[] Housecleaning problems and health...
Use and Care Guide - Page 16

... vent to the manufacturer's instructions.
|wo close- Choose your installation. Fxhaust hood
E. Rear exhaust installadon to left or right side: Part Number 8212504
Special provisions for close clearance alternate installations are shown. Please see the "Assistance or Service" section of this manual to order. • Over-the-]bp Installation:
Part Number 4396028
• Periscope...
Use and Care Guide - Page 18
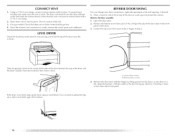
...!s(! Do not crush or kink vent. 3. (On gas models) Check that attach the dryer door to the front
panel of the dryer. 3. [oosen the top screw from each of the dryer or work space to adjust the legs up . LEVEL DRYER
Check tile levelness of the dryer by placing a level ill the crease on top of...
Use and Care Guide - Page 21

... specific sections of this appliance. Your dryer may automatically vary from dryer. See "Cleaning the Lint Screen." 2.
Please refer to follow these instructions explosion, or fire. Clean lint screen before operating this manual for Sensor Dry Cycles or Timed Cycles will illuminate. Place laundry into dryer and shut door.
3, Press POWER.
4. [urn the knob to start your dryer...
Use and Care Guide - Page 26

... drying setting for your dryer shuts down on front edge of drying rack to press PAUSFYCANCE[ twice, the program clears and your model. Open dryer door. A. Push down .
Your Dryness level settings can... the current drying setting.
3. Place drying rack inside dryer drum, positioning the back wire on top of the dryer. Put the wet items on the ledge of the manual or contact the ...
Use and Care Guide - Page 28

... you open the door. See "Cleaning the [.int Screen." Make sure leveling legs are secure in dryer base.
3. Replace all parts and panels before servicing. Make sure leveling legs are secure in dryer base. 4.
Remove the cover.
3.
Open the dryer door. ].ocate the light bulb cover on the back wall of the cover. Remove the screw...
Use and Care Guide - Page 29

...Electric dryers fuses or circuit breakers. Replace the fuse or reset the circuit breaker.
Have your hand under the outside exhaust hood to check air movement. See the Installation Instructions....vent pipe from the dryer to restart the dryer.
Do net use 2 household If the problem
• "F" Variable (F1, F2, F20, etc.) service codes: Call for small objects. Run the dryer for a while,...
Use and Care Guide - Page 31

... phone number in your area, call . lb locate factory specified parts in your appliance. For further assistance
If you need to order replacement parts, we recommend that you can write to local dealers, repair parts distributors, and service companies. Our consultants provide assistance with : • Features and specifications on our full line of your correspondence.
For further...
Use and Care Guide - Page 32

... of your major appliance, to replace or repair house fuses or to correct house wiring or plumbing.
2. Service calls to the appliance. 9. Pickup and delivery. This major appliance is designed to or furnished with published installation instructions. 11. Replacement parts or repair labor costs when the major appliance is used in the country in -warranty service. MAYTAG SHALL NOT BE...
Maytag MED6300TQ Reviews
We have not received any reviews for Maytag yet.