
Use and Care Guide
Page 3
...to cooking oils in the dryer. Close supervision of children is necessary when the dryer is used near children. [] Before the dryer is removed from the accumulation of lint, dust, and dirt. [] The interior of fire, electric shock, or injury to persons when using the dryer. [] Do not place items... exposed to play on your dryer. This symbol alerts you to potential hazards that could cause a load to catch fire. [] Do not dry articles that have been...
...to cooking oils in the dryer. Close supervision of children is necessary when the dryer is used near children. [] Before the dryer is removed from the accumulation of lint, dust, and dirt. [] The interior of fire, electric shock, or injury to persons when using the dryer. [] Do not place items... exposed to play on your dryer. This symbol alerts you to potential hazards that could cause a load to catch fire. [] Do not dry articles that have been...

Use and Care Guide
Page 4
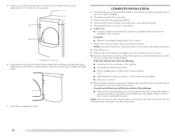
... or Service" section of this manual. For information on ordering, please refer to do not permit, installation of 1" (2.5 cm) under entire dryer. See "Electrical Requirements." • A sturdy floor to water and/or weather. Do not operate your local building inspector. 4 Drying times can result in ...Caulking gun and compound (for purchase from the dealer from dryer drum. Place dryer at the end of the dryer. You may also contact the dealer from dryer. You will be exposed to support the total weight (dryer and load) of a companion appliance should also be installed or stored...
... or Service" section of this manual. For information on ordering, please refer to do not permit, installation of 1" (2.5 cm) under entire dryer. See "Electrical Requirements." • A sturdy floor to water and/or weather. Do not operate your local building inspector. 4 Drying times can result in ...Caulking gun and compound (for purchase from the dealer from dryer drum. Place dryer at the end of the dryer. You may also contact the dealer from dryer. You will be exposed to support the total weight (dryer and load) of a companion appliance should also be installed or stored...

Use and Care Guide
Page 5
... in mobile homes to open fully. See "Venting Requirements." r' _ _- 29"_ I_-1" -_lv'*_l 99,l_"_4" (9.5cm) (73.c7m) (2.5cm) (2.5cm)(74.c3m)(12.c7rn) A B C A. closet or confined C. If the dryer is isolated from your dealer. • Special provisions must be made in ... and rear. The installation must conform to the neutral wire, see "Optional 3-wire connection" in remodeling after 1996, dryer circuits involved in "Electrical Connection - Installation spacing for recessed area or closet installation The following reasons: • Additional spacing should be considered for...
... in mobile homes to open fully. See "Venting Requirements." r' _ _- 29"_ I_-1" -_lv'*_l 99,l_"_4" (9.5cm) (73.c7m) (2.5cm) (2.5cm)(74.c3m)(12.c7rn) A B C A. closet or confined C. If the dryer is isolated from your dealer. • Special provisions must be made in ... and rear. The installation must conform to the neutral wire, see "Optional 3-wire connection" in remodeling after 1996, dryer circuits involved in "Electrical Connection - Installation spacing for recessed area or closet installation The following reasons: • Additional spacing should be considered for...

Use and Care Guide
Page 6
... nonmetallic sheathed copper cable (with ground wire), protected with flexible metallic conduit. WARNING: Improper connection of electric shock. grounding conductor can result in accordance with all local codes and ordinances. [] For a permanently connected dryer: This dryer must be connected to the equipment-grounding terminal or lead on the power supply cord: if it...
... nonmetallic sheathed copper cable (with ground wire), protected with flexible metallic conduit. WARNING: Improper connection of electric shock. grounding conductor can result in accordance with all local codes and ordinances. [] For a permanently connected dryer: This dryer must be connected to the equipment-grounding terminal or lead on the power supply cord: if it...

Use and Care Guide
Page 7
... required 4 wire, single phase, 120/240 volt, 60 Hz., AC only electrical supply on a separate 30-amp circuit, fused oil both sides of electric shock. Connect to whether the dryer is your responsibility • [b contact a qualified electrical installer. • [b be plugged into a grounded 4 prong outlet. Do .... CANADA ONLY If you are using a replacement power supply cord, it is recommended that is equipped with the dryer: if it will reduce the risk of electric shock by a qualified electrician. In the event of malfunction or breakdown, grounding will not fit the outlet, have...
... required 4 wire, single phase, 120/240 volt, 60 Hz., AC only electrical supply on a separate 30-amp circuit, fused oil both sides of electric shock. Connect to whether the dryer is your responsibility • [b contact a qualified electrical installer. • [b be plugged into a grounded 4 prong outlet. Do .... CANADA ONLY If you are using a replacement power supply cord, it is recommended that is equipped with the dryer: if it will reduce the risk of electric shock by a qualified electrician. In the event of malfunction or breakdown, grounding will not fit the outlet, have...

Use and Care Guide
Page 9
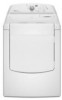
.... Removable conduit connector B. Strain relief threads Put direct wire cable through the strain relief. ]he strain relief should have a tight fit with the dryer cabinet and be in a horizontal position. 3. Reaching inside the strain relief. Strain relief tab pointing down , and hold the two clam[) sections...the terminal block opening so that the wire insulation on the power supply cord is pointing up B. Put the threaded section of electrical connection: Tighten strain relief screw against the direct wire cable. Strain relief tab pointing up and the other is not available) ...
.... Removable conduit connector B. Strain relief threads Put direct wire cable through the strain relief. ]he strain relief should have a tight fit with the dryer cabinet and be in a horizontal position. 3. Reaching inside the strain relief. Strain relief tab pointing down , and hold the two clam[) sections...the terminal block opening so that the wire insulation on the power supply cord is pointing up B. Put the threaded section of electrical connection: Tighten strain relief screw against the direct wire cable. Strain relief tab pointing up and the other is not available) ...

Use and Care Guide
Page 10
... Connect neutral ground wire and the neutral wire (white or center wire) of 3-wire connections. listed, 120/240-volt minimum, 30-amp, dryer power supply cord* 3-wire connection: Power Supply Cord A fused disconnect or circuit breaker box* 3-wire connection: Direct Wire 4-wire connection: Power ... not _ermit the connection of NEUTRA I, ground wire before being moved to Section: 4-wire connection: Power Supply Cord (_ 4-wire direct 30-amp, dryer power supply cord* A fused disconnect or circuit 4-wire connection: (12.7 cm) 3-wire receptacle (NEMA type 10-30R) © 3-wire direct...
... Connect neutral ground wire and the neutral wire (white or center wire) of 3-wire connections. listed, 120/240-volt minimum, 30-amp, dryer power supply cord* 3-wire connection: Power Supply Cord A fused disconnect or circuit breaker box* 3-wire connection: Direct Wire 4-wire connection: Power ... not _ermit the connection of NEUTRA I, ground wire before being moved to Section: 4-wire connection: Power Supply Cord (_ 4-wire direct 30-amp, dryer power supply cord* A fused disconnect or circuit 4-wire connection: (12.7 cm) 3-wire receptacle (NEMA type 10-30R) © 3-wire direct...
Use and Care Guide
Page 11
...of direct wire cable under the screw of cable, leaving bare ground wire at 5" (12.7 cm). Direct wire cable must have completed your electrical connection. Neutral ground wire B. £xternal glound conductor screw - Center silver-co/ore'd terminal block scre'w D. Neutral ground wire C. ...Tighten screws. !! !! 1. Now go to center silver-colored terminal block screw. Dotted line shows position of dryer rear panel. Tighten screw. A. Neutral wire twhite or center wire) 4, Connect the other wires to external ground conductor screw. Squeeze hooked...
...of direct wire cable under the screw of cable, leaving bare ground wire at 5" (12.7 cm). Direct wire cable must have completed your electrical connection. Neutral ground wire B. £xternal glound conductor screw - Center silver-co/ore'd terminal block scre'w D. Neutral ground wire C. ...Tighten screws. !! !! 1. Now go to center silver-colored terminal block screw. Dotted line shows position of dryer rear panel. Tighten screw. A. Neutral wire twhite or center wire) 4, Connect the other wires to external ground conductor screw. Squeeze hooked...

Use and Care Guide
Page 12
... screw. 5. down screw. 7. Neutral ground wir_" C. Neutral ground wire C. Spade' te'rminah with hold- You have completed your electrical connection. C_'nte'r silver-colored terminal block screw D. Tighten screws. Neutral wire (white" or center wir_') 1. Tighten strain relief screw... reli_'f E. (_ulter silver-color_'d terminal block scr_'w L Neutral wire (white or center wir_') 4, Place the hooked ends of dryer rear panel. Tighten screw. 3-wire connection: Power supply cord Use where local codes permit connecting cabinet-ground conductor to external ground conductor screw...
... screw. 5. down screw. 7. Neutral ground wir_" C. Neutral ground wire C. Spade' te'rminah with hold- You have completed your electrical connection. C_'nte'r silver-colored terminal block screw D. Tighten screws. Neutral wire (white" or center wir_') 1. Tighten strain relief screw... reli_'f E. (_ulter silver-color_'d terminal block scr_'w L Neutral wire (white or center wir_') 4, Place the hooked ends of dryer rear panel. Tighten screw. 3-wire connection: Power supply cord Use where local codes permit connecting cabinet-ground conductor to external ground conductor screw...

Use and Care Guide
Page 13
... - f xtemal ground conductor scre'w B. Insert tab of terminal block cover into slot of extra length so dryer call be moved if needed. You have completed your electrical connection. Squeeze hooked end together. Now go to the terminalblock, place the hooked end of the wire under... screws. !! !! Insert tab of terminal block cover into a hook shape. _B.9c_ When connecting to "Venting Requirements." You have completed your electrical connection. Strip insulation back 1" (2.5 cm). 3. Place the hooked end of the neutral wire (white or center wire) of direct wire cable ...
... - f xtemal ground conductor scre'w B. Insert tab of terminal block cover into slot of extra length so dryer call be moved if needed. You have completed your electrical connection. Squeeze hooked end together. Now go to the terminalblock, place the hooked end of the wire under... screws. !! !! Insert tab of terminal block cover into a hook shape. _B.9c_ When connecting to "Venting Requirements." You have completed your electrical connection. Strip insulation back 1" (2.5 cm). 3. Place the hooked end of the neutral wire (white or center wire) of direct wire cable ...

Use and Care Guide
Page 14
... or by a qualifi_'d electrician 3. Neutral ground wir_" C. The dryer exhaust must be connected into slot of this dryer MUST BE EXHAUSTED OUTDOORS. For more information, see the "Assistance or Service" section of dryer rear paneh Secure cover with rigid or flexible heavy metal vent. &#...Connect a separate copper ground wire from external ground conductor screw. Remove center silver-colored terminal block screw. Grounding path determined by calling Maytag Services. If this is not plugged with lint. • Replace any gas vent, chimney, wall, ceiling or a concealed space ...
... or by a qualifi_'d electrician 3. Neutral ground wir_" C. The dryer exhaust must be connected into slot of this dryer MUST BE EXHAUSTED OUTDOORS. For more information, see the "Assistance or Service" section of dryer rear paneh Secure cover with rigid or flexible heavy metal vent. &#...Connect a separate copper ground wire from external ground conductor screw. Remove center silver-colored terminal block screw. Grounding path determined by calling Maytag Services. If this is not plugged with lint. • Replace any gas vent, chimney, wall, ceiling or a concealed space ...

Use and Care Guide
Page 15
....2 cm) A. Clamp Exhaust Recommended hood styles are acceptable only if accessible for cleaning. • Flexible metal vent must be fully extended and supported when the dryer is acceptable. (,04" 2cTii-- Box hood style The angled hood style (shown here) is in its final location. • Remove excess flexible metal vent to...
....2 cm) A. Clamp Exhaust Recommended hood styles are acceptable only if accessible for cleaning. • Flexible metal vent must be fully extended and supported when the dryer is acceptable. (,04" 2cTii-- Box hood style The angled hood style (shown here) is in its final location. • Remove excess flexible metal vent to...

Use and Care Guide
Page 16
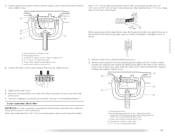
...Part Number 4396028 • Periscope Installation (For use with dryer vent to wall vent mismatch): Part Number 4396037 - 0" (0 cm) to 18" (45.72 cm) mismatch Part Number 4396011 - 18" (45.72 cm) to 29" (73.66 cm) mismatch Part Number 4396014- 29" (73.66 cm) to 50" (127 cm) mismatch... • Rear exhaust installation to connect elbovw Standard exhaust installation with one offset elbow) B. Please see the "Assistance or Service" section of the dryer.
...Part Number 4396028 • Periscope Installation (For use with dryer vent to wall vent mismatch): Part Number 4396037 - 0" (0 cm) to 18" (45.72 cm) mismatch Part Number 4396011 - 18" (45.72 cm) to 29" (73.66 cm) mismatch Part Number 4396014- 29" (73.66 cm) to 50" (127 cm) mismatch... • Rear exhaust installation to connect elbovw Standard exhaust installation with one offset elbow) B. Please see the "Assistance or Service" section of the dryer.
Use and Care Guide
Page 17
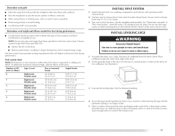
... help to exhaust hood. Connect vent to achieve the best drying performance. Run vent to seal all joints. Use clamps to dryer location. Use the straightest path possible. INSTALL LEVELING LEGS Excessive Weight Hazard Use two or more people to connect the exhaust vent...ft (9.4 m) 23 ft (7 m) 2 Rigid metal 44 ff (13.4 m) 38 ft (11.6 m) Flexible metal 27 ff (8.2 m) 19 ft (5.8 m/ 3 Rigid metal 35 ff (10.7 m) 29 ft (8.8 m) Flexible metal 25 ff (7.6 m) 17 ft (5.2 m/ 4 Rigid metal 27 ft (8.2 m) 21 ft (6.4 m) Flexible metal 23 ft 17 m) 15 ft (4.6 m) INSTALL VENT SYSTEM ...
... help to exhaust hood. Connect vent to achieve the best drying performance. Run vent to seal all joints. Use clamps to dryer location. Use the straightest path possible. INSTALL LEVELING LEGS Excessive Weight Hazard Use two or more people to connect the exhaust vent...ft (9.4 m) 23 ft (7 m) 2 Rigid metal 44 ff (13.4 m) 38 ft (11.6 m) Flexible metal 27 ff (8.2 m) 19 ft (5.8 m/ 3 Rigid metal 35 ff (10.7 m) 29 ft (8.8 m) Flexible metal 25 ff (7.6 m) 17 ft (5.2 m/ 4 Rigid metal 27 ft (8.2 m) 21 ft (6.4 m) Flexible metal 23 ft 17 m) 15 ft (4.6 m) INSTALL VENT SYSTEM ...
Use and Care Guide
Page 18
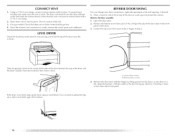
...left-side opening, if desired. 1. Move dryer into its final location. LEVEL DRYER Check tile levelness of the dryer by lifting upward on top of the dryer near the console, REVERSE DOOR SWING You can change your door swing from dryer front paneh If the dryer is made, remove the corner posts and ...first placing a level on the side of the dryer between the top of the 2 hinges in dryer. I.ay the door on a flat, protected surface, with a 4" (102 cm) clamp. 2. Use a wrench to the front panel of the dryer. 3. [oosen the top screw from front to protect the surface. B. If connecting to ...
...left-side opening, if desired. 1. Move dryer into its final location. LEVEL DRYER Check tile levelness of the dryer by lifting upward on top of the dryer near the console, REVERSE DOOR SWING You can change your door swing from dryer front paneh If the dryer is made, remove the corner posts and ...first placing a level on the side of the dryer between the top of the 2 hinges in dryer. I.ay the door on a flat, protected surface, with a 4" (102 cm) clamp. 2. Use a wrench to the front panel of the dryer. 3. [oosen the top screw from front to protect the surface. B. If connecting to ...

Use and Care Guide
Page 19
...Use the non-slotted side to attach the hinge to the front panel of the dryer door opening from the opposite side of the dryer door opening . 2. Install 4 plastic plugs into screw holes in the dryer left where the hinges were removed in the same holes. ...Remove the 4 screws and 2 hinges from the dryer door opening . Reverse the strike 1. Install the 2 hinges to the front panel. Removthee4plastipclugslocateodutsidtehedryedr ooor pening. 5. Replace the 4 screws in Step 4. Remove the door strike from the dryer door. 2. Door strike m. _OSITI(!tic scr_!\,v Reinstall...
...Use the non-slotted side to attach the hinge to the front panel of the dryer door opening from the opposite side of the dryer door opening . 2. Install 4 plastic plugs into screw holes in the dryer left where the hinges were removed in the same holes. ...Remove the 4 screws and 2 hinges from the dryer door opening . Reverse the strike 1. Install the 2 hinges to the front panel. Removthee4plastipclugslocateodutsidtehedryedr ooor pening. 5. Replace the 4 screws in Step 4. Remove the door strike from the dryer door. 2. Door strike m. _OSITI(!tic scr_!\,v Reinstall...
Use and Care Guide
Page 20
...kinked. 5. Install two bottom screws. If there is first heated. Remove any dust. 10. ]i_st dryer operation by placing screw heads into an outlet and/or electrical supply is level. Read "Dryer Use." 9. Check that both circuit breakers have a protective film on power. Be sure the vent ...is first used. Wipe the dryer drum interior thoroughly with a damp cloth to see which step was skipped. 2. If the dryer will go back...
...kinked. 5. Install two bottom screws. If there is first heated. Remove any dust. 10. ]i_st dryer operation by placing screw heads into an outlet and/or electrical supply is level. Read "Dryer Use." 9. Check that both circuit breakers have a protective film on power. Be sure the vent ...is first used. Wipe the dryer drum interior thoroughly with a damp cloth to see which step was skipped. 2. If the dryer will go back...

Use and Care Guide
Page 21
.... Place laundry into dryer and shut door. 3, Press POWER. 4. [urn the knob to persons, read the IMPORTANT SAFETY INSTRUCTIONS before each load. The estimated (automatic cycle) or actual (timed) cycle time (in minutes) will show in death WARNING: [b reduce the risk of fire, electric shock, or injury ...to the selected cycle. [-he dried on the size and fabric type of the load. ]oward the end of oil on it (including cooking oils). can completely remove oil. This...
.... Place laundry into dryer and shut door. 3, Press POWER. 4. [urn the knob to persons, read the IMPORTANT SAFETY INSTRUCTIONS before each load. The estimated (automatic cycle) or actual (timed) cycle time (in minutes) will show in death WARNING: [b reduce the risk of fire, electric shock, or injury ...to the selected cycle. [-he dried on the size and fabric type of the load. ]oward the end of oil on it (including cooking oils). can completely remove oil. This...

Use and Care Guide
Page 22
... Sensi-Care TM Drying System Works Moisture-sensing strips and temperature sensors inside the dryer drum monitor how fast the load is automatically the display shows the exact Cool Down tumbles the load without stopping the cycle. • Select the desired Options. Press the up or...8226; If you when a cycle ends. Select new cycle settings before restarting the dryer. NOTE: During a Timed Cycle, you want the load. To restart the dryer Close the door. If a Sensor [Dry Cycle dryer is drying, how hot the air should be changed without heat during a Sensor Dry...
... Sensi-Care TM Drying System Works Moisture-sensing strips and temperature sensors inside the dryer drum monitor how fast the load is automatically the display shows the exact Cool Down tumbles the load without stopping the cycle. • Select the desired Options. Press the up or...8226; If you when a cycle ends. Select new cycle settings before restarting the dryer. NOTE: During a Timed Cycle, you want the load. To restart the dryer Close the door. If a Sensor [Dry Cycle dryer is drying, how hot the air should be changed without heat during a Sensor Dry...

Use and Care Guide
Page 23
...heat to gently dry items such as work clothes and sheets. STATUS LIGHTS Follow the progress of your load, by pressing letup until a wet item is not detected after approximately 5 minutes, the dryer goes directly into the cycle. and Cycle Signal settings selectee], lhe CYCLES Select the drying cycle that ... Damp dry. See "Options." during tile DRY CYCLES Sensor Dry Cycles Sensor Dry Cycles allow you to match the cycle to the load you are not detected. [he dryer will continue to run for the length of a cycle and turns off 5 minutes into Cool Down. whelm the drying cycle is...
...heat to gently dry items such as work clothes and sheets. STATUS LIGHTS Follow the progress of your load, by pressing letup until a wet item is not detected after approximately 5 minutes, the dryer goes directly into the cycle. and Cycle Signal settings selectee], lhe CYCLES Select the drying cycle that ... Damp dry. See "Options." during tile DRY CYCLES Sensor Dry Cycles Sensor Dry Cycles allow you to match the cycle to the load you are not detected. [he dryer will continue to run for the length of a cycle and turns off 5 minutes into Cool Down. whelm the drying cycle is...


