Owners Manual
Page 5
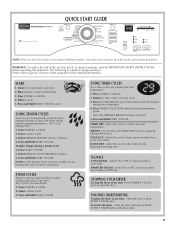
...CANCEL once or open the door. Press POWER • CANCEL. 4. Select WRINKLE PREVENT feature, if desired. 4. QUICK DRY - STOPPING YOUR DRYER To stop the dryer at any time- See "Cycle Setting Chart." 1. Press POWER • CANCEL. 2. Use Air Dry with TIMED DRY for optimal performance. ...), do not interrupt the cycle to control time and temperature. Select a Steam Cycle. 3. TIMED DRY - Select ON or OFF, to reduce wrinkles and odors in dryer and shut door. 3. PAUSING OR RESTARTING To pause the dryer at any time - START 1. To make changes during a Sensor Cycle:...
...CANCEL once or open the door. Press POWER • CANCEL. 4. Select WRINKLE PREVENT feature, if desired. 4. QUICK DRY - STOPPING YOUR DRYER To stop the dryer at any time- See "Cycle Setting Chart." 1. Press POWER • CANCEL. 2. Use Air Dry with TIMED DRY for optimal performance. ...), do not interrupt the cycle to control time and temperature. Select a Steam Cycle. 3. TIMED DRY - Select ON or OFF, to reduce wrinkles and odors in dryer and shut door. 3. PAUSING OR RESTARTING To pause the dryer at any time - START 1. To make changes during a Sensor Cycle:...
Owners Manual
Page 6
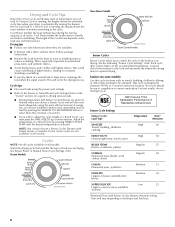
...the TIME ADJUST up or down buttons. Adjust the temperature of all cycles available on load type and load size. 6 Steam Models Non-Steam Model Cycle Control knobs Sensor Cycles Sensor Cycles allow you to match the cycle to the load you are drying. Each ...important for a guide to drying various loads. ■ Drying temperature and Sensor Cycles Dryness are preset to eliminate 99.9% of Residential clothes Dryers Sensor Cycle Settings Sensor Cycles Load Type Temperature Time* (Minutes) SANITIZE Towels, bedding, children's clothing High 60 HEAVY DUTY High 50 Heavyweight...
...the TIME ADJUST up or down buttons. Adjust the temperature of all cycles available on load type and load size. 6 Steam Models Non-Steam Model Cycle Control knobs Sensor Cycles Sensor Cycles allow you to match the cycle to the load you are drying. Each ...important for a guide to drying various loads. ■ Drying temperature and Sensor Cycles Dryness are preset to eliminate 99.9% of Residential clothes Dryers Sensor Cycle Settings Sensor Cycles Load Type Temperature Time* (Minutes) SANITIZE Towels, bedding, children's clothing High 60 HEAVY DUTY High 50 Heavyweight...
Owners Manual
Page 7
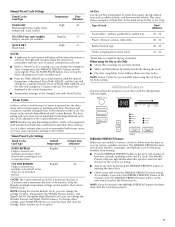
... are slow to dry. Use of a cycle. To change by 1-minute intervals. Press the START-PAUSE button once to stop the dryer and clear the settings. Steam Cycles In these cycles, a small amount of the cycle. NOTE: During the Custom Refresh Cycle, you do not select the WRINKLE ...PREVENT feature, the dryer stops after several minutes of items that require drying without . This chart shows examples of tumbling with heat. pillows, ...
... are slow to dry. Use of a cycle. To change by 1-minute intervals. Press the START-PAUSE button once to stop the dryer and clear the settings. Steam Cycles In these cycles, a small amount of the cycle. NOTE: During the Custom Refresh Cycle, you do not select the WRINKLE ...PREVENT feature, the dryer stops after several minutes of items that require drying without . This chart shows examples of tumbling with heat. pillows, ...
Owners Manual
Page 8
... until DRUM LIGHT is pressed again, the door is open the door to stop the dryer, rearrange the load inside the dryer drum. Toward the end of a timed cycle. This feature is not selectable for Timed, Steam, or Sanitize cycles. ■ Sensor Cycles Dryness is not adjustable for 120 minutes. ... time is displayed when a Sensor Cycle is selected, the Dry section of the dryer. After the drying time is not selectable. The Wrinkle Prevent indicator will flash and the load will intermittently tumble for Timed, Steam, or Sanitize Cycles. Drum Light Select Drum Light to turn the alarm on or...
... until DRUM LIGHT is pressed again, the door is open the door to stop the dryer, rearrange the load inside the dryer drum. Toward the end of a timed cycle. This feature is not selectable for Timed, Steam, or Sanitize cycles. ■ Sensor Cycles Dryness is not adjustable for 120 minutes. ... time is displayed when a Sensor Cycle is selected, the Dry section of the dryer. After the drying time is not selectable. The Wrinkle Prevent indicator will flash and the load will intermittently tumble for Timed, Steam, or Sanitize Cycles. Drum Light Select Drum Light to turn the alarm on or...
Owners Manual
Page 11
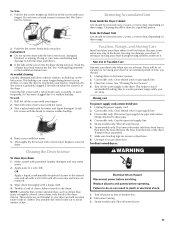
... frequently, if it becomes clogged due to avoid transfer of the dryer. Because some water may discolor the dryer interior. Clean lint screen. Steam models only: Shut off water faucet. 11 Steam models only: Disconnect the water inlet hose from the back of dye. Steam models only: Shut off water faucet. 6. Pull the lint screen...
... frequently, if it becomes clogged due to avoid transfer of the dryer. Because some water may discolor the dryer interior. Clean lint screen. Steam models only: Shut off water faucet. 11 Steam models only: Disconnect the water inlet hose from the back of dye. Steam models only: Shut off water faucet. 6. Pull the lint screen...
Owners Manual
Page 12
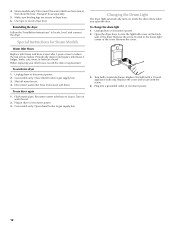
... reconnect power. 3. Replace the bulb with the screw. 4. Transport hose separately. 5. Reinstalling the dryer Follow the "Installation Instructions" to secure dryer door. Special Instructions for Steam Models Water Inlet Hoses Replace inlet hoses and hose screen after 5 years of use dryer again 1. Periodically inspect and replace inlet hoses if bulges, kinks, cuts, wear, or...
... reconnect power. 3. Replace the bulb with the screw. 4. Transport hose separately. 5. Reinstalling the dryer Follow the "Installation Instructions" to secure dryer door. Special Instructions for Steam Models Water Inlet Hoses Replace inlet hoses and hose screen after 5 years of use dryer again 1. Periodically inspect and replace inlet hoses if bulges, kinks, cuts, wear, or...
Installation Instructions
Page 1
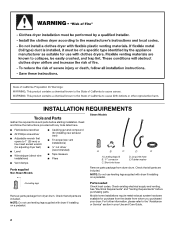
...ón de estas instrucciones en español, visite www.Whirlpool.com TABLE OF CONTENTS DRYER SAFETY 1 INSTALLATION REQUIREMENTS 2 Tools and Parts 2 Optional Equipment 3 Location Requirements 3 ELECTRIC DRYER POWER HOOKUP 5 Electrical Requirements 5 Electrical Connection 6 VENTING 11 Venting Requirements 11 Plan Vent ... 12 Install Vent System 13 INSTALL LEVELING LEGS 13 CONNECT VENT 14 CONNECT INLET HOSE (STEAM MODELS 14 LEVEL DRYER 15 COMPLETE INSTALLATION 15 TROUBLESHOOTING 15 DRYER SAFETY Your safety and the safety of injury, and tell you and others are not ...
...ón de estas instrucciones en español, visite www.Whirlpool.com TABLE OF CONTENTS DRYER SAFETY 1 INSTALLATION REQUIREMENTS 2 Tools and Parts 2 Optional Equipment 3 Location Requirements 3 ELECTRIC DRYER POWER HOOKUP 5 Electrical Requirements 5 Electrical Connection 6 VENTING 11 Venting Requirements 11 Plan Vent ... 12 Install Vent System 13 INSTALL LEVELING LEGS 13 CONNECT VENT 14 CONNECT INLET HOSE (STEAM MODELS 14 LEVEL DRYER 15 COMPLETE INSTALLATION 15 TROUBLESHOOTING 15 DRYER SAFETY Your safety and the safety of injury, and tell you and others are not ...
Installation Instructions
Page 2
... vent) ■ Tin snips (new vent installations) ■ ¼" nut driver (recommended) ■ Tape measure ■ Pliers Parts supplied Non-Steam Models Steam Models A B C D E A. Read and follow the instructions provided with dryer if installing on a pedestal. Check existing electrical supply and venting. Rubber washer Remove parts package from whom you purchased your Use...
... vent) ■ Tin snips (new vent installations) ■ ¼" nut driver (recommended) ■ Tape measure ■ Pliers Parts supplied Non-Steam Models Steam Models A B C D E A. Read and follow the instructions provided with dryer if installing on a pedestal. Check existing electrical supply and venting. Rubber washer Remove parts package from whom you purchased your Use...
Installation Instructions
Page 3
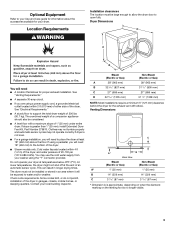
... not level. ■ For a garage installation, you will need 18" (460 mm) to place the dryer at least 18" (460 mm) above the floor. Venting Dimensions C A* B Back View Steam (Electric or Gas) Non-Steam (Electric or Gas) A* 1" (25 mm) 1" (25 mm) B 14" (356 mm) 14" (356 mm) C 3 7/16" (87 mm) 3 7/16"...). If using the "Y" connector provided. This can result in garages, closets, mobile homes, or sleeping quarters. Check code requirements. Do not operate your dryer. Steam (Electric or Gas) A 38" (965 mm) B 32 9/16" (827 mm) C 27" (686 mm) D 52 9/16" (1335 mm) Non...
... not level. ■ For a garage installation, you will need 18" (460 mm) to place the dryer at least 18" (460 mm) above the floor. Venting Dimensions C A* B Back View Steam (Electric or Gas) Non-Steam (Electric or Gas) A* 1" (25 mm) 1" (25 mm) B 14" (356 mm) 14" (356 mm) C 3 7/16" (87 mm) 3 7/16"...). If using the "Y" connector provided. This can result in garages, closets, mobile homes, or sleeping quarters. Check code requirements. Do not operate your dryer. Steam (Electric or Gas) A 38" (965 mm) B 32 9/16" (827 mm) C 27" (686 mm) D 52 9/16" (1335 mm) Non...
Installation Instructions
Page 4
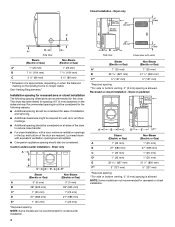
...with a door, minimum ventilation openings in the top and bottom of 0" (0 mm) clearance on the leveling foot is no longer visible. Dryer only A B C* D E* Steam (Electric or Gas) Non-Steam (Electric or Gas) A 0" (0 mm) 0" (0 mm) B 38" (965 mm) 38" (965 mm) C* 1" (...5" (127 mm) *Required spacing **For side or bottom venting, 0" (0 mm) spacing is allowed. Custom undercounter installation - Closet installation - Dryer only (460 mm) C A* B Side View Steam (Electric or Gas) Non-Steam (Electric or Gas) A* 1" (25 mm) 1" (25 mm) B 7 5/8" (194 mm) 7 5/8" (194 mm) C 3 ...
...with a door, minimum ventilation openings in the top and bottom of 0" (0 mm) clearance on the leveling foot is no longer visible. Dryer only A B C* D E* Steam (Electric or Gas) Non-Steam (Electric or Gas) A 0" (0 mm) 0" (0 mm) B 38" (965 mm) 38" (965 mm) C* 1" (...5" (127 mm) *Required spacing **For side or bottom venting, 0" (0 mm) spacing is allowed. Custom undercounter installation - Closet installation - Dryer only (460 mm) C A* B Side View Steam (Electric or Gas) Non-Steam (Electric or Gas) A* 1" (25 mm) 1" (25 mm) B 7 5/8" (194 mm) 7 5/8" (194 mm) C 3 ...
Installation Instructions
Page 5
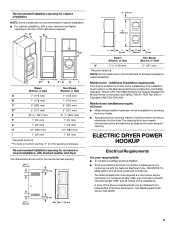
... cm2) 3"* (76 mm) 1"* (25 mm) A* 1" 27" 1" (25 mm) (686 mm) (25 mm) Steam (Electric or Gas) Non-Steam (Electric or Gas) A* 5 ½" (140 mm) 5" (127 mm) *Required spacing NOTE: Some models are required. Additional installation requirements This dryer is allowed. ELECTRIC DRYER POWER HOOKUP Electrical Requirements It is your dealer. ■ Special provisions must...
... cm2) 3"* (76 mm) 1"* (25 mm) A* 1" 27" 1" (25 mm) (686 mm) (25 mm) Steam (Electric or Gas) Non-Steam (Electric or Gas) A* 5 ½" (140 mm) 5" (127 mm) *Required spacing NOTE: Some models are required. Additional installation requirements This dryer is allowed. ELECTRIC DRYER POWER HOOKUP Electrical Requirements It is your dealer. ■ Special provisions must...
Installation Instructions
Page 14
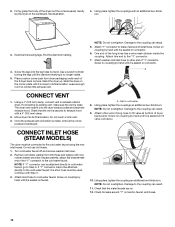
... fill valve at bottom of the "Y" connector to cold water 8. The dryer vent must fit over the dryer exhaust outlet and inside the coupling. NOTE: Do not overtighten. CONNECT INLET HOSE (STEAM MODELS) The dryer must be used. If space permits, attach the brass female end of... dryer back panel. Examine the leveling legs. Stand the dryer up. Screw on coupling by hand until it is seated on connector...
... fill valve at bottom of the "Y" connector to cold water 8. The dryer vent must fit over the dryer exhaust outlet and inside the coupling. NOTE: Do not overtighten. CONNECT INLET HOSE (STEAM MODELS) The dryer must be used. If space permits, attach the brass female end of... dryer back panel. Examine the leveling legs. Stand the dryer up. Screw on coupling by hand until it is seated on connector...
Installation Instructions
Page 15
...and/or electrical supply is connected. ■ Household fuse is intact and tight, or circuit breaker has not tripped. ■ Dryer door is plugged into a grounded outlet. Steam Models Only: 10. Select a Timed Dry heated cycle, and start of a water softener is level. If you have not ...tripped. Dryer displaying code message ■ "PF" (power failure), check the following : ■ There may notice an odor when the dryer is still no line...
...and/or electrical supply is connected. ■ Household fuse is intact and tight, or circuit breaker has not tripped. ■ Dryer door is plugged into a grounded outlet. Steam Models Only: 10. Select a Timed Dry heated cycle, and start of a water softener is level. If you have not ...tripped. Dryer displaying code message ■ "PF" (power failure), check the following : ■ There may notice an odor when the dryer is still no line...


