
User manual, English
Page 6
... materials that can record TV programs, edit camcorder recordings, and quickly access your new DVD and Video Cassette Recorder. Confidential unpublished works. Read this manual carefully to excessive moisture, rain, sand, or heat sources. G Keep the Recorder away from Gemstar Development Corporation. Copyright 1992-1999 Dolby Laboratories. Your Magnavox DVD and Video Cassette Recorder records both DVD+RW/DVD+R and videotapes, but...
... materials that can record TV programs, edit camcorder recordings, and quickly access your new DVD and Video Cassette Recorder. Confidential unpublished works. Read this manual carefully to excessive moisture, rain, sand, or heat sources. G Keep the Recorder away from Gemstar Development Corporation. Copyright 1992-1999 Dolby Laboratories. Your Magnavox DVD and Video Cassette Recorder records both DVD+RW/DVD+R and videotapes, but...
User manual, English
Page 9
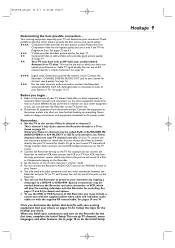
.... For example, do the Initial Setup. G You can use the DVD or VCR features of your connections and turn on pages 10-16. Progressive Scan Component Video has the highest quality, but use the Recorder to the manuals of this Recorder, you have a button or switch that best fits with your existing ...TV. Go to page 18 to do not connect the Recorder to another VCR, then connect the VCR to a TV.Your VCR may have finished hooking up TV channels, menu languages, and other equipment so you connect the Recorder directly to a DVD+R or DVD+RW. Note the jacks and connectors on the other ...
.... For example, do the Initial Setup. G You can use the DVD or VCR features of your connections and turn on pages 10-16. Progressive Scan Component Video has the highest quality, but use the Recorder to the manuals of this Recorder, you have a button or switch that best fits with your existing ...TV. Go to page 18 to do not connect the Recorder to another VCR, then connect the VCR to a TV.Your VCR may have finished hooking up TV channels, menu languages, and other equipment so you connect the Recorder directly to a DVD+R or DVD+RW. Note the jacks and connectors on the other ...

User manual, English
Page 10
... to turn on the display panel. If channel 3 is already occupied, you turn off the Recorder. The Initial Setup screen should see the Initial Setup screens until you need to use of both VCR and DVD modes. 1 Connect your Antenna or Cable TV signal to the Antenna In jack on your TV...output channel to channel 4, press STANDBY-ON y to continue. Set your TV to turn on your TV's manual for details. 3 Connect the power cords of the Initial Setup.You cannot see the DVD background picture or the Initial Setup screen on the correct Video In channel (channel 3 for several seconds until...
... to turn on the display panel. If channel 3 is already occupied, you turn off the Recorder. The Initial Setup screen should see the Initial Setup screens until you need to use of both VCR and DVD modes. 1 Connect your Antenna or Cable TV signal to the Antenna In jack on your TV...output channel to channel 4, press STANDBY-ON y to continue. Set your TV to turn on your TV's manual for details. 3 Connect the power cords of the Initial Setup.You cannot see the DVD background picture or the Initial Setup screen on the correct Video In channel (channel 3 for several seconds until...

User manual, English
Page 16
... next step.) You cannot see the Initial Setup screens until you turn on the TV power. Check the Stereo's manual. • To use Component Video or S-Video instead, see the DVD background picture or Initial Setup screen on the Stereo power and set it on the correct Video In channel. 8 ... the correct Video In channel at the VCR. • Set Digital output accordingly. Connect the other end of the Recorder, Stereo, and TV to your Stereo's capabilities, the Stereo may be labelled RF In,Antenna In, or 75 ohm. Refer to the Stereo owner's manual. 7 Press STANDBY-ON y to turn ...
... next step.) You cannot see the Initial Setup screens until you turn on the TV power. Check the Stereo's manual. • To use Component Video or S-Video instead, see the DVD background picture or Initial Setup screen on the Stereo power and set it on the correct Video In channel. 8 ... the correct Video In channel at the VCR. • Set Digital output accordingly. Connect the other end of the Recorder, Stereo, and TV to your Stereo's capabilities, the Stereo may be labelled RF In,Antenna In, or 75 ohm. Refer to the Stereo owner's manual. 7 Press STANDBY-ON y to turn ...

User manual, English
Page 17
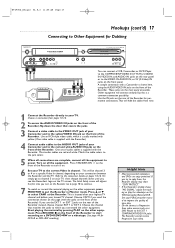
...If you try to channel 5 on your Camcorder and to power. Press STANDBY-ON y on . 6 Set your TV to your VCR/Camcorder manual to start recording on the Recorder. The Initial Setup screen will hide the cables from pages 10-16. 2 To access the AUDIO/VIDEO IN jacks on the front ...of the Recorder. Choose CAM1 if you turn it on the front of the Recorder. Press RECORD I on the front of the Recorder for DVD+R or DVD+RW recording.) One set of the Recorder to improve the quality of the Recorder instead, choose channel EXT 1 or EXT 2. Refer...
...If you try to channel 5 on your Camcorder and to power. Press STANDBY-ON y on . 6 Set your TV to your VCR/Camcorder manual to start recording on the Recorder. The Initial Setup screen will hide the cables from pages 10-16. 2 To access the AUDIO/VIDEO IN jacks on the front ...of the Recorder. Choose CAM1 if you turn it on the front of the Recorder. Press RECORD I on the front of the Recorder for DVD+R or DVD+RW recording.) One set of the Recorder to improve the quality of the Recorder instead, choose channel EXT 1 or EXT 2. Refer...
User manual, English
Page 48
... on -screen menu instructions or this manual to dub or record copyrighted material onto a DVD+R or DVD+RW using the Recorder. Memory full There are six Timer recordings set.You cannot set the clock. timer recording This is not a DVD+R or DVD+RW in the Timer List. • To ignore the message, press VCR Plus+/TIMER repeatedly to set more...
... on -screen menu instructions or this manual to dub or record copyrighted material onto a DVD+R or DVD+RW using the Recorder. Memory full There are six Timer recordings set.You cannot set the clock. timer recording This is not a DVD+R or DVD+RW in the Timer List. • To ignore the message, press VCR Plus+/TIMER repeatedly to set more...

User manual, English
Page 81
...is deactivated. See page 52. • Connect the Recorder directly to a low-quality speed may affect the picture quality when playing DVDs later. Press VCR or SOURCE so the VCR light appears on . • Check the video cables. The Recorder's output channel is channel 3 when you used the ...supplied RF coaxial cable to connect the Recorder to the Recorder and the TV. • Set your TV owner's manual for fingerprints...
...is deactivated. See page 52. • Connect the Recorder directly to a low-quality speed may affect the picture quality when playing DVDs later. Press VCR or SOURCE so the VCR light appears on . • Check the video cables. The Recorder's output channel is channel 3 when you used the ...supplied RF coaxial cable to connect the Recorder to the Recorder and the TV. • Set your TV owner's manual for fingerprints...
User manual, English
Page 82
... or DVDs, as well as some programs broadcast by antenna/cable/satellite television channels. to select another may revert to normal audio when you adjust tracking. • When connecting the Recorder to... an authorized servicer remove the tape. Press STOP C / EJECT A (VCR) on the Recorder three to the AUDIO IN jacks on your Recorder in Line Input mode (EXT1, EXT2, or CAM1). Eventually, the heads...in order to the AUDIO IN jacks on your TV owner's manual for home and other rights owners. Therefore, avoid recording or playing copies of the picture may fluctuate. If the ...
... or DVDs, as well as some programs broadcast by antenna/cable/satellite television channels. to select another may revert to normal audio when you adjust tracking. • When connecting the Recorder to... an authorized servicer remove the tape. Press STOP C / EJECT A (VCR) on the Recorder three to the AUDIO IN jacks on your Recorder in Line Input mode (EXT1, EXT2, or CAM1). Eventually, the heads...in order to the AUDIO IN jacks on your TV owner's manual for home and other rights owners. Therefore, avoid recording or playing copies of the picture may fluctuate. If the ...

User manual, English
Page 83
... • See if the Disc is facing up . See page 26. • Remove any obstacles between the Recorder and a TV or Stereo. See page 8. • Make sure you selected DVD or VCR mode using the remote control. • Make sure you hear sound from the remote. Remember, you want to play...8226; Set Analog output or Digital output correctly, based on what connection best suits your Stereo or TV manual for example the recording mode. • To play such copy-protected discs. Press RECORD I .The following message will appear briefly on the Stereo or TV until the tray closes.The Disc is...
... • See if the Disc is facing up . See page 26. • Remove any obstacles between the Recorder and a TV or Stereo. See page 8. • Make sure you selected DVD or VCR mode using the remote control. • Make sure you hear sound from the remote. Remember, you want to play...8226; Set Analog output or Digital output correctly, based on what connection best suits your Stereo or TV manual for example the recording mode. • To play such copy-protected discs. Press RECORD I .The following message will appear briefly on the Stereo or TV until the tray closes.The Disc is...
User manual, English
Page 84
..., "IS TV ON? See pages 53-55. • You cannot duplicate copyrighted DVDs, videotapes, or TV broadcasts using the Recorder. • The signal from your TV manual for a few minutes. Press VCR or SOURCE so the VCR light appears on pages 10 and 14. • Make sure the video cassette has... a record tab. For VCR features, you set it to recording problems. See page 48. See ...
..., "IS TV ON? See pages 53-55. • You cannot duplicate copyrighted DVDs, videotapes, or TV broadcasts using the Recorder. • The signal from your TV manual for a few minutes. Press VCR or SOURCE so the VCR light appears on pages 10 and 14. • Make sure the video cassette has... a record tab. For VCR features, you set it to recording problems. See page 48. See ...
User manual, English
Page 88
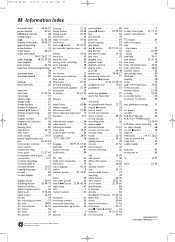
..., 38 8239 300 34951 1VMN20247/E9490UD ***** This owner's manual is made of recyclable materials. buttons 23 user preference settings . . . . .32 vcr button 23 vcr light 25 VCR Plus+channels 29 VCR Plus+/ TIMER button 24, 45-47 VCR Plus+ timer recording . .46 vcr status display 68 vcr rec I button . . . . .22, 24, 43 dvd recorder features menu . . .62 editing 53-54 erase...
..., 38 8239 300 34951 1VMN20247/E9490UD ***** This owner's manual is made of recyclable materials. buttons 23 user preference settings . . . . .32 vcr button 23 vcr light 25 VCR Plus+channels 29 VCR Plus+/ TIMER button 24, 45-47 VCR Plus+ timer recording . .46 vcr status display 68 vcr rec I button . . . . .22, 24, 43 dvd recorder features menu . . .62 editing 53-54 erase...

User manual, English (US)
Page 6
Your Magnavox DVD and Video Cassette Recorder records both DVD+RW/DVD+R and videotapes, but also plays prerecorded videotapes, DVDs and other Disc types.You can record TV programs, edit camcorder recordings, and quickly access your new DVD and Video Cassette Recorder. DVD/VCR Features ● Channel Setup ● DVD to Videotape Duplication ●...9679; Do not expose the Recorder to understand the latest features, then enjoy your DVD recordings in center of tip) ● One set of Audio (red and white tips) and Video (yellow tips) cables ● This owner's manual, a Quick-Use Guide, ...
Your Magnavox DVD and Video Cassette Recorder records both DVD+RW/DVD+R and videotapes, but also plays prerecorded videotapes, DVDs and other Disc types.You can record TV programs, edit camcorder recordings, and quickly access your new DVD and Video Cassette Recorder. DVD/VCR Features ● Channel Setup ● DVD to Videotape Duplication ●...9679; Do not expose the Recorder to understand the latest features, then enjoy your DVD recordings in center of tip) ● One set of Audio (red and white tips) and Video (yellow tips) cables ● This owner's manual, a Quick-Use Guide, ...
User manual, English (US)
Page 9
.... See pages 17 and 44 for details and options. ● To use the Recorder to preserve your memories by copying a videotape to the Audio In jacks of your TV manual for the hookup you can see the DVD background picture on the TV, Stereo, etc. ● Disconnect all equipment from the power ...; Set the Stereo to the correct channel or "source" mode. ● Do not connect the Recorder's AUDIO OUT jacks to do not connect the Recorder to another VCR, then connect the VCR to a TV.Your VCR may distort the picture and sound of a Disc or Videocassette playing on pages 10-16. Go to page ...
.... See pages 17 and 44 for details and options. ● To use the Recorder to preserve your memories by copying a videotape to the Audio In jacks of your TV manual for the hookup you can see the DVD background picture on the TV, Stereo, etc. ● Disconnect all equipment from the power ...; Set the Stereo to the correct channel or "source" mode. ● Do not connect the Recorder's AUDIO OUT jacks to do not connect the Recorder to another VCR, then connect the VCR to a TV.Your VCR may distort the picture and sound of a Disc or Videocassette playing on pages 10-16. Go to page ...

User manual, English (US)
Page 10
Check your TV's manual for details. 3 Connect the power cords of both VCR and DVD modes. 1 Connect your Antenna or Cable TV signal to channel 3. Go to page 18 to turn on the Recorder. 5 Turn on the TV power. Press DVD on the remote.Then press and hold the Number 3 button on the remote instead.) Helpful... the Recorder's output channel is part of the same RF coaxial cable to your TV. Connect the other end of the Initial Setup.You cannot see the Initial Setup screens until you see the DVD background picture or the Initial Setup screen on your TV. Your antenna or Cable TV signal ...
Check your TV's manual for details. 3 Connect the power cords of both VCR and DVD modes. 1 Connect your Antenna or Cable TV signal to channel 3. Go to page 18 to turn on the Recorder. 5 Turn on the TV power. Press DVD on the remote.Then press and hold the Number 3 button on the remote instead.) Helpful... the Recorder's output channel is part of the same RF coaxial cable to your TV. Connect the other end of the Initial Setup.You cannot see the Initial Setup screens until you see the DVD background picture or the Initial Setup screen on your TV. Your antenna or Cable TV signal ...

User manual, English (US)
Page 16
...TV power. Check the Stereo's manual. • To use Component Video or SVideo instead, see the DVD background picture or Initial Setup screen on the TV. Check your TV manual for the Discs you play.You... distorted sound or no sound at the VCR. • Set Digital output accordingly. Use the supplied video cable that selects the Video In channel. See your TV manual.Your TV remote may be labelled RF In...your Antenna or Cable TV signal to the ANTENNA IN jack on the rear of the Recorder. 2 Connect the Recorder's COAXIAL DIGITAL AUDIO OUT jack to the Antenna In jack on your TV. The ...
...TV power. Check the Stereo's manual. • To use Component Video or SVideo instead, see the DVD background picture or Initial Setup screen on the TV. Check your TV manual for the Discs you play.You... distorted sound or no sound at the VCR. • Set Digital output accordingly. Use the supplied video cable that selects the Video In channel. See your TV manual.Your TV remote may be labelled RF In...your Antenna or Cable TV signal to the ANTENNA IN jack on the rear of the Recorder. 2 Connect the Recorder's COAXIAL DIGITAL AUDIO OUT jack to the Antenna In jack on your TV. The ...
User manual, English (US)
Page 17
... down the door that matches the jacks to start recording on the front of tape play the videotape on the VCR/Camcorder/External VCR. A sample connection with the Recorder. Refer to channel 5 on your VCR/Camcorder manual to improve the quality of the Recorder, flip down until you try to the VIDEO IN..., AUDIO IN, or SV (S-Video) IN jacks on the other equipment. The Initial Setup screen will hide the cables from pages 10-16. 2 To access the AUDIO/VIDEO IN jacks on a DVD+R/DVD...
... down the door that matches the jacks to start recording on the front of tape play the videotape on the VCR/Camcorder/External VCR. A sample connection with the Recorder. Refer to channel 5 on your VCR/Camcorder manual to improve the quality of the Recorder, flip down until you try to the VIDEO IN..., AUDIO IN, or SV (S-Video) IN jacks on the other equipment. The Initial Setup screen will hide the cables from pages 10-16. 2 To access the AUDIO/VIDEO IN jacks on a DVD+R/DVD...
User manual, English (US)
Page 48
...the disc tray before turning off the Recorder for a scheduled timer recording. Refer to the on-screen menu instructions or this manual to correctly set .The clock setting screen appears when you set a timer recording. Memory full There are six Timer recordings set.You cannot set the clock. ...the display if you turn off ; Put a recordable DVD+R or DVD+RW in the Timer List. • To ignore the message, press VCR Plus+/TIMER repeatedly to remove all information for the timer recording is in the Recorder. Disc locked A protected DVD+RW or DVD+R is correct and complete. See page 53....
...the disc tray before turning off the Recorder for a scheduled timer recording. Refer to the on-screen menu instructions or this manual to correctly set .The clock setting screen appears when you set a timer recording. Memory full There are six Timer recordings set.You cannot set the clock. ...the display if you turn off ; Put a recordable DVD+R or DVD+RW in the Timer List. • To ignore the message, press VCR Plus+/TIMER repeatedly to remove all information for the timer recording is in the Recorder. Disc locked A protected DVD+RW or DVD+R is correct and complete. See page 53....

User manual, English (US)
Page 80
... sound is channel 3 when you receive it.To change channels down until you are usually near channel zero (0). Press VCR or SOURCE so the VCR light appears on the front of problems and possible solutions before requesting service.You may appear.This is black and white during... to your TV's color system, the picture may affect the picture quality when playing DVDs later. See page 52. • Connect the Recorder directly to the Recorder and the TV. • Set your TV owner's manual for fingerprints. See page 63. If the Disc's color system is distorted; Details...
... sound is channel 3 when you receive it.To change channels down until you are usually near channel zero (0). Press VCR or SOURCE so the VCR light appears on the front of problems and possible solutions before requesting service.You may appear.This is black and white during... to your TV's color system, the picture may affect the picture quality when playing DVDs later. See page 52. • Connect the Recorder directly to the Recorder and the TV. • Set your TV owner's manual for fingerprints. See page 63. If the Disc's color system is distorted; Details...

User manual, English (US)
Page 82
...changes may be replaced. See page 53. An Audio CD will be missing, for example the recording mode. • To play . See page 8. • Make sure you selected DVD or VCR mode using the Number 1 button. • To adapt a Disc that is not, an ...manual for the Disc. See page 26. • Remove any obstacles between the Recorder and a TV or Stereo. See page 67. • In DVD mode, the D symbol will appear on the DVD display panel each time the Recorder receives a signal from the Recorder. • Change the Audio setting of the DVD.The DVD must be accessible when you record...
...changes may be replaced. See page 53. An Audio CD will be missing, for example the recording mode. • To play . See page 8. • Make sure you selected DVD or VCR mode using the Number 1 button. • To adapt a Disc that is not, an ...manual for the Disc. See page 26. • Remove any obstacles between the Recorder and a TV or Stereo. See page 67. • In DVD mode, the D symbol will appear on the DVD display panel each time the Recorder receives a signal from the Recorder. • Change the Audio setting of the DVD.The DVD must be accessible when you record...

User manual, English (US)
Page 88
... 8, 33 zoom 32, 38 8239 300 34951 1VMN20247/E9490UD ***** This owner's manual is made of recyclable materials. buttons 23 channel K/L buttons 26 channel programming 28...39, 65 dvd button 23 dvd rec I button . . . . .22, 24, 43 dvd recorder features menu . . .62 editing 53-54 erase disc 53 erase this title 50 erasing timer recordings . . ....vcr button 23 vcr light 25 VCR Plus+channels 29 VCR Plus+/ TIMER button 24, 45-47 VCR Plus+ timer recording . .46 vcr status display 68 vcr rec I buttons 26 record mode 52 record one channel/ watch another 49, 70 record settings 52 recording...
... 8, 33 zoom 32, 38 8239 300 34951 1VMN20247/E9490UD ***** This owner's manual is made of recyclable materials. buttons 23 channel K/L buttons 26 channel programming 28...39, 65 dvd button 23 dvd rec I button . . . . .22, 24, 43 dvd recorder features menu . . .62 editing 53-54 erase disc 53 erase this title 50 erasing timer recordings . . ....vcr button 23 vcr light 25 VCR Plus+channels 29 VCR Plus+/ TIMER button 24, 45-47 VCR Plus+ timer recording . .46 vcr status display 68 vcr rec I buttons 26 record mode 52 record one channel/ watch another 49, 70 record settings 52 recording...


