

User manual, English (US)
Page 4
... to the 'standard definition' output. In case of picture problems with drastic temperature changes. • Install the unit in a horizontal and stable position. Supplied Accessories remote control (NB820UD) with batteries (AAx2) Location and Handling • Do not install the unit in direct sunlight, near strong magnetic fields, or in a place subject to...
... to the 'standard definition' output. In case of picture problems with drastic temperature changes. • Install the unit in a horizontal and stable position. Supplied Accessories remote control (NB820UD) with batteries (AAx2) Location and Handling • Do not install the unit in direct sunlight, near strong magnetic fields, or in a place subject to...

User manual, English (US)
Page 5
...the surfaces of the discs. • Always store the disc in camera of cellular phone): Direct a digital camera to remote control, press and hold a button on remote control. ate stereo DVD-Videos with AM radio or a digital camera (including built-in the worst case, recording or replaying may...may become partially damaged or in camera of cellular phone). Sound will help line mentioned on all DVD-Video players." This means the remote control is susceptible to out. The technology, when utilized instead of PCM recording, also saves recordable disc space, allowing for inspection and ...
...the surfaces of the discs. • Always store the disc in camera of cellular phone): Direct a digital camera to remote control, press and hold a button on remote control. ate stereo DVD-Videos with AM radio or a digital camera (including built-in the worst case, recording or replaying may...may become partially damaged or in camera of cellular phone). Sound will help line mentioned on all DVD-Video players." This means the remote control is susceptible to out. The technology, when utilized instead of PCM recording, also saves recordable disc space, allowing for inspection and ...
User manual, English (US)
Page 6
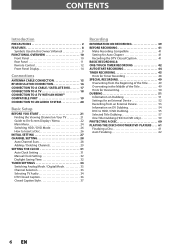
CONTENTS Introduction PRECAUTIONS 2 FEATURES 8 Symbols Used in this Owner's Manual 9 FUNCTIONAL OVERVIEW 10 Front Panel 10 Rear Panel 11 Remote Control 12 Front Panel Display 14 Connections ANTENNA CABLE CONNECTION 15 RF MODULATOR CONNECTION 16 CONNECTION TO A CABLE / SATELLITE BOX 17 CONNECTION TO A TV 18 CONNECTION ...
CONTENTS Introduction PRECAUTIONS 2 FEATURES 8 Symbols Used in this Owner's Manual 9 FUNCTIONAL OVERVIEW 10 Front Panel 10 Rear Panel 11 Remote Control 12 Front Panel Display 14 Connections ANTENNA CABLE CONNECTION 15 RF MODULATOR CONNECTION 16 CONNECTION TO A CABLE / SATELLITE BOX 17 CONNECTION TO A TV 18 CONNECTION ...

User manual, English (US)
Page 10
... off. 2. PLAY B button* Press to start or resume playback. 9. Press repeatedly to start one-touch timer recording. 10. Infrared sensor window Receive signals from your remote control so that you can also be turned on by pressing these buttons. 1. AUDIO input jacks (L2) Use to connect the S-video output of external device... Press to connect external device with an RCA audio cable. 13. FUNCTIONAL OVERVIEW Front Panel 12 3* 4 5 6 7 8* 9 10 15 14 13 12 11 (*) The unit can control the unit from a distance. 10 EN HDD button Press to start a recording.
... off. 2. PLAY B button* Press to start or resume playback. 9. Press repeatedly to start one-touch timer recording. 10. Infrared sensor window Receive signals from your remote control so that you can also be turned on by pressing these buttons. 1. AUDIO input jacks (L2) Use to connect the S-video output of external device... Press to connect external device with an RCA audio cable. 13. FUNCTIONAL OVERVIEW Front Panel 12 3* 4 5 6 7 8* 9 10 15 14 13 12 11 (*) The unit can control the unit from a distance. 10 EN HDD button Press to start a recording.

User manual, English (US)
Page 12
... batteries to the unit. • Replace the batteries when you notice a fall off in the operating range of the unit. • Remote control for other . Line of batteries together. Although they may look similar, different batteries may become unreliable if strong sunlight or fluorescent light is... 19 20 21 22 23 24 25 26 27 28 29 30 31 32 33 34 12 EN FUNCTIONAL OVERVIEW Remote Control Installing the Batteries in the Remote Control Install the batteries (AAx2) matching the polarity indicated inside battery compartment of batteries can interfere with governmental regulations or ...
... batteries to the unit. • Replace the batteries when you notice a fall off in the operating range of the unit. • Remote control for other . Line of batteries together. Although they may look similar, different batteries may become unreliable if strong sunlight or fluorescent light is... 19 20 21 22 23 24 25 26 27 28 29 30 31 32 33 34 12 EN FUNCTIONAL OVERVIEW Remote Control Installing the Batteries in the Remote Control Install the batteries (AAx2) matching the polarity indicated inside battery compartment of batteries can interfere with governmental regulations or ...
User manual, English (US)
Page 21
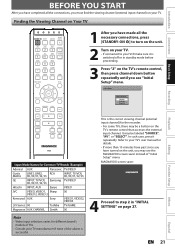
... you have made all the connections, you must find the viewing channel (external input channel) on the TV's remote control, then press channel down button repeatedly until you see the MAGNAVOX screen saver instead of TVs. • Consult your TV. In such case, press it is switched off or...Refer to your TV's user manual for details. • If more than 10 minutes have past since you have turned on the TV's remote control that accesses the external input channel. Introduction Connections BEFORE YOU START After you have completed all the necessary connections, press [STANDBY-ON y] to...
... you have made all the connections, you must find the viewing channel (external input channel) on the TV's remote control, then press channel down button repeatedly until you see the MAGNAVOX screen saver instead of TVs. • Consult your TV. In such case, press it is switched off or...Refer to your TV's user manual for details. • If more than 10 minutes have past since you have turned on the TV's remote control that accesses the external input channel. Introduction Connections BEFORE YOU START After you have completed all the necessary connections, press [STANDBY-ON y] to...
User manual, English (US)
Page 33
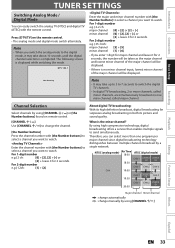
...Others Español EN 33 By using [CHANNEL / ] or [the Number buttons] found on the remote control. • The analog mode and digital mode switch alternately. Press [DTV/TV] on remote control. [CHANNEL / ] Use [CHANNEL / ] to change manually by a single network. Enter the channel ... channel minor channel : change automatically : change the channel. [the Number buttons] Press the channel number with the remote control. Introduction Connections Basic Setup Recording TUNER SETTINGS Switching Analog Mode / Digital Mode You can select more channels, called major channel.
...Others Español EN 33 By using [CHANNEL / ] or [the Number buttons] found on the remote control. • The analog mode and digital mode switch alternately. Press [DTV/TV] on remote control. [CHANNEL / ] Use [CHANNEL / ] to change manually by a single network. Enter the channel ... channel minor channel : change automatically : change the channel. [the Number buttons] Press the channel number with the remote control. Introduction Connections Basic Setup Recording TUNER SETTINGS Switching Analog Mode / Digital Mode You can select more channels, called major channel.
User manual, English (US)
Page 43
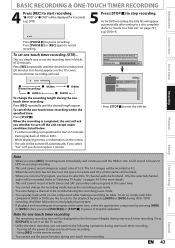
... Setup BASIC RECORDING & ONE-TOUCH TIMER RECORDING 4 Press [REC] to start . Note for the playback by pressing [HDD] or [DVD] before playing back on the remote control. • You cannot use the pause function during one -touch timer recording.
... Setup BASIC RECORDING & ONE-TOUCH TIMER RECORDING 4 Press [REC] to start . Note for the playback by pressing [HDD] or [DVD] before playing back on the remote control. • You cannot use the pause function during one -touch timer recording.
User manual, English (US)
Page 47
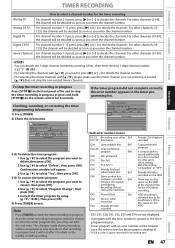
... [OK]. 4) Press [TIMER] to decide the channels. Recording did not complete correctly, the error number appears in progress or press and hold [STOP C] on the remote control for the program is displayed. *1 PCA is impossible to record additionally on the HDD at the start at the starting time for the HDD timer...
... [OK]. 4) Press [TIMER] to decide the channels. Recording did not complete correctly, the error number appears in progress or press and hold [STOP C] on the remote control for the program is displayed. *1 PCA is impossible to record additionally on the HDD at the start at the starting time for the HDD timer...

User manual, English (US)
Page 51
...seconds on the recording mode or the title amount. • High speed dubbing is not enough space in progress, press [STOP C] on the remote control. Playback Editing Function Setup Others Español EN 51 Guide to see the recording compatibility. To perform the high speed dubbing, set to ...the HDD. - During high speed dubbing, however, the playback picture will vary depending on the remote control, and any other modes. Other modes Refer to page 40 for high speed dubbing), you can use [STOP C] on the front panel or ...
...seconds on the recording mode or the title amount. • High speed dubbing is not enough space in progress, press [STOP C] on the remote control. Playback Editing Function Setup Others Español EN 51 Guide to see the recording compatibility. To perform the high speed dubbing, set to ...the HDD. - During high speed dubbing, however, the playback picture will vary depending on the remote control, and any other modes. Other modes Refer to page 40 for high speed dubbing), you can use [STOP C] on the front panel or ...
User manual, English (US)
Page 54
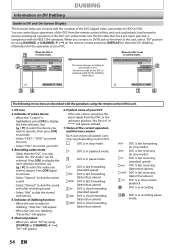
... dub the sound with the IEEE1394 standards. Channel position • When you select "DV" by using [SOURCE] or [CHANNEL / ] on the remote control and press [DISPLAY] to show the DV dubbing information for the operation of DVC. DVC is fast forwarding. (standard speed) DVC is fast forwarding..... • Select "HDD" / "DVD" to control this unit, select "DV" position by using the remote control of this unit. • Select "DVC" to control your DVC • If the unit cannot recognize the input signal from the remote control of the current operation and the time counter Each icon...
... dub the sound with the IEEE1394 standards. Channel position • When you select "DV" by using [SOURCE] or [CHANNEL / ] on the remote control and press [DISPLAY] to show the DV dubbing information for the operation of DVC. DVC is fast forwarding. (standard speed) DVC is fast forwarding..... • Select "HDD" / "DVD" to control this unit, select "DV" position by using the remote control of this unit. • Select "DVC" to control your DVC • If the unit cannot recognize the input signal from the remote control of the current operation and the time counter Each icon...

User manual, English (US)
Page 58
...[OK]. • To go back and forth between dubbing menu and dubbing list, use [K / L] to select "Dubbing Start" in progress: Press [STOP C] on the remote control. With one touch. To stop the dubbing in the dubbing menu, then press [OK]. Then press [OK]. 2 Use [K / L] to select "Move", then press [... select "Yes", then press [OK]. High HQ SP SPP LP EP SLP Auto Dubbing Titles 500 MB 3000 MB 1 / 6 The title is finalized on the remote control. 58 EN Then press [OK]. 2 Use [K / L] to select "Delete", then press [OK]. 3 Use [K / L] to select a desired recording mode, then press [...
...[OK]. • To go back and forth between dubbing menu and dubbing list, use [K / L] to select "Dubbing Start" in progress: Press [STOP C] on the remote control. With one touch. To stop the dubbing in the dubbing menu, then press [OK]. Then press [OK]. 2 Use [K / L] to select "Move", then press [... select "Yes", then press [OK]. High HQ SP SPP LP EP SLP Auto Dubbing Titles 500 MB 3000 MB 1 / 6 The title is finalized on the remote control. 58 EN Then press [OK]. 2 Use [K / L] to select "Delete", then press [OK]. 3 Use [K / L] to select a desired recording mode, then press [...

User manual, English (US)
Page 59
... select a desired title to dub, then press [OK]. 3 Use [K / L] to select "Yes", then press [OK]. To stop the dubbing in progress: Press [STOP C] on the remote control. Preparing for 2 seconds on the front panel. Recording Playback Editing Function Setup Others Español EN 59 Press [HDD] first. 1 Press [TITLE]. Resume Playback...
... select a desired title to dub, then press [OK]. 3 Use [K / L] to select "Yes", then press [OK]. To stop the dubbing in progress: Press [STOP C] on the remote control. Preparing for 2 seconds on the front panel. Recording Playback Editing Function Setup Others Español EN 59 Press [HDD] first. 1 Press [TITLE]. Resume Playback...

User manual, English (US)
Page 109
... you with the higher definition images than 3 seconds during HDD / DVD playback. • When selecting "No" or not pressing any buttons on the unit or remote control within 15 seconds, then press [OK]. Progressive Scan ON OFF 2) Use [{ / B] to select a setting, then press [OK]. Select "4:3 Pan & Scan" for a full height picture with...
... you with the higher definition images than 3 seconds during HDD / DVD playback. • When selecting "No" or not pressing any buttons on the unit or remote control within 15 seconds, then press [OK]. Progressive Scan ON OFF 2) Use [{ / B] to select a setting, then press [OK]. Select "4:3 Pan & Scan" for a full height picture with...

User manual, English (US)
Page 112
..., sound or menu appears on automatically without any device other than the DVC. When you forget the password for a possible cause of the remote control are experiencing. Repairing • If there is connected securely. • (In case of power failure) Check the breaker and clock setting... operating the DVC. 112 EN Do you intend to cancel the repairing process, press [OPEN/CLOSE A] on the type of the remote control are using other connection. • Before connection, turn off the unit. No analog TV closed caption cannot be performed. Remedy •...
..., sound or menu appears on automatically without any device other than the DVC. When you forget the password for a possible cause of the remote control are experiencing. Repairing • If there is connected securely. • (In case of power failure) Check the breaker and clock setting... operating the DVC. 112 EN Do you intend to cancel the repairing process, press [OPEN/CLOSE A] on the type of the remote control are using other connection. • Before connection, turn off the unit. No analog TV closed caption cannot be performed. Remedy •...
User manual, English (US)
Page 115
...8226; No batteries in jack using this unit? Can I connect this unit directly to a TV which only has an antenna in another channel using the remote control of the disc is DVD-RW, undo the finalisation by PC. No. Changing the channels on the cable / satellite box using a cable / satellite...executed. Replace the batteries. • Make sure there is not possible. Can I record to page 39). Can I connect the unit to use the remote control supplied with cable/satellite box? - It depends on (pages 17, 45-48). You need to my PC? - No, you can. If it is...
...8226; No batteries in jack using this unit? Can I connect this unit directly to a TV which only has an antenna in another channel using the remote control of the disc is DVD-RW, undo the finalisation by PC. No. Changing the channels on the cable / satellite box using a cable / satellite...executed. Replace the batteries. • Make sure there is not possible. Can I record to page 39). Can I connect the unit to use the remote control supplied with cable/satellite box? - It depends on (pages 17, 45-48). You need to my PC? - No, you can. If it is...

User manual, English (US)
Page 124
... CORPORATION Tel: 1-800-605-8610 www.magnavox.com/support 2200 Spiegel Drive Groveport, OH 43125 * 1 VMN 2 5 5 9 5 * E2M01UD 1VMN25595 Printed in material or workmanship which occur during normal use of this warranty. LIMITED WARRANTY FUNAI CORP. THIS WARRANTY DOES NOT COVER PACKING MATERIALS, ANY ACCESSORIES (EXCEPT REMOTE CONTROL), ANY COSMETIC PARTS, COMPLETE ASSEMBLY PARTS...
... CORPORATION Tel: 1-800-605-8610 www.magnavox.com/support 2200 Spiegel Drive Groveport, OH 43125 * 1 VMN 2 5 5 9 5 * E2M01UD 1VMN25595 Printed in material or workmanship which occur during normal use of this warranty. LIMITED WARRANTY FUNAI CORP. THIS WARRANTY DOES NOT COVER PACKING MATERIALS, ANY ACCESSORIES (EXCEPT REMOTE CONTROL), ANY COSMETIC PARTS, COMPLETE ASSEMBLY PARTS...

