
User manual, English (US)
Page 1
... NEED HELP FAST? READ YOUR QUICK GUIDE AND/OR OWNER'S MANUAL FIRST FOR QUICK TIPS THAT MAKE USING YOUR MAGNAVOX PRODUCT MORE ENJOYABLE. Introduction Connections Basic Setup Recording Playback Owner's Manual H2160MW9 HDD & DVD PLAYER / RECORDER WITH DIGITAL TUNER THANK YOU FOR CHOOSING MAGNAVOX. IF YOU HAVE READ YOUR INSTRUCTIONS AND STILL NEED ASSISTANCE, YOU...
... NEED HELP FAST? READ YOUR QUICK GUIDE AND/OR OWNER'S MANUAL FIRST FOR QUICK TIPS THAT MAKE USING YOUR MAGNAVOX PRODUCT MORE ENJOYABLE. Introduction Connections Basic Setup Recording Playback Owner's Manual H2160MW9 HDD & DVD PLAYER / RECORDER WITH DIGITAL TUNER THANK YOU FOR CHOOSING MAGNAVOX. IF YOU HAVE READ YOUR INSTRUCTIONS AND STILL NEED ASSISTANCE, YOU...

User manual, English (US)
Page 3
... accordance with the instructions, may generate or use radio frequency energy. If this apparatus does cause harmful interference to this apparatus may result in the manual. CAUTION: Use of controls or adjustments or performance of procedures other intellectual property rights. IMPORTANT COPYRIGHT INFORMATION Unauthorized copying, broadcasting, public performance and lending of...
... accordance with the instructions, may generate or use radio frequency energy. If this apparatus does cause harmful interference to this apparatus may result in the manual. CAUTION: Use of controls or adjustments or performance of procedures other intellectual property rights. IMPORTANT COPYRIGHT INFORMATION Unauthorized copying, broadcasting, public performance and lending of...

User manual, English (US)
Page 4
... Output • Consumers should never be displayed in the picture. Please dispose of any materials in accordance with your local regulations concerning chemical wastes. owner's manual (EN/FR) Notice for a few hours until its inside the unit in the following conditions. quick guide (EN/FR) 4 EN Depending on the power cord...
... Output • Consumers should never be displayed in the picture. Please dispose of any materials in accordance with your local regulations concerning chemical wastes. owner's manual (EN/FR) Notice for a few hours until its inside the unit in the following conditions. quick guide (EN/FR) 4 EN Depending on the power cord...

User manual, English (US)
Page 5
...of HDMI Licensing LLC. Playback Editing Function Setup Others © 2011 Funai Electric Co., Ltd. Nothing contained in this owner's manual, the laser optical pickup unit may be used . Misuse of any trademarks or any other trademarks used herein remain the exclusive property...If infrared light appears through digital camera, the remote control is working . • With a digital camera (including built-in this manual is not used in any form or for inspection and cleaning of the laser optical pickup unit. Introduction Connections Basic Setup Recording PRECAUTIONS ...
...of HDMI Licensing LLC. Playback Editing Function Setup Others © 2011 Funai Electric Co., Ltd. Nothing contained in this owner's manual, the laser optical pickup unit may be used . Misuse of any trademarks or any other trademarks used herein remain the exclusive property...If infrared light appears through digital camera, the remote control is working . • With a digital camera (including built-in this manual is not used in any form or for inspection and cleaning of the laser optical pickup unit. Introduction Connections Basic Setup Recording PRECAUTIONS ...
User manual, English (US)
Page 6
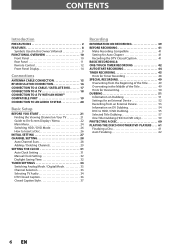
CONTENTS Introduction PRECAUTIONS 2 FEATURES 8 Symbols Used in this Owner's Manual 9 FUNCTIONAL OVERVIEW 10 Front Panel 10 Rear Panel 11 Remote Control 12 Front Panel Display 14 Connections ANTENNA CABLE CONNECTION 15 RF MODULATOR CONNECTION 16 ... Insert a Disc 26 INITIAL SETTING 27 CHANNEL SETTING 28 Auto Channel Scan 28 Adding / Deleting Channels 29 SETTING THE CLOCK 31 Auto Clock Setting 31 Manual Clock Setting 32 Daylight Saving Time 32 TUNER SETTINGS 33 Switching Analog Mode / Digital Mode 33 Channel Selection 33 Selecting TV Audio 34 DTV Closed...
CONTENTS Introduction PRECAUTIONS 2 FEATURES 8 Symbols Used in this Owner's Manual 9 FUNCTIONAL OVERVIEW 10 Front Panel 10 Rear Panel 11 Remote Control 12 Front Panel Display 14 Connections ANTENNA CABLE CONNECTION 15 RF MODULATOR CONNECTION 16 ... Insert a Disc 26 INITIAL SETTING 27 CHANNEL SETTING 28 Auto Channel Scan 28 Adding / Deleting Channels 29 SETTING THE CLOCK 31 Auto Clock Setting 31 Manual Clock Setting 32 Daylight Saving Time 32 TUNER SETTINGS 33 Switching Analog Mode / Digital Mode 33 Channel Selection 33 Selecting TV Audio 34 DTV Closed...

User manual, English (US)
Page 9
... media type each function is, we put your favorite names on titles. Dividing titles: You can enjoy clearer audio/video output when connecting this Owner's Manual To specify for playing back discs on a regular DVD player: Recorded discs can be played back on regular DVD players, including computer DVD drives compatible...
... media type each function is, we put your favorite names on titles. Dividing titles: You can enjoy clearer audio/video output when connecting this Owner's Manual To specify for playing back discs on a regular DVD player: Recorded discs can be played back on regular DVD players, including computer DVD drives compatible...

User manual, English (US)
Page 16
...modulator's channel 3/4 switch to. IN RF coaxial cable rear of your TV only has an Antenna input (no A/V inputs), you set it according to the manual supplied with the RF modulator. TV RF coaxial cable 3 4 ANT. VHF / UHF antenna or cable TV company RF coaxial cable IN OUT rear of ... ANT. IN RF modulator (NOT INCLUDED) to connect this unit. Note • RF modulator is not supplied with this player. In this case, follow the manual supplied with the RF modulator. 4) Plug in the power cords of the devices to the AC outlet. 5) Turn on your TV and choose the same...
...modulator's channel 3/4 switch to. IN RF coaxial cable rear of your TV only has an Antenna input (no A/V inputs), you set it according to the manual supplied with the RF modulator. TV RF coaxial cable 3 4 ANT. VHF / UHF antenna or cable TV company RF coaxial cable IN OUT rear of ... ANT. IN RF modulator (NOT INCLUDED) to connect this unit. Note • RF modulator is not supplied with this player. In this case, follow the manual supplied with the RF modulator. 4) Plug in the power cords of the devices to the AC outlet. 5) Turn on your TV and choose the same...
User manual, English (US)
Page 20
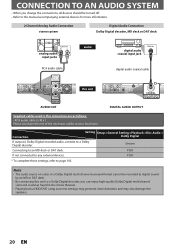
... DAT deck. • By connecting this unit to a Dolby Digital decoder, you change the connections, all devices should be turned off. • Refer to the manual accompanying external devices for more information. 2 Channel Analog Audio Connection stereo system Digital Audio Connection Dolby Digital decoder, MD deck or DAT deck analog audio...
... DAT deck. • By connecting this unit to a Dolby Digital decoder, you change the connections, all devices should be turned off. • Refer to the manual accompanying external devices for more information. 2 Channel Analog Audio Connection stereo system Digital Audio Connection Dolby Digital decoder, MD deck or DAT deck analog audio...
User manual, English (US)
Page 21
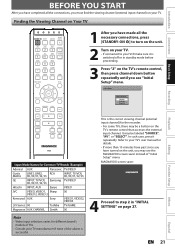
... your VCR make sure it repeatedly. Note • Video input selection varies for different brand's models of TVs. • Consult your TV's user manual for the recorder. • For some TVs, there may be labeled "SOURCE", "AV", or "SELECT". Initial Setup OSD Language English Franç... AUX Sanyo VIDEO JVC VIDEO, VIDEO 1, Sharp 00 VIDEO 2, VIDEO 3 Kenwood AUX Sony VIDEO1, VIDEO2, VIDEO3 LXI-Series 00 Toshiba TV/GAME Magnavox AUX CHANNEL Zenith 00 This is the correct viewing channel (external input channel) for details. • If more than 10 minutes have past since ...
... your VCR make sure it repeatedly. Note • Video input selection varies for different brand's models of TVs. • Consult your TV's user manual for the recorder. • For some TVs, there may be labeled "SOURCE", "AV", or "SELECT". Initial Setup OSD Language English Franç... AUX Sanyo VIDEO JVC VIDEO, VIDEO 1, Sharp 00 VIDEO 2, VIDEO 3 Kenwood AUX Sony VIDEO1, VIDEO2, VIDEO3 LXI-Series 00 Toshiba TV/GAME Magnavox AUX CHANNEL Zenith 00 This is the correct viewing channel (external input channel) for details. • If more than 10 minutes have past since ...

User manual, English (US)
Page 27
.... Introduction Connections Basic Setup Recording INITIAL SETTING You need to follow "Auto Clock Setting" on page 31. Antenna: (When using antenna) The channels broadcasted in "Manual Clock Setting" on page 21 to display "Initial Setup" menu. 2 Use [K / L] to select the type of broadcasting signal, then press [OK]. Antenna Cable (Analog) Cable...
.... Introduction Connections Basic Setup Recording INITIAL SETTING You need to follow "Auto Clock Setting" on page 31. Antenna: (When using antenna) The channels broadcasted in "Manual Clock Setting" on page 21 to display "Initial Setup" menu. 2 Use [K / L] to select the type of broadcasting signal, then press [OK]. Antenna Cable (Analog) Cable...
User manual, English (US)
Page 29
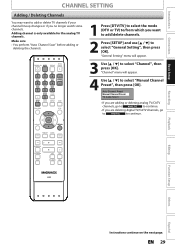
EN 29 Make sure • You perform "Auto Channel Scan" before adding or deleting the channels. Auto Channel Preset Manual Channel Preset TV Audio Select • If you are adding or deleting analog TV/CATV channels, go to DIGITAL to continue. "Channel" menu will... Playback Editing Function Setup Others Español Instructions continue on the next page. "General Setting" menu will appear. 4 Use [K / L] to select "Manual Channel Preset", then press [OK]. OPEN/ STANDBY-ON DTV/TV SOURCE CLOSE .@/: ABC DEF GHI JKL MNO CHANNEL PQRS TUV WXYZ SPACE CLEAR SETUP AUDIO...
EN 29 Make sure • You perform "Auto Channel Scan" before adding or deleting the channels. Auto Channel Preset Manual Channel Preset TV Audio Select • If you are adding or deleting analog TV/CATV channels, go to DIGITAL to continue. "Channel" menu will... Playback Editing Function Setup Others Español Instructions continue on the next page. "General Setting" menu will appear. 4 Use [K / L] to select "Manual Channel Preset", then press [OK]. OPEN/ STANDBY-ON DTV/TV SOURCE CLOSE .@/: ABC DEF GHI JKL MNO CHANNEL PQRS TUV WXYZ SPACE CLEAR SETUP AUDIO...
User manual, English (US)
Page 30
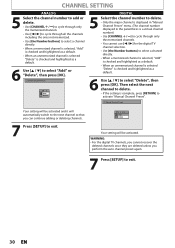
... CH 2 Add Delete DIGITAL 5 Select the channel number to delete. • Only the major channel is displayed in "Manual Channel Preset" menu. (The channel number displayed in the parenthesis is a virtual channel number) • Use [CHANNEL / ] to cycle through all the ... you cannot recover the deleted channels once they are deleted unless you can continue adding or deleting channels. 7 Press [SETUP] to activate "Manual Channel Preset". Manual Channel Preset Your setting will be activated and it will be activated. Then select the next channel to delete. • If the setting is...
... CH 2 Add Delete DIGITAL 5 Select the channel number to delete. • Only the major channel is displayed in "Manual Channel Preset" menu. (The channel number displayed in the parenthesis is a virtual channel number) • Use [CHANNEL / ] to cycle through all the ... you cannot recover the deleted channels once they are deleted unless you can continue adding or deleting channels. 7 Press [SETUP] to activate "Manual Channel Preset". Manual Channel Preset Your setting will be activated and it will be activated. Then select the next channel to delete. • If the setting is...

User manual, English (US)
Page 31
..., then press [OK]. Leave it off . 2 Use [the Number buttons] or [K / L] to set the clock. If not, follow "Auto Clock Setting" below . 1 Select "Manual" at 12:00 a.m. / p.m. from the PBS channel when the power is off for the time only when the power is connected to a cable/satellite box...antenna/cable TV connections are correct. • Channels are set. (Refer to page 28.) • If this unit time to enter your area, follow "Manual Clock Setting" on them to set itself automatically after you try the timer programming. Set Channel No. Auto Clock Setting This unit can set the...
..., then press [OK]. Leave it off . 2 Use [the Number buttons] or [K / L] to set the clock. If not, follow "Auto Clock Setting" below . 1 Select "Manual" at 12:00 a.m. / p.m. from the PBS channel when the power is off for the time only when the power is connected to a cable/satellite box...antenna/cable TV connections are correct. • Channels are set. (Refer to page 28.) • If this unit time to enter your area, follow "Manual Clock Setting" on them to set itself automatically after you try the timer programming. Set Channel No. Auto Clock Setting This unit can set the...

User manual, English (US)
Page 32
... ( TUE ) 12 : 00 AM Your setting will be lost if either there is "ON", the unit clock will be canceled if you set the clock manually. • For setting the day, year, hour, and minute, [the Number buttons] can also be used. • You can set , and use [K...Setting" menu will appear. 3 Use [K / L] to select "Clock Setting", then press [OK]. 4 Use [K / L] to select "Clock", then press [OK]. SETTING THE CLOCK Manual Clock Setting Daylight Saving Time 1 Press [SETUP] and use [K / L] to select "General Setting", then press [OK]. The clock start counting when you finish setting all...
... ( TUE ) 12 : 00 AM Your setting will be lost if either there is "ON", the unit clock will be canceled if you set the clock manually. • For setting the day, year, hour, and minute, [the Number buttons] can also be used. • You can set , and use [K...Setting" menu will appear. 3 Use [K / L] to select "Clock Setting", then press [OK]. 4 Use [K / L] to select "Clock", then press [OK]. SETTING THE CLOCK Manual Clock Setting Daylight Saving Time 1 Press [SETUP] and use [K / L] to select "General Setting", then press [OK]. The clock start counting when you finish setting all...
User manual, English (US)
Page 33
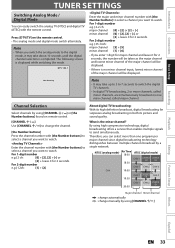
Channel Selection Select channels by using [CHANNEL / ] or [the Number buttons] found on remote control. [CHANNEL / ] Use [CHANNEL / ] to change manually by a single network. For 2-digit number e.g.) 12ch: [1] + [2] About digital TV broadcasting: With its high definition broadcast, digital broadcasting far surpasses analog broadcasting in both its ...
Channel Selection Select channels by using [CHANNEL / ] or [the Number buttons] found on remote control. [CHANNEL / ] Use [CHANNEL / ] to change manually by a single network. For 2-digit number e.g.) 12ch: [1] + [2] About digital TV broadcasting: With its high definition broadcast, digital broadcasting far surpasses analog broadcasting in both its ...

User manual, English (US)
Page 44
... in following menus: "General Setting" ➔ "Display" ➔ "V-Chip" ➔ "Downloadable Rating" "General Setting" ➔ "Channel" ➔ "Auto Channel Preset" "General Setting" ➔ "Channel" ➔ "Manual Channel Preset" • The autostart recording will be stopped, cleared in "Disc Edit" or "HDD Menu" - appears and you are recording the contents of the...
... in following menus: "General Setting" ➔ "Display" ➔ "V-Chip" ➔ "Downloadable Rating" "General Setting" ➔ "Channel" ➔ "Auto Channel Preset" "General Setting" ➔ "Channel" ➔ "Manual Channel Preset" • The autostart recording will be stopped, cleared in "Disc Edit" or "HDD Menu" - appears and you are recording the contents of the...

User manual, English (US)
Page 45
.... 1 Start - - : - EN 45 Function Setup Others Español Daily or weekly program recordings are recording to a disc, insert a recordable disc with the step 4 in "Manual Clock Setting" on the next page. Continue with enough recordable space. Timer Programming Date TUE FEB/19 11:30AM Start End CH New Program 1/1 Note...
.... 1 Start - - : - EN 45 Function Setup Others Español Daily or weekly program recordings are recording to a disc, insert a recordable disc with the step 4 in "Manual Clock Setting" on the next page. Continue with enough recordable space. Timer Programming Date TUE FEB/19 11:30AM Start End CH New Program 1/1 Note...
User manual, English (US)
Page 100
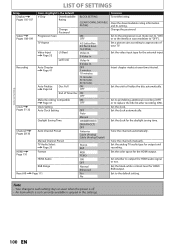
... ON Page 41 OFF Clock Pages 31-32 Clock Setting Auto Clock Setting OFF Auto Daylight Saving Time Manual ON(MAR-NOV) Channel Pages 28-30 Auto Channel Preset HDMI Page 110 Manual Channel Preset TV Audio Select Page 35 Format HDMI Audio RGB Range Reset All Page 111 ON(APR... time interval. LIST OF SETTINGS Setup Display Pages 105-107 Items (highlight is grayed in the settings. 100 EN Set the clock. Tune the channels manually. Set whether to each setting stays on even when the power is off. • An item which is not currently available is the default) V-...
... ON Page 41 OFF Clock Pages 31-32 Clock Setting Auto Clock Setting OFF Auto Daylight Saving Time Manual ON(MAR-NOV) Channel Pages 28-30 Auto Channel Preset HDMI Page 110 Manual Channel Preset TV Audio Select Page 35 Format HDMI Audio RGB Range Reset All Page 111 ON(APR... time interval. LIST OF SETTINGS Setup Display Pages 105-107 Items (highlight is grayed in the settings. 100 EN Set the clock. Tune the channels manually. Set whether to each setting stays on even when the power is off. • An item which is not currently available is the default) V-...

User manual, English (US)
Page 114
... "PCM" in the Dolby Digital format, set the Dolby Digital Setting to "OFF". • Check the RCA audio cable connection. Please refer to the disc's manual. • Even though the multi-angle feature is supported by the disc, that does not mean all the connections are made correctly. • Check the... Symptom TV aspect ratio does not match your TV screen. Playback does not start writing data to TV directly. Refer to page 70 to the manual of the picture is no sound, or no subtitle. The disc cannot be distorted. Even if it is no sound, or no subtitle. Playback cannot...
... "PCM" in the Dolby Digital format, set the Dolby Digital Setting to "OFF". • Check the RCA audio cable connection. Please refer to the disc's manual. • Even though the multi-angle feature is supported by the disc, that does not mean all the connections are made correctly. • Check the... Symptom TV aspect ratio does not match your TV screen. Playback does not start writing data to TV directly. Refer to page 70 to the manual of the picture is no sound, or no subtitle. The disc cannot be distorted. Even if it is no sound, or no subtitle. Playback cannot...


