
User manual, English (US)
Page 1
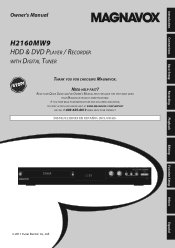
Introduction Connections Basic Setup Recording Playback Owner's Manual H2160MW9 HDD & DVD PLAYER / RECORDER WITH DIGITAL TUNER THANK YOU FOR CHOOSING MAGNAVOX. READ YOUR QUICK GUIDE AND/OR OWNER'S MANUAL FIRST FOR QUICK TIPS THAT MAKE USING YOUR MAGNAVOX PRODUCT MORE ENJOYABLE. NEED HELP FAST? Editing Function Setup Others Español INSTRUCCIONES EN ESPA... INCLUIDAS. © 2011 Funai Electric Co., Ltd. IF YOU HAVE READ YOUR INSTRUCTIONS AND STILL NEED ASSISTANCE, YOU MAY ACCESS OUR ONLINE HELP AT WWW.MAGNAVOX.COM/SUPPORT OR CALL 1-800-605-8610 WHILE WITH YOUR PRODUCT.
Introduction Connections Basic Setup Recording Playback Owner's Manual H2160MW9 HDD & DVD PLAYER / RECORDER WITH DIGITAL TUNER THANK YOU FOR CHOOSING MAGNAVOX. READ YOUR QUICK GUIDE AND/OR OWNER'S MANUAL FIRST FOR QUICK TIPS THAT MAKE USING YOUR MAGNAVOX PRODUCT MORE ENJOYABLE. NEED HELP FAST? Editing Function Setup Others Español INSTRUCCIONES EN ESPA... INCLUIDAS. © 2011 Funai Electric Co., Ltd. IF YOU HAVE READ YOUR INSTRUCTIONS AND STILL NEED ASSISTANCE, YOU MAY ACCESS OUR ONLINE HELP AT WWW.MAGNAVOX.COM/SUPPORT OR CALL 1-800-605-8610 WHILE WITH YOUR PRODUCT.

User manual, English (US)
Page 2
NO USER SERVICEABLE PARTS INSIDE. Important Safeguards The lightning flash with arrowhead symbol, within an equilateral triangle, is intended to alert the user to the presence of uninsulated "dangerous voltage" within an equilateral triangle is intended to alert the user to the presence of important operating and maintenance (servicing) instructions in the literature accompanying the apparatus. 1. FOLLOW INSTRUCTIONS - Unplug this apparatus on the marking label. Do not place this apparatus from the apparatus. 13. An apparatus and cart combination should never be blocked by ...
NO USER SERVICEABLE PARTS INSIDE. Important Safeguards The lightning flash with arrowhead symbol, within an equilateral triangle, is intended to alert the user to the presence of uninsulated "dangerous voltage" within an equilateral triangle is intended to alert the user to the presence of important operating and maintenance (servicing) instructions in the literature accompanying the apparatus. 1. FOLLOW INSTRUCTIONS - Unplug this apparatus on the marking label. Do not place this apparatus from the apparatus. 13. An apparatus and cart combination should never be blocked by ...

User manual, English (US)
Page 3
A falling unit can be authorized by Macrovision, and is protected by Macrovision. These limits are designed to provide reasonable protection against harmful interference in the manual. Do not stare into an outlet on a circuit different from that to comply with Canadian ICES-003. IMPORTANT COPYRIGHT INFORMATION Unauthorized copying, broadcasting, public performance and lending of discs are expressly approved in a residential installation. RADIO-TV INTERFERENCE This apparatus has been tested and found to which can cause serious injury or even death. Use of this ...
A falling unit can be authorized by Macrovision, and is protected by Macrovision. These limits are designed to provide reasonable protection against harmful interference in the manual. Do not stare into an outlet on a circuit different from that to comply with Canadian ICES-003. IMPORTANT COPYRIGHT INFORMATION Unauthorized copying, broadcasting, public performance and lending of discs are expressly approved in a residential installation. RADIO-TV INTERFERENCE This apparatus has been tested and found to which can cause serious injury or even death. Use of this ...

User manual, English (US)
Page 4
Grasp it by the plug. • Do not put your external devices, noise or disturbance of the picture and/or sound may increase slightly. This is recommended that not all high definition television sets are fully compatible with this unit may be thrown away or incinerated but disposed of in the following conditions. Under conditions of any materials in accordance with your local regulations concerning chemical wastes. Supplied Accessories remote control (NB820UD) with batteries (AAx2) Location and Handling • Do not install the unit in direct sunlight, near strong magnetic ...
Grasp it by the plug. • Do not put your external devices, noise or disturbance of the picture and/or sound may increase slightly. This is recommended that not all high definition television sets are fully compatible with this unit may be thrown away or incinerated but disposed of in the following conditions. Under conditions of any materials in accordance with your local regulations concerning chemical wastes. Supplied Accessories remote control (NB820UD) with batteries (AAx2) Location and Handling • Do not install the unit in direct sunlight, near strong magnetic ...

User manual, English (US)
Page 5
There are trademarks of Dolby Laboratories. Wipe the disc from Dolby Laboratories. Depending on the installation environment or handling, the unit may not be lost. • HDD rotates at home. And if a power failure occurs, the content of the recording / replaying program may be available. Press a button on remote control toward the radio. Manufactured under license from the center to out. Playback Editing Function Setup Others © 2011 Funai Electric Co., Ltd. Nothing contained in its intellectual property rights to the fullest extent of the law. Disc ...
There are trademarks of Dolby Laboratories. Wipe the disc from Dolby Laboratories. Depending on the installation environment or handling, the unit may not be lost. • HDD rotates at home. And if a power failure occurs, the content of the recording / replaying program may be available. Press a button on remote control toward the radio. Manufactured under license from the center to out. Playback Editing Function Setup Others © 2011 Funai Electric Co., Ltd. Nothing contained in its intellectual property rights to the fullest extent of the law. Disc ...
User manual, English (US)
Page 6
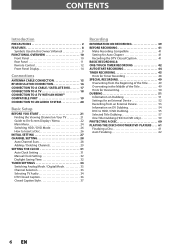
CONTENTS Introduction PRECAUTIONS 2 FEATURES 8 Symbols Used in this Owner's Manual 9 FUNCTIONAL OVERVIEW 10 Front Panel 10 Rear Panel 11 Remote Control 12 Front Panel Display 14 Connections ANTENNA CABLE CONNECTION 15 RF MODULATOR CONNECTION 16 CONNECTION TO A CABLE / SATELLITE BOX 17 CONNECTION TO A TV 18 CONNECTION TO A TV WITH AN HDMI™ COMPATIBLE PORT 19 CONNECTION TO AN AUDIO SYSTEM 20 Basic Setup BEFORE YOU START 21 Finding the Viewing Channel on Your TV 21 Guide to On-Screen Display / Menu 22 Main Menu 24 Switching HDD / DVD Mode 26 How to Insert a Disc 26 ...
CONTENTS Introduction PRECAUTIONS 2 FEATURES 8 Symbols Used in this Owner's Manual 9 FUNCTIONAL OVERVIEW 10 Front Panel 10 Rear Panel 11 Remote Control 12 Front Panel Display 14 Connections ANTENNA CABLE CONNECTION 15 RF MODULATOR CONNECTION 16 CONNECTION TO A CABLE / SATELLITE BOX 17 CONNECTION TO A TV 18 CONNECTION TO A TV WITH AN HDMI™ COMPATIBLE PORT 19 CONNECTION TO AN AUDIO SYSTEM 20 Basic Setup BEFORE YOU START 21 Finding the Viewing Channel on Your TV 21 Guide to On-Screen Display / Menu 22 Main Menu 24 Switching HDD / DVD Mode 26 How to Insert a Disc 26 ...

User manual, English (US)
Page 7
Introduction Connections Basic Setup Recording CONTENTS Playback INFORMATION ON PLAYBACK 63 BASIC PLAYBACK 65 Direct Playback 65 Playback from the Title List 66 Playing Back an Audio CD and a CD-RW/-R with MP3 / JPEG Files 68 Using the Title / Disc Menu 69 Pause 69 SPECIAL PLAYBACK 70 Resume Playback 70 Fast Forward / Fast Reverse Playback 70 Variable Skip / Variable Replay 70 Rapid Playback 70 Step by Step Playback 71 Slow Forward / Slow Reverse Playback 71 Chasing Playback during Recording 71 Simultaneous Playback and Recording 71 Zoom 72 Marker Setting 72 Repeat ...
Introduction Connections Basic Setup Recording CONTENTS Playback INFORMATION ON PLAYBACK 63 BASIC PLAYBACK 65 Direct Playback 65 Playback from the Title List 66 Playing Back an Audio CD and a CD-RW/-R with MP3 / JPEG Files 68 Using the Title / Disc Menu 69 Pause 69 SPECIAL PLAYBACK 70 Resume Playback 70 Fast Forward / Fast Reverse Playback 70 Variable Skip / Variable Replay 70 Rapid Playback 70 Step by Step Playback 71 Slow Forward / Slow Reverse Playback 71 Chasing Playback during Recording 71 Simultaneous Playback and Recording 71 Zoom 72 Marker Setting 72 Repeat ...
User manual, English (US)
Page 8
HDD DVD Up to 36 program recording: You can program the unit to record up to 180 hours (with surround sound system. Every time [REC] is specified in "Playback" menu in advance, with the index automatically. Automatic title list making: The unit makes a title list with one for a desired point by 30 minutes up to 6 hours. By using the search functions. HDD DVD High speed dubbing (HDD ➔ DVD only): If you dub a title recorded in the remaining space of the DVC (digital video camcorder) to record on the HDD, a DVD+RW/- Auto recording mode dubbing: When dubbing, if...
HDD DVD Up to 36 program recording: You can program the unit to record up to 180 hours (with surround sound system. Every time [REC] is specified in "Playback" menu in advance, with the index automatically. Automatic title list making: The unit makes a title list with one for a desired point by 30 minutes up to 6 hours. By using the search functions. HDD DVD High speed dubbing (HDD ➔ DVD only): If you dub a title recorded in the remaining space of the DVC (digital video camcorder) to record on the HDD, a DVD+RW/- Auto recording mode dubbing: When dubbing, if...

User manual, English (US)
Page 9
Introduction Connections Basic Setup FEATURES Editing Deleting a title: HDD DVD You can delete a title which media type each item to operate. * DVD-RW/-R recorded in VR mode or non compatible recording format are playable on other units without finalization in most cases, it is recommended to finalize in order to stabilize the performance. Deleting a scene of each function is not recordable on a regular DVD player: Recorded discs can change pictures for which you need anymore. Compatibility DVD Available for playing back discs on this Owner's Manual To specify for an ...
Introduction Connections Basic Setup FEATURES Editing Deleting a title: HDD DVD You can delete a title which media type each item to operate. * DVD-RW/-R recorded in VR mode or non compatible recording format are playable on other units without finalization in most cases, it is recommended to finalize in order to stabilize the performance. Deleting a scene of each function is not recordable on a regular DVD player: Recorded discs can change pictures for which you need anymore. Compatibility DVD Available for playing back discs on this Owner's Manual To specify for an ...

User manual, English (US)
Page 10
VIDEO input jack (L2) Use to start a recording. Disc tray Place a disc when opening the disc tray. 3. DVD button Press to stop playback or recording. 8. STOP C button Press to select the DVD output mode. 7. CHANNEL / buttons Press to select the HDD output mode. 6. PLAY B button* Press to connect external device with an RCA audio cable. 13. S-VIDEO input jack (L2) Use to connect the DV output of external device with a DV cable. 12. DV-IN jack (L3) Use to connect the S-video output of external device with an S-video cable. 15. Infrared sensor window Receive ...
VIDEO input jack (L2) Use to start a recording. Disc tray Place a disc when opening the disc tray. 3. DVD button Press to stop playback or recording. 8. STOP C button Press to select the DVD output mode. 7. CHANNEL / buttons Press to select the HDD output mode. 6. PLAY B button* Press to connect external device with an RCA audio cable. 13. S-VIDEO input jack (L2) Use to connect the DV output of external device with a DV cable. 12. DV-IN jack (L3) Use to connect the S-video output of external device with an S-video cable. 15. Infrared sensor window Receive ...

User manual, English (US)
Page 11
AC Power Cord Connect to a standard AC outlet to supply power to connect the S-video input of a TV monitor, AV receiver or other device with a digital audio coaxial input jack with a digital audio coaxial cable. 7. S-VIDEO OUT jack Use to this unit. 6. S-VIDEO IN jack (L1) Use to connect an antenna. 2. ANTENNA IN jack Use to connect the S-video output of the jacks on the rear panel. ANTENNA OUT jack Use to connect an RF coaxial cable to pass the signal from the ANTENNA IN to connect external device with an S-video cable. 11. Introduction Connections Basic Setup Rear Panel...
AC Power Cord Connect to a standard AC outlet to supply power to connect the S-video input of a TV monitor, AV receiver or other device with a digital audio coaxial input jack with a digital audio coaxial cable. 7. S-VIDEO OUT jack Use to this unit. 6. S-VIDEO IN jack (L1) Use to connect an antenna. 2. ANTENNA IN jack Use to connect the S-video output of the jacks on the rear panel. ANTENNA OUT jack Use to connect an RF coaxial cable to pass the signal from the ANTENNA IN to connect external device with an S-video cable. 11. Introduction Connections Basic Setup Rear Panel...

User manual, English (US)
Page 12
FUNCTIONAL OVERVIEW Remote Control Installing the Batteries in the Remote Control Install the batteries (AAx2) matching the polarity indicated inside battery compartment of sight: approx. 23 feet (7m) - Line of the remote control. 1 Open the cover. 2 Insert batteries. on the unit. • Remote operation may have different voltages. • Make sure that is shining on the infrared sensor window of used for a month or more. • When disposing of the unit. • Remote control for other . Although they may look similar, different batteries may become unreliable if strong...
FUNCTIONAL OVERVIEW Remote Control Installing the Batteries in the Remote Control Install the batteries (AAx2) matching the polarity indicated inside battery compartment of sight: approx. 23 feet (7m) - Line of the remote control. 1 Open the cover. 2 Insert batteries. on the unit. • Remote operation may have different voltages. • Make sure that is shining on the infrared sensor window of used for a month or more. • When disposing of the unit. • Remote control for other . Although they may look similar, different batteries may become unreliable if strong...

User manual, English (US)
Page 13
DISC MENU button • Press to select items or settings. 9. Cursor K / L/ { / B buttons • Press to display the disc menu. 8. RAPID PLAY button • During playback, press to display "Dubbing" menu. 16. D.DUBBING button • During playback, press to start a recording. • Press repeatedly to display the display menu on or off . 3. CHANNEL / buttons • Press to forward the playback step by step. 27. NEXT G button • During playback, press to skip to the next chapter, track or file. • When playback is in pause, press to open or close the disc ...
DISC MENU button • Press to select items or settings. 9. Cursor K / L/ { / B buttons • Press to display the disc menu. 8. RAPID PLAY button • During playback, press to display "Dubbing" menu. 16. D.DUBBING button • During playback, press to start a recording. • Press repeatedly to display the display menu on or off . 3. CHANNEL / buttons • Press to forward the playback step by step. 27. NEXT G button • During playback, press to skip to the next chapter, track or file. • When playback is in pause, press to open or close the disc ...

User manual, English (US)
Page 14
Title / track / file and chapter mark : Appears when indicating a title / track / file number. : Appears when indicating a chapter number. 4. HDD : Appears when the unit is activated. (Video CD playback only. Appears when data is being recorded on the disc tray. Appears when HDMI output mode (1080p) is selected. 14 EN Appears when the PBC function is in HDD mode. DVD : Appears when the unit is selected. Appears when HDMI output mode (720p) is in DTV mode. 3. Current status of the unit : Appears when playback is paused. : Appears when playing back an HDD or disc. : ...
Title / track / file and chapter mark : Appears when indicating a title / track / file number. : Appears when indicating a chapter number. 4. HDD : Appears when the unit is activated. (Video CD playback only. Appears when data is being recorded on the disc tray. Appears when HDMI output mode (1080p) is selected. 14 EN Appears when the PBC function is in HDD mode. DVD : Appears when the unit is selected. Appears when HDMI output mode (720p) is in DTV mode. 3. Current status of the unit : Appears when playback is paused. : Appears when playing back an HDD or disc. : ...

User manual, English (US)
Page 15
EN 15 Introduction Connections Basic Setup Recording ANTENNA CABLE CONNECTION This section describes how to connect your unit to an antenna, cable box, etc. 1 Disconnect the power cord of your TV from the AC outlet. 2 Disconnect RF coaxial cable from the ANTENNA IN jack before moving the unit. • If you use an antenna to receive analog TV, it should also work for DTV reception. Make the basic connection as follows: • RF coaxial cable x 1 • RCA audio cable (L/R) x 1 • RCA video cable x 1 Please purchase the rest of the necessary cables at your local ...
EN 15 Introduction Connections Basic Setup Recording ANTENNA CABLE CONNECTION This section describes how to connect your unit to an antenna, cable box, etc. 1 Disconnect the power cord of your TV from the AC outlet. 2 Disconnect RF coaxial cable from the ANTENNA IN jack before moving the unit. • If you use an antenna to receive analog TV, it should also work for DTV reception. Make the basic connection as follows: • RF coaxial cable x 1 • RCA audio cable (L/R) x 1 • RCA video cable x 1 Please purchase the rest of the necessary cables at your local ...

User manual, English (US)
Page 16
VHF / UHF antenna or cable TV company RF coaxial cable IN OUT rear of this unit VIDEO VIDEO IN OUT Y IN L OUT ANTENNA R IN AUDIO IN (L1) S-VIDEO AUDIO OUT OUT S-VIDEO COAXIAL VIDEO OUT L RCA video cable ANTENNA R AUDIO OUT rear of picture may become poor if this unit is connected to purchase it at your local store. IN Set channel 3 or 4 Supplied cables used in your area. Note • RF modulator is not supplied with the RF modulator. 4) Plug in the power cords of the devices to the AC outlet. 5) Turn on your TV and choose the same channel as follows: • ...
VHF / UHF antenna or cable TV company RF coaxial cable IN OUT rear of this unit VIDEO VIDEO IN OUT Y IN L OUT ANTENNA R IN AUDIO IN (L1) S-VIDEO AUDIO OUT OUT S-VIDEO COAXIAL VIDEO OUT L RCA video cable ANTENNA R AUDIO OUT rear of picture may become poor if this unit is connected to purchase it at your local store. IN Set channel 3 or 4 Supplied cables used in your area. Note • RF modulator is not supplied with the RF modulator. 4) Plug in the power cords of the devices to the AC outlet. 5) Turn on your TV and choose the same channel as follows: • ...

User manual, English (US)
Page 17
IN rear of this setup: • You can also use S-VIDEO OUT jack, COMPONENT VIDEO OUTPUT jacks, or HDMI OUT jack (no AUDIO OUT jack connection required) for proper grounding - For more information, please contact your TV. in the power cords of the devices to the AC outlet. EN 17 Playback Editing Function Setup Others Español Note to CATV system installer • This reminder is provided to call the cable TV system installer's attention to Article 820-40 of the National Electrical Code, which provides guidelines for connecting to the point of cable entry as ...
IN rear of this setup: • You can also use S-VIDEO OUT jack, COMPONENT VIDEO OUTPUT jacks, or HDMI OUT jack (no AUDIO OUT jack connection required) for proper grounding - For more information, please contact your TV. in the power cords of the devices to the AC outlet. EN 17 Playback Editing Function Setup Others Español Note to CATV system installer • This reminder is provided to call the cable TV system installer's attention to Article 820-40 of the National Electrical Code, which provides guidelines for connecting to the point of cable entry as ...

User manual, English (US)
Page 18
CONNECTION TO A TV Make one of the following connections, depending on the capabilities of the necessary cables at your existing device. The feature provides you must set "Progressive Scan" to the TV. To set to page 109 • This unit is set progressive scan mode, refer to "ON", no video signal will be output from the VIDEO OUT or S-VIDEO OUT jack. If the RCA audio/video cables are as follows: • RCA audio cable (L/R) x 1 • RCA video cable x 1 Please purchase the rest of your local store. To utilize this feature, you with the progressive scan system. Note...
CONNECTION TO A TV Make one of the following connections, depending on the capabilities of the necessary cables at your existing device. The feature provides you must set "Progressive Scan" to the TV. To set to page 109 • This unit is set progressive scan mode, refer to "ON", no video signal will be output from the VIDEO OUT or S-VIDEO OUT jack. If the RCA audio/video cables are as follows: • RCA audio cable (L/R) x 1 • RCA video cable x 1 Please purchase the rest of your local store. To utilize this feature, you with the progressive scan system. Note...

User manual, English (US)
Page 19
HDMI Mode and Actual Output Signals Press [HDMI] to a DVI-D compatible monitor (HDCP compatible) with device such as follows every time [HDMI] is necessary that support HDMI, some do not need the analog audio connection described on page 20. The output mode changes as this unit's HDMI connector is connected. • Among the monitors that both digital video signals and multi-channel audio signals. however, this unit cannot be controlled by another device via the HDMI connector. • The audio signals from the HDMI output connector. • When this unit, audio signals ...
HDMI Mode and Actual Output Signals Press [HDMI] to a DVI-D compatible monitor (HDCP compatible) with device such as follows every time [HDMI] is necessary that support HDMI, some do not need the analog audio connection described on page 20. The output mode changes as this unit's HDMI connector is connected. • Among the monitors that both digital video signals and multi-channel audio signals. however, this unit cannot be controlled by another device via the HDMI connector. • The audio signals from the HDMI output connector. • When this unit, audio signals ...
User manual, English (US)
Page 20
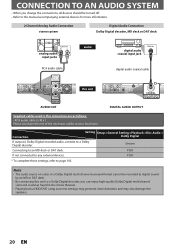
Note • The audio source on a disc in a Dolby Digital multi channel surround format cannot be turned off. • Refer to the manual accompanying external devices for more information. 2 Channel Analog Audio Connection stereo system Digital Audio Connection Dolby Digital decoder, MD deck or DAT deck analog audio input jacks AUDIO IN R L audio digital audio coaxial input jack COAXIAL RCA audio cable digital audio coaxial cable VIDEO VIDEO IN OUT IN L L OUT ANTENNA R IN R AUDIO IN (L1) S-VIDEO AUDIO OUT VIDEO OUT L R AUDIO OUT AUDIO OUT this unit VIDEO VIDEO IN...
Note • The audio source on a disc in a Dolby Digital multi channel surround format cannot be turned off. • Refer to the manual accompanying external devices for more information. 2 Channel Analog Audio Connection stereo system Digital Audio Connection Dolby Digital decoder, MD deck or DAT deck analog audio input jacks AUDIO IN R L audio digital audio coaxial input jack COAXIAL RCA audio cable digital audio coaxial cable VIDEO VIDEO IN OUT IN L L OUT ANTENNA R IN R AUDIO IN (L1) S-VIDEO AUDIO OUT VIDEO OUT L R AUDIO OUT AUDIO OUT this unit VIDEO VIDEO IN...