
User manual, English (US)
Page 5
... content in any way without the obligation to 35 notify any person or organization of any trademarks or any other HDMI link devices (such as Magnavox DVD) to be controlled by implication or otherwise, any license or right to 37 use your PC has a DVI output terminal. 22 • Component ...Video Input 24 • S-Video Input 27 • AV Input 29 30 • USB Terminal 30 30 30 31 The MP3 music and the JPEG picture files stored on a USB flash memory...
... content in any way without the obligation to 35 notify any person or organization of any trademarks or any other HDMI link devices (such as Magnavox DVD) to be controlled by implication or otherwise, any license or right to 37 use your PC has a DVI output terminal. 22 • Component ...Video Input 24 • S-Video Input 27 • AV Input 29 30 • USB Terminal 30 30 30 31 The MP3 music and the JPEG picture files stored on a USB flash memory...
User manual, English (US)
Page 7
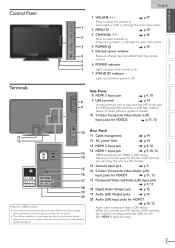
...work). • The software update is off. Rear Panel 11 Cable management ➠ p.14 12 AC power Inlet ➠ p.14 13 HDMI 2 Input jack ➠ p.9, 10 14 HDMI 1 Input jack ➠ p.9, 10, 13 HDMI connection for HDMI 1 ➠ p.10, 13 Audio cable connection from the remote 5 control. 6 6 POWER... indicator 7 Lights up green when power is on a USB flash memory device, or when software update is needed. 10 S-Video / Composite Video /Audio (L/R) Input jacks for VIDEO2 ➠ p.11, 12 10 11 12 13 14 15 16 17 18 19 20 Note for USB terminal • User should not...
...work). • The software update is off. Rear Panel 11 Cable management ➠ p.14 12 AC power Inlet ➠ p.14 13 HDMI 2 Input jack ➠ p.9, 10 14 HDMI 1 Input jack ➠ p.9, 10, 13 HDMI connection for HDMI 1 ➠ p.10, 13 Audio cable connection from the remote 5 control. 6 6 POWER... indicator 7 Lights up green when power is on a USB flash memory device, or when software update is needed. 10 S-Video / Composite Video /Audio (L/R) Input jacks for VIDEO2 ➠ p.11, 12 10 11 12 13 14 15 16 17 18 19 20 Note for USB terminal • User should not...

User manual, English (US)
Page 9
... switch your reception source easily between antenna and cable, install an antenna selector. • If you are not receiving a signal from the antenna input jack before plugging in your area. [Initial Setup] ➠ p.15 Note • If you connect: Be sure your cable / satellite provider.... Channel scanning is recommended for further information. • Depending on your antenna system, you connect to the unit's Component Video Input jacks, connect audio cables to the HDMI or the component video output jacks of combiners (mixers) or separators (splitters). Contact your...
... switch your reception source easily between antenna and cable, install an antenna selector. • If you are not receiving a signal from the antenna input jack before plugging in your area. [Initial Setup] ➠ p.15 Note • If you connect: Be sure your cable / satellite provider.... Channel scanning is recommended for further information. • Depending on your antenna system, you connect to the unit's Component Video Input jacks, connect audio cables to the HDMI or the component video output jacks of combiners (mixers) or separators (splitters). Contact your...
User manual, English (US)
Page 10
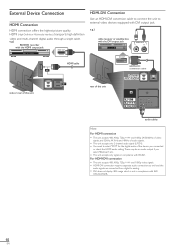
... receiver or satellite box with the DVI output jack STEREO PCM AUDIO OUT L R DVI OUT rear of this unit HDMI-DVI conversion cable To HDMI1 Input jack only audio cables Note For HDMI connection • The unit accepts 480i, 480p, 720p, 1080i and 1080p 24/30/60Hz of video signals, and...
... receiver or satellite box with the DVI output jack STEREO PCM AUDIO OUT L R DVI OUT rear of this unit HDMI-DVI conversion cable To HDMI1 Input jack only audio cables Note For HDMI connection • The unit accepts 480i, 480p, 720p, 1080i and 1080p 24/30/60Hz of video signals, and...
User manual, English (US)
Page 11
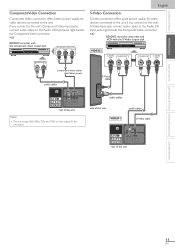
... to the unit. If you connect to the unit's Component Video Input jacks, connect audio cables to the Audio L/R Input jacks right beside the Composite Video connector. If you connect to the unit's S-Video Input jack, connect audio cables to the Audio L/R Input jacks right beside the Component Video connector. audio cables side of...
... to the unit. If you connect to the unit's Component Video Input jacks, connect audio cables to the Audio L/R Input jacks right beside the Composite Video connector. If you connect to the unit's S-Video Input jack, connect audio cables to the Audio L/R Input jacks right beside the Component Video connector. audio cables side of...
User manual, English (US)
Page 12
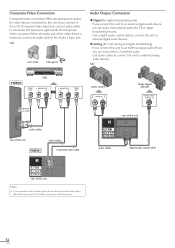
...only) If you connect this unit Note • If you can enjoy stereo (2-channel) audio. When the audio jack of this unit to the Audio L/R Input jacks right beside the Composite Video connector. e.g.) VIDEO2 STEREO VCR STAND-BY VIDEO AUDIO OUT AUDIO OUT VIDEO OUT L R L R OUT or stereo system ...video cable audio cables digital audio coaxial cable rear of the video device is monaural, connect an audio cable to the S-Video Input jack and the Composite Video Input jack at the same time, the S-Video connection will have priority. 12 EN Use audio cables to connect the unit to...
...only) If you connect this unit Note • If you can enjoy stereo (2-channel) audio. When the audio jack of this unit to the Audio L/R Input jacks right beside the Composite Video connector. e.g.) VIDEO2 STEREO VCR STAND-BY VIDEO AUDIO OUT AUDIO OUT VIDEO OUT L R L R OUT or stereo system ...video cable audio cables digital audio coaxial cable rear of the video device is monaural, connect an audio cable to the S-Video Input jack and the Composite Video Input jack at the same time, the S-Video connection will have priority. 12 EN Use audio cables to connect the unit to...
User manual, English (US)
Page 13
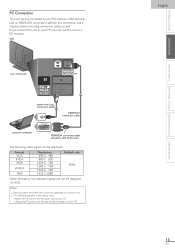
... connect this connection and it requires stereo mini plug conversion cables as a PC monitor. Unplug the AC power cord and use this unit To HDMI1 Input jack only stereo mini plug conversion cables HDMI-DVI conversion cable DVI OUT personal computer HDMI-DVI conversion cable should be displayed correctly. If you...
... connect this connection and it requires stereo mini plug conversion cables as a PC monitor. Unplug the AC power cord and use this unit To HDMI1 Input jack only stereo mini plug conversion cables HDMI-DVI conversion cable DVI OUT personal computer HDMI-DVI conversion cable should be displayed correctly. If you...
User manual, English (US)
Page 15
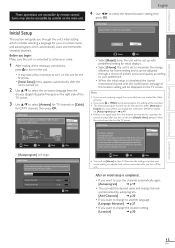
... once.When you turn on the unit, [Helpful Hints] appears. If you are using a cable or satellite box, please confirm the input which you adjusted will be adjusted through the unit's initial setting which automatically scans and memorizes viewable channels. Retail Home Select OK OK Select... after you turn off the unit. Select your signal source. Follow the instructions listed on the remote control to select the appropriate source input. IN'' jack. Auto programming may take more than 20 minutes to complete. 0% Digital channels Analog channels 0 ch 0 ch MENU ...
... once.When you turn on the unit, [Helpful Hints] appears. If you are using a cable or satellite box, please confirm the input which you adjusted will be adjusted through the unit's initial setting which automatically scans and memorizes viewable channels. Retail Home Select OK OK Select... after you turn off the unit. Select your signal source. Follow the instructions listed on the remote control to select the appropriate source input. IN'' jack. Auto programming may take more than 20 minutes to complete. 0% Digital channels Analog channels 0 ch 0 ch MENU ...

User manual, English (US)
Page 16
... remaining time. • To cancel sleep timer, press SLEEP repeatedly until shut off the unit after the subchannel broadcast is displayed. Switching Each Input Mode can be set to 120 minutes) until [Sleep Off] is over. • [Audio only program] message will not be paused. ...press any buttons except . Source TV Video1 Video2 Component HDMI1 HDMI2 HDMI3 e.g.) 11.1 DTV/TV channel HDMI3 Video1 HDMI2 Video2 HDMI1 (or PC input) Component • Pressing CH − reverses the direction of time. Press FREEZE to press before entering the subchannel number. Press SLEEP once...
... remaining time. • To cancel sleep timer, press SLEEP repeatedly until shut off the unit after the subchannel broadcast is displayed. Switching Each Input Mode can be set to 120 minutes) until [Sleep Off] is over. • [Audio only program] message will not be paused. ...press any buttons except . Source TV Video1 Video2 Component HDMI1 HDMI2 HDMI3 e.g.) 11.1 DTV/TV channel HDMI3 Video1 HDMI2 Video2 HDMI1 (or PC input) Component • Pressing CH − reverses the direction of time. Press FREEZE to press before entering the subchannel number. Press SLEEP once...
User manual, English (US)
Page 17
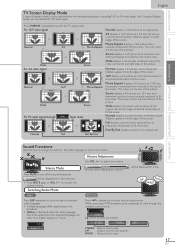
... 16:9 size; For 16:9 video signal Normal 4:3 Movie Expand Wide For 4:3 video signal Zoom Normal 16:9 Movie Expand Wide Zoom For PC input signal through the available audio languages. • Available languages differ depending on both edges of the screen. Normal displays a 4:3 picture at its ...Press MUTE to adjust the volume. This crops out the top of the screen. the picture is stretched horizontally to cycle through HDMI1 Input mode Normal Full Dot By Dot Normal displays a 16:9 picture at its horizontal and vertical ratio. at its original size. 4:3 ...
... 16:9 size; For 16:9 video signal Normal 4:3 Movie Expand Wide For 4:3 video signal Zoom Normal 16:9 Movie Expand Wide Zoom For PC input signal through the available audio languages. • Available languages differ depending on both edges of the screen. Normal displays a 4:3 picture at its ...Press MUTE to adjust the volume. This crops out the top of the screen. the picture is stretched horizontally to cycle through HDMI1 Input mode Normal Full Dot By Dot Normal displays a 16:9 picture at its horizontal and vertical ratio. at its original size. 4:3 ...
User manual, English (US)
Page 18
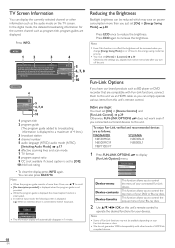
... disappear in [Energy Saving Mode]. ➠ p.30 Press ECO once to this unit via an HDMI cable so you just set to Video1 Input jack. This function allows you to control the pop-up menu of your Blu-ray discs. 2 Use OK on your devices. This function ...and [Fun-Link Control]. ➠ p.29 Otherwise, FUN-LINK OPTIONS does not work even if you change [Energy Saving Mode] on the TV screen. MAGNAVOX SYLVANIA NB530MGX NB530SLX NB500MG1F NB500SL1 MBP1100 / F7 1 Press FUN-LINK OPTIONS [Fun-Link Options] menu. In the digital mode, the detailed broadcasting information for...
... disappear in [Energy Saving Mode]. ➠ p.30 Press ECO once to this unit via an HDMI cable so you just set to Video1 Input jack. This function allows you to control the pop-up menu of your Blu-ray discs. 2 Use OK on your devices. This function ...and [Fun-Link Control]. ➠ p.29 Otherwise, FUN-LINK OPTIONS does not work even if you change [Energy Saving Mode] on the TV screen. MAGNAVOX SYLVANIA NB530MGX NB530SLX NB500MG1F NB500SL1 MBP1100 / F7 1 Press FUN-LINK OPTIONS [Fun-Link Options] menu. In the digital mode, the detailed broadcasting information for...
User manual, English (US)
Page 20
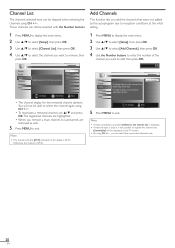
... the channel you want to remove, then press OK. Note • If setup completes successfully, [Added to the channel list] is displayed. • If external input is used, it is ATSC. Ch Select OK Watch/Skip BACK Back • The channel display for Ch Up / Down key selection. For digital channels...
... the channel you want to remove, then press OK. Note • If setup completes successfully, [Added to the channel list] is displayed. • If external input is used, it is ATSC. Ch Select OK Watch/Skip BACK Back • The channel display for Ch Up / Down key selection. For digital channels...
User manual, English (US)
Page 21
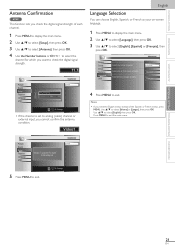
Seleccione el idioma para el menú. Picture Back Sound Setup Features Language Indicator is set to analog (cable) channel or external input, you cannot confirm the antenna condition. English Español Français 4 Press MENU to select [Idioma] or [Langue], then press OK. Note • ...
Seleccione el idioma para el menú. Picture Back Sound Setup Features Language Indicator is set to analog (cable) channel or external input, you cannot confirm the antenna condition. English Español Français 4 Press MENU to select [Idioma] or [Langue], then press OK. Note • ...
User manual, English (US)
Page 24
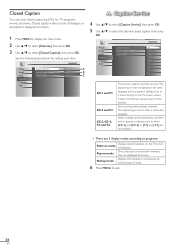
... and news. Rarely available and broadcasters use them only in memory, Pop-on mode they are 3 display modes according to programs: Paint-on mode Displays input characters on -screen. 1 Press MENU to display the main menu. 2 Use ▲/▼ to select [Features], then press OK. 3 Use ▲/▼ to 4 lines of...
... and news. Rarely available and broadcasters use them only in memory, Pop-on mode they are 3 display modes according to programs: Paint-on mode Displays input characters on -screen. 1 Press MENU to display the main menu. 2 Use ▲/▼ to select [Features], then press OK. 3 Use ▲/▼ to 4 lines of...
User manual, English (US)
Page 27
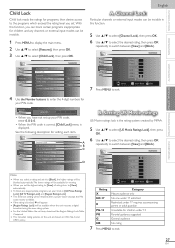
...for viewing. • When you set the highest rating to [View], all ratings turn to [View] automatically. • To block any channels or external input modes can be invisible. 1 Press MENU to display the main menu. 2 Use ▲/▼ to select [Features], then press OK. 3 Use ▲/&#...[Region Ratings Lock] will be invisible in this unit are based on CEA-766-A and CRTC policy. Channel Lock Particular channels or external input modes can block certain programs inappropriate for setting each item. Setting US Movie ratings US Movie ratings lock is the rating system created by ...
...for viewing. • When you set the highest rating to [View], all ratings turn to [View] automatically. • To block any channels or external input modes can be invisible. 1 Press MENU to display the main menu. 2 Use ▲/▼ to select [Features], then press OK. 3 Use ▲/&#...[Region Ratings Lock] will be invisible in this unit are based on CEA-766-A and CRTC policy. Channel Lock Particular channels or external input modes can block certain programs inappropriate for setting each item. Setting US Movie ratings US Movie ratings lock is the rating system created by ...
User manual, English (US)
Page 29
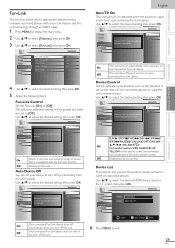
... On Off When set to select [Fun-Link], then press OK. Picture Sound Setup Features Language USB HDMI1 HDMI2 NB530MGX MBP1100 / F7 Select BACK OK Input Change Back On Your connected Fun-Link device turns off by using the remote control. Use ▲/▼ to select the desired setting, then press...
... On Off When set to select [Fun-Link], then press OK. Picture Sound Setup Features Language USB HDMI1 HDMI2 NB530MGX MBP1100 / F7 Select BACK OK Input Change Back On Your connected Fun-Link device turns off by using the remote control. Use ▲/▼ to select the desired setting, then press...
User manual, English (US)
Page 32
... antenna, cable receiver or satellite box is connected correctly. • Make sure that the selected input mode is connected to the working input jack. • Check if your computer is NOT in sleep mode when the input mode of this unit is in PC mode.Tap any key on the keyboard to wake... PC mode.Tap any key on the keyboard to wake up your computer. • Check if the power is on. • Check if the right input mode is selected. • Check whether all the cables to the unit are connected to the correct output jack of your device like BD / DVD...
... antenna, cable receiver or satellite box is connected correctly. • Make sure that the selected input mode is connected to the working input jack. • Check if your computer is NOT in sleep mode when the input mode of this unit is in PC mode.Tap any key on the keyboard to wake... PC mode.Tap any key on the keyboard to wake up your computer. • Check if the power is on. • Check if the right input mode is selected. • Check whether all the cables to the unit are connected to the correct output jack of your device like BD / DVD...
User manual, English (US)
Page 33
... mode from buildings or weather conditions may shorten the program to insert advertisement. You switch to a different input • This unit will change. input modes. The closed caption decoder cannot read the information of useful life. Broadcasting station may cause captioning to... • View other TV channels.The problem might be limited to the broadcasting station, screen missing data or pixelation. HDMI with 480i Input, press FORMAT repeatedly to provide many years of the shortened program. Select [CC-1], [CC-2], [CC-3], [CC-4] or [Off]. ...
... mode from buildings or weather conditions may shorten the program to insert advertisement. You switch to a different input • This unit will change. input modes. The closed caption decoder cannot read the information of useful life. Broadcasting station may cause captioning to... • View other TV channels.The problem might be limited to the broadcasting station, screen missing data or pixelation. HDMI with 480i Input, press FORMAT repeatedly to provide many years of the shortened program. Select [CC-1], [CC-2], [CC-3], [CC-4] or [Off]. ...

User manual, English (US)
Page 34
...Reduce the distance to ch#6.1) Why are captions not displayed • Captions that the captions remain up the unit for previous analog broadcasts. (e.g., input ch#30 auto change the angle of the infrared sensor or turn on the front of the remote control. • Check if there is ...the channel scan before turning off the infrared communication function. insure that are delayed a few seconds behind the actual dialogue are delayed behind of antenna input. An indoor antenna (VHF /UHF), an external antenna (VHF /UHF) or an RF coaxial cable from this unit? • Connect the ...
...Reduce the distance to ch#6.1) Why are captions not displayed • Captions that the captions remain up the unit for previous analog broadcasts. (e.g., input ch#30 auto change the angle of the infrared sensor or turn on the front of the remote control. • Check if there is ...the channel scan before turning off the infrared communication function. insure that are delayed a few seconds behind the actual dialogue are delayed behind of antenna input. An indoor antenna (VHF /UHF), an external antenna (VHF /UHF) or an RF coaxial cable from this unit? • Connect the ...

User manual, English (US)
Page 36
... Specification Audio Output 10W, 8 Ω x 2 Other Specifications Terminals Antenna Input VHF / UHF / CATV Audio Input RCA jack (L/R) x 8 Composite Video Input RCA jack x 2 S-Video Input Mini DIN 4pin jack x 2 Component Video Input RCA jack x 3 HDMI Input HDMI 19 pin x 3 USB Input USB x 1 Coaxial Digital Audio Output RCA jack x 1 Audio Output RCA jack (L/R) x 2 75 Ω...
... Specification Audio Output 10W, 8 Ω x 2 Other Specifications Terminals Antenna Input VHF / UHF / CATV Audio Input RCA jack (L/R) x 8 Composite Video Input RCA jack x 2 S-Video Input Mini DIN 4pin jack x 2 Component Video Input RCA jack x 3 HDMI Input HDMI 19 pin x 3 USB Input USB x 1 Coaxial Digital Audio Output RCA jack x 1 Audio Output RCA jack (L/R) x 2 75 Ω...


