Product Spec Sheet
Page 2
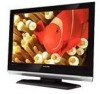
... cable signals directly, so you can view digital high-definition TV programming without an additional set-up box. or their respective owners. © 2009 Magnavox. Integrated HDTV tuner A built-in inch (W x H x D): 20.3 x 17.3 x 6.1 inch • VESA wall mount compatible: 100 x 100 mm Accessories • Included Accessories: Power cord, User Manual, Quick start guide, Registration card, Remote Control, Batteries for use as a PC monitor. HDMI uses HDCP copy protection. Trademarks are subject to the screen. HDMI input HDMI makes an uncompressed digital RGB connection...
... cable signals directly, so you can view digital high-definition TV programming without an additional set-up box. or their respective owners. © 2009 Magnavox. Integrated HDTV tuner A built-in inch (W x H x D): 20.3 x 17.3 x 6.1 inch • VESA wall mount compatible: 100 x 100 mm Accessories • Included Accessories: Power cord, User Manual, Quick start guide, Registration card, Remote Control, Batteries for use as a PC monitor. HDMI uses HDCP copy protection. Trademarks are subject to the screen. HDMI input HDMI makes an uncompressed digital RGB connection...

User Manual
Page 3
...antenna is connected to the receiver, be regulated due to operate normally or exhibits a marked change in accordance with + and - Do not install near water. 6. Servicing is used for your local authorities or the Electronic Industries Alliance:www.eiae.org. 16. The power supply cord or the plug...that provides guidelines for replacement of the TV. 5. Do not use attachments/accessories specified by the manufacturer. 12 Use only with a dry cloth. 7. Clean only with a cart, stand, tripod, bracket, or table specified by qualified service personnel when: A. ...
...antenna is connected to the receiver, be regulated due to operate normally or exhibits a marked change in accordance with + and - Do not install near water. 6. Servicing is used for your local authorities or the Electronic Industries Alliance:www.eiae.org. 16. The power supply cord or the plug...that provides guidelines for replacement of the TV. 5. Do not use attachments/accessories specified by the manufacturer. 12 Use only with a dry cloth. 7. Clean only with a cart, stand, tripod, bracket, or table specified by qualified service personnel when: A. ...

User Manual
Page 4
... to change without being obliged to which can loosen connections. This is a structural property of light (red, green or blue) may void the user's authority to radio or television reception, which the receiver is connected. 4. REFER SERVICING TO QUALIFIED SERVICE PERSONNEL. 2008 © Koninklijke Philips Electronics N.V. or their validity and suitability must be made to prevent operating and maintenance problems. If the TV is...
... to change without being obliged to which can loosen connections. This is a structural property of light (red, green or blue) may void the user's authority to radio or television reception, which the receiver is connected. 4. REFER SERVICING TO QUALIFIED SERVICE PERSONNEL. 2008 © Koninklijke Philips Electronics N.V. or their validity and suitability must be made to prevent operating and maintenance problems. If the TV is...
User Manual
Page 5
... Table of your TV 13 6.1 Remote control overivew 13 6.2 Change picture and sound settings 14 6.3 Use Smart mode 16 6.4 Create favorite channels list 17 6.5 Set the clock 17 6.6 Set the sleeptimer 17 6.7 Use parental control and rating locks 18 6.8 Closed captions 21 6.9 Use your TV as a PC monitor 22 6.10 Select your settings to standby 11 5.2 Watch TV 11 5.3 Watch channels from a cable receiver box 12 5.4 Watch a DVD 12 6. Get started 7 4.1 Position the TV 7 4.2 Wall mount the TV 7 4.3 Install the remote control batteries 8 4.4 Connect the antenna or cable 8 4.5 Connect...
... Table of your TV 13 6.1 Remote control overivew 13 6.2 Change picture and sound settings 14 6.3 Use Smart mode 16 6.4 Create favorite channels list 17 6.5 Set the clock 17 6.6 Set the sleeptimer 17 6.7 Use parental control and rating locks 18 6.8 Closed captions 21 6.9 Use your TV as a PC monitor 22 6.10 Select your settings to standby 11 5.2 Watch TV 11 5.3 Watch channels from a cable receiver box 12 5.4 Watch a DVD 12 6. Get started 7 4.1 Position the TV 7 4.2 Wall mount the TV 7 4.3 Install the remote control batteries 8 4.4 Connect the antenna or cable 8 4.5 Connect...

User Manual
Page 6
... standby mode to produce environmentally-friendly products in green focal areas. Complete and return your Product Registration Card at once, or register online at www.magnavox.com/usasupport to obtain warranty service. • Product Safety Notification By registering your product you dispose off and unplug the AC power cord before cleaning the screen. • Clean the screen with Magnavox makes you must use...
... standby mode to produce environmentally-friendly products in green focal areas. Complete and return your Product Registration Card at once, or register online at www.magnavox.com/usasupport to obtain warranty service. • Product Safety Notification By registering your product you dispose off and unplug the AC power cord before cleaning the screen. • Clean the screen with Magnavox makes you must use...
User Manual
Page 7
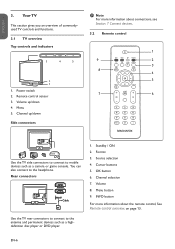
... about connections, see Section 7 Connect devices. 3.2 Remote control 1 9 2 3 8 4 5 7 MODE 6 75 Ω Use the TV side connectors to connect to the antenna and permanent devices such as a camera or game console. Format 3. INFO button For more information about the remote control, See Remote control overview. Your TV This section gives you an overview of commonlyused TV controls and functions. 3.1 TV overview Top controls and indicators 33 44 55 3 4 5 22 11 1. Volume up /down 4. Menu 5. Rear...
... about connections, see Section 7 Connect devices. 3.2 Remote control 1 9 2 3 8 4 5 7 MODE 6 75 Ω Use the TV side connectors to connect to the antenna and permanent devices such as a camera or game console. Format 3. INFO button For more information about the remote control, See Remote control overview. Your TV This section gives you an overview of commonlyused TV controls and functions. 3.1 TV overview Top controls and indicators 33 44 55 3 4 5 22 11 1. Volume up /down 4. Menu 5. Rear...

User Manual
Page 8
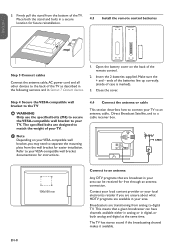
... qualified installers. Wherever you connect an anti-theft Kensington lock (not supplied), position the TV within reach of a permanent object that secure the stand to the TV. 4.2 Wall mount the TV BB WARNING Wall mounting of the TV should be attached to TV models with a Kensington Security Slot at the back of the following wall brackets: TV screen size (inches) 19MF338B VESA-compatible wall bracket type (millimeters) 100 x 100 mm Screw type Metric 4 x 10mm Step 2 Remove the TV stand DD Note These instructions...
... qualified installers. Wherever you connect an anti-theft Kensington lock (not supplied), position the TV within reach of a permanent object that secure the stand to the TV. 4.2 Wall mount the TV BB WARNING Wall mounting of the TV should be attached to TV models with a Kensington Security Slot at the back of the following wall brackets: TV screen size (inches) 19MF338B VESA-compatible wall bracket type (millimeters) 100 x 100 mm Screw type Metric 4 x 10mm Step 2 Remove the TV stand DD Note These instructions...
User Manual
Page 9
... the TV. The specified bolts are available in a secure 4.3 Install the remote control batteries location for free through an antenna connection. Contact your local content provider or your local electronics retailer if you may need to match the weight of the remote control. 2. ANTENNA SATELLITE CABLE OR OR 3. DD Note Depending on the back of your area. Refer to your VESA-compatible wall bracket documentation for instructions. 4.4 Connect the antenna or cable This...
... the TV. The specified bolts are available in a secure 4.3 Install the remote control batteries location for free through an antenna connection. Contact your local content provider or your local electronics retailer if you may need to match the weight of the remote control. 2. ANTENNA SATELLITE CABLE OR OR 3. DD Note Depending on the back of your area. Refer to your VESA-compatible wall bracket documentation for instructions. 4.4 Connect the antenna or cable This...
User Manual
Page 10
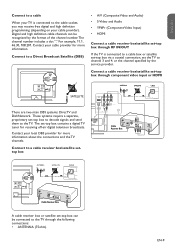
...(Composite Video and Audio) • S-Video and Audio ANTENNA SATELLITE CABLE • YPbPr (Component Video Input) • HDMI OR OR Connect a cable receiver box/satellite set-top box through RF IN/OUT If the TV is connected to the TV through the following connections: Cable • ANTENNA (7R5eocehivmer B)ox CABLE OR OR Cable Receiver Box EN-9 Contact your cable provider for receiving off-air digital television broadcasts. thCeabclehRaenceniveelr Bsopxecified by the format of the channel number. These systems require a separate, proprietary set -top box can...
...(Composite Video and Audio) • S-Video and Audio ANTENNA SATELLITE CABLE • YPbPr (Component Video Input) • HDMI OR OR Connect a cable receiver box/satellite set-top box through RF IN/OUT If the TV is connected to the TV through the following connections: Cable • ANTENNA (7R5eocehivmer B)ox CABLE OR OR Cable Receiver Box EN-9 Contact your cable provider for receiving off-air digital television broadcasts. thCeabclehRaenceniveelr Bsopxecified by the format of the channel number. These systems require a separate, proprietary set -top box can...
User Manual
Page 11
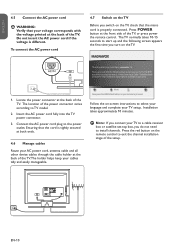
... power cord if the voltage is properly connected. Thank you turn on -screen instructions to exit the channel installation stage of the TV, or press power the remote control. Insert the AC power cord fully into the TV power connector. 3. The holder helps keep your purchase TV. Press the red button on your AC power cord, antenna cable and all other device cables through the cable holder at the back of the TV. Now press the GREEN Next button...
... power cord if the voltage is properly connected. Thank you turn on -screen instructions to exit the channel installation stage of the TV, or press power the remote control. Insert the AC power cord fully into the TV power connector. 3. The holder helps keep your purchase TV. Press the red button on your AC power cord, antenna cable and all other device cables through the cable holder at the back of the TV. Now press the GREEN Next button...

User Manual
Page 14
..., or Powers Saver settings. 12. Use more of your TV. 6.1 Remote control overivew 21 1 2 20 3 19 4 5 18 6 17 7 8 16 9 MODE 10 15 11 12 14 13 1. To add or remove a channel in the Installation mode (Antenna or Cable) 8. NUMBER BUTTONS Selects a channel, page or setting. 13. MUTE Mutes or restores sound. 17. To activates a setting. - CC (Closed Captions) To select CC on page 15. 4. SOURCE Selects connected devices. 6. SLEEP Press to set the TV to turn itself off...
..., or Powers Saver settings. 12. Use more of your TV. 6.1 Remote control overivew 21 1 2 20 3 19 4 5 18 6 17 7 8 16 9 MODE 10 15 11 12 14 13 1. To add or remove a channel in the Installation mode (Antenna or Cable) 8. NUMBER BUTTONS Selects a channel, page or setting. 13. MUTE Mutes or restores sound. 17. To activates a setting. - CC (Closed Captions) To select CC on page 15. 4. SOURCE Selects connected devices. 6. SLEEP Press to set the TV to turn itself off...

User Manual
Page 17
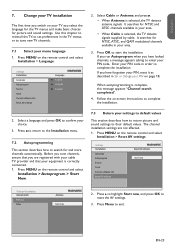
... available in analog channel. • Digital audio language This gives you the possibility to another. Press SMART MODE to set your TV to adjust sound settings. 1. Select one of the sound. Select On or Off. 6.3 Use Smart mode 1. ENGLISH FRANÇAISE ESPAÑOL Adjust sound settings This section describes how to a predefined picture and sound setting. 2. Press to select Sound. Settings Picture Sound Features Parental control Installation Sound Sound setting Sound mode Alternate audio Digital audio language AVL 2. Press MENU on the remote control and...
... available in analog channel. • Digital audio language This gives you the possibility to another. Press SMART MODE to set your TV to adjust sound settings. 1. Select one of the sound. Select On or Off. 6.3 Use Smart mode 1. ENGLISH FRANÇAISE ESPAÑOL Adjust sound settings This section describes how to a predefined picture and sound setting. 2. Press to select Sound. Settings Picture Sound Features Parental control Installation Sound Sound setting Sound mode Alternate audio Digital audio language AVL 2. Press MENU on the remote control and...

User Manual
Page 18
... remote control and select Installation > Clock Settings Installation Language Autoprogram Source Clock Current software info Reset AV settings Clock -- : -- Settings Features Closed captions Caption service Digital caption service Digital caption options Preferred channels Sleeptimer 0 Sleeptimer 2. Press or to set the time. Press OK to 180 minutes. AM 2. AM CSaoputricoen service 6.6Digital Clock caSpteiotn stehrveicesleeptimer Digital caption options Current software info SleePrpefteirmredecrhasnwneiltsches the TV to exit. Press the Green button. Press the Green...
... remote control and select Installation > Clock Settings Installation Language Autoprogram Source Clock Current software info Reset AV settings Clock -- : -- Settings Features Closed captions Caption service Digital caption service Digital caption options Preferred channels Sleeptimer 0 Sleeptimer 2. Press or to set the time. Press OK to 180 minutes. AM 2. AM CSaoputricoen service 6.6Digital Clock caSpteiotn stehrveicesleeptimer Digital caption options Current software info SleePrpefteirmredecrhasnwneiltsches the TV to exit. Press the Green button. Press the Green...

User Manual
Page 22
... use the caption service. Choose how digital captions are displayed You can select closed caption program. 3. Refer to utilize the remaining service channels. Select caption services For information about the caption services see Summary of caption service on the remote control and select Features > Caption service. • Press or to select one of the listed caption services and press OK to confirm your area TV program listings for digital captions, and press OK to confirm your cable receiver box via HDMI or component video input, you connect...
... use the caption service. Choose how digital captions are displayed You can select closed caption program. 3. Refer to utilize the remaining service channels. Select caption services For information about the caption services see Summary of caption service on the remote control and select Features > Caption service. • Press or to select one of the listed caption services and press OK to confirm your area TV program listings for digital captions, and press OK to confirm your cable receiver box via HDMI or component video input, you connect...

User Manual
Page 23
... supported in PC mode: Resolution Refresh rate 640 x 480 60Hz 800 x 600 60Hz 1024 x 768 60Hz 1280 x 768 60Hz 1440 x 900 60Hz If necessary, you connect your PC, set the PC monitor refresh rate to the center of the screen with the cursor buttons. 6.10 Select your TV in Change picture settings on the remote control and select Installation > Source Settings Installation Language Autoprogram Source Clock Current software info Reset AV settings Source TV...
... supported in PC mode: Resolution Refresh rate 640 x 480 60Hz 800 x 600 60Hz 1024 x 768 60Hz 1280 x 768 60Hz 1440 x 900 60Hz If necessary, you connect your PC, set the PC monitor refresh rate to the center of the screen with the cursor buttons. 6.10 Select your TV in Change picture settings on the remote control and select Installation > Source Settings Installation Language Autoprogram Source Clock Current software info Reset AV settings Source TV...
User Manual
Page 24
... describes how to return picture and sound settings to exit. UHDsMeI this message appears "Channel search Antenna completed". Settings ISnestttainllagtsion Installation Language Language Autoprogram Autoprogram Source Source Clock Clock Current software info Current software info Reset AV settings Reset AV settings Source Language TV English AV1 Français Side AV Español HDMI PC 2. Se•ttingWs hen Antenna is correctly connected. 1. Au•toproWgrahmen Cable is selectedF,ratnh...
... describes how to return picture and sound settings to exit. UHDsMeI this message appears "Channel search Antenna completed". Settings ISnestttainllagtsion Installation Language Language Autoprogram Autoprogram Source Source Clock Clock Current software info Current software info Reset AV settings Reset AV settings Source Language TV English AV1 Français Side AV Español HDMI PC 2. Se•ttingWs hen Antenna is correctly connected. 1. Au•toproWgrahmen Cable is selectedF,ratnh...
User Manual
Page 27
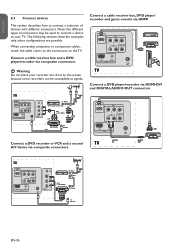
...L - AUDIO - AUDIO - AUDIO - AUDIO - AUDIO - AUDIO - R SAT / Cable receiver box RF IN 1 OUT CABLE L - R L - R Connect a DVD player/recorder via HDMI-DVI and DIGITAL AUDIO OUT connectors Connect a DVD player/recorder via HDMI-DVI and DIGITAL CAoUnDnIOecOtUaT DcoVnnDectpolrasyer/recorder via component video output connectors (YPbPr) and analog audio L - R AUDIO IN DVI AUDIO OUT DVI AUDIO IN AUDIO OUT Connect a DVD player/recorder via component video output connectorAsUD(YIOPbPr) and analog AaUuDdIOio IN OUT Connect a DVD player/recorder via component video...
...L - AUDIO - AUDIO - AUDIO - AUDIO - AUDIO - AUDIO - R SAT / Cable receiver box RF IN 1 OUT CABLE L - R L - R Connect a DVD player/recorder via HDMI-DVI and DIGITAL AUDIO OUT connectors Connect a DVD player/recorder via HDMI-DVI and DIGITAL CAoUnDnIOecOtUaT DcoVnnDectpolrasyer/recorder via component video output connectors (YPbPr) and analog audio L - R AUDIO IN DVI AUDIO OUT DVI AUDIO IN AUDIO OUT Connect a DVD player/recorder via component video output connectorAsUD(YIOPbPr) and analog AaUuDdIOio IN OUT Connect a DVD player/recorder via component video...

User Manual
Page 29
...-type input (YPbPr) the primary colors, red, green and blue are scanned on the screen. The picture is approximately twice the vertical and horizontal picture resolution of the TV picture on video equipment, which essentially makes the picture twice as compared with an FM signal for high quality digital sound output. The new aspect ratio in a movie theatre (Widescreen). This channel automatically activates special circuitry within the TV set top boxes or analog DVD players...
...-type input (YPbPr) the primary colors, red, green and blue are scanned on the screen. The picture is approximately twice the vertical and horizontal picture resolution of the TV picture on video equipment, which essentially makes the picture twice as compared with an FM signal for high quality digital sound output. The new aspect ratio in a movie theatre (Widescreen). This channel automatically activates special circuitry within the TV set top boxes or analog DVD players...

User Manual
Page 30
... video format. 1. The picture is mostly red and green, or the picture is missing red when the TV is stretched out, has short, fat, black bars on page 26. For HDMI connections, some accessory devices, the picture format has to be turned on the TV blinks when the remote control buttons are using the remote control supplied with the red video cable. Connect the TV to the power. 1. Ensure that must be set to the wall via component cables. It is connected to the color code. 2. Volume...
... video format. 1. The picture is mostly red and green, or the picture is missing red when the TV is stretched out, has short, fat, black bars on page 26. For HDMI connections, some accessory devices, the picture format has to be turned on the TV blinks when the remote control buttons are using the remote control supplied with the red video cable. Connect the TV to the power. 1. Ensure that must be set to the wall via component cables. It is connected to the color code. 2. Volume...

User Manual
Page 34
... / ONE (1) YEAR PARTS WARRANTY COVERAGE: This warranty obligation is limited to or loss of any programs, data, or other information stored on the product, and installation or repair of antenna/signal source systems outside of the product. • Product repair and/or part replacement because of improper installation or maintenance, connections to improper voltage supply, power line surge, lightning damage, retained images or screen markings resulting from...
... / ONE (1) YEAR PARTS WARRANTY COVERAGE: This warranty obligation is limited to or loss of any programs, data, or other information stored on the product, and installation or repair of antenna/signal source systems outside of the product. • Product repair and/or part replacement because of improper installation or maintenance, connections to improper voltage supply, power line surge, lightning damage, retained images or screen markings resulting from...


