User Manual
Page 5
English TABLE OF CONTENT INSTRODUCTION WELCOME/REGISTRATION OF YOUR TV 2 IMPORTANT SAFETY INSTRUCTIONS 3 TABLE OF CONTENT 5 INSTALLATION PRESENTATION OF THE LCD TV 6-7 SUPPLIED ACCESSORIES 8 REMOTE CONTROL OPERATION 9 INSTALLING LCD TV ON THE WALL 10 GETTING STARTED 11 OSD SETTING 12 CONNECT VIDEO RECORDER 13 CONNECT CAMERA /CAMCORDER/ VIDEO GAME SET 13 CONNECT DVD PLAYER 14 ...
English TABLE OF CONTENT INSTRODUCTION WELCOME/REGISTRATION OF YOUR TV 2 IMPORTANT SAFETY INSTRUCTIONS 3 TABLE OF CONTENT 5 INSTALLATION PRESENTATION OF THE LCD TV 6-7 SUPPLIED ACCESSORIES 8 REMOTE CONTROL OPERATION 9 INSTALLING LCD TV ON THE WALL 10 GETTING STARTED 11 OSD SETTING 12 CONNECT VIDEO RECORDER 13 CONNECT CAMERA /CAMCORDER/ VIDEO GAME SET 13 CONNECT DVD PLAYER 14 ...
User Manual
Page 9
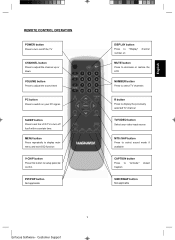
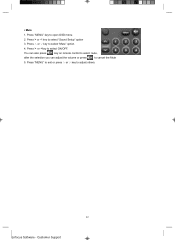
...and exit OSD function V-CHIP button Press this button to adjust the channel up or down. Customer Support English REMOTE CONTROL OPERATION POWER button Press to turn off the TV CHANNEL button Press to setup parental control. PIP/POP button Not applicable DISPLAY button Press to "Display" number on...Press to select sound mode if available CAPTION button Press to turn on/off Itself within a certain time. SLEEP button Press to set the LCD TV to "activate" Caption. VOLUME button Press to adjust the sound level PC button Press to switch on channel MUTE button Press to eliminate ...
...and exit OSD function V-CHIP button Press this button to adjust the channel up or down. Customer Support English REMOTE CONTROL OPERATION POWER button Press to turn off the TV CHANNEL button Press to setup parental control. PIP/POP button Not applicable DISPLAY button Press to "Display" number on...Press to select sound mode if available CAPTION button Press to turn on/off Itself within a certain time. SLEEP button Press to set the LCD TV to "activate" Caption. VOLUME button Press to adjust the sound level PC button Press to switch on channel MUTE button Press to eliminate ...
User Manual
Page 11
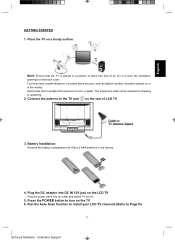
... remote. 4. Do not cover the ventilation openings on a sturdy surface. Press the POWER button to dripping or splashing. 2. The equipment shall not be placed on the TV 6. Place the TV on the back cover. Customer Support Place 2 AAA batteries in the vicinity. Connect the antenna to allow free flow of LCD TV... DC IN 12V jack on the LCD TV Plug the power cable into an outlet and switch TV set on the rear of air. Note: Ensure that the TV is placed in a position to the TV jack on . 5. Run the Auto Scan function to install your LCD TV channels (Refer to rain or water...
... remote. 4. Do not cover the ventilation openings on a sturdy surface. Press the POWER button to dripping or splashing. 2. The equipment shall not be placed on the TV 6. Place the TV on the back cover. Customer Support Place 2 AAA batteries in the vicinity. Connect the antenna to allow free flow of LCD TV... DC IN 12V jack on the LCD TV Plug the power cable into an outlet and switch TV set on the rear of air. Note: Ensure that the TV is placed in a position to the TV jack on . 5. Run the Auto Scan function to install your LCD TV channels (Refer to rain or water...
User Manual
Page 16
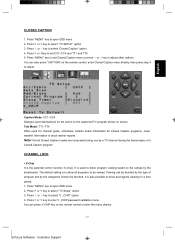
... 3. Press > or < key to select the sleep timer that you need to set by the current TV, you can also press the digital keys 0-9/100 or channel ġ or Ģ on the remote control to adjust other options ƒ Current Program Current program is the channel set , you can also ...5. Press" MENU'' key to open OSD menu 2. Customer Support Press > or < key to select "Current Program" option 4. Press ġ or Ģ key to select "TV SETUP'' option 3. Press "MENU" key to exit Current Program menu or press ġ or Ģ key to open OSD menu 2. Press" MENU'' key to adjust...
... 3. Press > or < key to select the sleep timer that you need to set by the current TV, you can also press the digital keys 0-9/100 or channel ġ or Ģ on the remote control to adjust other options ƒ Current Program Current program is the channel set , you can also ...5. Press" MENU'' key to open OSD menu 2. Customer Support Press > or < key to select "Current Program" option 4. Press ġ or Ģ key to select "TV SETUP'' option 3. Press "MENU" key to exit Current Program menu or press ġ or Ģ key to open OSD menu 2. Press" MENU'' key to adjust...
User Manual
Page 17
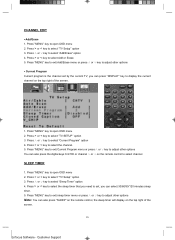
Press ġ or Ģ key to enter V _CHIP password validation menu. Press > or or < key to select "Closed Caption" option 4. Press " MENU'' key to select "TV SETUP'' option 3. English CLOSED CAPTION 1. Press > or < key to open OSD menu 2. Customer Support You can press V-CHIP key on the remote control to enter the menu directly. 17 Enfocus Software -
Press ġ or Ģ key to enter V _CHIP password validation menu. Press > or or < key to select "Closed Caption" option 4. Press " MENU'' key to select "TV SETUP'' option 3. English CLOSED CAPTION 1. Press > or < key to open OSD menu 2. Customer Support You can press V-CHIP key on the remote control to enter the menu directly. 17 Enfocus Software -
User Manual
Page 18
... 1) Press ġ or Ģ key to select "TV Guidelines" option 2) Press > or < key to enter "TV Guidelines" menu 3) Press ġ or Ģ key to select block item. 4) Press > or < key to select U or B, selecting U means "Unlock", selecting B means "Block". 5) If the ... condition of "ON". 1) Press ġ or Ģ key to select "Status'' option 2) Press > or < key to select "ON'' or "OFF" 6. enter the password to exit TV Guidelines menu. 18 Enfocus Software - After enter the V-CHIP menu, press ġ or Ģ key to select, if you want to set V_CHIP, you need...
... 1) Press ġ or Ģ key to select "TV Guidelines" option 2) Press > or < key to enter "TV Guidelines" menu 3) Press ġ or Ģ key to select block item. 4) Press > or < key to select U or B, selecting U means "Unlock", selecting B means "Block". 5) If the ... condition of "ON". 1) Press ġ or Ģ key to select "Status'' option 2) Press > or < key to select "ON'' or "OFF" 6. enter the password to exit TV Guidelines menu. 18 Enfocus Software - After enter the V-CHIP menu, press ġ or Ģ key to select, if you want to set V_CHIP, you need...

User Manual
Page 19
.... 8. Change PIN 1) Press ġ or Ģ key to select "Change PIN" option 2) Press > or < key to enter Change PIN menu. 3) Press digital keys on the remote control, and then enter the new password. 4) Enter the new password again, if the setting is OK, press "MENU" key to select U or B, selecting U means...
.... 8. Change PIN 1) Press ġ or Ģ key to select "Change PIN" option 2) Press > or < key to enter Change PIN menu. 3) Press digital keys on the remote control, and then enter the new password. 4) Enter the new password again, if the setting is OK, press "MENU" key to select U or B, selecting U means...
User Manual
Page 21
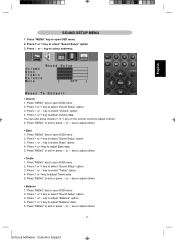
... Ģ key to adjust others . 21 Enfocus Software - Press > or < key to adjust volume. 5. Customer Support You can also press Volume > or < key on the remote control to select "Sound Setup" option 3. Press > or or < key to select "Treble" option. 4. Press ġ or Ģ key to select "Sound Setup" option 3. Press...
... Ģ key to adjust others . 21 Enfocus Software - Press > or < key to adjust volume. 5. Customer Support You can also press Volume > or < key on the remote control to select "Sound Setup" option 3. Press > or or < key to select "Treble" option. 4. Press ġ or Ģ key to select "Sound Setup" option 3. Press...
User Manual
Page 22
Press > or Press "MENU" key to select "Mute" option. 4. Press ġ or Ģ key to open OSD menu. 2. Press > or < key to select "Sound Setup" option 3. ƒ Mute 1.
Press > or Press "MENU" key to select "Mute" option. 4. Press ġ or Ģ key to open OSD menu. 2. Press > or < key to select "Sound Setup" option 3. ƒ Mute 1.
User Manual
Page 28
...the same time. Snowy picture and noise Horizontal dotted line Television not responding to remote control *Check the antenna connection *This may be caused by obstruction to the antenna due to the TV. *possible broadcast station trouble. In this case, please connect power cords of customer...since charges for 60 seconds. Replace if necessary *Clean the remote control sensor lens on the remote control. *Adjust the contrast, color and brightness settings. These tips may inprove the picture. press the button on the TV. *Use the buttons at the rear of your warranty. ...
...the same time. Snowy picture and noise Horizontal dotted line Television not responding to remote control *Check the antenna connection *This may be caused by obstruction to the antenna due to the TV. *possible broadcast station trouble. In this case, please connect power cords of customer...since charges for 60 seconds. Replace if necessary *Clean the remote control sensor lens on the remote control. *Adjust the contrast, color and brightness settings. These tips may inprove the picture. press the button on the TV. *Use the buttons at the rear of your warranty. ...
User Manual
Page 31
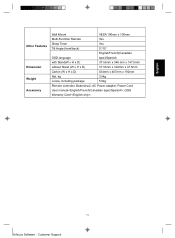
Customer Support English Other Features Dimension Weight Accessory Wall Mount VESA 100mm x 100mm Multi-Function Remote Yes Sleep Timer Yes Tilt Angle (front/back) 5°/15° English/French(Canadian OSD language type)/Spanish with Stand(W x H x D) 371.6mm x 346 mm x 147.5mm without Stand (W x H x D) 371.6mm x 324mm x 47.5mm Carton (W x H x D) 434mm x 407mm x 192mm Net, kg 3.5kg Loose, including package 5.0kg Remote controller, Batteriesx2, AC Power adapter, Power Cord User manual, QSG Warranty Card , 31 Enfocus Software -
Customer Support English Other Features Dimension Weight Accessory Wall Mount VESA 100mm x 100mm Multi-Function Remote Yes Sleep Timer Yes Tilt Angle (front/back) 5°/15° English/French(Canadian OSD language type)/Spanish with Stand(W x H x D) 371.6mm x 346 mm x 147.5mm without Stand (W x H x D) 371.6mm x 324mm x 47.5mm Carton (W x H x D) 434mm x 407mm x 192mm Net, kg 3.5kg Loose, including package 5.0kg Remote controller, Batteriesx2, AC Power adapter, Power Cord User manual, QSG Warranty Card , 31 Enfocus Software -
Product Spec Sheet
Page 2
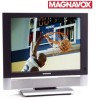
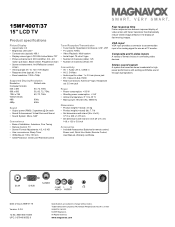
...Magnavox. Composite and S-video inputs A variety of an analog signal for use as a PC monitor...fast-moving images. 15MF400T/37 15" LCD TV Product specifications Picture/Display •...LCD XGA Active Matrix TFT • Picture enhancement: 2D Combfilter, 3/2 - 2/2 motion pull down, Black stretch, Progressive Scan • Screen enhancement: Anti-Reflection coated screen • Viewing angle (H / V): 120 / 100 degree • Response time (typical): 16 ms • Panel...8226; Ease of Installation: Autostore, Fine Tuning • Remote Control: TV • Screen Format Adjustments: 4:3, 4:3 HD •...
...Magnavox. Composite and S-video inputs A variety of an analog signal for use as a PC monitor...fast-moving images. 15MF400T/37 15" LCD TV Product specifications Picture/Display •...LCD XGA Active Matrix TFT • Picture enhancement: 2D Combfilter, 3/2 - 2/2 motion pull down, Black stretch, Progressive Scan • Screen enhancement: Anti-Reflection coated screen • Viewing angle (H / V): 120 / 100 degree • Response time (typical): 16 ms • Panel...8226; Ease of Installation: Autostore, Fine Tuning • Remote Control: TV • Screen Format Adjustments: 4:3, 4:3 HD •...


