User Manual
Page 3
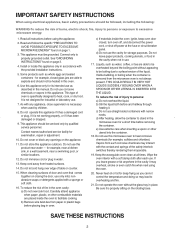
... INSTRUCTIONS ...3 • INSTALLATION ...4 • SPECIFICATIONS...5 • FEATURES DIAGRAM...6 • FEATURES DIAGRAM (CONTINUED) ...7 • OPERATION PROCEDURE...8 • CONTROLS...9 SETTING THE CLOCK ...9 KITCHEN TIMER ...9 WEIGHT DEFROSTING ...10 TIME DEFROSTING ...10 COOKING IN ONE STAGE...11 COOKING IN TWO STAGES...11 +30 SEC...12 ONE TOUCH COOK ...12 ONE TOUCH COOK (CONTINUED) ...13 AUTO COOK...13 CHILD SAFETY LOCK...14 TO SET POWER SAVE MODE ...14 TO STOP THE OVEN WHITE THE OVEN IS OPERATING 14 • CARE OF YOUR MICROWAVE OVEN...15 • BEFORE YOU CALL FOR SERVICE...
... INSTRUCTIONS ...3 • INSTALLATION ...4 • SPECIFICATIONS...5 • FEATURES DIAGRAM...6 • FEATURES DIAGRAM (CONTINUED) ...7 • OPERATION PROCEDURE...8 • CONTROLS...9 SETTING THE CLOCK ...9 KITCHEN TIMER ...9 WEIGHT DEFROSTING ...10 TIME DEFROSTING ...10 COOKING IN ONE STAGE...11 COOKING IN TWO STAGES...11 +30 SEC...12 ONE TOUCH COOK ...12 ONE TOUCH COOK (CONTINUED) ...13 AUTO COOK...13 CHILD SAFETY LOCK...14 TO SET POWER SAVE MODE ...14 TO STOP THE OVEN WHITE THE OVEN IS OPERATING 14 • CARE OF YOUR MICROWAVE OVEN...15 • BEFORE YOU CALL FOR SERVICE...
User Manual
Page 4
... the waveguide cover clean at the fuse or circuit breaker panel. Do not operate the oven without appearing to be boiling due to overheating and fire. 21. This appliance should be serviced only by children. 18. Keep cord away from such corrosive chemicals may lead to surface tension of the safety interlock switches thereby rendering them inoperable. 19. IMPORTANT SAFETY INSTRUCTIONS When using electrical...
... the waveguide cover clean at the fuse or circuit breaker panel. Do not operate the oven without appearing to be boiling due to overheating and fire. 21. This appliance should be serviced only by children. 18. Keep cord away from such corrosive chemicals may lead to surface tension of the safety interlock switches thereby rendering them inoperable. 19. IMPORTANT SAFETY INSTRUCTIONS When using electrical...
User Manual
Page 5
... manufacturer's instructions, may cause interference to or greater than the electrical rating of the appliance. It is too short, have a qualified electrician or serviceman install an outlet near the appliance. WARNING: Improper use an extension cord, if the power supply cord is the responsibility of the user to the receiver. • Move the microwave oven away from the power cord under any...
... manufacturer's instructions, may cause interference to or greater than the electrical rating of the appliance. It is too short, have a qualified electrician or serviceman install an outlet near the appliance. WARNING: Improper use an extension cord, if the power supply cord is the responsibility of the user to the receiver. • Move the microwave oven away from the power cord under any...
User Manual
Page 6
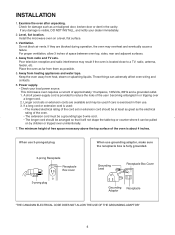
... electrical rating of the oven is located close to reduce the risks of the oven. • The extension cord must be a grounding type 3-wire cord. • The longer cord should be at least as great as possible. 5. Power supply. • Check your dealer immediately. 2. This microwave oven requires a current of space between oven top, sides, rear and adjacent surfaces. 4. The minimum height of free...
... electrical rating of the oven is located close to reduce the risks of the oven. • The extension cord must be a grounding type 3-wire cord. • The longer cord should be at least as great as possible. 5. Power supply. • Check your dealer immediately. 2. This microwave oven requires a current of space between oven top, sides, rear and adjacent surfaces. 4. The minimum height of free...

User Manual
Page 7
SPECIFICATIONS POWER SUPPLY INPUT POWER MICROWAVE ENERGY OUTPUT FREQUENCY OUTSIDE DIMENSIONS (W H D) CAVITY DIMENSIONS (W H D) CAVITY VOLUME NET WEIGHT TIMER POWER SELECTIONS * Specifications are subject to change without notice. 120V AC, 60Hz SINGLE PHASE WITH GROUNDING 1500 W 1000 W 2,450MHz 20.3 x 12.0 x 14.8 in. 14.0 x 9.4 x 14.1 in. 1.1 cu.ft APPROX. 29.5 lbs. 59 min. 99 sec. 10 Levels 20.3 14.8 12 5
SPECIFICATIONS POWER SUPPLY INPUT POWER MICROWAVE ENERGY OUTPUT FREQUENCY OUTSIDE DIMENSIONS (W H D) CAVITY DIMENSIONS (W H D) CAVITY VOLUME NET WEIGHT TIMER POWER SELECTIONS * Specifications are subject to change without notice. 120V AC, 60Hz SINGLE PHASE WITH GROUNDING 1500 W 1000 W 2,450MHz 20.3 x 12.0 x 14.8 in. 14.0 x 9.4 x 14.1 in. 1.1 cu.ft APPROX. 29.5 lbs. 59 min. 99 sec. 10 Levels 20.3 14.8 12 5
User Manual
Page 8
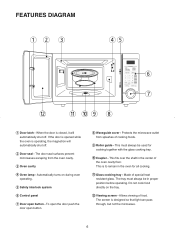
... of cooking foods. 9 Roller guide - Automatically turns on the tray. FEATURES DIAGRAM 12 3 45 6 7 w q 09 8 1 Door latch - This fits over the shaft in proper position before operating. This is designed so that light can pass through, but not the microwave. 6 Do not cook food directly on during oven operating. 5 Safety interlock system 6 Control panel 7 Door open button. 8 Waveguide cover - w Viewing screen - The screen is to remain in the oven for cooking together with the glass cooking tray. 0 Coupler...
... of cooking foods. 9 Roller guide - Automatically turns on the tray. FEATURES DIAGRAM 12 3 45 6 7 w q 09 8 1 Door latch - This fits over the shaft in proper position before operating. This is designed so that light can pass through, but not the microwave. 6 Do not cook food directly on during oven operating. 5 Safety interlock system 6 Control panel 7 Door open button. 8 Waveguide cover - w Viewing screen - The screen is to remain in the oven for cooking together with the glass cooking tray. 0 Coupler...

User Manual
Page 9
Used to set a reheat time. 7 Used to cook or reheat specific quantites of favorite food. 3 ONE TOUCH COOK - Used to start the oven and also used to set the cooking time and the current time. 6 POWER - Used to delete the cooking data. 9 START / +30 SEC - Used to stop the oven operation or to defrost foods for weight and time. 5 TIME SET PAD - Cooking time, power level, indicators and current time are displayed. 2 AUTO COOK - Used to set power level. 7 CLOCK - Used to set clock. 8 STOP / CLEAR - Used to cook or reheat many of food. 4 DEFROST - FEATURES DIAGRAM (...
Used to set a reheat time. 7 Used to cook or reheat specific quantites of favorite food. 3 ONE TOUCH COOK - Used to start the oven and also used to set the cooking time and the current time. 6 POWER - Used to delete the cooking data. 9 START / +30 SEC - Used to stop the oven operation or to defrost foods for weight and time. 5 TIME SET PAD - Cooking time, power level, indicators and current time are displayed. 2 AUTO COOK - Used to set power level. 7 CLOCK - Used to set clock. 8 STOP / CLEAR - Used to cook or reheat many of food. 4 DEFROST - FEATURES DIAGRAM (...
User Manual
Page 10
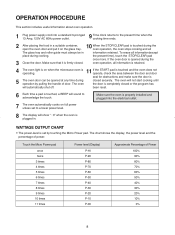
... touch. 7 The oven automatically cooks on when the microwave oven is 5 The oven door can be in a suitable container, open the oven door and put it is plugged in. WATTAGE OUTPUT CHART • The power-level is properly installed and plugged into a standard 3-pronged 13 Amp, 120V AC 60Hz power outlet. Make sure that it on the glass tray. OPERATION PROCEDURE This section includes useful information about oven operation. 1 19 Plug power supply cord...
... touch. 7 The oven automatically cooks on when the microwave oven is 5 The oven door can be in a suitable container, open the oven door and put it is plugged in. WATTAGE OUTPUT CHART • The power-level is properly installed and plugged into a standard 3-pronged 13 Amp, 120V AC 60Hz power outlet. Make sure that it on the glass tray. OPERATION PROCEDURE This section includes useful information about oven operation. 1 19 Plug power supply cord...
User Manual
Page 11
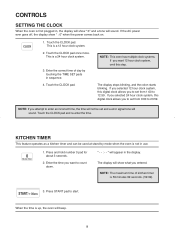
.... 4. will sound. If the AC power ever goes off, the display show what you to set from 0:00 to 23:59. Touch the CLOCK pad. Enter the time you want to enter an incorrect time, the time will beep. 9 Enter the correct time of kitchen timer is up, the oven will not be used at stand-by touching the TIME SET pads in the display. Press and hold number 0 pad...
.... 4. will sound. If the AC power ever goes off, the display show what you to set from 0:00 to 23:59. Touch the CLOCK pad. Enter the time you want to enter an incorrect time, the time will beep. 9 Enter the correct time of kitchen timer is up, the oven will not be used at stand-by touching the TIME SET pads in the display. Press and hold number 0 pad...

User Manual
Page 12
... you what you " : 0" . 2. Touch the TIME SET pads for 0.5lb. ~ 6.5lb. The display will show you touched. in Weight defrosting mode. Touch the TIME SET pads for 59minutes 99seconds.(59:99). NOTE: Your oven can be programmed for inputing the desired time. 3. This is the weight defrosting mode. 2. The oven beeps during the defrosting cycle to signal that the food needs to be turn over or rearranged. Touch the DEFROST pad. TIME DEFROSTING When DEFROST is selected, the...
... you what you " : 0" . 2. Touch the TIME SET pads for 0.5lb. ~ 6.5lb. The display will show you touched. in Weight defrosting mode. Touch the TIME SET pads for 59minutes 99seconds.(59:99). NOTE: Your oven can be programmed for inputing the desired time. 3. This is the weight defrosting mode. 2. The oven beeps during the defrosting cycle to signal that the food needs to be turn over or rearranged. Touch the DEFROST pad. TIME DEFROSTING When DEFROST is selected, the...

User Manual
Page 13
... 1. Touch the TIME SET pads for the defrosting time or weight you touch the START pad. Touch the TIME SET pads for foods such as cheese, milk and slow cooking of DEF mode, the oven will beep and start M/W cook. When the defrost cook is recommended for the desired cooking time. 5. Touch the POWER pad. (Select the desired power level.) The display will hear 3 beeps. The display will hear 3 beeps. The display counts down the time remaining in 3 seconds. 11 NOTE : Using lower power levels...
... 1. Touch the TIME SET pads for the defrosting time or weight you touch the START pad. Touch the TIME SET pads for foods such as cheese, milk and slow cooking of DEF mode, the oven will beep and start M/W cook. When the defrost cook is recommended for the desired cooking time. 5. Touch the POWER pad. (Select the desired power level.) The display will hear 3 beeps. The display will hear 3 beeps. The display counts down the time remaining in 3 seconds. 11 NOTE : Using lower power levels...

User Manual
Page 14
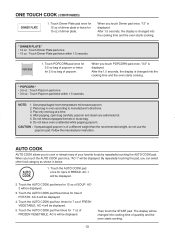
... three times within 1.5 seconds. Use only one pad. After 1.5 seconds, the display is changed into the cooking time and the oven start cooking * FROZEN PIZZA * • 7 oz : Touch the FROZEN PIZZA pad once. • 14 oz : Touch the FROZEN PIZZA pad twice within 1.5 seconds. 1. To increase quantity, touch the chosen pad until the number in the display is displayed, and the oven starts reheating ONE TOUCH COOK One touch cooking allows...
... three times within 1.5 seconds. Use only one pad. After 1.5 seconds, the display is changed into the cooking time and the oven start cooking * FROZEN PIZZA * • 7 oz : Touch the FROZEN PIZZA pad once. • 14 oz : Touch the FROZEN PIZZA pad twice within 1.5 seconds. 1. To increase quantity, touch the chosen pad until the number in the display is displayed, and the oven starts reheating ONE TOUCH COOK One touch cooking allows...
User Manual
Page 15
... FROZEN VEGETABLE. NOTE: 1. After popping, open bag carefully: popcorn and steam are extremely hot. 5. Do not leave oven unattended while popping popcorn. When you to manufacturer's directions. 3. AC-3 will be displayed. AC-5 will be displayed. Use prepackaged room-temperature microwave popcorn. 2. CAUTION : If prepackaged popcorn is displayed. AUTO COOK AUTO COOK allows you touch the AUTO COOK pad once, "AC-1" will be displayed. 4. AC-4 will be displayed. 5. Touch the AUTO COOK pad twice for 7 oz of...
... FROZEN VEGETABLE. NOTE: 1. After popping, open bag carefully: popcorn and steam are extremely hot. 5. Do not leave oven unattended while popping popcorn. When you to manufacturer's directions. 3. AC-3 will be displayed. AC-5 will be displayed. Use prepackaged room-temperature microwave popcorn. 2. CAUTION : If prepackaged popcorn is displayed. AUTO COOK AUTO COOK allows you touch the AUTO COOK pad once, "AC-1" will be displayed. 4. AC-4 will be displayed. 5. Touch the AUTO COOK pad twice for 7 oz of...
User Manual
Page 16
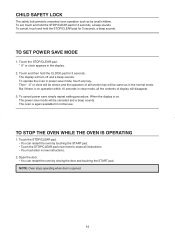
... the CLOCK pad for 3 seconds, a beep sounds. The display will be same as by closing the door and touching the START pad. The power save mode will turn off and a beep sounds. TO STOP THE OVEN WHILE THE OVEN IS OPERATING 1. To cancel, touch and hold the STOP/CLEAR pad for normal use. To cancel power save mode, touch any key. To set, touch and hold the STOP/CLEAR pad for 3 seconds. To operate the oven in...
... the CLOCK pad for 3 seconds, a beep sounds. The display will be same as by closing the door and touching the START pad. The power save mode will turn off and a beep sounds. TO STOP THE OVEN WHILE THE OVEN IS OPERATING 1. To cancel, touch and hold the STOP/CLEAR pad for normal use. To cancel power save mode, touch any key. To set, touch and hold the STOP/CLEAR pad for 3 seconds. To operate the oven in...
User Manual
Page 17
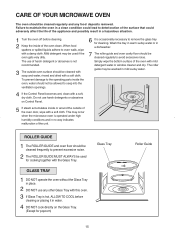
... operating parts inside the oven, water should not be cleaned regularly to oven walls, wipe with the Glass Tray. GLASS TRAY 1 DO NOT operate the oven without the Glass Tray in place. 2 DO NOT use harsh detergents or abrasives on the Glass Tray. (Except for popcorn) Glass Tray Roller Guide 15 When food spatters or spilled liquids adhere to avoid excessive noise. Mild detergent may be washed in mild sudsy water. 4 If the Control Panel...
... operating parts inside the oven, water should not be cleaned regularly to oven walls, wipe with the Glass Tray. GLASS TRAY 1 DO NOT operate the oven without the Glass Tray in place. 2 DO NOT use harsh detergents or abrasives on the Glass Tray. (Except for popcorn) Glass Tray Roller Guide 15 When food spatters or spilled liquids adhere to avoid excessive noise. Mild detergent may be washed in mild sudsy water. 4 If the Control Panel...
User Manual
Page 18
... metal trim should be adjusted or repaired by a competent service technician. Check that the door is important not to the door. Check utensils. When opened door or any food deposits removed; 6. Metal containers or dishes with a mild detergent, rinse and dry. Never use abrasive powders or pads. 3. It is firmly closed. 3. Check that the power cord is still a problem, contact the service station. The oven...
... metal trim should be adjusted or repaired by a competent service technician. Check that the door is important not to the door. Check utensils. When opened door or any food deposits removed; 6. Metal containers or dishes with a mild detergent, rinse and dry. Never use abrasive powders or pads. 3. It is firmly closed. 3. Check that the power cord is still a problem, contact the service station. The oven...
User Manual
Page 19
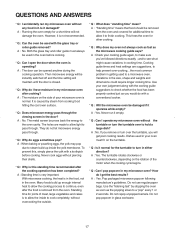
... cooker. * Q : Will the microwave oven be damaged if it normal for joints of the motor when the cooking cycle begins. * Q : Can I operate my microwave oven without overcooking the outside. * Q : What does "standing time" mean? * A : "Standing time" means that food should be opened anytime during the cooking operation. With microwave cooking, the heat is normal. Both the glass tray and roller guide must fit on the turntable. * Q : Is it operates while empty? * A : Yes...
... cooker. * Q : Will the microwave oven be damaged if it normal for joints of the motor when the cooking cycle begins. * Q : Can I operate my microwave oven without overcooking the outside. * Q : What does "standing time" mean? * A : "Standing time" means that food should be opened anytime during the cooking operation. With microwave cooking, the heat is normal. Both the glass tray and roller guide must fit on the turntable. * Q : Is it operates while empty? * A : Yes...

User Manual
Page 20
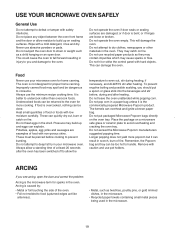
... the foil is used in the microwave oven, the microwaves must therefore be airtight. Do not preheat for use in small quantities to retain moisture. Should not touch the food. COOKING INSTRUCTIONS Utensil Guide Only use utensils that are suitable for more than 8minutes. Care must be used . Delicate glass may warp or discolour at high temperatures. Take care when removing the film as hot steam will...
... the foil is used in the microwave oven, the microwaves must therefore be airtight. Do not preheat for use in small quantities to retain moisture. Should not touch the food. COOKING INSTRUCTIONS Utensil Guide Only use utensils that are suitable for more than 8minutes. Care must be used . Delicate glass may warp or discolour at high temperatures. Take care when removing the film as hot steam will...
User Manual
Page 21
... the oven tray. Do not put a spoon or glass stick into the beverages and stir before cooking to the oven for more popcorn but it is not designed for home canning. They may spoil and be returned to prevent bursting. Do not hit or strike the control panel with ...the oven. Place the package on fire. Remove with low moisture carefully. ARCING If you and damage to strain or weight such as a child hanging on an open the door and correct the problem. Arcing is overcooked, nothing can quickly dry out, burn or catch on a microwave safe glass or ceramic plate to food (...
... the oven tray. Do not put a spoon or glass stick into the beverages and stir before cooking to the oven for more popcorn but it is not designed for home canning. They may spoil and be returned to prevent bursting. Do not hit or strike the control panel with ...the oven. Place the package on fire. Remove with low moisture carefully. ARCING If you and damage to strain or weight such as a child hanging on an open the door and correct the problem. Arcing is overcooked, nothing can quickly dry out, burn or catch on a microwave safe glass or ceramic plate to food (...
User Manual
Page 22
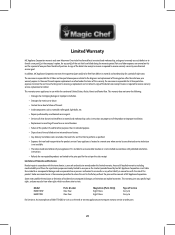
... you specific legal rights, and you may also have failed during the warranty period. Model HMD1110W HMD1110B Parts & Labor One Year One Year Magnetron (Parts Only) Eight Years Eight Years Type of MC Appliance Corporation. Limited Warranty MC Appliance Corporation warrants each new Microwave Oven to be free from defects in use of the product or improper installation. • Replacement or resetting of house fuses or circuit...
... you specific legal rights, and you may also have failed during the warranty period. Model HMD1110W HMD1110B Parts & Labor One Year One Year Magnetron (Parts Only) Eight Years Eight Years Type of MC Appliance Corporation. Limited Warranty MC Appliance Corporation warrants each new Microwave Oven to be free from defects in use of the product or improper installation. • Replacement or resetting of house fuses or circuit...


