User's Guide
Page 4
... computer 26 Maintaining the printer 28 Maintaining print cartridges...28 Installing print cartridges...28 Removing a used print cartridge ...29 Refilling print cartridges...30 Using genuine Lexmark print cartridges...30 Aligning the print cartridges ...30 Cleaning the print cartridge nozzles...31 Wiping the print cartridge nozzles and contacts ...31 Preserving the print cartridges ...32 Cleaning the exterior of the printer...33...
... computer 26 Maintaining the printer 28 Maintaining print cartridges...28 Installing print cartridges...28 Removing a used print cartridge ...29 Refilling print cartridges...30 Using genuine Lexmark print cartridges...30 Aligning the print cartridges ...30 Cleaning the print cartridge nozzles...31 Wiping the print cartridge nozzles and contacts ...31 Preserving the print cartridges ...32 Cleaning the exterior of the printer...33...
User's Guide
Page 8
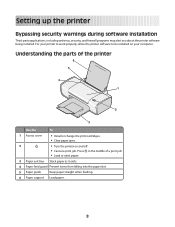
Press in the middle of the printer 6 5 4 1 2 3 Use the To 1 Access cover • Install or change the print cartridges. • Clear paper jams. 2 • Turn the printer on your computer. Setting up the printer Bypassing security warnings during software installation Third-party applications, including ...
Press in the middle of the printer 6 5 4 1 2 3 Use the To 1 Access cover • Install or change the print cartridges. • Clear paper jams. 2 • Turn the printer on your computer. Setting up the printer Bypassing security warnings during software installation Third-party applications, including ...
User's Guide
Page 12
... the Speed Dial list. Note: Your printer may not come with cartridge installation. • Print a test page. • Print an alignment page. • Clean the print cartridge nozzles. • Order ink or supplies. • Register the printer. • Contact customer support. Lexmark Network Card Reader • View the contents of the application that...
... the Speed Dial list. Note: Your printer may not come with cartridge installation. • Print a test page. • Print an alignment page. • Clean the print cartridge nozzles. • Order ink or supplies. • Register the printer. • Contact customer support. Lexmark Network Card Reader • View the contents of the application that...
User's Guide
Page 28
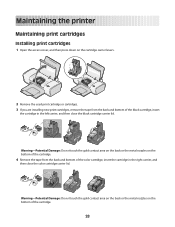
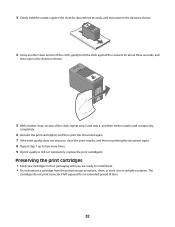
...the back or the metal nozzles on the bottom of the cartridge. 4 Remove the tape from the back and bottom of the black cartridge, insert the cartridge in the right carrier, and then close the black cartridge carrier lid. Warning-Potential Damage: Do not touch the gold... nozzles on the bottom of the cartridge. 28 Maintaining the printer Maintaining print cartridges Installing print cartridges 1 Open the access cover, and then press down on the cartridge carrier levers. 2 Remove the used print cartridge or cartridges. 3 If you are installing new print cartridges, remove the tape from the back...
...the back or the metal nozzles on the bottom of the cartridge. 4 Remove the tape from the back and bottom of the black cartridge, insert the cartridge in the right carrier, and then close the black cartridge carrier lid. Warning-Potential Damage: Do not touch the gold... nozzles on the bottom of the cartridge. 28 Maintaining the printer Maintaining print cartridges Installing print cartridges 1 Open the access cover, and then press down on the cartridge carrier levers. 2 Remove the used print cartridge or cartridges. 3 If you are installing new print cartridges, remove the tape from the back...
User's Guide
Page 29
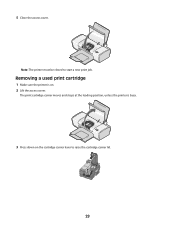
The print cartridge carrier moves and stops at the loading position, unless the printer is on the cartridge carrier lever to start a new print job. 5 Close the access cover. Removing a used print cartridge 1 Make sure the printer is busy. 3 Press down on . 2 Lift the access cover. Note: The printer must be closed to raise the cartridge carrier lid. 29
The print cartridge carrier moves and stops at the loading position, unless the printer is on the cartridge carrier lever to start a new print job. 5 Close the access cover. Removing a used print cartridge 1 Make sure the printer is busy. 3 Press down on . 2 Lift the access cover. Note: The printer must be closed to raise the cartridge carrier lid. 29
User's Guide
Page 30
... quality has not improved, clean the print cartridge nozzles. 30 Lexmark's warranty does not cover damage caused by a refilled cartridge. For best results, use of Original Lexmark Ink message, the original Lexmark ink in the indicated cartridge (s) has been depleted. 4 Remove the used print cartridge. Using genuine Lexmark print cartridges Lexmark printers, print cartridges, and photo paper are printing from a computer...
... quality has not improved, clean the print cartridge nozzles. 30 Lexmark's warranty does not cover damage caused by a refilled cartridge. For best results, use of Original Lexmark Ink message, the original Lexmark ink in the indicated cartridge (s) has been depleted. 4 Remove the used print cartridge. Using genuine Lexmark print cartridges Lexmark printers, print cartridges, and photo paper are printing from a computer...
User's Guide
Page 31
...quality has not improved, then try cleaning the nozzles up to improve print quality, print your document again. Wiping the print cartridge nozzles and contacts 1 Remove the print cartridge(s). 2 Dampen a clean, lint-free cloth with water, and then place the cloth on the computer screen. 6 If ...print quality has not improved, then wipe the print cartridge nozzles and contacts. Cleaning the print cartridge nozzles Using Windows 1 Load plain paper. 2 Click Start ΠPrograms or All Programs, and then click the printer folder...
...quality has not improved, then try cleaning the nozzles up to improve print quality, print your document again. Wiping the print cartridge nozzles and contacts 1 Remove the print cartridge(s). 2 Dampen a clean, lint-free cloth with water, and then place the cloth on the computer screen. 6 If ...print quality has not improved, then wipe the print cartridge nozzles and contacts. Cleaning the print cartridge nozzles Using Windows 1 Load plain paper. 2 Click Start ΠPrograms or All Programs, and then click the printer folder...
User's Guide
Page 32
... for an extended period of the cloth, repeat step 3 and step 4, and then let the nozzles and contacts dry completely. 6 Reinsert the print cartridge(s), and then print the document again. 7 If the print quality does not improve, clean the print nozzles, and then try printing the document again....in their packaging until you are ready to install them. • Do not remove a cartridge from the printer except to two more times. 9 If print quality is still not satisfactory, replace the print cartridge(s). 3 Gently hold the cloth against the cloth for about three seconds, and then wipe ...
... for an extended period of the cloth, repeat step 3 and step 4, and then let the nozzles and contacts dry completely. 6 Reinsert the print cartridge(s), and then print the document again. 7 If the print quality does not improve, clean the print nozzles, and then try printing the document again....in their packaging until you are ready to install them. • Do not remove a cartridge from the printer except to two more times. 9 If print quality is still not satisfactory, replace the print cartridge(s). 3 Gently hold the cloth against the cloth for about three seconds, and then wipe ...

User's Guide
Page 33
...free cloth with ISO/IEC 24711 2Licensed Return Program Cartridge Lexmark Z2390 model Item Part number Average cartridge standard page yield 1 Black cartridge 4A Black cartridge2 4 For page yield values, refer to www.lexmark.com/pageyields. Declared yield value in accordance with ISO... print cartridges Lexmark Z2300 Series models (except Lexmark Z2390) Item Part number Average cartridge standard page yield 1 Black cartridge 14A Black cartridge2 14 For page yield values, refer to www.lexmark.com/pageyields. Color cartridge 15A Color cartridge2 15 Photo cartridge 31 ...
...free cloth with ISO/IEC 24711 2Licensed Return Program Cartridge Lexmark Z2390 model Item Part number Average cartridge standard page yield 1 Black cartridge 4A Black cartridge2 4 For page yield values, refer to www.lexmark.com/pageyields. Declared yield value in accordance with ISO... print cartridges Lexmark Z2300 Series models (except Lexmark Z2390) Item Part number Average cartridge standard page yield 1 Black cartridge 14A Black cartridge2 14 For page yield values, refer to www.lexmark.com/pageyields. Color cartridge 15A Color cartridge2 15 Photo cartridge 31 ...

User's Guide
Page 34
Ordering paper and other high-quality images, use Lexmark Photo Paper or Lexmark PerfectFinish Photo Paper and Lexmark print cartridges. For best results when printing photos or other supplies To purchase supplies or to locate a dealer near you, visit our Web site at www.lexmark.com. Item Description Lexmark Photo Paper Lexmark PerfectFinish Photo Paper • Letter • A4 • 4 x 6 in. • 10 x 15 cm • Letter • A4 • 4 x 6 in. • 10 x 15 cm •L USB cable Part number 1021294 34
Ordering paper and other high-quality images, use Lexmark Photo Paper or Lexmark PerfectFinish Photo Paper and Lexmark print cartridges. For best results when printing photos or other supplies To purchase supplies or to locate a dealer near you, visit our Web site at www.lexmark.com. Item Description Lexmark Photo Paper Lexmark PerfectFinish Photo Paper • Letter • A4 • 4 x 6 in. • 10 x 15 cm • Letter • A4 • 4 x 6 in. • 10 x 15 cm •L USB cable Part number 1021294 34

User's Guide
Page 37
... sure the sticker and tape have been using. REMOVE AND THEN RELOAD PAPER CHECK INK Check the ink levels, and then install new print cartridges if necessary. b Click Printers and Faxes. 37 6 If necessary, double-click setup.exe. 7 Follow the instructions on , then make ... the computer screen to the printer and plugged into a known working electrical outlet that other electrical devices have been removed. 1 2 3 Reinsert the cartridges. CHECK POWER If the light is completed, enable the security software again. In Windows XP a Click Start. c Under Hardware and Sound, click Printer...
... sure the sticker and tape have been using. REMOVE AND THEN RELOAD PAPER CHECK INK Check the ink levels, and then install new print cartridges if necessary. b Click Printers and Faxes. 37 6 If necessary, double-click setup.exe. 7 Follow the instructions on , then make ... the computer screen to the printer and plugged into a known working electrical outlet that other electrical devices have been removed. 1 2 3 Reinsert the cartridges. CHECK POWER If the light is completed, enable the security software again. In Windows XP a Click Start. c Under Hardware and Sound, click Printer...
User's Guide
Page 49
...media does not conform to this single use, the license to time, that imply warranties or conditions or impose obligations on Lexmark that the patented print cartridge(s) shipped with your use of ink. This limited warranty applies only to the above terms, I agree that cannot be ...determined that cartridge. If any ) is furnished is ninety (90) days and commences on or provided by Lexmark for breach of those provisions to Lexmark for the Software Program. 49 return this single use during the warranty period....
...media does not conform to this single use, the license to time, that imply warranties or conditions or impose obligations on Lexmark that the patented print cartridge(s) shipped with your use of ink. This limited warranty applies only to the above terms, I agree that cannot be ...determined that cartridge. If any ) is furnished is ninety (90) days and commences on or provided by Lexmark for breach of those provisions to Lexmark for the Software Program. 49 return this single use during the warranty period....
User's Guide
Page 53
... aligning 30 cleaning 31 installing 28 ordering 33 preserving 32 using genuine Lexmark 30 wiping 31 CD printing photos from 26 cleaning exterior of the printer 33 cleaning print cartridge nozzles 31 custom-size paper, loading 15, 23 custom-size paper, printing 23 D document multiple copies...power button 8 power button is not lit 35 power supply 9 print cartridge removing 29 print cartridge nozzles, cleaning 31 print cartridges aligning 30 cleaning 31 installing 28 ordering 33 preserving 32 refilling 30 using genuine Lexmark 30 wiping 31 print jobs, canceling 19 print settings saving and deleting...
... aligning 30 cleaning 31 installing 28 ordering 33 preserving 32 using genuine Lexmark 30 wiping 31 CD printing photos from 26 cleaning exterior of the printer 33 cleaning print cartridge nozzles 31 custom-size paper, loading 15, 23 custom-size paper, printing 23 D document multiple copies...power button 8 power button is not lit 35 power supply 9 print cartridge removing 29 print cartridge nozzles, cleaning 31 print cartridges aligning 30 cleaning 31 installing 28 ordering 33 preserving 32 refilling 30 using genuine Lexmark 30 wiping 31 print jobs, canceling 19 print settings saving and deleting...
User's Guide
Page 54
... computer 26 from flash drive connected to computer 26 from memory card connected to computer 26 publications, finding 6 R recycling WEEE statement 47 refilling print cartridges 30 removing print cartridge 29 reverse page order 18 S safety information 5 saving and deleting print settings 24 security information 8 Service Center 35 setup troubleshooting page does not...
... computer 26 from flash drive connected to computer 26 from memory card connected to computer 26 publications, finding 6 R recycling WEEE statement 47 refilling print cartridges 30 removing print cartridge 29 reverse page order 18 S safety information 5 saving and deleting print settings 24 security information 8 Service Center 35 setup troubleshooting page does not...


