Getting Started
Page 3
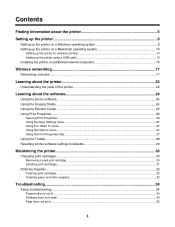
...on a Macintosh operating system 10 Setting up the printer for wireless printing 14 Setting up the printer using a USB cable...15 Installing the printer on additional network computers 16 Wireless networking...17 Networking overview...17 Learning about the printer 22 ...Resetting printer software settings to defaults 29 Maintaining the printer 30 Changing print cartridges...30 Removing a used print cartridge...30 Installing print cartridges...31 Ordering Supplies...32 Ordering print cartridges...32 Ordering paper and other supplies ...32 Troubleshooting...34 Setup troubleshooting...34 ...
...on a Macintosh operating system 10 Setting up the printer for wireless printing 14 Setting up the printer using a USB cable...15 Installing the printer on additional network computers 16 Wireless networking...17 Networking overview...17 Learning about the printer 22 ...Resetting printer software settings to defaults 29 Maintaining the printer 30 Changing print cartridges...30 Removing a used print cartridge...30 Installing print cartridges...31 Ordering Supplies...32 Ordering print cartridges...32 Ordering paper and other supplies ...32 Troubleshooting...34 Setup troubleshooting...34 ...
Getting Started
Page 10
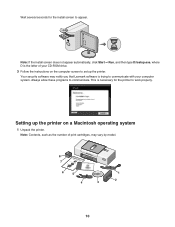
... appear. Note: If the install screen does not appear automatically, click Start ΠRun, and then type D:\setup.exe, where D is the letter of print cartridges, may notify you that Lexmark software is necessary for the install screen to communicate.
... appear. Note: If the install screen does not appear automatically, click Start ΠRun, and then type D:\setup.exe, where D is the letter of print cartridges, may notify you that Lexmark software is necessary for the install screen to communicate.
Getting Started
Page 13
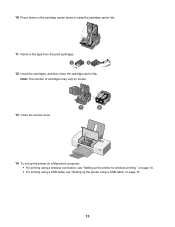
Note: The number of cartridges may vary by model. 13 Close the access cover. 1 2 14 To set up the printer on a Macintosh computer: • For printing using a wireless connection, see "Setting up the printer for wireless printing " on page 14. • For printing using a USB cable, see "Setting up the printer using a USB cable" on the cartridge carrier levers to raise the cartridge carrier lids. 11 Remove the tape from the print cartridges. 1 2 12 Insert the cartridges, and then close the cartridge carrier lids. 10 Press down on page 15. 13
Note: The number of cartridges may vary by model. 13 Close the access cover. 1 2 14 To set up the printer on a Macintosh computer: • For printing using a wireless connection, see "Setting up the printer for wireless printing " on page 14. • For printing using a USB cable, see "Setting up the printer using a USB cable" on the cartridge carrier levers to raise the cartridge carrier lids. 11 Remove the tape from the print cartridges. 1 2 12 Insert the cartridges, and then close the cartridge carrier lids. 10 Press down on page 15. 13
Getting Started
Page 22
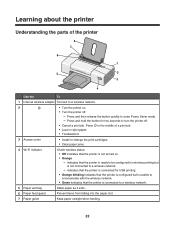
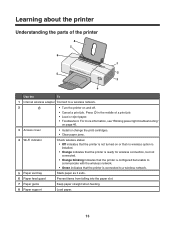
...not connected to turn the printer off . - Press in the middle of the printer 8 7 6 1 5 2 3 4 Use the To 1 Internal wireless adapter Connect to a wireless network. 2 • Turn the printer on . • Orange - Learning about the printer Understanding the parts of a print job. • Load or ...eject paper. • Troubleshoot. 3 Access cover • Install or change the print cartridges. • Clear paper jams. 4 Wi-Fi indicator Check wireless status: • Off indicates that the printer is ready to be configured for two seconds to...
...not connected to turn the printer off . - Press in the middle of the printer 8 7 6 1 5 2 3 4 Use the To 1 Internal wireless adapter Connect to a wireless network. 2 • Turn the printer on . • Orange - Learning about the printer Understanding the parts of a print job. • Load or ...eject paper. • Troubleshoot. 3 Access cover • Install or change the print cartridges. • Clear paper jams. 4 Wi-Fi indicator Check wireless status: • Off indicates that the printer is ready to be configured for two seconds to...
Getting Started
Page 24
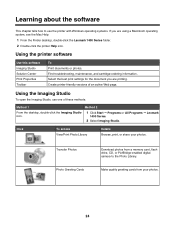
...Method 1 Method 2 From the desktop, double-click the Imaging Studio icon. 1 Click Start ΠPrograms or All Programs ΠLexmark 1400 Series. 2 Select Imaging Studio. Click To access View/Print Photo Library Details Browse, print, or share your photos. 24 Make ...Help: 1 From the Finder desktop, double-click the Lexmark 1400 Series folder. 2 Double-click the printer Help icon. Transfer Photos Photo Greeting Cards Download photos from your photos. Find troubleshooting, maintenance, and cartridge-ordering information. Using the printer software Use this software Imaging...
...Method 1 Method 2 From the desktop, double-click the Imaging Studio icon. 1 Click Start ΠPrograms or All Programs ΠLexmark 1400 Series. 2 Select Imaging Studio. Click To access View/Print Photo Library Details Browse, print, or share your photos. 24 Make ...Help: 1 From the Finder desktop, double-click the Lexmark 1400 Series folder. 2 Double-click the printer Help icon. Transfer Photos Photo Greeting Cards Download photos from your photos. Find troubleshooting, maintenance, and cartridge-ordering information. Using the printer software Use this software Imaging...
Getting Started
Page 25
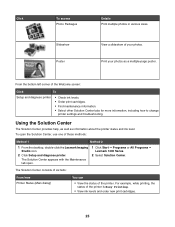
...with the Maintenance tab open the Solution Center, use one of these methods: Method 1 Method 2 1 From the desktop, double-click the Lexmark Imaging Studio icon. 2 Click Setup and diagnose printer. View a slideshow of the Welcome screen: Click To Setup and diagnose printer •...; Check ink levels. • Order print cartridges. • Find maintenance information. • Select other Solution Center tabs for more information, including how to change printer settings and troubleshooting....
...with the Maintenance tab open the Solution Center, use one of these methods: Method 1 Method 2 1 From the desktop, double-click the Lexmark Imaging Studio icon. 2 Click Setup and diagnose printer. View a slideshow of the Welcome screen: Click To Setup and diagnose printer •...; Check ink levels. • Order print cartridges. • Find maintenance information. • Select other Solution Center tabs for more information, including how to change printer settings and troubleshooting....
Getting Started
Page 26
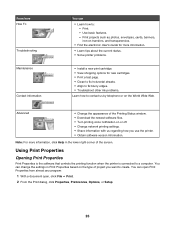
... Setup. 26 Print. - Use basic features. - Using Print Properties Opening Print Properties Print Properties is the software that controls the printing function when the printer is connected to : - Print projects such as photos, envelopes, cards, banners, iron-on transfers, and transparencies. •...; Find the electronic User's Guide for new cartridges. • Print a test page. • Clean to fix horizontal streaks. • Align to fix blurry edges. • Troubleshoot other ...
... Setup. 26 Print. - Use basic features. - Using Print Properties Opening Print Properties Print Properties is the software that controls the printing function when the printer is connected to : - Print projects such as photos, envelopes, cards, banners, iron-on transfers, and transparencies. •...; Find the electronic User's Guide for new cartridges. • Print a test page. • Clean to fix horizontal streaks. • Align to fix blurry edges. • Troubleshoot other ...
Getting Started
Page 30
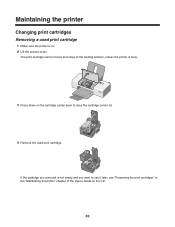
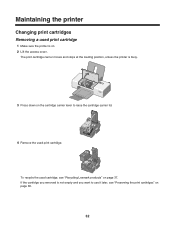
The print cartridge carrier moves and stops at the loading position, unless the printer is busy. 3 Press down on the cartridge carrier lever to raise the cartridge carrier lid. 4 Remove the used print cartridge 1 Make sure the printer is not empty and you want to use it later, see "Preserving the print cartridges" in the "Maintaining the printer" chapter of the User's Guide on . 2 Lift the access cover. If the cartridge you removed is on the CD. 30 Maintaining the printer Changing print cartridges Removing a used print cartridge.
The print cartridge carrier moves and stops at the loading position, unless the printer is busy. 3 Press down on the cartridge carrier lever to raise the cartridge carrier lid. 4 Remove the used print cartridge 1 Make sure the printer is not empty and you want to use it later, see "Preserving the print cartridges" in the "Maintaining the printer" chapter of the User's Guide on . 2 Lift the access cover. If the cartridge you removed is on the CD. 30 Maintaining the printer Changing print cartridges Removing a used print cartridge.
Getting Started
Page 31
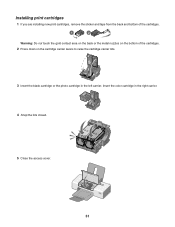
Installing print cartridges 1 If you are installing new print cartridges, remove the sticker and tape from the back and bottom of the cartridges. 1 2 Warning: Do not touch the gold contact area on the back or the metal nozzles on the bottom of the cartridges. 2 Press down on the cartridge carrier levers to raise the cartridge carrier lids. 3 Insert the black cartridge or the photo cartridge in the right carrier. 4 Snap the lids closed. 5 Close the access cover. 31 Insert the color cartridge in the left carrier.
Installing print cartridges 1 If you are installing new print cartridges, remove the sticker and tape from the back and bottom of the cartridges. 1 2 Warning: Do not touch the gold contact area on the back or the metal nozzles on the bottom of the cartridges. 2 Press down on the cartridge carrier levers to raise the cartridge carrier lids. 3 Insert the black cartridge or the photo cartridge in the right carrier. 4 Snap the lids closed. 5 Close the access cover. 31 Insert the color cartridge in the left carrier.
Getting Started
Page 32
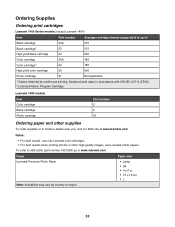
... 24711 (FDIS). 2 Licensed Return Program Cartridge Lexmark 1480 models Item Color cartridge Black cartridge Photo cartridge Part number 2 3 31 Ordering paper and other high-quality images, use Lexmark photo papers. Ordering Supplies Ordering print cartridges Lexmark 1400 Series models (except Lexmark 1480) Item Part number Average cartridge standard page yield is up to1 Black cartridge 23A 215 Black cartridge2 23 215...
... 24711 (FDIS). 2 Licensed Return Program Cartridge Lexmark 1480 models Item Color cartridge Black cartridge Photo cartridge Part number 2 3 31 Ordering paper and other high-quality images, use Lexmark photo papers. Ordering Supplies Ordering print cartridges Lexmark 1400 Series models (except Lexmark 1480) Item Part number Average cartridge standard page yield is up to1 Black cartridge 23A 215 Black cartridge2 23 215...
Getting Started
Page 35
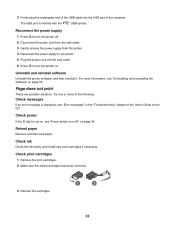
...If the light is displayed, see "Error messages" in the "Troubleshooting" chapter of the computer. Check print cartridges 1 Remove the print cartridges. 2 Make sure the sticker and tape have been removed. 3 Reinsert the cartridges. 1 2 35 The USB port is not lit" on page 34. Reconnect the power supply 1 Press ... the power cord into the USB port of the User's Guide on the CD. Check ink Check the ink levels, and install new print cartridges if necessary. Reload paper Remove and then load paper. For more of the following: Check messages If an error message is not on, see...
...If the light is displayed, see "Error messages" in the "Troubleshooting" chapter of the computer. Check print cartridges 1 Remove the print cartridges. 2 Make sure the sticker and tape have been removed. 3 Reinsert the cartridges. 1 2 35 The USB port is not lit" on page 34. Reconnect the power supply 1 Press ... the power cord into the USB port of the User's Guide on the CD. Check ink Check the ink levels, and install new print cartridges if necessary. Reload paper Remove and then load paper. For more of the following: Check messages If an error message is not on, see...

Getting Started
Page 57
...A variable amount of ink. If you do not accept the terms of this single use only and is/are not subject to this product in the cartridge when replacement is available at www.lexmark.com. * Products within the XX80 Series (including but not limited to Models X1380...X2580, X3580, and X4580) are designed to Lexmark for a single use license/agreement, return this license agreement. 57 A replacement cartridge sold without these terms is required. After this single use, the license to use the print cartridge terminates, and the used cartridge must be returned only to stop working after ...
...A variable amount of ink. If you do not accept the terms of this single use only and is/are not subject to this product in the cartridge when replacement is available at www.lexmark.com. * Products within the XX80 Series (including but not limited to Models X1380...X2580, X3580, and X4580) are designed to Lexmark for a single use license/agreement, return this license agreement. 57 A replacement cartridge sold without these terms is required. After this single use, the license to use the print cartridge terminates, and the used cartridge must be returned only to stop working after ...
User's Guide
Page 4
... better print quality...34 Improving print quality ...34 Aligning the print cartridges ...34 Cleaning the print cartridge nozzles ...34 Wiping the print cartridge nozzles and contacts 35 Preserving the print cartridges...36 Ordering supplies...36 Using genuine Lexmark print cartridges 37 Refilling a print cartridge...37 Recycling Lexmark products...37 Troubleshooting...38 Setup troubleshooting...38 Power light is not...
... better print quality...34 Improving print quality ...34 Aligning the print cartridges ...34 Cleaning the print cartridge nozzles ...34 Wiping the print cartridge nozzles and contacts 35 Preserving the print cartridges...36 Ordering supplies...36 Using genuine Lexmark print cartridges 37 Refilling a print cartridge...37 Recycling Lexmark products...37 Troubleshooting...38 Setup troubleshooting...38 Power light is not...

User's Guide
Page 5
Paper or specialty media misfeeds...44 Printer does not feed paper, envelopes, or specialty media 45 Banner paper jams ...45 Blinking power light troubleshooting 46 Power light blinks slowly...46 Power light blinks rapidly ...46 Error messages troubleshooting...46 Cartridge Alert ...46 Black cartridge replacement required 46 Color cartridge replacement required 46 Black and Color cartridge replacement required 47 Paper Jam ...47 Out of Paper...47 Removing and reinstalling the software 47 Notices...48 Edition notice...48 Power consumption...50 Index...51 5
Paper or specialty media misfeeds...44 Printer does not feed paper, envelopes, or specialty media 45 Banner paper jams ...45 Blinking power light troubleshooting 46 Power light blinks slowly...46 Power light blinks rapidly ...46 Error messages troubleshooting...46 Cartridge Alert ...46 Black cartridge replacement required 46 Color cartridge replacement required 46 Black and Color cartridge replacement required 47 Paper Jam ...47 Out of Paper...47 Removing and reinstalling the software 47 Notices...48 Edition notice...48 Power consumption...50 Index...51 5
User's Guide
Page 11
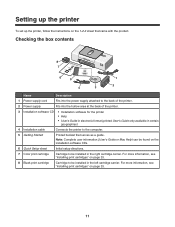
.... 3 Installation software CD • Installation software for the printer • Help • User's Guide in electronic format (printed User's Guide only available in the left cartridge carrier. Checking the box contents 8 1 7 2 3 6 5 1 2 4 3 Name Description 1 Power supply cord Fits into the power supply attached to the computer. 5 Getting Started Printed booklet that came...
.... 3 Installation software CD • Installation software for the printer • Help • User's Guide in electronic format (printed User's Guide only available in the left cartridge carrier. Checking the box contents 8 1 7 2 3 6 5 1 2 4 3 Name Description 1 Power supply cord Fits into the power supply attached to the computer. 5 Getting Started Printed booklet that came...
User's Guide
Page 13
... 46. 3 Access cover • Install or change the print cartridges. • Clear paper jams. 4 Wi-Fi indicator Check wireless status: • Off indicates that the printer is not turned on or that no wireless option is installed. • Orange indicates that the printer is ...ready for wireless connection, but not connected. • Orange blinking indicates that the printer is configured but unable to communicate with the wireless network. • Green indicates that the printer is connected to a wireless network. 2 • Turn the printer on...
... 46. 3 Access cover • Install or change the print cartridges. • Clear paper jams. 4 Wi-Fi indicator Check wireless status: • Off indicates that the printer is not turned on or that no wireless option is installed. • Orange indicates that the printer is ...ready for wireless connection, but not connected. • Orange blinking indicates that the printer is configured but unable to communicate with the wireless network. • Green indicates that the printer is connected to a wireless network. 2 • Turn the printer on...

User's Guide
Page 15
... troubleshooting, maintenance, and cartridge-ordering information. Create printer-friendly versions of these methods: Method 1 Method 2 From the desktop, double-click the Lexmark Imaging Studio icon. 1 Click Start ΠPrograms or All Programs ΠLexmark 1400 Series. 2 Select Lexmark Imaging Studio. Make quality...icon. Select the best print settings for the document you are printing. Using the printer software Use this software Lexmark Imaging Studio Solution Center Print Properties Toolbar To Print documents or photos. Learning about the software This chapter tells...
... troubleshooting, maintenance, and cartridge-ordering information. Create printer-friendly versions of these methods: Method 1 Method 2 From the desktop, double-click the Lexmark Imaging Studio icon. 1 Click Start ΠPrograms or All Programs ΠLexmark 1400 Series. 2 Select Lexmark Imaging Studio. Make quality...icon. Select the best print settings for the document you are printing. Using the printer software Use this software Lexmark Imaging Studio Solution Center Print Properties Toolbar To Print documents or photos. Learning about the software This chapter tells...

User's Guide
Page 16
...of these methods: Method 1 Method 2 1 From the desktop, double-click the Lexmark Imaging Studio icon. 2 Click Setup and diagnose printer. To open . 1 Click Start Œ Programs or All Programs Œ Lexmark 1400 Series. 2 Select Solution Center. For example, while printing, the status ... Center, use one of the Welcome screen: Click To Setup and diagnose printer • Check ink levels. • Order print cartridges. • Find maintenance information. • Select other Solution Center tabs for more information, including how to change printer settings and troubleshooting...
...of these methods: Method 1 Method 2 1 From the desktop, double-click the Lexmark Imaging Studio icon. 2 Click Setup and diagnose printer. To open . 1 Click Start Œ Programs or All Programs Œ Lexmark 1400 Series. 2 Select Solution Center. For example, while printing, the status ... Center, use one of the Welcome screen: Click To Setup and diagnose printer • Check ink levels. • Order print cartridges. • Find maintenance information. • Select other Solution Center tabs for more information, including how to change printer settings and troubleshooting...

User's Guide
Page 17
Using Print Properties Opening Print Properties Print Properties is the software that controls the printing function when the printer is connected to : - From here How To Troubleshooting Maintenance Contact Information You can • Learn how to a computer.... - Note: For more information. • Learn tips about the current status. • Solve printer problems. • Install a new print cartridge. • View shopping options for new cartridges. • Print a test page. • Clean to fix horizontal streaks. • Align to fix blurry edges. • Troubleshoot other ink...
Using Print Properties Opening Print Properties Print Properties is the software that controls the printing function when the printer is connected to : - From here How To Troubleshooting Maintenance Contact Information You can • Learn how to a computer.... - Note: For more information. • Learn tips about the current status. • Solve printer problems. • Install a new print cartridge. • View shopping options for new cartridges. • Print a test page. • Clean to fix horizontal streaks. • Align to fix blurry edges. • Troubleshoot other ink...
User's Guide
Page 32
To recycle the used print cartridge. If the cartridge you removed is not empty and you want to raise the cartridge carrier lid. 4 Remove the used cartridge, see "Preserving the print cartridges" on page 37. The print cartridge carrier moves and stops at the loading position, unless the printer is busy. 3 Press down on . 2 Lift the access cover. Maintaining the printer Changing print cartridges Removing a used print cartridge 1 Make sure the printer is on the cartridge carrier lever to use it later, see "Recycling Lexmark products" on page 36. 32
To recycle the used print cartridge. If the cartridge you removed is not empty and you want to raise the cartridge carrier lid. 4 Remove the used cartridge, see "Preserving the print cartridges" on page 37. The print cartridge carrier moves and stops at the loading position, unless the printer is busy. 3 Press down on . 2 Lift the access cover. Maintaining the printer Changing print cartridges Removing a used print cartridge 1 Make sure the printer is on the cartridge carrier lever to use it later, see "Recycling Lexmark products" on page 36. 32


