
Getting Started
Page 2
... HAZARD: Do not use of specific Lexmark components. Remove the power cord from the electrical outlet before inspecting it. Do not pinch the power cord between objects such as the power supply cord or telephone, during a lightning storm. Inspect the power cord regularly for the use of misuse...bind, crush, or place heavy objects on the power cord. Lexmark is near the product and easily accessible. Refer service or repairs, other replacement parts. Connect the power supply cord to abrasion or stress. Do not subject the power cord to a properly grounded electrical outlet that ...
... HAZARD: Do not use of specific Lexmark components. Remove the power cord from the electrical outlet before inspecting it. Do not pinch the power cord between objects such as the power supply cord or telephone, during a lightning storm. Inspect the power cord regularly for the use of misuse...bind, crush, or place heavy objects on the power cord. Lexmark is near the product and easily accessible. Refer service or repairs, other replacement parts. Connect the power supply cord to abrasion or stress. Do not subject the power cord to a properly grounded electrical outlet that ...
Getting Started
Page 16
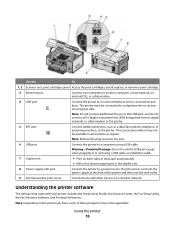
..., some of these programs may not be applicable. Plug the power cord into the power supply at the back of the paper automatically. • Pull out to a power source. Using the printer 16 This connection method may not be available in the duplex unit. 8 Power supply with other devices on both sides of the printer and...
..., some of these programs may not be applicable. Plug the power cord into the power supply at the back of the paper automatically. • Pull out to a power source. Using the printer 16 This connection method may not be available in the duplex unit. 8 Power supply with other devices on both sides of the printer and...
Getting Started
Page 38
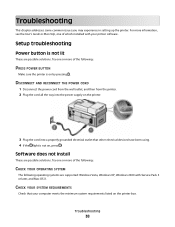
... minimum system requirements listed on the printer box. DISCONNECT AND RECONNECT THE POWER CORD 1 Disconnect the power cord from the wall outlet, and then from the printer. 2 Plug the cord all the way into the power supply on the printer. 3 Plug the cord into a properly grounded electrical... outlet that your printer software. Troubleshooting 38 Setup troubleshooting Power button is not on by pressing . Software does not install These are possible...
... minimum system requirements listed on the printer box. DISCONNECT AND RECONNECT THE POWER CORD 1 Disconnect the power cord from the wall outlet, and then from the printer. 2 Plug the cord all the way into the power supply on the printer. 3 Plug the cord into a properly grounded electrical... outlet that your printer software. Troubleshooting 38 Setup troubleshooting Power button is not on by pressing . Software does not install These are possible...
Getting Started
Page 39
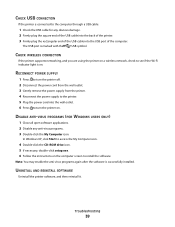
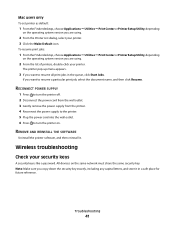
... the USB cable into the wall outlet. 6 Press to turn the printer off. 2 Disconnect the power cord from the wall outlet. 3 Gently remove the power supply from the printer. 4 Reconnect the power supply to the printer. 5 Plug the power cord into the USB port of the computer. In Windows XP, click Start to access the... programs again after the software is marked with the USB symbol. UNINSTALL AND REINSTALL SOFTWARE Uninstall the printer software, and then reinstall it. RECONNECT POWER SUPPLY 1 Press to turn the printer on a wireless network, check to install the software.
... the USB cable into the wall outlet. 6 Press to turn the printer off. 2 Disconnect the power cord from the wall outlet. 3 Gently remove the power supply from the printer. 4 Reconnect the power supply to the printer. 5 Plug the power cord into the USB port of the computer. In Windows XP, click Start to access the... programs again after the software is marked with the USB symbol. UNINSTALL AND REINSTALL SOFTWARE Uninstall the printer software, and then reinstall it. RECONNECT POWER SUPPLY 1 Press to turn the printer on a wireless network, check to install the software.
Getting Started
Page 41
... place for future reference. Wireless troubleshooting Check your printer. Troubleshooting 41 RECONNECT POWER SUPPLY 1 Press to turn the printer off. 2 Disconnect the power cord from the wall outlet. 3 Gently remove the power supply from the printer. 4 Reconnect the power supply to the printer. 5 Plug the power cord into the wall outlet. 6 Press to resume a particular print job, select...
... place for future reference. Wireless troubleshooting Check your printer. Troubleshooting 41 RECONNECT POWER SUPPLY 1 Press to turn the printer off. 2 Disconnect the power cord from the wall outlet. 3 Gently remove the power supply from the printer. 4 Reconnect the power supply to the printer. 5 Plug the power cord into the wall outlet. 6 Press to resume a particular print job, select...
User's Guide
Page 10
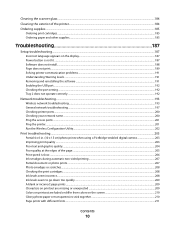
Cleaning the scanner glass...184 Cleaning the exterior of the printer...184 Ordering supplies...185 Ordering print cartridges ...185 Ordering paper and other supplies...185 Troubleshooting 187 Setup troubleshooting...187 Incorrect language appears on the display...187 Power button is not lit ...187 Software does not install...188 Page does not print...189 Solving...
Cleaning the scanner glass...184 Cleaning the exterior of the printer...184 Ordering supplies...185 Ordering print cartridges ...185 Ordering paper and other supplies...185 Troubleshooting 187 Setup troubleshooting...187 Incorrect language appears on the display...187 Power button is not lit ...187 Software does not install...188 Page does not print...189 Solving...

User's Guide
Page 20
... misused, a risk of fire or electrical shock results. Do not pinch the power cord between objects such as the power supply cord or telephone, during a lightning storm. If the power cord is not responsible for signs of specific Lexmark components. Connect the power supply cord to a properly grounded electrical outlet that is designed, tested, and approved to...
... misused, a risk of fire or electrical shock results. Do not pinch the power cord between objects such as the power supply cord or telephone, during a lightning storm. If the power cord is not responsible for signs of specific Lexmark components. Connect the power supply cord to a properly grounded electrical outlet that is designed, tested, and approved to...
User's Guide
Page 21
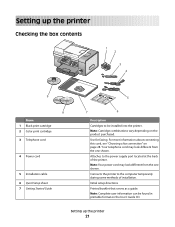
... about connecting this cord, see "Choosing a fax connection" on the product purchased. Attaches to the computer temporarily during some methods of the printer. Note: Your power cord may look different from the one shown. Setting up the printer Checking the box contents 1 2 3 4 9 8 Name 1 Black print cartridge 2 Color print cartridge 3 Telephone ... vary depending on page 28. Note: Complete user information can be installed into the printer. Setting up the printer 21 Connects the printer to the power supply port located at the back of installation. Use for faxing.
... about connecting this cord, see "Choosing a fax connection" on the product purchased. Attaches to the computer temporarily during some methods of the printer. Note: Your power cord may look different from the one shown. Setting up the printer Checking the box contents 1 2 3 4 9 8 Name 1 Black print cartridge 2 Color print cartridge 3 Telephone ... vary depending on page 28. Note: Complete user information can be installed into the printer. Setting up the printer 21 Connects the printer to the power supply port located at the back of installation. Use for faxing.
User's Guide
Page 25
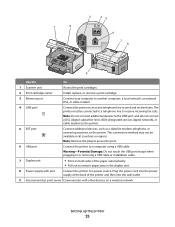
...available in all countries or regions. This connection method may not be connected to a telephone line to the printer. Plug the power cord into the power supply at the back of the printer and then into the wall outlet. 9 Internal wireless print server Communicate with port Connect the printer.... Warning-Potential Damage: Do not touch the USB port except when plugging in the duplex unit. 8 Power supply with other devices on both sides of the paper automatically. • Pull out to a power source. Note: Do not connect additional devices to the LINE port, and do not connect a DSL ...
...available in all countries or regions. This connection method may not be connected to a telephone line to the printer. Plug the power cord into the power supply at the back of the printer and then into the wall outlet. 9 Internal wireless print server Communicate with port Connect the printer.... Warning-Potential Damage: Do not touch the USB port except when plugging in the duplex unit. 8 Power supply with other devices on both sides of the paper automatically. • Pull out to a power source. Note: Do not connect additional devices to the LINE port, and do not connect a DSL ...

User's Guide
Page 28
... CAUTION-SHOCK HAZARD: Do not use the fax feature during a lightning storm. If problems occur, see "Connecting directly to pass through the printer, as the power supply cord or telephone, during a lightning storm.
... CAUTION-SHOCK HAZARD: Do not use the fax feature during a lightning storm. If problems occur, see "Connecting directly to pass through the printer, as the power supply cord or telephone, during a lightning storm.
User's Guide
Page 187
...a different language after initial setup 1 Press to the same wireless network. • The printer is within the range of the following: PRESS POWER BUTTON Make sure the printer is on by pressing . Try one or more of the wireless network. Setup troubleshooting Incorrect language appears on the ... or repeatedly until the language you want appears on the computer from other electronic devices that may interfere with the wireless signal. • The power supply is connected to the printer, and is lit. • The Wi-Fi indicator light is green. • The printer driver is installed on...
...a different language after initial setup 1 Press to the same wireless network. • The printer is within the range of the following: PRESS POWER BUTTON Make sure the printer is on by pressing . Try one or more of the wireless network. Setup troubleshooting Incorrect language appears on the ... or repeatedly until the language you want appears on the computer from other electronic devices that may interfere with the wireless signal. • The power supply is connected to the printer, and is lit. • The Wi-Fi indicator light is green. • The printer driver is installed on...
User's Guide
Page 188
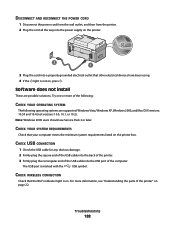
... been using. 4 If the light is marked with the USB symbol. DISCONNECT AND RECONNECT THE POWER CORD 1 Disconnect the power cord from the wall outlet, and then from the printer. 2 Plug the cord all the way into the power supply on the printer. 2 1 3 Plug the cord into the USB port of the following: CHECK...
... been using. 4 If the light is marked with the USB symbol. DISCONNECT AND RECONNECT THE POWER CORD 1 Disconnect the power cord from the wall outlet, and then from the printer. 2 Plug the cord all the way into the power supply on the printer. 2 1 3 Plug the cord into the USB port of the following: CHECK...
User's Guide
Page 189
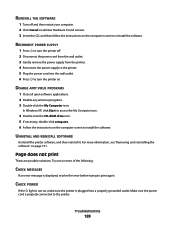
... the CD-ROM drive icon. 5 If necessary, double-click setup.exe. 6 Follow the instructions on the computer screen to reinstall the software. RECONNECT POWER SUPPLY 1 Press to turn the printer off and then restart your computer. 2 Click Cancel on all open software applications. 2 Disable any antivirus programs. ...follow the instructions on the computer screen to install the software. Troubleshooting 189 REINSTALL THE SOFTWARE 1 Turn off . 2 Disconnect the power cord from the wall outlet. 3 Gently remove the power supply from the printer. 4 Reconnect the power supply to turn the printer on.
... the CD-ROM drive icon. 5 If necessary, double-click setup.exe. 6 Follow the instructions on the computer screen to reinstall the software. RECONNECT POWER SUPPLY 1 Press to turn the printer off and then restart your computer. 2 Click Cancel on all open software applications. 2 Disable any antivirus programs. ...follow the instructions on the computer screen to install the software. Troubleshooting 189 REINSTALL THE SOFTWARE 1 Turn off . 2 Disconnect the power cord from the wall outlet. 3 Gently remove the power supply from the printer. 4 Reconnect the power supply to turn the printer on.
User's Guide
Page 190
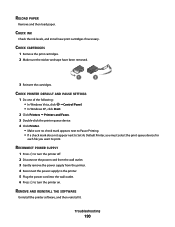
... REINSTALL THE SOFTWARE Uninstall the printer software, and then reinstall it. RECONNECT POWER SUPPLY 1 Press to turn the printer off. 2 Disconnect the power cord from the wall outlet. 3 Gently remove the power supply from the printer. 4 Reconnect the power supply to the printer. 5 Plug the power cord into the wall outlet. 6 Press to print. RELOAD PAPER Remove and...
... REINSTALL THE SOFTWARE Uninstall the printer software, and then reinstall it. RECONNECT POWER SUPPLY 1 Press to turn the printer off. 2 Disconnect the power cord from the wall outlet. 3 Gently remove the power supply from the printer. 4 Reconnect the power supply to the printer. 5 Plug the power cord into the wall outlet. 6 Press to print. RELOAD PAPER Remove and...

User's Guide
Page 239
...Size setting under the Scan Mode menu is Auto Detect or the size of the document or image. CHECK POWER If the light is not on, see "Power button is loaded facedown on the scanner glass in the lower right corner. CHECK CABLE CONNECTIONS Make sure ...ADF). Fax troubleshooting Cannot send or receive a fax These are possible solutions. Try one or more of the following hardware are secure, if applicable: • Power supply • Telephone • Handset • Answering machine Troubleshooting 239 Cannot scan to a computer over a network See "Scanning to a computer over a network ...
...Size setting under the Scan Mode menu is Auto Detect or the size of the document or image. CHECK POWER If the light is not on, see "Power button is loaded facedown on the scanner glass in the lower right corner. CHECK CABLE CONNECTIONS Make sure ...ADF). Fax troubleshooting Cannot send or receive a fax These are possible solutions. Try one or more of the following hardware are secure, if applicable: • Power supply • Telephone • Handset • Answering machine Troubleshooting 239 Cannot scan to a computer over a network See "Scanning to a computer over a network ...
User's Guide
Page 247
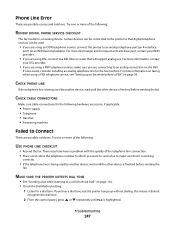
... fax. Phone Line Error These are connecting to an analog connection on the PBX. For more of the following hardware are secure, if applicable: • Power supply • Telephone • Handset • Answering machine Failed to Connect These are using a PBX telephone service, make sure that it did not recognize the dial...
... fax. Phone Line Error These are connecting to an analog connection on the PBX. For more of the following hardware are secure, if applicable: • Power supply • Telephone • Handset • Answering machine Failed to Connect These are using a PBX telephone service, make sure that it did not recognize the dial...
User's Guide
Page 251
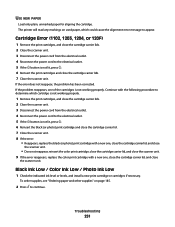
...determine which could cause the alignment error message to the electrical outlet. 5 If the button is not working properly. To order supplies, see "Ordering paper and other supplies" on used paper, which cartridge is not lit, press . 6 Reinsert the black (or photo) print cartridge and close ...properly. 1 Remove the print cartridges, and close the cartridge carrier lids. 2 Close the scanner unit. 3 Disconnect the power cord from the electrical outlet. 4 Reconnect the power cord to appear. USE NEW PAPER Load only plain, unmarked paper for aligning the cartridge. The printer will read any ...
...determine which could cause the alignment error message to the electrical outlet. 5 If the button is not working properly. To order supplies, see "Ordering paper and other supplies" on used paper, which cartridge is not lit, press . 6 Reinsert the black (or photo) print cartridge and close ...properly. 1 Remove the print cartridges, and close the cartridge carrier lids. 2 Close the scanner unit. 3 Disconnect the power cord from the electrical outlet. 4 Reconnect the power cord to appear. USE NEW PAPER Load only plain, unmarked paper for aligning the cartridge. The printer will read any ...

User's Guide
Page 271
... If this product has an off mode which still consumes a small amount of power, then to completely stop product power consumption, disconnect the power supply cord from Lexmark or a Lexmark remarketer, referred to in this statement as "Remarketer." Statement of the Remarketer or Lexmark. This limited warranty applies to this product only if it prepaid and suitably...
... If this product has an off mode which still consumes a small amount of power, then to completely stop product power consumption, disconnect the power supply cord from Lexmark or a Lexmark remarketer, referred to in this statement as "Remarketer." Statement of the Remarketer or Lexmark. This limited warranty applies to this product only if it prepaid and suitably...
User's Guide
Page 284
..., editing document text 144 On Hook Dial using 152 On Hook Dial feature 154 One-Click Auto Fixes for photos 122 ordering paper and other supplies 185 out of memory error 258 P page does not print 189 page prints with different fonts 211 paper capacities for Tray 1 73 capacities for Tray... 22 Ethernet port 22 EXT port 22 LINE port 22 memory card slots 22 paper exit tray 22 paper tray (Tray 1) 22 PictBridge port 22 power supply port 22 print cartridge carrier 22 scanner glass 22 scanner unit 22 small media feeder 22 top cover 22 USB port 22 wireless printer server...
..., editing document text 144 On Hook Dial using 152 On Hook Dial feature 154 One-Click Auto Fixes for photos 122 ordering paper and other supplies 185 out of memory error 258 P page does not print 189 page prints with different fonts 211 paper capacities for Tray 1 73 capacities for Tray... 22 Ethernet port 22 EXT port 22 LINE port 22 memory card slots 22 paper exit tray 22 paper tray (Tray 1) 22 PictBridge port 22 power supply port 22 print cartridge carrier 22 scanner glass 22 scanner unit 22 small media feeder 22 top cover 22 USB port 22 wireless printer server...

User's Guide
Page 285
...text and graphic quality 204 port setting, checking 192 postcards loading 77 printing 97 poster, printing 98 posters, printing 97 power button is not lit 187 power supply port 22 preferences, e-mail screen changing 150 preferences, library changing 119 preferences, searched folders changing 119 preferences, temporary files... nozzles, cleaning 182 print cartridges aligning 181 cleaning 182 installing 178 ordering 185 preserving 183 refilling 180 removing 180 using genuine Lexmark 180 wiping 182 print file error 259 Print Files Mode menu 107 print is too dark or smudged 211 print jobs canceling...
...text and graphic quality 204 port setting, checking 192 postcards loading 77 printing 97 poster, printing 98 posters, printing 97 power button is not lit 187 power supply port 22 preferences, e-mail screen changing 150 preferences, library changing 119 preferences, searched folders changing 119 preferences, temporary files... nozzles, cleaning 182 print cartridges aligning 181 cleaning 182 installing 178 ordering 185 preserving 183 refilling 180 removing 180 using genuine Lexmark 180 wiping 182 print file error 259 Print Files Mode menu 107 print is too dark or smudged 211 print jobs canceling...


