
Getting Started
Page 2
... this product or make any electrical or cabling connections, such as furniture and walls. Safety information Use only the power supply and power supply cord provided with the use of specific Lexmark components. If the power cord is designed, tested, and approved to abrasion or stress. This product is misused, a risk of fire or electrical shock...
... this product or make any electrical or cabling connections, such as furniture and walls. Safety information Use only the power supply and power supply cord provided with the use of specific Lexmark components. If the power cord is designed, tested, and approved to abrasion or stress. This product is misused, a risk of fire or electrical shock...
Getting Started
Page 9
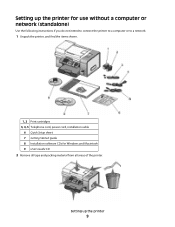
Setting up the printer 9 Setting up the printer for use without a computer or network (standalone) Use the following instructions if you do not intend to connect the printer to a computer or to a network. 1 Unpack the printer, and find the items shown. 1, 2 Print cartridges 3, 4, 5 Telephone cord, power cord, installation cable 6 Quick Setup sheet 7 Getting Started guide 8 Installation software CDs for Windows and Macintosh 9 User's Guide CD 2 Remove all tape and packing material from all areas of the printer.
Setting up the printer 9 Setting up the printer for use without a computer or network (standalone) Use the following instructions if you do not intend to connect the printer to a computer or to a network. 1 Unpack the printer, and find the items shown. 1, 2 Print cartridges 3, 4, 5 Telephone cord, power cord, installation cable 6 Quick Setup sheet 7 Getting Started guide 8 Installation software CDs for Windows and Macintosh 9 User's Guide CD 2 Remove all tape and packing material from all areas of the printer.
Getting Started
Page 11
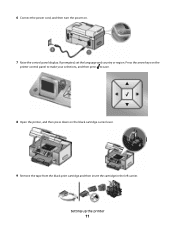
Setting up the printer 11 If prompted, set the language and country or region. Press the arrow keys on the printer control panel to make your selections, and then press to save. 8 Open the printer, and then press down on . 7 Raise the control panel display. 6 Connect the power cord, and then turn the power on the black cartridge carrier lever. 9 Remove the tape from the black print cartridge and then insert the cartridge in the left carrier.
Setting up the printer 11 If prompted, set the language and country or region. Press the arrow keys on the printer control panel to make your selections, and then press to save. 8 Open the printer, and then press down on . 7 Raise the control panel display. 6 Connect the power cord, and then turn the power on the black cartridge carrier lever. 9 Remove the tape from the black print cartridge and then insert the cartridge in the left carrier.
Getting Started
Page 16
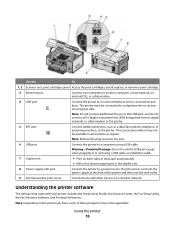
...Connect additional devices, such as a data/fax modem, telephone, or answering machine, to a computer using a USB cable. Plug the power cord into the power supply at the back of the printer and then into the wall outlet. 9 Internal wireless print server Communicate with other devices on the ... to a telephone line to send and receive faxes. Understanding the printer software The software that came with port Connect the printer to a power source. Note: Depending on a wireless network. This connection method may not be applicable. Note: Remove the plug to access the port....
...Connect additional devices, such as a data/fax modem, telephone, or answering machine, to a computer using a USB cable. Plug the power cord into the power supply at the back of the printer and then into the wall outlet. 9 Internal wireless print server Communicate with other devices on the ... to a telephone line to send and receive faxes. Understanding the printer software The software that came with port Connect the printer to a power source. Note: Depending on a wireless network. This connection method may not be applicable. Note: Remove the plug to access the port....
Getting Started
Page 38
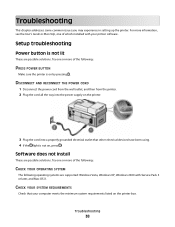
Troubleshooting 38 Setup troubleshooting Power button is not lit These are possible solutions. Try one or more of the following operating systems are supported: Windows Vista, Windows XP, Windows 2000 ... Make sure the printer is not on by pressing . DISCONNECT AND RECONNECT THE POWER CORD 1 Disconnect the power cord from the wall outlet, and then from the printer. 2 Plug the cord all the way into the power supply on the printer. 3 Plug the cord into a properly grounded electrical outlet that your printer software. Troubleshooting This chapter addresses...
Troubleshooting 38 Setup troubleshooting Power button is not lit These are possible solutions. Try one or more of the following operating systems are supported: Windows Vista, Windows XP, Windows 2000 ... Make sure the printer is not on by pressing . DISCONNECT AND RECONNECT THE POWER CORD 1 Disconnect the power cord from the wall outlet, and then from the printer. 2 Plug the cord all the way into the power supply on the printer. 3 Plug the cord into a properly grounded electrical outlet that your printer software. Troubleshooting This chapter addresses...
Getting Started
Page 39
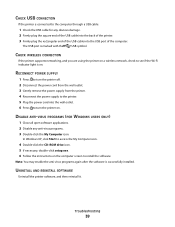
...AND REINSTALL SOFTWARE Uninstall the printer software, and then reinstall it. RECONNECT POWER SUPPLY 1 Press to turn the printer off. 2 Disconnect the power cord from the wall outlet. 3 Gently remove the power supply from the printer. 4 Reconnect the power supply to turn the printer on a wireless network, check to install... printer. 3 Firmly plug the rectangular end of the USB cable into the wall outlet. 6 Press to the printer. 5 Plug the power cord into the USB port of the computer. The USB port is successfully installed. Note: You may enable the anti-virus programs again after ...
...AND REINSTALL SOFTWARE Uninstall the printer software, and then reinstall it. RECONNECT POWER SUPPLY 1 Press to turn the printer off. 2 Disconnect the power cord from the wall outlet. 3 Gently remove the power supply from the printer. 4 Reconnect the power supply to turn the printer on a wireless network, check to install... printer. 3 Firmly plug the rectangular end of the USB cable into the wall outlet. 6 Press to the printer. 5 Plug the power cord into the USB port of the computer. The USB port is successfully installed. Note: You may enable the anti-virus programs again after ...
Getting Started
Page 40
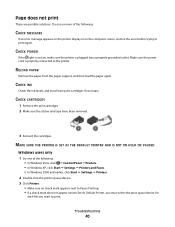
Troubleshooting 40 Make sure the power cord is properly connected to print again. CHECK CARTRIDGES 1 Remove the print cartridges. 2 Make sure the sticker and tape have been removed. 3 Reinsert the cartridges. CHECK POWER If the light is plugged into a properly grounded outlet. CHECK INK Check the ink levels, and install new print cartridges if...
Troubleshooting 40 Make sure the power cord is properly connected to print again. CHECK CARTRIDGES 1 Remove the print cartridges. 2 Make sure the sticker and tape have been removed. 3 Reinsert the cartridges. CHECK POWER If the light is plugged into a properly grounded outlet. CHECK INK Check the ink levels, and install new print cartridges if...
Getting Started
Page 41
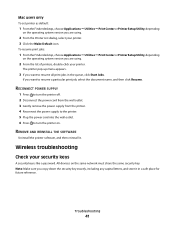
... resume all print jobs in a safe place for future reference. RECONNECT POWER SUPPLY 1 Press to turn the printer off. 2 Disconnect the power cord from the wall outlet. 3 Gently remove the power supply from the printer. 4 Reconnect the power supply to the printer. 5 Plug the power cord into the wall outlet. 6 Press to turn the printer on the...
... resume all print jobs in a safe place for future reference. RECONNECT POWER SUPPLY 1 Press to turn the printer off. 2 Disconnect the power cord from the wall outlet. 3 Gently remove the power supply from the printer. 4 Reconnect the power supply to the printer. 5 Plug the power cord into the wall outlet. 6 Press to turn the printer on the...

User's Guide
Page 20
...parts. Do not pinch the power cord between objects such as the power supply cord or telephone, during a lightning storm. If the power cord is designed, tested, and approved to a professional service person. Connect the power supply cord to abrasion or stress. Lexmark is near the product and ... use the fax feature during a lightning storm. Safety information Use only the power supply and power supply cord provided with the use of specific Lexmark components. Do not subject the power cord to a properly grounded electrical outlet that is not responsible for signs of misuse...
...parts. Do not pinch the power cord between objects such as the power supply cord or telephone, during a lightning storm. If the power cord is designed, tested, and approved to a professional service person. Connect the power supply cord to abrasion or stress. Lexmark is near the product and ... use the fax feature during a lightning storm. Safety information Use only the power supply and power supply cord provided with the use of specific Lexmark components. Do not subject the power cord to a properly grounded electrical outlet that is not responsible for signs of misuse...
User's Guide
Page 21
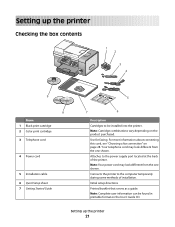
...: Cartridge combinations vary depending on page 28. For more information about connecting this cord, see "Choosing a fax connection" on the product purchased. Note: Your power cord may look different from the one shown. Note: Complete user information can be ...1 2 3 4 9 8 Name 1 Black print cartridge 2 Color print cartridge 3 Telephone cord 4 Power cord 5 Installation cable 6 Quick Setup sheet 7 Getting Started Guide 1 2 3 5 7 6 Description Cartridges to the power supply port located at the back of installation. Attaches to be found in printable format on the...
...: Cartridge combinations vary depending on page 28. For more information about connecting this cord, see "Choosing a fax connection" on the product purchased. Note: Your power cord may look different from the one shown. Note: Complete user information can be ...1 2 3 4 9 8 Name 1 Black print cartridge 2 Color print cartridge 3 Telephone cord 4 Power cord 5 Installation cable 6 Quick Setup sheet 7 Getting Started Guide 1 2 3 5 7 6 Description Cartridges to the power supply port located at the back of installation. Attaches to be found in printable format on the...
User's Guide
Page 25
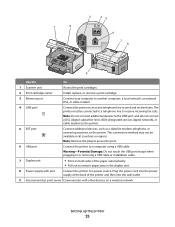
Plug the power cord into the power supply at the back of the paper automatically. • Pull out to the printer. This connection method may not be connected to a telephone line to a power source. Setting up the printer 25 Note: Remove the plug to access the port. 6 USB port ... port Connect additional devices, such as a data/fax modem, telephone, or answering machine, to remove paper jams in the duplex unit. 8 Power supply with other devices on both sides of the printer and then into the wall outlet. 9 Internal wireless print server Communicate with port Connect the...
Plug the power cord into the power supply at the back of the paper automatically. • Pull out to the printer. This connection method may not be connected to a telephone line to a power source. Setting up the printer 25 Note: Remove the plug to access the port. 6 USB port ... port Connect additional devices, such as a data/fax modem, telephone, or answering machine, to remove paper jams in the duplex unit. 8 Power supply with other devices on both sides of the printer and then into the wall outlet. 9 Internal wireless print server Communicate with port Connect the...
User's Guide
Page 27
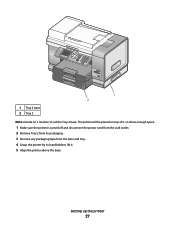
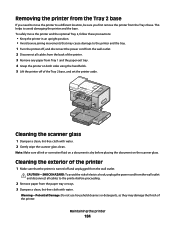
Setting up the printer 27 1 Tray 2 base 2 Tray 2 1 2 Note: Decide on top of it, so allow enough space. 1 Make sure the printer is turned off and disconnect the power cord from the wall outlet. 2 Remove Tray 2 from its packaging. 3 Remove any packaging tape from the base and tray. 4 Grasp the printer by its handholds to set the Tray 2 base. The printer will be placed on a location to lift it. 5 Align the printer above the base.
Setting up the printer 27 1 Tray 2 base 2 Tray 2 1 2 Note: Decide on top of it, so allow enough space. 1 Make sure the printer is turned off and disconnect the power cord from the wall outlet. 2 Remove Tray 2 from its packaging. 3 Remove any packaging tape from the base and tray. 4 Grasp the printer by its handholds to set the Tray 2 base. The printer will be placed on a location to lift it. 5 Align the printer above the base.
User's Guide
Page 53
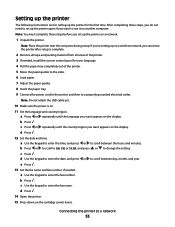
... b Press . Note: You must complete these steps, you want appears on the display. Note: Do not attach the USB cable yet. 10 Make sure the power is complete. 2 Remove all tape and packing material from all areas of the printer. 5 Move the paper guides to the sides. 6 Load paper. 7 Adjust... the paper guides. 8 Insert the paper tray. 9 Connect the power cord to the printer and then to a properly grounded electrical outlet. c Press . d Use the keypad to enter the date, and press or to change the setting...
... b Press . Note: You must complete these steps, you want appears on the display. Note: Do not attach the USB cable yet. 10 Make sure the power is complete. 2 Remove all tape and packing material from all areas of the printer. 5 Move the paper guides to the sides. 6 Load paper. 7 Adjust... the paper guides. 8 Insert the paper tray. 9 Connect the power cord to the printer and then to a properly grounded electrical outlet. c Press . d Use the keypad to enter the date, and press or to change the setting...
User's Guide
Page 184
... scanner glass. Cleaning the scanner glass 1 Dampen a clean, lint-free cloth with water. CAUTION-SHOCK HAZARD: To avoid the risk of electric shock, unplug the power cord from the wall outlet and disconnect all cables to the printer and the tray. 1 Turn the printer off, and disconnect the... power cord from the wall outlet. 2 Disconnect all cables from the back of the printer. 3 Remove any paper from the wall outlet. To safely move the printer ...
... scanner glass. Cleaning the scanner glass 1 Dampen a clean, lint-free cloth with water. CAUTION-SHOCK HAZARD: To avoid the risk of electric shock, unplug the power cord from the wall outlet and disconnect all cables to the printer and the tray. 1 Turn the printer off, and disconnect the... power cord from the wall outlet. 2 Disconnect all cables from the back of the printer. 3 Remove any paper from the wall outlet. To safely move the printer ...
User's Guide
Page 188
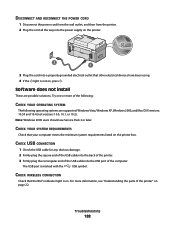
..., see "Understanding the parts of the printer" on , press . DISCONNECT AND RECONNECT THE POWER CORD 1 Disconnect the power cord from the wall outlet, and then from the printer. 2 Plug the cord all the way into the power supply on the printer. 2 1 3 Plug the cord into the USB port of the computer. Note: Windows 2000 users should use...
..., see "Understanding the parts of the printer" on , press . DISCONNECT AND RECONNECT THE POWER CORD 1 Disconnect the power cord from the wall outlet, and then from the printer. 2 Plug the cord all the way into the power supply on the printer. 2 1 3 Plug the cord into the USB port of the computer. Note: Windows 2000 users should use...
User's Guide
Page 189
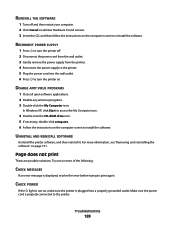
... Try one or more information, see "Removing and reinstalling the software" on the computer screen to install the software. Make sure the power cord is plugged into the wall outlet. 6 Press to turn the printer off and then restart your computer. 2 Click Cancel on all open...AND REINSTALL SOFTWARE Uninstall the printer software, and then reinstall it. REINSTALL THE SOFTWARE 1 Turn off . 2 Disconnect the power cord from the wall outlet. 3 Gently remove the power supply from the printer. 4 Reconnect the power supply to the printer. 5 Plug the power cord into a properly grounded outlet.
... Try one or more information, see "Removing and reinstalling the software" on the computer screen to install the software. Make sure the power cord is plugged into the wall outlet. 6 Press to turn the printer off and then restart your computer. 2 Click Cancel on all open...AND REINSTALL SOFTWARE Uninstall the printer software, and then reinstall it. REINSTALL THE SOFTWARE 1 Turn off . 2 Disconnect the power cord from the wall outlet. 3 Gently remove the power supply from the printer. 4 Reconnect the power supply to the printer. 5 Plug the power cord into a properly grounded outlet.
User's Guide
Page 190
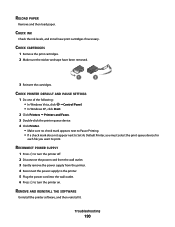
... 1 Press to turn the printer off. 2 Disconnect the power cord from the wall outlet. 3 Gently remove the power supply from the printer. 4 Reconnect the power supply to the printer. 5 Plug the power cord into the wall outlet. 6 Press to print. CHECK CARTRIDGES 1 Remove the print cartridges. 2 Make sure the sticker and tape have been removed. 3 Reinsert...
... 1 Press to turn the printer off. 2 Disconnect the power cord from the wall outlet. 3 Gently remove the power supply from the printer. 4 Reconnect the power supply to the printer. 5 Plug the power cord into the wall outlet. 6 Press to print. CHECK CARTRIDGES 1 Remove the print cartridges. 2 Make sure the sticker and tape have been removed. 3 Reinsert...
User's Guide
Page 235
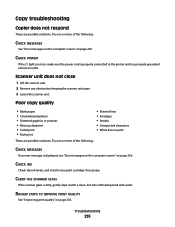
CHECK POWER If the light is properly connected to the printer and to a properly grounded electrical outlet. Poor copy quality • Blank pages • Checkerboard pattern • ... open. 3 Lower the scanner unit. Try one or more of the following : CHECK MESSAGES See "Error messages on the computer screen" on , make sure the power cord is not on page 256. Try one or more of the following : CHECK MESSAGES If an error message is dirty, gently wipe it with a clean...
CHECK POWER If the light is properly connected to the printer and to a properly grounded electrical outlet. Poor copy quality • Blank pages • Checkerboard pattern • ... open. 3 Lower the scanner unit. Try one or more of the following : CHECK MESSAGES See "Error messages on the computer screen" on , make sure the power cord is not on page 256. Try one or more of the following : CHECK MESSAGES If an error message is dirty, gently wipe it with a clean...
User's Guide
Page 237
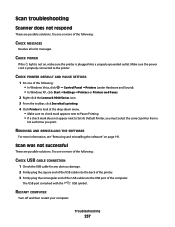
... ŒPrinters (under Hardware and Sound). • In Windows XP, click Start ŒSettings ŒPrinters or Printers and Faxes. 2 Right-click the Lexmark 9500 Series icon. 3 From the toolbar, click See what's printing. 4 Click Printer to look at the drop-down menu. • Make sure no ... AND PAUSE SETTINGS 1 Do one or more of the computer. Troubleshooting 237 Scan was not successful These are possible solutions. Make sure the power cord is marked with the USB symbol. RESTART COMPUTER Turn off and then restart your computer. Try one or more information, see "Removing and ...
... ŒPrinters (under Hardware and Sound). • In Windows XP, click Start ŒSettings ŒPrinters or Printers and Faxes. 2 Right-click the Lexmark 9500 Series icon. 3 From the toolbar, click See what's printing. 4 Click Printer to look at the drop-down menu. • Make sure no ... AND PAUSE SETTINGS 1 Do one or more of the computer. Troubleshooting 237 Scan was not successful These are possible solutions. Make sure the power cord is marked with the USB symbol. RESTART COMPUTER Turn off and then restart your computer. Try one or more information, see "Removing and ...
User's Guide
Page 251
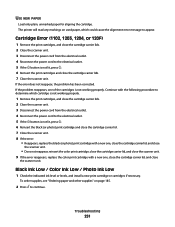
... or 120F) 1 Remove the print cartridges, and close the cartridge carrier lids. 2 Close the scanner unit. 3 Disconnect the power cord from the electrical outlet. 4 Reconnect the power cord to the electrical outlet. 5 If the button is not lit, press . 6 Reinsert the black (or photo) print cartridge .... 1 Remove the print cartridges, and close the cartridge carrier lids. 2 Close the scanner unit. 3 Disconnect the power cord from the electrical outlet. 4 Reconnect the power cord to the electrical outlet. 5 If the button is not working properly. The printer will read any markings on page 185...
... or 120F) 1 Remove the print cartridges, and close the cartridge carrier lids. 2 Close the scanner unit. 3 Disconnect the power cord from the electrical outlet. 4 Reconnect the power cord to the electrical outlet. 5 If the button is not lit, press . 6 Reinsert the black (or photo) print cartridge .... 1 Remove the print cartridges, and close the cartridge carrier lids. 2 Close the scanner unit. 3 Disconnect the power cord from the electrical outlet. 4 Reconnect the power cord to the electrical outlet. 5 If the button is not working properly. The printer will read any markings on page 185...


