User's Guide for Windows
Page 4
Using the Productivity Suite buttons 33 Using the All-In-One Center 34 Using the Maintain/Troubleshoot link 35 Using the Scanning & Copying tab 35 Using the Saved Images tab...36 Using the Solution Center 37 Using Print Properties...38 Save Settings ...
Using the Productivity Suite buttons 33 Using the All-In-One Center 34 Using the Maintain/Troubleshoot link 35 Using the Scanning & Copying tab 35 Using the Saved Images tab...36 Using the Solution Center 37 Using Print Properties...38 Save Settings ...
User's Guide for Windows
Page 7
...Finding your MAC address...92 Configuring a network printer manually 92 Finding a printer/print server located on remote subnets 92 Network troubleshooting tips...92 Maintaining the printer 94 Removing a used print cartridge 94 Installing print cartridges...95 Aligning print cartridges...96 Aligning ...print quality...98 Preserving the print cartridges 99 Cleaning the scanner glass 99 Ordering supplies...100 Recycling Lexmark products 100 Troubleshooting 101 Setup troubleshooting...101 Incorrect language appears on the display 101 Power button is not lit...102 Software does not install...102...
...Finding your MAC address...92 Configuring a network printer manually 92 Finding a printer/print server located on remote subnets 92 Network troubleshooting tips...92 Maintaining the printer 94 Removing a used print cartridge 94 Installing print cartridges...95 Aligning print cartridges...96 Aligning ...print quality...98 Preserving the print cartridges 99 Cleaning the scanner glass 99 Ordering supplies...100 Recycling Lexmark products 100 Troubleshooting 101 Setup troubleshooting...101 Incorrect language appears on the display 101 Power button is not lit...102 Software does not install...102...
User's Guide for Windows
Page 8
...was not successful...110 Partial document or photo scans 110 Cannot scan to an application 110 Cannot scan to a computer over a network 110 Fax troubleshooting...110 Cannot send or receive a fax...110 Can send but not receive faxes 112 Can receive but not send faxes 113 Printer receives a ...blank fax...114 Received fax has poor print quality 114 Error message: Fax error...115 Error message: Fax mode unsupported 115 Network troubleshooting 116 The printer to be configured does not appear in the list of printers found on your network.......116 You cannot print to the network...
...was not successful...110 Partial document or photo scans 110 Cannot scan to an application 110 Cannot scan to a computer over a network 110 Fax troubleshooting...110 Cannot send or receive a fax...110 Can send but not receive faxes 112 Can receive but not send faxes 113 Printer receives a ...blank fax...114 Received fax has poor print quality 114 Error message: Fax error...115 Error message: Fax mode unsupported 115 Network troubleshooting 116 The printer to be configured does not appear in the list of printers found on your network.......116 You cannot print to the network...

User's Guide for Windows
Page 9
Printer does not feed paper, envelopes, or specialty media 119 Banner paper jams...119 Memory card troubleshooting 120 Memory card cannot be inserted 120 Nothing happens when a memory card is inserted 120 Error messages on display...121 Error messages...121 Low Ink......
Printer does not feed paper, envelopes, or specialty media 119 Banner paper jams...119 Memory card troubleshooting 120 Memory card cannot be inserted 120 Nothing happens when a memory card is inserted 120 Error messages on display...121 Error messages...121 Low Ink......
User's Guide for Windows
Page 11
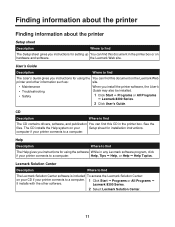
...for using the software While in any Lexmark software program, click if your printer connects to a computer. Lexmark Solution Center Description Where to find The Lexmark Solution Center software is included To access the Lexmark Solution Center: on the Lexmark Web printer and other software. The... Start Œ Programs or All Programs Œ It installs with the other information such as: site. • Maintenance • Troubleshooting • Safety When you install the printer software, the User's Guide may also be installed. 1 Click Start Œ Programs or All Programs...
...for using the software While in any Lexmark software program, click if your printer connects to a computer. Lexmark Solution Center Description Where to find The Lexmark Solution Center software is included To access the Lexmark Solution Center: on the Lexmark Web printer and other software. The... Start Œ Programs or All Programs Œ It installs with the other information such as: site. • Maintenance • Troubleshooting • Safety When you install the printer software, the User's Guide may also be installed. 1 Click Start Œ Programs or All Programs...
User's Guide for Windows
Page 13
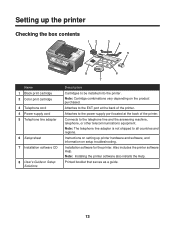
...port at the back of the printer. Instructions on setting up the printer Checking the box contents 12 3 4 5 x Name 1 Black print cartridge 2 Color print cartridge 3 Telephone cord 4 Power supply cord 5 Telephone line adapter 6 Setup sheet 7 Installation software CD 8 User's Guide or Setup Solutions 8 6...regions. Printed booklet that serves as a guide. 13 Setting up printer hardware and software, and information on setup troubleshooting. Also includes the printer software Help. Note: Cartridge combinations vary depending on the product purchased. Attaches to be installed into the printer...
...port at the back of the printer. Instructions on setting up the printer Checking the box contents 12 3 4 5 x Name 1 Black print cartridge 2 Color print cartridge 3 Telephone cord 4 Power supply cord 5 Telephone line adapter 6 Setup sheet 7 Installation software CD 8 User's Guide or Setup Solutions 8 6...regions. Printed booklet that serves as a guide. 13 Setting up printer hardware and software, and information on setup troubleshooting. Also includes the printer software Help. Note: Cartridge combinations vary depending on the product purchased. Attaches to be installed into the printer...
User's Guide for Windows
Page 14
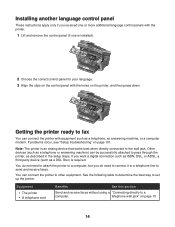
... such as a telephone, an answering machine, or a computer modem. See the following table to determine the best way to a computer. If problems occur, see "Setup troubleshooting" on page 15 14 You do need to attach the printer to send and receive faxes. telephone wall jack" on page 101. x 2 Choose the correct...
... such as a telephone, an answering machine, or a computer modem. See the following table to determine the best way to a computer. If problems occur, see "Setup troubleshooting" on page 15 14 You do need to attach the printer to send and receive faxes. telephone wall jack" on page 101. x 2 Choose the correct...
User's Guide for Windows
Page 33
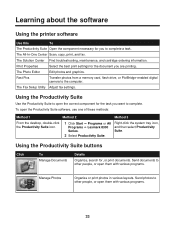
The Solution Center Find troubleshooting, maintenance, and cartridge ordering information. Right-click the system tray icon, and then select Productivity Suite. Learning about the software Using the printer software Use ..., use one of these methods: Method 1 Method 2 Method 3 From the desktop, double-click the Productivity Suite icon. 1 Click Start ΠPrograms or All Programs ΠLexmark 8300 Series. 2 Select Productivity Suite. The Fax Setup Utility Adjust fax settings. To open the correct component for , or print documents. Send documents to other...
The Solution Center Find troubleshooting, maintenance, and cartridge ordering information. Right-click the system tray icon, and then select Productivity Suite. Learning about the software Using the printer software Use ..., use one of these methods: Method 1 Method 2 Method 3 From the desktop, double-click the Productivity Suite icon. 1 Click Start ΠPrograms or All Programs ΠLexmark 8300 Series. 2 Select Productivity Suite. The Fax Setup Utility Adjust fax settings. To open the correct component for , or print documents. Send documents to other...
User's Guide for Windows
Page 34
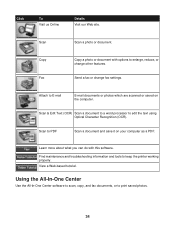
... a Web-based tutorial. Learn more about what you can do with options to print saved photos. 34 Scan Scan a photo or document. Find maintenance and troubleshooting information and tools to edit the text using Optical Character Recognition (OCR).
... a Web-based tutorial. Learn more about what you can do with options to print saved photos. 34 Scan Scan a photo or document. Find maintenance and troubleshooting information and tools to edit the text using Optical Character Recognition (OCR).

User's Guide for Windows
Page 35
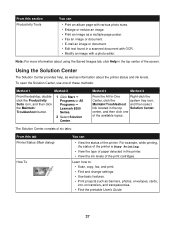
... to the Solution Center and the Fax Setup Utility. 1 Click Start Œ Programs or All Programs Œ Lexmark 8300 Series. 2 Select All-In-One Center. 3 Click Maintain/Troubleshoot. 4 Select from Productivity Tools, or to preview an image. Note: Click See More Scan Settings to select a...8226; Select a program to send a scanned image to. • Select what type of these topics: • Maintain or fix quality problems • Troubleshoot problems • Device status and ink levels • More printing ideas and how to's • Contact information • Advanced (Skin, voice, and ...
... to the Solution Center and the Fax Setup Utility. 1 Click Start Œ Programs or All Programs Œ Lexmark 8300 Series. 2 Select All-In-One Center. 3 Click Maintain/Troubleshoot. 4 Select from Productivity Tools, or to preview an image. Note: Click See More Scan Settings to select a...8226; Select a program to send a scanned image to. • Select what type of these topics: • Maintain or fix quality problems • Troubleshoot problems • Device status and ink levels • More printing ideas and how to's • Contact information • Advanced (Skin, voice, and ...
User's Guide for Windows
Page 37
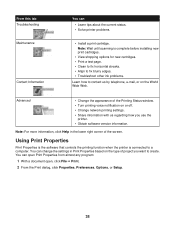
...of these methods: Method 1 Method 2 From the desktop, doubleclick the Productivity Suite icon, and then click the Maintain/ Troubleshoot button. 1 Click Start Œ Programs or All Programs Œ Lexmark 8300 Series. 2 Select Solution Center. From this tab Printer Status (Main dialog) How To You can • ... User's Guide. 37 Method 3 Method 4 From the All-In-One Right-click the Center, click the system tray icon, Maintain/Troubleshoot and then select link located in the top Solution Center. To open the Solution Center, use one of the print cartridges.
...of these methods: Method 1 Method 2 From the desktop, doubleclick the Productivity Suite icon, and then click the Maintain/ Troubleshoot button. 1 Click Start Œ Programs or All Programs Œ Lexmark 8300 Series. 2 Select Solution Center. From this tab Printer Status (Main dialog) How To You can • ... User's Guide. 37 Method 3 Method 4 From the All-In-One Right-click the Center, click the system tray icon, Maintain/Troubleshoot and then select link located in the top Solution Center. To open the Solution Center, use one of the print cartridges.
User's Guide for Windows
Page 38
... new cartridges. • Print a test page. • Clean to fix horizontal streaks. • Align to fix blurry edges. • Troubleshoot other ink problems. Learn how to contact us regarding how you want to a computer. Note: For more information, click Help in Print Properties ...Web. You can • Learn tips about the current status. • Solve printer problems. • Install a print cartridge. From this tab Troubleshooting Maintenance Contact Information You can open Print Properties from almost any program: 1 With a document open, click File Œ Print. 2 From the ...
... new cartridges. • Print a test page. • Clean to fix horizontal streaks. • Align to fix blurry edges. • Troubleshoot other ink problems. Learn how to contact us regarding how you want to a computer. Note: For more information, click Help in Print Properties ...Web. You can • Learn tips about the current status. • Solve printer problems. • Install a print cartridge. From this tab Troubleshooting Maintenance Contact Information You can open Print Properties from almost any program: 1 With a document open, click File Œ Print. 2 From the ...
User's Guide for Windows
Page 92
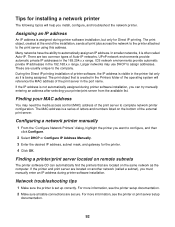
...address during printer software installation, but only for Direct IP printing. Finding your printer/print server from the available list. Network troubleshooting tips 1 Make sure the printer is a series of letters and numbers listed on the bottom of the external print server... correctly. Configuring a network printer manually 1 From the "Configure Network Printers" dialog, highlight the printer you install, configure, and troubleshoot the network printer. There are usually unique to automatically assign an IP address. ICS network environments provide automatic private IP addresses in ...
...address during printer software installation, but only for Direct IP printing. Finding your printer/print server from the available list. Network troubleshooting tips 1 Make sure the printer is a series of letters and numbers listed on the bottom of the external print server... correctly. Configuring a network printer manually 1 From the "Configure Network Printers" dialog, highlight the printer you install, configure, and troubleshoot the network printer. There are usually unique to automatically assign an IP address. ICS network environments provide automatic private IP addresses in ...

User's Guide for Windows
Page 93
3 Make sure the correct lights are using to install the printer is connected to the network. 6 See the print server documentation for additional troubleshooting. 93 For more information, see the print server documentation. 4 If the printer software CD cannot find the printer/print server, wait a few minutes, and then try running the CD again. Network traffic speeds vary. 5 Make sure the computer you are showing on the print server.
3 Make sure the correct lights are using to install the printer is connected to the network. 6 See the print server documentation for additional troubleshooting. 93 For more information, see the print server documentation. 4 If the printer software CD cannot find the printer/print server, wait a few minutes, and then try running the CD again. Network traffic speeds vary. 5 Make sure the computer you are showing on the print server.
User's Guide for Windows
Page 96
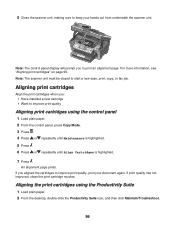
... print quality Aligning print cartridges using the Productivity Suite 1 Load plain paper. 2 From the desktop, double-click the Productivity Suite icon, and then click Maintain/Troubleshoot. 96 Aligning print cartridges Align the print cartridges when you: • Have installed a new cartridge • Want to improve print quality, print your hands out...
... print quality Aligning print cartridges using the Productivity Suite 1 Load plain paper. 2 From the desktop, double-click the Productivity Suite icon, and then click Maintain/Troubleshoot. 96 Aligning print cartridges Align the print cartridges when you: • Have installed a new cartridge • Want to improve print quality, print your hands out...

User's Guide for Windows
Page 97
... Cleaning the print cartridge nozzles using the Productivity Suite 1 Load plain paper. 2 From the desktop, double-click the Productivity Suite icon, and then click Maintain/Troubleshoot. 3 Click the Maintenance tab. 4 Click Clean to improve print quality, print your document again. If you aligned the cartridges to fix horizontal streaks. 5 Click Print...
... Cleaning the print cartridge nozzles using the Productivity Suite 1 Load plain paper. 2 From the desktop, double-click the Productivity Suite icon, and then click Maintain/Troubleshoot. 3 Click the Maintenance tab. 4 Click Clean to improve print quality, print your document again. If you aligned the cartridges to fix horizontal streaks. 5 Click Print...
User's Guide for Windows
Page 101
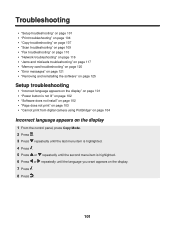
... page 101 • "Print troubleshooting" on page 104 • "Copy troubleshooting" on page 107 • "Scan troubleshooting" on page 109 • "Fax troubleshooting" on page 110 • "Network troubleshooting" on page 116 • "Jams and misfeeds troubleshooting" on page 117 • "Memory card troubleshooting" on page 120 • "Error messages" ...on page 121 • "Removing and reinstalling the software" on page 125 Setup troubleshooting • "Incorrect language appears on the display" on page 101 • "Power button is not lit" on page 102 ...
... page 101 • "Print troubleshooting" on page 104 • "Copy troubleshooting" on page 107 • "Scan troubleshooting" on page 109 • "Fax troubleshooting" on page 110 • "Network troubleshooting" on page 116 • "Jams and misfeeds troubleshooting" on page 117 • "Memory card troubleshooting" on page 120 • "Error messages" ...on page 121 • "Removing and reinstalling the software" on page 125 Setup troubleshooting • "Incorrect language appears on the display" on page 101 • "Power button is not lit" on page 102 ...
User's Guide for Windows
Page 104
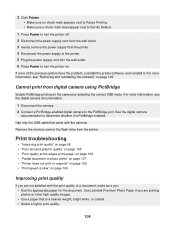
Cannot print from digital camera using PictBridge Enable PictBridge printing on page 125. Print troubleshooting • "Improving print quality" on page 98 • "Poor text and graphic quality" on page 105 • "Poor quality at the edges of the page" ... not print or respond" on page 106 • "Print speed is slow" on . Remove the memory card or the flash drive from the printer. Use Lexmark Premium Photo Paper if you are not satisfied with the camera. For more information, see "Removing and reinstalling the software" on the camera by selecting...
Cannot print from digital camera using PictBridge Enable PictBridge printing on page 125. Print troubleshooting • "Improving print quality" on page 98 • "Poor text and graphic quality" on page 105 • "Poor quality at the edges of the page" ... not print or respond" on page 106 • "Print speed is slow" on . Remove the memory card or the flash drive from the printer. Use Lexmark Premium Photo Paper if you are not satisfied with the camera. For more information, see "Removing and reinstalling the software" on the camera by selecting...
User's Guide for Windows
Page 107
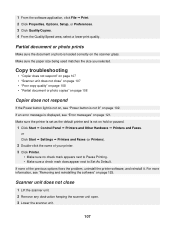
... software application, click File Œ Print. 2 Click Properties, Options, Setup, or Preferences. 3 Click Quality/Copies. 4 From the Quality/Speed area, select a lower print quality. Copy troubleshooting • "Copier does not respond" on page 107 • "Scanner unit does not close 1 Lift the scanner unit. 2 Remove any obstruction keeping the scanner unit...
... software application, click File Œ Print. 2 Click Properties, Options, Setup, or Preferences. 3 Click Quality/Copies. 4 From the Quality/Speed area, select a lower print quality. Copy troubleshooting • "Copier does not respond" on page 107 • "Scanner unit does not close 1 Lift the scanner unit. 2 Remove any obstruction keeping the scanner unit...
User's Guide for Windows
Page 109
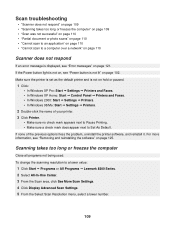
... change the scanning resolution to Set As Default. Make sure the printer is set as the default printer and is not on page 102. Scan troubleshooting • "Scanner does not respond" on page 109 • "Scanning takes too long or freezes the computer" on page 109 • "Scan was ...appears next to Pause Printing. • Make sure a check mark does appear next to a lower value: 1 Click Start Œ Programs or All Programs Œ Lexmark 8300 Series. 2 Select All-In-One Center. 3 From the Scan area, click See More Scan Settings. 4 Click Display Advanced Scan Settings. 5 From the Select ...
... change the scanning resolution to Set As Default. Make sure the printer is set as the default printer and is not on page 102. Scan troubleshooting • "Scanner does not respond" on page 109 • "Scanning takes too long or freezes the computer" on page 109 • "Scan was ...appears next to Pause Printing. • Make sure a check mark does appear next to a lower value: 1 Click Start Œ Programs or All Programs Œ Lexmark 8300 Series. 2 Select All-In-One Center. 3 From the Scan area, click See More Scan Settings. 4 Click Display Advanced Scan Settings. 5 From the Select ...


