
User's Guide for Windows
Page 2
...any electrical or cabling connections, such as the power cord or telephone, during a lightning storm. Edition: August 2005 The following paragraph does not apply to you. Lexmark may be made to make any accompanying documentation ...supply in the user documentation, to Lexmark International Ltd., Marketing and Services Department, Westhorpe House, Westhorpe, Marlow Bucks SL7 3RQ. Safety information • Use only the power supply and power cord provided with this product or the manufacturer's authorized replacement power supply and power cord. • Connect the power supply...
...any electrical or cabling connections, such as the power cord or telephone, during a lightning storm. Edition: August 2005 The following paragraph does not apply to you. Lexmark may be made to make any accompanying documentation ...supply in the user documentation, to Lexmark International Ltd., Marketing and Services Department, Westhorpe House, Westhorpe, Marlow Bucks SL7 3RQ. Safety information • Use only the power supply and power cord provided with this product or the manufacturer's authorized replacement power supply and power cord. • Connect the power supply...
User's Guide for Windows
Page 7
... 97 Wiping the print cartridge nozzles and contacts 98 Improving print quality...98 Preserving the print cartridges 99 Cleaning the scanner glass 99 Ordering supplies...100 Recycling Lexmark products 100 Troubleshooting 101 Setup troubleshooting...101 Incorrect language appears on the display 101 Power button is not lit...102 Software does not install...102 7
... 97 Wiping the print cartridge nozzles and contacts 98 Improving print quality...98 Preserving the print cartridges 99 Cleaning the scanner glass 99 Ordering supplies...100 Recycling Lexmark products 100 Troubleshooting 101 Setup troubleshooting...101 Incorrect language appears on the display 101 Power button is not lit...102 Software does not install...102 7
User's Guide for Windows
Page 13
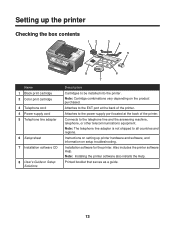
...software for the printer. Instructions on setting up the printer Checking the box contents 12 3 4 5 x Name 1 Black print cartridge 2 Color print cartridge 3 Telephone cord 4 Power supply cord 5 Telephone line adapter 6 Setup sheet 7 Installation software CD 8 User's Guide or Setup Solutions 8 6 7 Description Cartridges to ...be installed into the printer. Printed booklet that serves as a guide. 13 Attaches to the power supply port located at the back of the printer. Attaches to the EXT port at the back of the printer. Also includes the ...
...software for the printer. Instructions on setting up the printer Checking the box contents 12 3 4 5 x Name 1 Black print cartridge 2 Color print cartridge 3 Telephone cord 4 Power supply cord 5 Telephone line adapter 6 Setup sheet 7 Installation software CD 8 User's Guide or Setup Solutions 8 6 7 Description Cartridges to ...be installed into the printer. Printed booklet that serves as a guide. 13 Attaches to the power supply port located at the back of the printer. Attaches to the EXT port at the back of the printer. Also includes the ...
User's Guide for Windows
Page 22
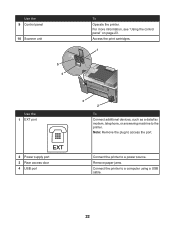
Use the 9 Control panel 10 Scanner unit LINE EXT 5 4 To Operate the printer. Connect the printer to access the port. For more information, see "Using the control panel" on page 23. Note: Remove the plug to a power source. Access the print cartridges. 1 LINE EXT Use the 1 EXT port EXT 2 Power supply port 3 Rear access door 4 USB port 3 2 To Connect additional devices, such as a data/fax modem, telephone, or answering machine to a computer using a USB cable. 22 Remove paper jams. Connect the printer to the printer.
Use the 9 Control panel 10 Scanner unit LINE EXT 5 4 To Operate the printer. Connect the printer to access the port. For more information, see "Using the control panel" on page 23. Note: Remove the plug to a power source. Access the print cartridges. 1 LINE EXT Use the 1 EXT port EXT 2 Power supply port 3 Rear access door 4 USB port 3 2 To Connect additional devices, such as a data/fax modem, telephone, or answering machine to a computer using a USB cable. 22 Remove paper jams. Connect the printer to the printer.
User's Guide for Windows
Page 102
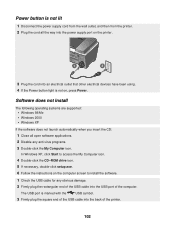
... Windows 2000 • Windows XP If the software does not launch automatically when you insert the CD: 1 Close all the way into the power supply port on the printer. 1 2 3 Plug the cord into an electrical outlet that other electrical devices have been using. 4 If the... Computer icon. 4 Double-click the CD-ROM drive icon. 5 If necessary, double-click setup.exe. 6 Follow the instructions on , press Power. Power button is not lit 1 Disconnect the power supply cord from the wall outlet, and then from the printer. 2 Plug the cord all open software applications. 2 Disable any obvious damage. 2...
... Windows 2000 • Windows XP If the software does not launch automatically when you insert the CD: 1 Close all the way into the power supply port on the printer. 1 2 3 Plug the cord into an electrical outlet that other electrical devices have been using. 4 If the... Computer icon. 4 Double-click the CD-ROM drive icon. 5 If necessary, double-click setup.exe. 6 Follow the instructions on , press Power. Power button is not lit 1 Disconnect the power supply cord from the wall outlet, and then from the printer. 2 Plug the cord all open software applications. 2 Disable any obvious damage. 2...
User's Guide for Windows
Page 104
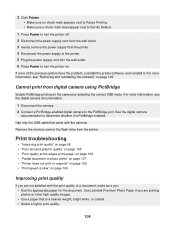
...Lexmark Premium Photo Paper if you : • Use the appropriate paper for the document. 3 Click Printer. • Make sure no check mark appears next to Pause Printing. • Make sure a check mark does appear next to Set As Default. 1 Press Power to turn the printer off. 2 Disconnect the power supply... cord from the wall outlet. 3 Gently remove the power supply from the printer. 4 Reconnect the power supply to the printer. 5 Plug the power supply cord into the wall outlet. 6 Press Power to turn the printer on...
...Lexmark Premium Photo Paper if you : • Use the appropriate paper for the document. 3 Click Printer. • Make sure no check mark appears next to Pause Printing. • Make sure a check mark does appear next to Set As Default. 1 Press Power to turn the printer off. 2 Disconnect the power supply... cord from the wall outlet. 3 Gently remove the power supply from the printer. 4 Reconnect the power supply to the printer. 5 Plug the power supply cord into the wall outlet. 6 Press Power to turn the printer on...
User's Guide for Windows
Page 111
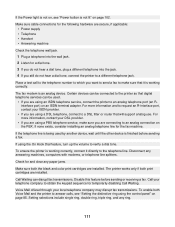
... Mail and the printer to verify a dial tone. If the telephone line is being used . • If you are secure, if applicable: • Power supply • Telephone • Handset • Answering machine Check the telephone wall jack. 1 Plug a telephone into the jack. 4 If you do not hear... device is finished before sending or receiving a fax. Check for the fax machine. The printer works only if both the black and color print cartridges are installed. Setting selections include single ring, double ring, triple ring, and any answering machines, computers with modems, or telephone...
... Mail and the printer to verify a dial tone. If the telephone line is being used . • If you are secure, if applicable: • Power supply • Telephone • Handset • Answering machine Check the telephone wall jack. 1 Plug a telephone into the jack. 4 If you do not hear... device is finished before sending or receiving a fax. Check for the fax machine. The printer works only if both the black and color print cartridges are installed. Setting selections include single ring, double ring, triple ring, and any answering machines, computers with modems, or telephone...
User's Guide for Windows
Page 121
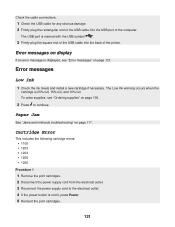
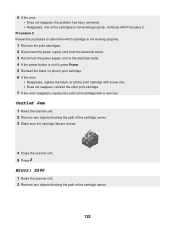
...the computer. Error messages on display If an error message is displayed, see "Ordering supplies" on page 100. 2 Press to the electrical outlet. 4 If the power button is not lit, press Power. 5 Reinsert the print cartridges. 121 The Low Ink warning occurs when the cartridge is...• 1203 • 1204 • 1205 • 1206 Procedure 1 1 Remove the print cartridges. 2 Disconnect the power supply cord from the electrical outlet. 3 Reconnect the power supply cord to continue. To order supplies, see "Error messages" on page 117. The USB port is 25% full, 15% full, and 10% full. ...
...the computer. Error messages on display If an error message is displayed, see "Ordering supplies" on page 100. 2 Press to the electrical outlet. 4 If the power button is not lit, press Power. 5 Reinsert the print cartridges. 121 The Low Ink warning occurs when the cartridge is...• 1203 • 1204 • 1205 • 1206 Procedure 1 1 Remove the print cartridges. 2 Disconnect the power supply cord from the electrical outlet. 3 Reconnect the power supply cord to continue. To order supplies, see "Error messages" on page 117. The USB port is 25% full, 15% full, and 10% full. ...
User's Guide for Windows
Page 122
...one of the cartridges is not working properly. 1 Remove the print cartridges. 2 Disconnect the power supply cord from the electrical outlet. 3 Reconnect the power supply cord to determine which cartridge is not lit, press Power. 5 Reinsert the black (or photo) print cartridge. 6 If the error: •... Reappears, replace the black (or photo) print cartridge with a new one. • Does not reappear, reinsert the color print cartridge....
...one of the cartridges is not working properly. 1 Remove the print cartridges. 2 Disconnect the power supply cord from the electrical outlet. 3 Reconnect the power supply cord to determine which cartridge is not lit, press Power. 5 Reinsert the black (or photo) print cartridge. 6 If the error: •... Reappears, replace the black (or photo) print cartridge with a new one. • Does not reappear, reinsert the color print cartridge....
User's Guide for Windows
Page 131
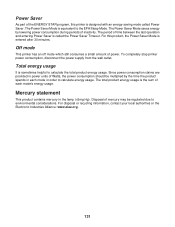
...spends in each mode's energy usage. Since power consumption claims are provided in the lamp ( To completely stop printer power consumption, disconnect the power supply from the wall outlet. Mercury statement This product contains mercury in power units of inactivity. For this printer is ...designed with an energy-saving mode called the Power Saver Timeout. Off mode This ...
...spends in each mode's energy usage. Since power consumption claims are provided in the lamp ( To completely stop printer power consumption, disconnect the power supply from the wall outlet. Mercury statement This product contains mercury in power units of inactivity. For this printer is ...designed with an energy-saving mode called the Power Saver Timeout. Off mode This ...
User's Guide for Windows
Page 134
..., loading on the scanner glass 48 no computer error 125 O OCR, editing document text 74 On Hook Dial feature 84 Online Tutorial button 34 ordering supplies 100 orientation, changing landscape 38 portrait 38 P page does not print 101 paper exit tray 21 paper jam error 121 paper out error 123 Paper... (ADF) 21 control panel 22 EXT port 22 LINE port 23 memory card slots 21 paper exit tray 21 paper tray 21 PictBridge port 21 power supply port 22 rear access door 22 scanner unit 22 top cover 21 USB port 22 peer-to-peer method 91 Photo Card Mode menu 29...
..., loading on the scanner glass 48 no computer error 125 O OCR, editing document text 74 On Hook Dial feature 84 Online Tutorial button 34 ordering supplies 100 orientation, changing landscape 38 portrait 38 P page does not print 101 paper exit tray 21 paper jam error 121 paper out error 123 Paper... (ADF) 21 control panel 22 EXT port 22 LINE port 23 memory card slots 21 paper exit tray 21 paper tray 21 PictBridge port 21 power supply port 22 rear access door 22 scanner unit 22 top cover 21 USB port 22 peer-to-peer method 91 Photo Card Mode menu 29...
User's Guide for Windows
Page 135
postcards loading 46 printing 50 power button is not lit 101 power supply port 22 premium paper, loading 44 Preview section 36 previewing photos 30 from the... access door 22 receiving a fax automatically 78 fax forwarding 85 manually 79 using an answering machine 79 recycling 100 Lexmark products 100 WEEE statement 128 reducing an image using the control panel 70 removing print cartridges 94 repeating an image ... troubleshooting 101 incorrect language appears on display 101 page does not print 101 power button is not lit 101 software does not install 101 shared printing peer-to-peer method 90 135
postcards loading 46 printing 50 power button is not lit 101 power supply port 22 premium paper, loading 44 Preview section 36 previewing photos 30 from the... access door 22 receiving a fax automatically 78 fax forwarding 85 manually 79 using an answering machine 79 recycling 100 Lexmark products 100 WEEE statement 128 reducing an image using the control panel 70 removing print cartridges 94 repeating an image ... troubleshooting 101 incorrect language appears on display 101 page does not print 101 power button is not lit 101 software does not install 101 shared printing peer-to-peer method 90 135
User's Guide for Windows
Page 136
... 37 Maintenance tab 38 opening 37 Printer Status 37 Troubleshooting tab 38 using 37 speed dial adding to list 80 setting up 80 using 81 supplies, ordering 100 T temporary files 124 text captions, adding 65 Tips button 34 top cover 21 transferring digital photos from memory cards 57 from flash drives... too long or freezes computer 109 scan was not successful 110 troubleshooting, setup 101 incorrect language appears on display 101 page does not print 101 power button is not lit 101 software does not install 101 Troubleshooting tab 38 U unwanted faxes, blocking 86 USB port 22 W Web site button 34 ...
... 37 Maintenance tab 38 opening 37 Printer Status 37 Troubleshooting tab 38 using 37 speed dial adding to list 80 setting up 80 using 81 supplies, ordering 100 T temporary files 124 text captions, adding 65 Tips button 34 top cover 21 transferring digital photos from memory cards 57 from flash drives... too long or freezes computer 109 scan was not successful 110 troubleshooting, setup 101 incorrect language appears on display 101 page does not print 101 power button is not lit 101 software does not install 101 Troubleshooting tab 38 U unwanted faxes, blocking 86 USB port 22 W Web site button 34 ...


