User's Guide
Page 6
... page...105 Copying multiple pages on one sheet (N-Up)...105 Canceling a copy job...106 Scanning 107 Scanning original documents...107 Scanning color or black-and-white original documents 109 Scanning photos for editing...109 Scanning to a computer over a network...110 Canceling scan jobs...110 Faxing 112 Sending a fax...112 Sending a fax using the printer control panel...
... page...105 Copying multiple pages on one sheet (N-Up)...105 Canceling a copy job...106 Scanning 107 Scanning original documents...107 Scanning color or black-and-white original documents 109 Scanning photos for editing...109 Scanning to a computer over a network...110 Canceling scan jobs...110 Faxing 112 Sending a fax...112 Sending a fax using the printer control panel...
User's Guide
Page 20
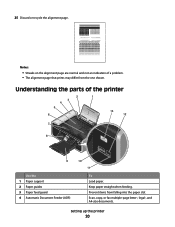
Keep paper straight when feeding. Scan, copy, or fax multiple-page letter-, legal-, and A4-size documents. Notes: • Streaks on the alignment page are normal and not an indication of ...
Keep paper straight when feeding. Scan, copy, or fax multiple-page letter-, legal-, and A4-size documents. Notes: • Streaks on the alignment page are normal and not an indication of ...
User's Guide
Page 21
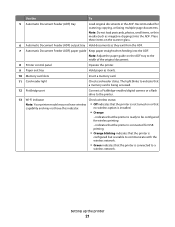
... the printer is configured but is unable to communicate with the wireless network. • Green indicates that the printer is connected to be configured for scanning, copying, or faxing multiple-page documents. Setting up the printer 21 Use the To 5 Automatic Document Feeder (ADF) tray Load original documents in the ADF...
... the printer is configured but is unable to communicate with the wireless network. • Green indicates that the printer is connected to be configured for scanning, copying, or faxing multiple-page documents. Setting up the printer 21 Use the To 5 Automatic Document Feeder (ADF) tray Load original documents in the ADF...
User's Guide
Page 22
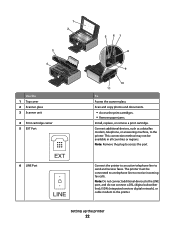
... 8 4 W I F I PRINTING Use the 1 Top cover 2 Scanner glass 3 Scanner unit 4 Print cartridge carrier 5 EXT Port 6 LINE Port EXT LINE 9 10 11 To Access the scanner glass. Scan and copy photos and documents. • Access the print cartridges. • Remove paper jams. Install, replace, or remove a print cartridge.
... 8 4 W I F I PRINTING Use the 1 Top cover 2 Scanner glass 3 Scanner unit 4 Print cartridge carrier 5 EXT Port 6 LINE Port EXT LINE 9 10 11 To Access the scanner glass. Scan and copy photos and documents. • Access the print cartridges. • Remove paper jams. Install, replace, or remove a print cartridge.
User's Guide
Page 23
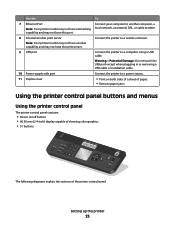
... printer control panel contains: • Power on/off button • 60.96 mm (2.4-inch) display capable of showing color graphics • 31 buttons ON COPY SCAN FAX PHOTO The following diagrams explain the sections of the printer control panel: Setting up the printer 23
... printer control panel contains: • Power on/off button • 60.96 mm (2.4-inch) display capable of showing color graphics • 31 buttons ON COPY SCAN FAX PHOTO The following diagrams explain the sections of the printer control panel: Setting up the printer 23

User's Guide
Page 24
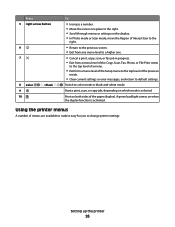
... the photo menu and print photos. 8 Access the fax menu and send faxes. Press the left or right arrow button to make. Note: The Copy, Scan, Fax, and Photo button lights are off when this button is turned off in the number to be dialed to wait for an outside line...
... the photo menu and print photos. 8 Access the fax menu and send faxes. Press the left or right arrow button to make. Note: The Copy, Scan, Fax, and Photo button lights are off when this button is turned off in the number to be dialed to wait for an outside line...

User's Guide
Page 25
... button 3 OK 4 down . Press and hold for 3 seconds to the left . • Scroll through a submenu listing within a menu. • In Photo mode or Scan mode, move the Region of Interest box to feed or eject paper from the printer. • Move downward through menus or settings on the display.... • In Photo mode or Scan mode, move the Region of Interest box down arrow button 4 5 6 7 To • Move upward through a submenu listing within a menu. • In...
... button 3 OK 4 down . Press and hold for 3 seconds to the left . • Scroll through a submenu listing within a menu. • In Photo mode or Scan mode, move the Region of Interest box to feed or eject paper from the printer. • Move downward through menus or settings on the display.... • In Photo mode or Scan mode, move the Region of Interest box down arrow button 4 5 6 7 To • Move upward through a submenu listing within a menu. • In...
User's Guide
Page 26
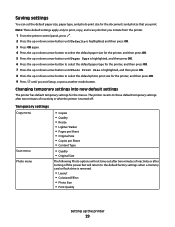
...; Increase a number. • Move the cursor one place to the right. • Scroll through menus or settings on the display. • In Photo mode or Scan mode, move the Region of Interest box to the right. • Return to the previous screen. • Exit from one menu level to a higher one... the top level of the paper (duplex). A green backlight comes on when the duplex function is selected. Print on which mode is activated. Start a print, scan, or copy job, depending on both sides of the previous mode. • Clear current settings or error messages, and return to default settings.
...; Increase a number. • Move the cursor one place to the right. • Scroll through menus or settings on the display. • In Photo mode or Scan mode, move the Region of Interest box to the right. • Return to the previous screen. • Exit from one menu level to a higher one... the top level of the paper (duplex). A green backlight comes on when the duplex function is selected. Print on which mode is activated. Start a print, scan, or copy job, depending on both sides of the previous mode. • Clear current settings or error messages, and return to default settings.

User's Guide
Page 27
... on Network Photo Proof Sheet • Print Sheet with Recent 20 Photos • Print Sheet with All Photos • Print Sheet with Date Range • Scan Proof Sheet Print Photos • Print All • Print Date Range • Print Photo Range • Print Camera Selections (DPOF) Save Photos • Computer •... - Menus List Copy menu Copies Quality Resize Lighter/Darker Collate Photo Reprint 2-Sided Copies Pages per Sheet Original Size Copies per Sheet Content Type Preview Scan menu Scan to Print -
... on Network Photo Proof Sheet • Print Sheet with Recent 20 Photos • Print Sheet with All Photos • Print Sheet with Date Range • Scan Proof Sheet Print Photos • Print All • Print Date Range • Print Photo Range • Print Camera Selections (DPOF) Save Photos • Computer •... - Menus List Copy menu Copies Quality Resize Lighter/Darker Collate Photo Reprint 2-Sided Copies Pages per Sheet Original Size Copies per Sheet Content Type Preview Scan menu Scan to Print -
User's Guide
Page 29
The printer reverts to these default temporary settings after two minutes of inactivity or after the printer is turned off: Temporary settings Copy menu Scan menu Photo menu • Copies • Quality • Resize • Lighter/Darker • Pages per Sheet • Original Size • Copies per ... paper type, and photo print size for the documents and photos that you print. Note: These default settings apply only to print, copy, and scan jobs that you initiate from the printer. 1 From the printer control panel, press . 2 Press the up or down arrow button until Defaults is ...
The printer reverts to these default temporary settings after two minutes of inactivity or after the printer is turned off: Temporary settings Copy menu Scan menu Photo menu • Copies • Quality • Resize • Lighter/Darker • Pages per Sheet • Original Size • Copies per ... paper type, and photo print size for the documents and photos that you print. Note: These default settings apply only to print, copy, and scan jobs that you initiate from the printer. 1 From the printer control panel, press . 2 Press the up or down arrow button until Defaults is ...

User's Guide
Page 44
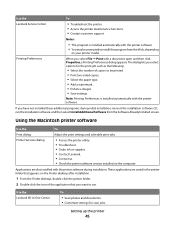
...Ringing and Answering, and print fax history and status reports. Access your own photos. • Adjust settings for Office Lexmark Fax Solutions Abbyy Sprint OCR Lexmark Wireless Setup Utility To • Scan, copy, fax, e-mail, or print a photo or document. • Manage and edit photos. • Transfer... photos. • Scan documents to set the Speed Dial and Group Dial numbers, set up the printer using the ...
...Ringing and Answering, and print fax history and status reports. Access your own photos. • Adjust settings for Office Lexmark Fax Solutions Abbyy Sprint OCR Lexmark Wireless Setup Utility To • Scan, copy, fax, e-mail, or print a photo or document. • Manage and edit photos. • Transfer... photos. • Scan documents to set the Speed Dial and Group Dial numbers, set up the printer using the ...
User's Guide
Page 45
... Install Additional Software from the Web, depending on your printer model. Setting up the printer 45 When you select options for scan jobs. Use the Lexmark All-In-One Center To • Scan photos and documents. • Customize settings for the print job such as the following: • Select the number of the...
... Install Additional Software from the Web, depending on your printer model. Setting up the printer 45 When you select options for scan jobs. Use the Lexmark All-In-One Center To • Scan photos and documents. • Customize settings for the print job such as the following: • Select the number of the...

User's Guide
Page 76
... on. 2 Open the top cover. WI F I PRINTING 3 Place the original document facedown on the scanner glass You can scan and then print photos, text documents, magazine articles, newspapers, and other publications. You can scan a document for use in the upper left corner. Loading original documents on the scanner glass in catalogs, brochures...
... on. 2 Open the top cover. WI F I PRINTING 3 Place the original document facedown on the scanner glass You can scan and then print photos, text documents, magazine articles, newspapers, and other publications. You can scan a document for use in the upper left corner. Loading original documents on the scanner glass in catalogs, brochures...

User's Guide
Page 77
... F I PRINTING Loading original documents into the Automatic Document Feeder You can load A4-, letter-, or legal-size paper into the Automatic Document Feeder (ADF) for scanning, copying, and faxing. Loading paper 77 Place these items on the scanner glass. 1 Adjust the paper guide on the... scanned image. Notes: • Use only new, unwrinkled paper that is not curled. • Do not load postcards, photos, small items, transparencies, photo paper, or thin ...
... F I PRINTING Loading original documents into the Automatic Document Feeder You can load A4-, letter-, or legal-size paper into the Automatic Document Feeder (ADF) for scanning, copying, and faxing. Loading paper 77 Place these items on the scanner glass. 1 Adjust the paper guide on the... scanned image. Notes: • Use only new, unwrinkled paper that is not curled. • Do not load postcards, photos, small items, transparencies, photo paper, or thin ...
User's Guide
Page 99
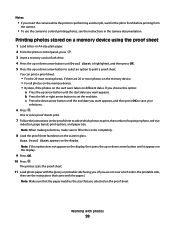
... . You can print a proof sheet: • For the 20 most recent photos, if there are not sure which photos to print a proof sheet. The printer scans the proof sheet. 11 Load photo paper with the glossy or printable side facing you. (If you are 20 or more proof sheets print. 7 Follow... the instructions on different dates. Scan Proof Sheet appears on a memory device using the proof sheet 1 Load letter- If you choose this option does not appear on the display, then press...
... . You can print a proof sheet: • For the 20 most recent photos, if there are not sure which photos to print a proof sheet. The printer scans the proof sheet. 11 Load photo paper with the glossy or printable side facing you. (If you are 20 or more proof sheets print. 7 Follow... the instructions on different dates. Scan Proof Sheet appears on a memory device using the proof sheet 1 Load letter- If you choose this option does not appear on the display, then press...
User's Guide
Page 101
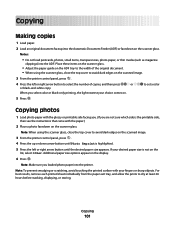
...a color or black-and-white copy. Copying photos 1 Load photo paper with your fingers or sharp objects. Additional paper size options appear on the scanned image. 3 From the printer control panel, press . 4 Press the left or right arrow button until Photo Reprint is not on the scanner glass...Note: When using the scanner glass, close the top cover to avoid dark edges on . 5 Press . Copying 101 If your choice comes on the scanned image. 3 From the printer control panel, press . 4 Press the up or down arrow button until the desired paper size appears. Copying Making copies ...
...a color or black-and-white copy. Copying photos 1 Load photo paper with your fingers or sharp objects. Additional paper size options appear on the scanned image. 3 From the printer control panel, press . 4 Press the left or right arrow button until Photo Reprint is not on the scanner glass...Note: When using the scanner glass, close the top cover to avoid dark edges on . 5 Press . Copying 101 If your choice comes on the scanned image. 3 From the printer control panel, press . 4 Press the up or down arrow button until the desired paper size appears. Copying Making copies ...

User's Guide
Page 102
... ADF tray to the width of the original document. • When using the scanner glass, close the top cover to avoid dark edges on the scanned image. 3 From the printer control panel, press . 4 Press the up or down arrow button until 1 to 2 appears. b Press . Copying 102 It picks the paper after... ADF tray to the width of the original document. • When using the scanner glass, close the top cover to avoid dark edges on the scanned image. 3 From the printer control panel, press . 4 Press the up or down arrow button until 2-Sided Copies is highlighted. 5 Press the left or right ...
... ADF tray to the width of the original document. • When using the scanner glass, close the top cover to avoid dark edges on the scanned image. 3 From the printer control panel, press . 4 Press the up or down arrow button until 1 to 2 appears. b Press . Copying 102 It picks the paper after... ADF tray to the width of the original document. • When using the scanner glass, close the top cover to avoid dark edges on the scanned image. 3 From the printer control panel, press . 4 Press the up or down arrow button until 2-Sided Copies is highlighted. 5 Press the left or right ...
User's Guide
Page 103
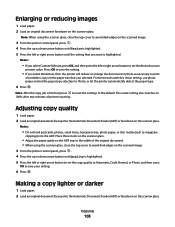
... to 100% after two minutes of the original document. • When using the scanner glass, close the top cover to avoid dark edges on the scanned image. 3 From the printer control panel, press . 4 Press the up or down arrow button until the setting that you selected. Notes: • Do not load... or right arrow button to set the copy quality to Automatic, Draft, Normal, or Photo, and then press OK to avoid dark edges on the scanned image. 3 From the printer control panel, press . 4 Press the up or down arrow button until Resize is highlighted. 5 Press the left or right arrow button...
... to 100% after two minutes of the original document. • When using the scanner glass, close the top cover to avoid dark edges on the scanned image. 3 From the printer control panel, press . 4 Press the up or down arrow button until the setting that you selected. Notes: • Do not load... or right arrow button to set the copy quality to Automatic, Draft, Normal, or Photo, and then press OK to avoid dark edges on the scanned image. 3 From the printer control panel, press . 4 Press the up or down arrow button until Resize is highlighted. 5 Press the left or right arrow button...

User's Guide
Page 104
... Notes: • Do not load postcards, photos, small items, transparencies, photo paper, or thin media (such as groups of the original document facedown on the scanned image. 3 From the printer control panel, press . 4 Press the left or right arrow button to select the number of copies, and then press OK. 5...using the scanner glass, close the top cover to save the image of the page to the printer memory. 8 When prompted if you want to scan another page, press the left arrow button makes the copy lighter, and pressing the right arrow button makes the copy darker. 6 Press . Place ...
... Notes: • Do not load postcards, photos, small items, transparencies, photo paper, or thin media (such as groups of the original document facedown on the scanned image. 3 From the printer control panel, press . 4 Press the left or right arrow button to select the number of copies, and then press OK. 5...using the scanner glass, close the top cover to save the image of the page to the printer memory. 8 When prompted if you want to scan another page, press the left arrow button makes the copy lighter, and pressing the right arrow button makes the copy darker. 6 Press . Place ...
User's Guide
Page 105
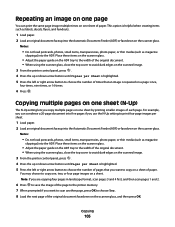
... ADF tray to the width of the original document. • When using the scanner glass, close the top cover to avoid dark edges on the scanned image. 3 From the printer control panel, press . 4 Press the up or down arrow button until Copies per Sheet is highlighted. 5 Press the left or ... ADF tray to the width of the original document. • When using the scanner glass, close the top cover to avoid dark edges on the scanned image. 3 From the printer control panel, press . 4 Press the up or down arrow button until Pages per sheet. 1 Load paper. 2 Load an original document faceup...
... ADF tray to the width of the original document. • When using the scanner glass, close the top cover to avoid dark edges on the scanned image. 3 From the printer control panel, press . 4 Press the up or down arrow button until Copies per Sheet is highlighted. 5 Press the left or ... ADF tray to the width of the original document. • When using the scanner glass, close the top cover to avoid dark edges on the scanned image. 3 From the printer control panel, press . 4 Press the up or down arrow button until Pages per sheet. 1 Load paper. 2 Load an original document faceup...


