X4500, X7500 MFP Options User's Guide
Page 13
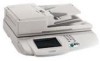
Copying How do I copy to the multipurpose feeder? 1 Load your printer Setup Guide for the location.) 3 From the home screen, touch the Copy icon. 4 Touch Copy to: and then touch MP Feeder. For example: Legal (8 1/2" x 14") 6 Touch ...the type of paper you want your copies to be printed on into the multipurpose feeder (refer to your original document in the MFP. 2 Load the type of print media you are copying to the multipurpose feeder? 8 For example: Colored Paper 7 Touch Done. 8 Press Start. MP Feeder 5 Touch the...
Copying How do I copy to the multipurpose feeder? 1 Load your printer Setup Guide for the location.) 3 From the home screen, touch the Copy icon. 4 Touch Copy to: and then touch MP Feeder. For example: Legal (8 1/2" x 14") 6 Touch ...the type of paper you want your copies to be printed on into the multipurpose feeder (refer to your original document in the MFP. 2 Load the type of print media you are copying to the multipurpose feeder? 8 For example: Colored Paper 7 Touch Done. 8 Press Start. MP Feeder 5 Touch the...

X4500, X7500 MFP Options User's Guide
Page 31
... a multi-number shortcut? 1 From your browser window). How do not have an ID and password, get one from your browser window). 3 Click Fax Destinations Setup and enter a unique name for the shortcut. 4 Enter the fax numbers for the shortcut and specify the fax number. 5 Assign a shortcut number. If you...your original document. 8 From the numeric keypad, press # and then enter your shortcut number. 9 Touch Fax It or press Start to the MFP and load your job. Instead of entering the entire phone number of your Web browser. How do I create shortcuts? If you separate each time...
... a multi-number shortcut? 1 From your browser window). How do not have an ID and password, get one from your browser window). 3 Click Fax Destinations Setup and enter a unique name for the shortcut. 4 Enter the fax numbers for the shortcut and specify the fax number. 5 Assign a shortcut number. If you...your original document. 8 From the numeric keypad, press # and then enter your shortcut number. 9 Touch Fax It or press Start to the MFP and load your job. Instead of entering the entire phone number of your Web browser. How do I create shortcuts? If you separate each time...

X4500, X7500 MFP Options User's Guide
Page 49
How do I create a FTP shortcut? 1 From your computer, enter the IP address of the MFP you do not have an ID and password, get one from your administrator. 3 Click E-mail Destination Setup. 4 Enter a unique name for the recipient and specify the FTP address. 5 Choose your scan settings (Format, Content,...) of your Web browser. 2 Click Configuration (in the left frame) and then click Manage Destinations (in the right frame). 3 Click FTP Destination Setup. 4 Enter a unique name for the recipient and specify the e-mail address. If you enter a number that is already in the right frame). ...
How do I create a FTP shortcut? 1 From your computer, enter the IP address of the MFP you do not have an ID and password, get one from your administrator. 3 Click E-mail Destination Setup. 4 Enter a unique name for the recipient and specify the FTP address. 5 Choose your scan settings (Format, Content,...) of your Web browser. 2 Click Configuration (in the left frame) and then click Manage Destinations (in the right frame). 3 Click FTP Destination Setup. 4 Enter a unique name for the recipient and specify the e-mail address. If you enter a number that is already in the right frame). ...
X4500, X7500 MFP Options User's Guide
Page 51
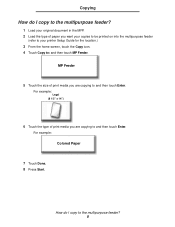
... 11 Return to your original document. 8 Touch Profiles. The ScanBack utility is installed on your computer. 1 From your computer, launch the ScanBack utility. 2 Select the MFP you set up from your original document and the type of the profile you want . 4 Select a location to store the scan. 5 Assign a Profile Name. This... load your computer. Your scan file is the name that you want to use and then click Setup.... 3 Follow the instructions on the MFP CD. Note: The Profiles icon will display in the box with your profile by scrolling through the list of names. 10 Touch the name of...
... 11 Return to your original document. 8 Touch Profiles. The ScanBack utility is installed on your computer. 1 From your computer, launch the ScanBack utility. 2 Select the MFP you set up from your original document and the type of the profile you want . 4 Select a location to store the scan. 5 Assign a Profile Name. This... load your computer. Your scan file is the name that you want to use and then click Setup.... 3 Follow the instructions on the MFP CD. Note: The Profiles icon will display in the box with your profile by scrolling through the list of names. 10 Touch the name of...
Setup Guide
Page 6
... 14 Turning on the control unit and printer 15 Step 9: Configure your MFP 16 Setting the IP address 16 Configuring Scan to E-mail 16 Configuring Fax Setup 17 Registering with a Windows NT domain server 18 Step 10: Verify setup 19 Making a test copy 19 Sending a test fax 19 Sending a ...test e-mail 20 Sending a network print job to the MFP 20 Troubleshooting 21 If you need more help 21 Maintaining your MFP 22 Cleaning the touch screen 22 Cleaning the scanner bed 22 Cleaning the scanner rollers 22 Cleaning the scanner pick pads 24 Lexmark Document Distributor 25 vi
... 14 Turning on the control unit and printer 15 Step 9: Configure your MFP 16 Setting the IP address 16 Configuring Scan to E-mail 16 Configuring Fax Setup 17 Registering with a Windows NT domain server 18 Step 10: Verify setup 19 Making a test copy 19 Sending a test fax 19 Sending a ...test e-mail 20 Sending a network print job to the MFP 20 Troubleshooting 21 If you need more help 21 Maintaining your MFP 22 Cleaning the touch screen 22 Cleaning the scanner bed 22 Cleaning the scanner rollers 22 Cleaning the scanner pick pads 24 Lexmark Document Distributor 25 vi
Setup Guide
Page 10
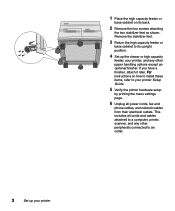
... upright position. 4 Set up the drawer or high capacity feeder, your printer, and any other peripherals connected to an outlet. 2 Set up your printer Setup Guide. 5 Verify the printer hardware setup by printing the menu settings page. 6 Unplug all cords and cables attached to a computer, printer, scanner, and any other paper handling...
... upright position. 4 Set up the drawer or high capacity feeder, your printer, and any other peripherals connected to an outlet. 2 Set up your printer Setup Guide. 5 Verify the printer hardware setup by printing the menu settings page. 6 Unplug all cords and cables attached to a computer, printer, scanner, and any other paper handling...

Setup Guide
Page 14
... bracket d Telephone fax line cable (RJ-11) e Ethernet cable (RJ-45) (with toroid) f Operator panel housing g Power switch cover h Operator panel cover i Folder with Setup Guide, MFP CD, and a set of Quick References (in different languages) j Power supply line cord k Two nuts and bolts The box may also contain an adapter for...
... bracket d Telephone fax line cable (RJ-11) e Ethernet cable (RJ-45) (with toroid) f Operator panel housing g Power switch cover h Operator panel cover i Folder with Setup Guide, MFP CD, and a set of Quick References (in different languages) j Power supply line cord k Two nuts and bolts The box may also contain an adapter for...

Setup Guide
Page 17
1 Back the printer up to the stand and slide it now. Attaching the optional finisher If you purchased an optional finisher, attach it in between the two stand legs. 2 Align the mounting posts on the stand base with the first hole on both sides of the printer. 3 Secure the stand to the printer with two long screws. Attach the stand to the printer Setup Guide for instructions. Refer to the printer 9
1 Back the printer up to the stand and slide it now. Attaching the optional finisher If you purchased an optional finisher, attach it in between the two stand legs. 2 Align the mounting posts on the stand base with the first hole on both sides of the printer. 3 Secure the stand to the printer with two long screws. Attach the stand to the printer Setup Guide for instructions. Refer to the printer 9
Setup Guide
Page 21
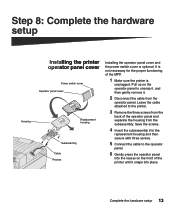
...housing and then secure with three screws. 5 Connect the cable to the printer. 3 Remove the three screws from the back of the MFP. 1 Make sure the printer is unplugged. Leave the cable attached to the operator panel. 6 Gently press the operator panel into place. Complete... the hardware setup 13 Housing Installing the printer operator panel cover Power switch cover Operator panel cover Replacement housing Subassembly Cable Recess Installing the operator panel...
...housing and then secure with three screws. 5 Connect the cable to the printer. 3 Remove the three screws from the back of the MFP. 1 Make sure the printer is unplugged. Leave the cable attached to the operator panel. 6 Gently press the operator panel into place. Complete... the hardware setup 13 Housing Installing the printer operator panel cover Power switch cover Operator panel cover Replacement housing Subassembly Cable Recess Installing the operator panel...

Setup Guide
Page 22
Attaching the Quick Reference 1 Peel the backing off of the adhesive strip on the back of the Quick Reference. 2 Press the Quick Reference into the slots on the bottom of the cover into place above the touch screen as shown. 14 Complete the hardware setup 7 Attach the operator panel cover: a Slide the locking tabs on the operator panel housing. b Push the cover down until the top two tabs snap into place.
Attaching the Quick Reference 1 Peel the backing off of the adhesive strip on the back of the Quick Reference. 2 Press the Quick Reference into the slots on the bottom of the cover into place above the touch screen as shown. 14 Complete the hardware setup 7 Attach the operator panel cover: a Slide the locking tabs on the operator panel housing. b Push the cover down until the top two tabs snap into place.

Setup Guide
Page 23
Complete the hardware setup 15 After the MFP completes its tests, the Home screen is displayed on the touch screen. During this period, the message Please wait while the device initializes appears on ... of the cover into the slots on the operator panel, b Push the cover down until the top two tabs snap into place. 4 Turn on . The MFP requires time to warm up after you turn it on the control unit.
Complete the hardware setup 15 After the MFP completes its tests, the Home screen is displayed on the touch screen. During this period, the message Please wait while the device initializes appears on ... of the cover into the slots on the operator panel, b Push the cover down until the top two tabs snap into place. 4 Turn on . The MFP requires time to warm up after you turn it on the control unit.

Setup Guide
Page 24
...address You must have DHCP: 1 From the Home screen, touch the Key icon, and then touch System Configuration. 2 Under the Printer/Print Server heading, touch Setup and Configuration. 3 Under the Print Server heading, touch TCP/IP. 4 Address, Netmask, and Gateway are as print, copy, fax, or e-mail. Type... the IP address in your network. To check your MFP 1 Type the MFP IP address in the URL field of the browser (for the configuration page to refresh, then verify the parameters are required fields, and should...
...address You must have DHCP: 1 From the Home screen, touch the Key icon, and then touch System Configuration. 2 Under the Printer/Print Server heading, touch Setup and Configuration. 3 Under the Print Server heading, touch TCP/IP. 4 Address, Netmask, and Gateway are as print, copy, fax, or e-mail. Type... the IP address in your network. To check your MFP 1 Type the MFP IP address in the URL field of the browser (for the configuration page to refresh, then verify the parameters are required fields, and should...

Setup Guide
Page 25
...current date and time are not correct, click Set Date and Time. Configuring Fax Setup The Telephone Consumer Protection Act of 1991 requires all outgoing faxes to set the required fax information: 1 Type the MFP IP address in your browser URL field (for example, http://192.168.236.24),... contain specific information in a margin at the top or bottom of each transmitted page, or on the first page of your MFP 17 2 Click Configuration. 3 Click Scan to the Fax Setup configuration page and switch modes. Specify a default e-mail address for the Fax Server mode, return to E-mail General...
...current date and time are not correct, click Set Date and Time. Configuring Fax Setup The Telephone Consumer Protection Act of 1991 requires all outgoing faxes to set the required fax information: 1 Type the MFP IP address in your browser URL field (for example, http://192.168.236.24),... contain specific information in a margin at the top or bottom of each transmitted page, or on the first page of your MFP 17 2 Click Configuration. 3 Click Scan to the Fax Setup configuration page and switch modes. Specify a default e-mail address for the Fax Server mode, return to E-mail General...

Setup Guide
Page 27
... your document face up in the ADF and press Start. Making a test copy Make a one -page test fax to send the fax. 5 Touch Done. Verify setup 19
... your document face up in the ADF and press Start. Making a test copy Make a one -page test fax to send the fax. 5 Touch Done. Verify setup 19

Setup Guide
Page 28
Sending a network print job to the MFP Use a computer application to send a network print job to your document face down on the scanner bed. 4 Touch Send It or press Start to a known e-mail address: 1 From the Home screen, touch the E-mail icon. 2 In the E-mail destination screen, enter an e-mail address using the virtual keypad. 3 Place your MFP. 20 Verify setup Sending a test e-mail Send a one-page test e-mail to scan and send the document. 5 Touch Done.
Sending a network print job to the MFP Use a computer application to send a network print job to your document face down on the scanner bed. 4 Touch Send It or press Start to a known e-mail address: 1 From the Home screen, touch the E-mail icon. 2 In the E-mail destination screen, enter an e-mail address using the virtual keypad. 3 Place your MFP. 20 Verify setup Sending a test e-mail Send a one-page test e-mail to scan and send the document. 5 Touch Done.

Setup Guide
Page 29
... the Ethernet cables are properly connected. My network print job doesn't print. For more information). • Print a network setup page: - Solution • Verify that came with your MFP" on page 11. • Turn off and then back on the Home screen. For more help " for more information..., see "If you need more help Contact Lexmark. Touch Network Setup Page. • Verify the IP address and settings. ...
... the Ethernet cables are properly connected. My network print job doesn't print. For more information). • Print a network setup page: - Solution • Verify that came with your MFP" on page 11. • Turn off and then back on the Home screen. For more help " for more information..., see "If you need more help Contact Lexmark. Touch Network Setup Page. • Verify the IP address and settings. ...
Setup Guide
Page 34
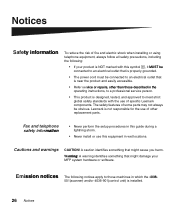
Fax and telephone safety information • Never perform the setup procedures in this guide during a lightning storm. • Never install or use this symbol , it MUST be connected to an electrical outlet that is ... • Refer service or repairs, other replacement parts. Emission notices The following : • If your MFP system hardware or software. A caution identifies something that might damage your product is NOT marked with the use of specific Lexmark components. Warning: A warning identifies something that might cause you harm. Safety information To reduce the...
Fax and telephone safety information • Never perform the setup procedures in this guide during a lightning storm. • Never install or use this symbol , it MUST be connected to an electrical outlet that is ... • Refer service or repairs, other replacement parts. Emission notices The following : • If your MFP system hardware or software. A caution identifies something that might damage your product is NOT marked with the use of specific Lexmark components. Warning: A warning identifies something that might cause you harm. Safety information To reduce the...


