
User's Guide
Page 10
... make it the active application. The correct menu bar does not appear if the application is the active application. Note: Your printer may not have support for using the printer software on a Macintosh operating system. The Help installs automatically with the programs. 1 Do one of the following: • In Windows Vista...
... make it the active application. The correct menu bar does not appear if the application is the active application. Note: Your printer may not have support for using the printer software on a Macintosh operating system. The Help installs automatically with the programs. 1 Do one of the following: • In Windows Vista...
User's Guide
Page 11
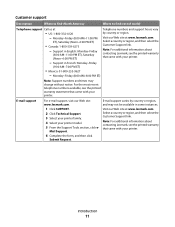
...-6:00 PM ET) Telephone numbers and support hours vary by country or region, and may change without notice. E-mail support For e-mail support, visit our Web site: www.lexmark.com. 1 Click SUPPORT. 2 Click Technical Support. 3 Select your printer family. 4 Select your printer. E-mail support varies by country or region. Introduction 11 Support in some instances. Select a country or...
...-6:00 PM ET) Telephone numbers and support hours vary by country or region, and may change without notice. E-mail support For e-mail support, visit our Web site: www.lexmark.com. 1 Click SUPPORT. 2 Click Technical Support. 3 Select your printer family. 4 Select your printer. E-mail support varies by country or region. Introduction 11 Support in some instances. Select a country or...
User's Guide
Page 12
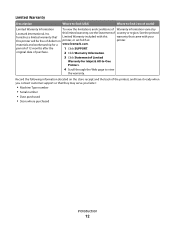
... find (USA) Where to find (rest of world) Limited Warranty Information To view the limitations and conditions of Limited Warranty for a www.lexmark.com. this printer will be free of country or region. original date of purchase. 2 Click Warranty Information. 3 Click Statement of Warranty information ... the following information (located on the store receipt and the back of 12 months after the 1 Click SUPPORT. period of the printer), and have it ready when you contact customer support so that came with this warranty that they may serve you faster: • Machine Type number •...
... find (USA) Where to find (rest of world) Limited Warranty Information To view the limitations and conditions of Limited Warranty for a www.lexmark.com. this printer will be free of country or region. original date of purchase. 2 Click Warranty Information. 3 Click Statement of Warranty information ... the following information (located on the store receipt and the back of 12 months after the 1 Click SUPPORT. period of the printer), and have it ready when you contact customer support so that came with this warranty that they may serve you faster: • Machine Type number •...
User's Guide
Page 15
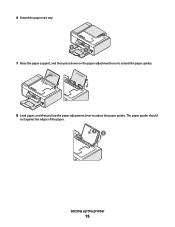
6 Extend the paper exit tray. 2 1 7 Raise the paper support, and then press down on the paper adjustment lever to extend the paper guides. 8 Load paper, and then pull up the printer 15 The paper guides should rest against the edges of the paper. 12 Setting up the paper adjustment lever to adjust the paper guides.
6 Extend the paper exit tray. 2 1 7 Raise the paper support, and then press down on the paper adjustment lever to extend the paper guides. 8 Load paper, and then pull up the printer 15 The paper guides should rest against the edges of the paper. 12 Setting up the paper adjustment lever to adjust the paper guides.
User's Guide
Page 20
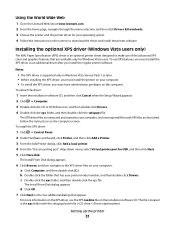
... alignment page. Keep paper straight when feeding. Understanding the parts of the printer 2 4 3 5 6 1 7 8 9 10 W I F I PRINTING WI F I PRINTING 15 14 Use the 1 Paper adjustment lever 2 Paper support 3 Paper guides 4 Paper feed guard 5 Automatic Document Feeder (ADF) 11 13 12 To Adjust the paper guides. Scan, copy, or fax multiple-page letter-, legal...
... alignment page. Keep paper straight when feeding. Understanding the parts of the printer 2 4 3 5 6 1 7 8 9 10 W I F I PRINTING WI F I PRINTING 15 14 Use the 1 Paper adjustment lever 2 Paper support 3 Paper guides 4 Paper feed guard 5 Automatic Document Feeder (ADF) 11 13 12 To Adjust the paper guides. Scan, copy, or fax multiple-page letter-, legal...
User's Guide
Page 31
...of the advanced XPS color and graphics features that has your computer: a Click Computer, and then double-click (C:). Notes: • The XPS driver is supported only in the xps folder with the setupxps batch file (:\Drivers\xps\readme). d Click OK. 7 Click Next on the computer screen. b Double-click the... software CD. c Double-click the xps folder, and then double-click the xps file. Using the World Wide Web 1 Go to the Lexmark Web site at www.lexmark.com. 2 From the home page, navigate through the menu selection, and then click Drivers & Downloads. 3 Choose the printer and the printer...
...of the advanced XPS color and graphics features that has your computer: a Click Computer, and then double-click (C:). Notes: • The XPS driver is supported only in the xps folder with the setupxps batch file (:\Drivers\xps\readme). d Click OK. 7 Click Next on the computer screen. b Double-click the... software CD. c Double-click the xps folder, and then double-click the xps file. Using the World Wide Web 1 Go to the Lexmark Web site at www.lexmark.com. 2 From the home page, navigate through the menu selection, and then click Drivers & Downloads. 3 Choose the printer and the printer...
User's Guide
Page 33
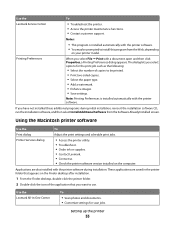
... saved in the printer folder that appears on the computer. Setting up the printer 33 Use the Lexmark Service Center To • Troubleshoot the printer. • Access the printer maintenance functions. • Contact customer support. Using the Macintosh printer software Use the Print dialog Printer Services dialog To Adjust the print settings...
... saved in the printer folder that appears on the computer. Setting up the printer 33 Use the Lexmark Service Center To • Troubleshoot the printer. • Access the printer maintenance functions. • Contact customer support. Using the Macintosh printer software Use the Print dialog Printer Services dialog To Adjust the print settings...
User's Guide
Page 34
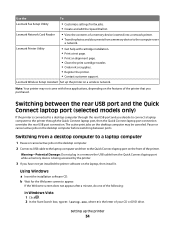
...laptop, then install it. Switching between ports. Note: Your printer may be canceled. Pause or cancel active jobs on a wireless network. Lexmark Printer Utility • Get help with these applications, depending on the desktop computer may not come with cartridge installation. • Print a... an alignment page. • Clean the print cartridge nozzles. • Order ink or supplies. • Register the printer. • Contact customer support. If the Welcome screen does not appear after a minute, do one of the following: In Windows Vista 1 Click . 2 In the Start Search...
...laptop, then install it. Switching between ports. Note: Your printer may be canceled. Pause or cancel active jobs on a wireless network. Lexmark Printer Utility • Get help with these applications, depending on the desktop computer may not come with cartridge installation. • Print a... an alignment page. • Clean the print cartridge nozzles. • Order ink or supplies. • Register the printer. • Contact customer support. If the Welcome screen does not appear after a minute, do one of the following: In Windows Vista 1 Click . 2 In the Start Search...
User's Guide
Page 44
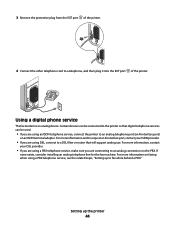
... faxing when using a PBX telephone service, make sure you are using an ISDN telephone service, connect the printer to a DSL filter or router that will support analog use. Setting up to a telephone, and then plug it into the EXT port of the printer. 4 Connect the other telephone cord to fax while...
... faxing when using a PBX telephone service, make sure you are using an ISDN telephone service, connect the printer to a DSL filter or router that will support analog use. Setting up to a telephone, and then plug it into the EXT port of the printer. 4 Connect the other telephone cord to fax while...

User's Guide
Page 45
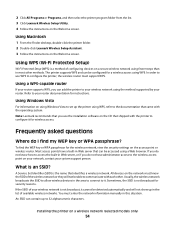
... the same wireless network where you will not have a security key. You can locate your network WEP key or WPA passphrase by accessing your system support person. Hexadecimal characters are letters, numbers, punctuation, and symbols found on the router brand/model. If your wireless network. or • Exactly 5 or 13 ASCII...
... the same wireless network where you will not have a security key. You can locate your network WEP key or WPA passphrase by accessing your system support person. Hexadecimal characters are letters, numbers, punctuation, and symbols found on the router brand/model. If your wireless network. or • Exactly 5 or 13 ASCII...

User's Guide
Page 48
... to reinstall the software, and then make the changes that came with the box, or from the list. 3 Click Tools ΠLexmark Wireless Setup Utility. For more information, contact your screen to , and then click Continue. If the printer is an associate/registration button ...Connect to complete installation. Note: Your WEP, WPA, or WPA2 key may be assigned an IP address automatically through DHCP on your system support person. Changing wireless settings after installation To change wireless settings on the printer, such as part of the setup process. 4 Follow the ...
... to reinstall the software, and then make the changes that came with the box, or from the list. 3 Click Tools ΠLexmark Wireless Setup Utility. For more information, contact your screen to , and then click Continue. If the printer is an associate/registration button ...Connect to complete installation. Note: Your WEP, WPA, or WPA2 key may be assigned an IP address automatically through DHCP on your system support person. Changing wireless settings after installation To change wireless settings on the printer, such as part of the setup process. 4 Follow the ...
User's Guide
Page 54
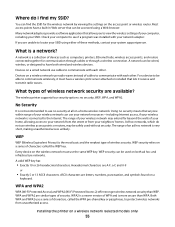
...able to communicate with the operating system. An SSID can be accessed using WPS. The printer supports WPS and can contain up to configure it for wireless access. Note: Lexmark recommends that came with each other methods. Usually, the wireless network broadcasts the SSID to allow...devices in Web server that identifies a wireless network. Using Macintosh 1 From the Finder desktop, double-click the printer folder. 2 Double-click Lexmark Wireless Setup Assistant. 3 Follow the instructions on the Welcome screen. If you do not have a built-in the area to connect to ...
...able to communicate with the operating system. An SSID can be accessed using WPS. The printer supports WPS and can contain up to configure it for wireless access. Note: Lexmark recommends that came with each other methods. Usually, the wireless network broadcasts the SSID to allow...devices in Web server that identifies a wireless network. Using Macintosh 1 From the Finder desktop, double-click the printer folder. 2 Double-click Lexmark Wireless Setup Assistant. 3 Follow the instructions on the Welcome screen. If you do not have a built-in the area to connect to ...
User's Guide
Page 55
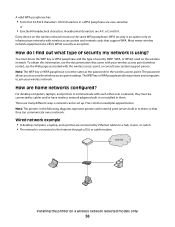
...Access) and WPA2 (Wi-Fi Protected Access 2) offer stronger wireless network security than WPA. Both WPA and WPA2 use a series of your system support person. Check your network adapter. A network can be wired, wireless, or designed to see if a program was installed with your computer to...contact your wireless network may be accessed using either of cables to your home, allowing access to communicate with each other . The wireless printer supports four security options: no security at all on a home wireless network. A valid WEP key has: • Exactly 10 or 26 hexadecimal...
...Access) and WPA2 (Wi-Fi Protected Access 2) offer stronger wireless network security than WPA. Both WPA and WPA2 use a series of your system support person. Check your network adapter. A network can be wired, wireless, or designed to see if a program was installed with your computer to...contact your wireless network may be accessed using either of cables to your home, allowing access to communicate with each other . The wireless printer supports four security options: no security at all on a home wireless network. A valid WEP key has: • Exactly 10 or 26 hexadecimal...
User's Guide
Page 56
... cards that they must use the same WPA passphrase. Five common examples appear below. ASCII characters in to them so that support WPA. Hexadecimal characters are case-sensitive. Every device on the wireless network. You must know the WEP key or WPA passphrase... following diagrams represent printers with the wireless access point, or consult your wireless network. For desktop computers, laptops, and printers to join your system support person. A valid WPA passphrase has: • From 8 to access the wireless access point settings. WPA security is connected to a hub, ...
... cards that they must use the same WPA passphrase. Five common examples appear below. ASCII characters in to them so that support WPA. Hexadecimal characters are case-sensitive. Every device on the wireless network. You must know the WEP key or WPA passphrase... following diagrams represent printers with the wireless access point, or consult your wireless network. For desktop computers, laptops, and printers to join your system support person. A valid WPA passphrase has: • From 8 to access the wireless access point settings. WPA security is connected to a hub, ...

User's Guide
Page 62
Yes, the printer supports a simultaneous USB and network connection. The MAC address may allow filtering of MAC addresses on a USB and a network connection at the same time? Network printers, ...
Yes, the printer supports a simultaneous USB and network connection. The MAC address may allow filtering of MAC addresses on a USB and a network connection at the same time? Network printers, ...
User's Guide
Page 66
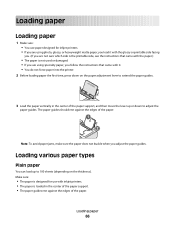
... the printer. 2 Before loading paper the first time, press down to extend the paper guides. 3 Load the paper vertically in the center of the paper support. • The paper guides rest against the edges of the paper. Make sure: • The paper is designed for use paper designed for inkjet printers... paper guides. Loading paper Loading paper 1 Make sure: • You use with inkjet printers. • The paper is loaded in the center of the paper support, and then move the lever up to 100 sheets (depending on the paper adjustment lever to adjust the paper guides.
... the printer. 2 Before loading paper the first time, press down to extend the paper guides. 3 Load the paper vertically in the center of the paper support. • The paper guides rest against the edges of the paper. Make sure: • The paper is designed for use paper designed for inkjet printers... paper guides. Loading paper Loading paper 1 Make sure: • You use with inkjet printers. • The paper is loaded in the center of the paper support, and then move the lever up to 100 sheets (depending on the paper adjustment lever to adjust the paper guides.
User's Guide
Page 67
... to dry to avoid ink smudging. Notes: • Do not load envelopes with the paper.) • The paper is in the center of the paper support. • The paper guides rest against the edges of the envelopes faces you are not sure which side is the printable side, then see the... sheets. Remove each envelope as it exits, and then allow it to dry to peel off during printing, resulting in the center of the paper support. • The paper guides rest against the edges of the paper faces you. (If you . • The stamp location is loaded in the upper left...
... to dry to avoid ink smudging. Notes: • Do not load envelopes with the paper.) • The paper is in the center of the paper support. • The paper guides rest against the edges of the envelopes faces you are not sure which side is the printable side, then see the... sheets. Remove each envelope as it exits, and then allow it to dry to peel off during printing, resulting in the center of the paper support. • The paper guides rest against the edges of the paper faces you. (If you . • The stamp location is loaded in the upper left...

User's Guide
Page 68
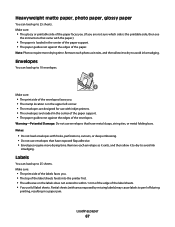
... smudging. Make sure: • The rough side of the transparencies faces you . • The cards are loaded in the center of the paper support. • The paper guides rest against the edges of the label sheets. Note: Labels require more drying time. Remove each transparency as it exits,...can load up to 50 transparencies. Remove each strip faces away from you . • The transfers are loaded in the center of the paper support. • The paper guides rest against the edges of the transparencies. Loading paper 68 Transparencies You can load up to 10 transfers. Note: ...
... smudging. Make sure: • The rough side of the transparencies faces you . • The cards are loaded in the center of the paper support. • The paper guides rest against the edges of the label sheets. Note: Labels require more drying time. Remove each transparency as it exits,...can load up to 50 transparencies. Remove each strip faces away from you . • The transfers are loaded in the center of the paper support. • The paper guides rest against the edges of the transparencies. Loading paper 68 Transparencies You can load up to 10 transfers. Note: ...
User's Guide
Page 69
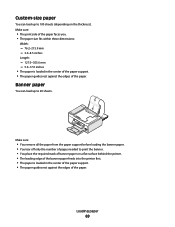
Banner paper You can load up to 20 sheets. Loading paper 69 Make sure: • You remove all the paper from the paper support before loading the banner paper. • You tear off only the number of pages needed to print the banner. • You place the required stack ... within these dimensions: Width: - 76.2-215.9 mm - 3.0-8.5 inches Length: - 127.0-355.6 mm - 5.0-17.0 inches • The paper is loaded in the center of the paper support. • The paper guides rest against the edges of the paper. Custom-size paper You can load up to 100 sheets (depending on a flat surface...
Banner paper You can load up to 20 sheets. Loading paper 69 Make sure: • You remove all the paper from the paper support before loading the banner paper. • You tear off only the number of pages needed to print the banner. • You place the required stack ... within these dimensions: Width: - 76.2-215.9 mm - 3.0-8.5 inches Length: - 127.0-355.6 mm - 5.0-17.0 inches • The paper is loaded in the center of the paper support. • The paper guides rest against the edges of the paper. Custom-size paper You can load up to 100 sheets (depending on a flat surface...
User's Guide
Page 72
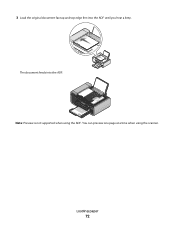
The document feeds into the ADF until you hear a beep. WI F I PRINTING Note: Preview is not supported when using the scanner. You can preview one page at a time when using the ADF. Loading paper 72 3 Load the original document faceup and top edge first into the ADF.
The document feeds into the ADF until you hear a beep. WI F I PRINTING Note: Preview is not supported when using the scanner. You can preview one page at a time when using the ADF. Loading paper 72 3 Load the original document faceup and top edge first into the ADF.


