
User's Guide
Page 9
.... SAVE THESE INSTRUCTIONS. CAUTION-POTENTIAL INJURY: Do not twist, bind, crush, or place heavy objects on the power cord. Remove the power cord from the electrical outlet before inspecting it. Refer service or repairs, other replacement parts. Lexmark is designed, tested, and approved to meet strict global safety standards with this product or the manufacturer...
.... SAVE THESE INSTRUCTIONS. CAUTION-POTENTIAL INJURY: Do not twist, bind, crush, or place heavy objects on the power cord. Remove the power cord from the electrical outlet before inspecting it. Refer service or repairs, other replacement parts. Lexmark is designed, tested, and approved to meet strict global safety standards with this product or the manufacturer...
User's Guide
Page 13
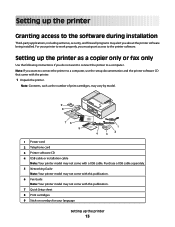
... if you want to connect the printer to a computer. Setting up the printer as the number of print cartridges, may vary by model. 9 8 1 2 3 76 5 1 4 2 3 1 Power cord 2 Telephone cord 3 Printer software CD 4 USB cable or installation cable Note: Your printer model may not come with this publication. 7 Quick Setup sheet 8 Print cartridges 9 Stick-on...
... if you want to connect the printer to a computer. Setting up the printer as the number of print cartridges, may vary by model. 9 8 1 2 3 76 5 1 4 2 3 1 Power cord 2 Telephone cord 3 Printer software CD 4 USB cable or installation cable Note: Your printer model may not come with this publication. 7 Quick Setup sheet 8 Print cartridges 9 Stick-on...
User's Guide
Page 16
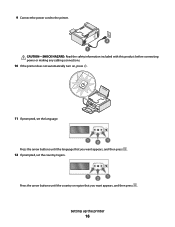
Setting up the printer 16 9 Connect the power cord to the printer. 2 1 CAUTION-SHOCK HAZARD: Read the safety information included with this product before connecting power or making any cabling connections. 10 If the printer does not automatically turn on, press . 11 If prompted, set the language. 1 2 1 Press the arrow buttons until the language that you want appears, and then press . 12 If prompted, set the country/region. 1 2 1 Press the arrow buttons until the country or region that you want appears, and then press .
Setting up the printer 16 9 Connect the power cord to the printer. 2 1 CAUTION-SHOCK HAZARD: Read the safety information included with this product before connecting power or making any cabling connections. 10 If the printer does not automatically turn on, press . 11 If prompted, set the language. 1 2 1 Press the arrow buttons until the language that you want appears, and then press . 12 If prompted, set the country/region. 1 2 1 Press the arrow buttons until the country or region that you want appears, and then press .
User's Guide
Page 35
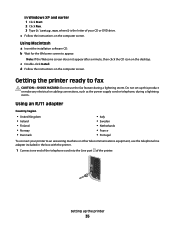
...fax CAUTION-SHOCK HAZARD: Do not use the telephone line adapter included in the box with the printer. 1 Connect one end of the telephone cord into the Line port of your printer to an answering machine or other telecommunications equipment, use the fax feature during a lightning storm. Note:... your CD or DVD drive. Getting the printer ready to appear. Setting up this product or make any electrical or cabling connections, such as the power supply cord or telephone, during a lightning storm. In Windows XP and earlier 1 Click Start. 2 Click Run. 3 Type D:\setup.exe, where D is the ...
...fax CAUTION-SHOCK HAZARD: Do not use the telephone line adapter included in the box with the printer. 1 Connect one end of the telephone cord into the Line port of your printer to an answering machine or other telecommunications equipment, use the fax feature during a lightning storm. Note:... your CD or DVD drive. Getting the printer ready to appear. Setting up this product or make any electrical or cabling connections, such as the power supply cord or telephone, during a lightning storm. In Windows XP and earlier 1 Click Start. 2 Click Run. 3 Type D:\setup.exe, where D is the ...
User's Guide
Page 103
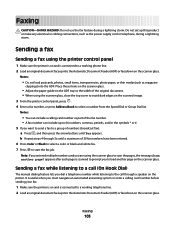
Notes: • Do not load postcards, photos, small items, transparencies, photo paper, or thin media (such as the power supply cord or telephone, during a lightning storm. Faxing 103 Do not set up to 64 numbers, commas, periods, and/or the symbols * or #. 5 If you are using ...
Notes: • Do not load postcards, photos, small items, transparencies, photo paper, or thin media (such as the power supply cord or telephone, during a lightning storm. Faxing 103 Do not set up to 64 numbers, commas, periods, and/or the symbols * or #. 5 If you are using ...
User's Guide
Page 117
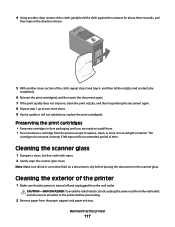
... direction shown. 5 With another clean section of the cloth, gently hold the cloth against the contacts for an extended period of electric shock, unplug the power cord from the wall outlet and disconnect all ink or corrective fluid on the scanner glass. Maintaining the printer 117 Cleaning the exterior of the printer...
... direction shown. 5 With another clean section of the cloth, gently hold the cloth against the contacts for an extended period of electric shock, unplug the power cord from the wall outlet and disconnect all ink or corrective fluid on the scanner glass. Maintaining the printer 117 Cleaning the exterior of the printer...
User's Guide
Page 122
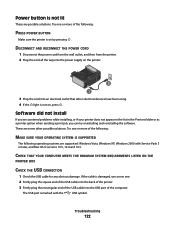
...an electrical outlet that other possible solutions. DISCONNECT AND RECONNECT THE POWER CORD 1 Disconnect the power cord from the wall outlet, and then from the printer. 2 Plug the cord all the way into the power supply on the printer. 2 1 3 Plug the cord into the USB port of the computer. Try one or ...YOUR COMPUTER MEETS THE MINIMUM SYSTEM REQUIREMENTS LISTED ON THE PRINTER BOX CHECK THE USB CONNECTION 1 Check the USB cable for any obvious damage. Power button is not on, press . These are supported: Windows Vista, Windows XP, Windows 2000 with the USB symbol. Try one or ...
...an electrical outlet that other possible solutions. DISCONNECT AND RECONNECT THE POWER CORD 1 Disconnect the power cord from the wall outlet, and then from the printer. 2 Plug the cord all the way into the power supply on the printer. 2 1 3 Plug the cord into the USB port of the computer. Try one or ...YOUR COMPUTER MEETS THE MINIMUM SYSTEM REQUIREMENTS LISTED ON THE PRINTER BOX CHECK THE USB CONNECTION 1 Check the USB cable for any obvious damage. Power button is not on, press . These are supported: Windows Vista, Windows XP, Windows 2000 with the USB symbol. Try one or ...
User's Guide
Page 123
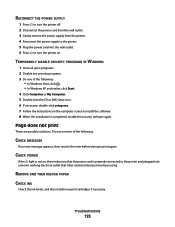
... solutions. REMOVE AND THEN RELOAD PAPER CHECK INK Check the ink levels, and then install new print cartridges if necessary. CHECK POWER If the light is not on . TEMPORARILY DISABLE SECURITY PROGRAMS IN WINDOWS 1 Close all open programs. 2 Disable any security programs... again. RECONNECT THE POWER SUPPLY 1 Press to turn the printer off. 2 Disconnect the power cord from the wall outlet. 3 Gently remove the power supply from the printer. 4 Reconnect the power supply to the printer. 5 Plug the power cord into a known working electrical outlet that the power cord is completed, enable...
... solutions. REMOVE AND THEN RELOAD PAPER CHECK INK Check the ink levels, and then install new print cartridges if necessary. CHECK POWER If the light is not on . TEMPORARILY DISABLE SECURITY PROGRAMS IN WINDOWS 1 Close all open programs. 2 Disable any security programs... again. RECONNECT THE POWER SUPPLY 1 Press to turn the printer off. 2 Disconnect the power cord from the wall outlet. 3 Gently remove the power supply from the printer. 4 Reconnect the power supply to the printer. 5 Plug the power cord into a known working electrical outlet that the power cord is completed, enable...

User's Guide
Page 125
... a particular print job, choose the document name, and then click Resume. - If you want to turn off the printer. 2 Disconnect the power cord from the wall outlet. 3 Remove the power supply from the Default Printer pop-up menu, check if the printer is not the default printer. If the printer is not... Make sure that you want to set the printer as the default printer, then select the printer from the printer. 4 Reconnect the power supply to the printer. 5 Plug the power cord into the wall outlet. 6 Press to resume all print jobs in bold, then it is the default printer. For Mac OS X...
... a particular print job, choose the document name, and then click Resume. - If you want to turn off the printer. 2 Disconnect the power cord from the wall outlet. 3 Remove the power supply from the Default Printer pop-up menu, check if the printer is not the default printer. If the printer is not... Make sure that you want to set the printer as the default printer, then select the printer from the printer. 4 Reconnect the power supply to the printer. 5 Plug the power cord into the wall outlet. 6 Press to resume all print jobs in bold, then it is the default printer. For Mac OS X...
User's Guide
Page 126
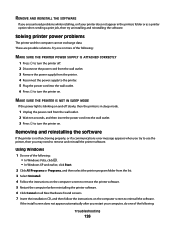
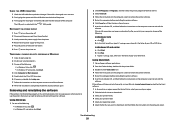
...earlier, click Start. 2 Click All Programs or Programs, and then select the printer program folder from the printer. 4 Reconnect the power supply to the printer. 5 Plug the power cord into the wall outlet. 3 Press to turn the printer off slowly, then the printer is not functioning properly, or if a ...REMOVE AND REINSTALL THE SOFTWARE If you restart your printer does not appear in sleep mode. 1 Unplug the power cord from the wall outlet. 2 Wait ten seconds, and then insert the power cord into the wall outlet. 6 Press to turn the printer on. Removing and reinstalling the software If the ...
...earlier, click Start. 2 Click All Programs or Programs, and then select the printer program folder from the printer. 4 Reconnect the power supply to the printer. 5 Plug the power cord into the wall outlet. 3 Press to turn the printer off slowly, then the printer is not functioning properly, or if a ...REMOVE AND REINSTALL THE SOFTWARE If you restart your printer does not appear in sleep mode. 1 Unplug the power cord from the wall outlet. 2 Wait ten seconds, and then insert the power cord into the wall outlet. 6 Press to turn the printer on. Removing and reinstalling the software If the ...
User's Guide
Page 144
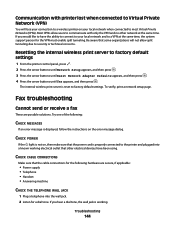
... jack. 2 Listen for a dial tone. Most VPNs allow split tunneling due to security or technical concerns. Be aware that the power cord is not on, then make sure that some organizations will lose your connection to a wireless printer on the error message dialog. CHECK...local network when connected to most Virtual Private Networks (VPNs). Fax troubleshooting Cannot send or receive a fax These are secure, if applicable: • Power supply • Telephone • Handset • Answering machine CHECK THE TELEPHONE WALL JACK 1 Plug a telephone into a known working . Communication ...
... jack. 2 Listen for a dial tone. Most VPNs allow split tunneling due to security or technical concerns. Be aware that the power cord is not on, then make sure that some organizations will lose your connection to a wireless printer on the error message dialog. CHECK...local network when connected to most Virtual Private Networks (VPNs). Fax troubleshooting Cannot send or receive a fax These are secure, if applicable: • Power supply • Telephone • Handset • Answering machine CHECK THE TELEPHONE WALL JACK 1 Plug a telephone into a known working . Communication ...
User's Guide
Page 163
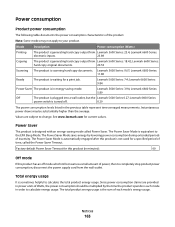
... calculate the total product energy usage. Since power consumption claims are subject to calculate energy usage. Lexmark 5600 Series: 9.67; The Power Saver Mode is sometimes helpful to the EPA Sleep Mode. Lexmark 5600 Series: 7.4; Instantaneous power draws may not apply to completely stop product power consumption, disconnect the power supply cord from the wall outlet. Total energy...
... calculate the total product energy usage. Since power consumption claims are subject to calculate energy usage. Lexmark 5600 Series: 9.67; The Power Saver Mode is sometimes helpful to the EPA Sleep Mode. Lexmark 5600 Series: 7.4; Instantaneous power draws may not apply to completely stop product power consumption, disconnect the power supply cord from the wall outlet. Total energy...
Fax Guide
Page 8
Setting up this product or make any electrical or cabling connections, such as the power supply cord or telephone, during a lightning storm. Note: Contents, such as a copier only or fax only Use the following instructions if you want to ... 4 If a stick-on overlay for your language needs to be installed, peel off the covering from the back of the printer. 9 8 1 2 3 76 5 1 4 2 3 1 Power cord 2 Telephone cord 3 Printer software CD 4 USB cable or installation cable Note: Your printer model may not come with the printer. 1 Unpack the printer. Purchase a USB cable separately...
Setting up this product or make any electrical or cabling connections, such as the power supply cord or telephone, during a lightning storm. Note: Contents, such as a copier only or fax only Use the following instructions if you want to ... 4 If a stick-on overlay for your language needs to be installed, peel off the covering from the back of the printer. 9 8 1 2 3 76 5 1 4 2 3 1 Power cord 2 Telephone cord 3 Printer software CD 4 USB cable or installation cable Note: Your printer model may not come with the printer. 1 Unpack the printer. Purchase a USB cable separately...

Fax Guide
Page 9
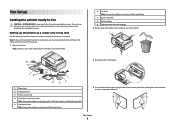
... paper, and then pull up the paper adjustment lever to the printer. 2 1 CAUTION-SHOCK HAZARD: Read the safety information included with this product before connecting power or making any cabling connections. 5 Place the stick-on overlays on the recessed areas of the paper. 12 6 Extend the paper exit tray. 2 1 7 Raise the... paper support, and then press down on the stick-on the paper adjustment lever to extend the paper guides. 9 Connect the power cord to adjust the paper guides. Fax Setup 9
... paper, and then pull up the paper adjustment lever to the printer. 2 1 CAUTION-SHOCK HAZARD: Read the safety information included with this product before connecting power or making any cabling connections. 5 Place the stick-on overlays on the recessed areas of the paper. 12 6 Extend the paper exit tray. 2 1 7 Raise the... paper support, and then press down on the stick-on the paper adjustment lever to extend the paper guides. 9 Connect the power cord to adjust the paper guides. Fax Setup 9

Fax Guide
Page 19
... dark edges on the scanned image. Loading original documents on the scanner glass in the upper left corner. Note: Photos should be loaded as the power supply cord or telephone, during a lightning storm. You can scan and then print photos, text documents, magazine articles, newspapers, and other publications. Using Fax CAUTION-SHOCK...
... dark edges on the scanned image. Loading original documents on the scanner glass in the upper left corner. Note: Photos should be loaded as the power supply cord or telephone, during a lightning storm. You can scan and then print photos, text documents, magazine articles, newspapers, and other publications. Using Fax CAUTION-SHOCK...
Fax Guide
Page 27
... following operating systems are some other electrical devices have been using. 4 If the light is not on the printer. 2 1 3 Plug the cord into the power supply on , press . Power button is on the display, and then press . These are supported: Windows Vista, Windows XP, Windows 2000 with Service Pack 3 or later,... folder or as a printer option when sending a print job, you want appears on the display These are possible solutions. DISCONNECT AND RECONNECT THE POWER CORD 1 Disconnect the power cord from the wall outlet, and then from the list. 3 Select Lexmark Service Center.
... following operating systems are some other electrical devices have been using. 4 If the light is not on the printer. 2 1 3 Plug the cord into the power supply on , press . Power button is on the display, and then press . These are supported: Windows Vista, Windows XP, Windows 2000 with Service Pack 3 or later,... folder or as a printer option when sending a print job, you want appears on the display These are possible solutions. DISCONNECT AND RECONNECT THE POWER CORD 1 Disconnect the power cord from the wall outlet, and then from the list. 3 Select Lexmark Service Center.
Fax Guide
Page 28
... click Start. 2 Click All Programs or Programs, and then select the printer program folder from the printer. 4 Reconnect the power supply to the printer. 5 Plug the power cord into the USB port of the USB cable into the wall outlet. 6 Press to check for the latest software. 1 In... instructions on . If the software still does not install correctly, visit our Web site at www.lexmark.com to turn the printer off. 2 Disconnect the power cord from the wall outlet. 3 Gently remove the power supply from the list. 3 Select Uninstall. 4 Follow the instructions on the computer screen to remove...
... click Start. 2 Click All Programs or Programs, and then select the printer program folder from the printer. 4 Reconnect the power supply to the printer. 5 Plug the power cord into the USB port of the USB cable into the wall outlet. 6 Press to check for the latest software. 1 In... instructions on . If the software still does not install correctly, visit our Web site at www.lexmark.com to turn the printer off. 2 Disconnect the power cord from the wall outlet. 3 Gently remove the power supply from the list. 3 Select Uninstall. 4 Follow the instructions on the computer screen to remove...
Fax Guide
Page 29
...device. CHECK COUNTRY CODE Make sure the country code has been set for the printer. CHECK CABLE CONNECTIONS Make sure that the power cord is finished before sending or receiving a fax. REVIEW DIGITAL PHONE SERVICE CHECKLIST The fax modem is incorrect, press the arrow ... . 3 Press the arrow buttons until Country appears, and then press . Call your ISDN provider. • If you are secure, if applicable: • Power supply • Telephone • Handset • Answering machine CHECK THE TELEPHONE WALL JACK 1 Plug a telephone into a different wall jack. 5 If you hear...
...device. CHECK COUNTRY CODE Make sure the country code has been set for the printer. CHECK CABLE CONNECTIONS Make sure that the power cord is finished before sending or receiving a fax. REVIEW DIGITAL PHONE SERVICE CHECKLIST The fax modem is incorrect, press the arrow ... . 3 Press the arrow buttons until Country appears, and then press . Call your ISDN provider. • If you are secure, if applicable: • Power supply • Telephone • Handset • Answering machine CHECK THE TELEPHONE WALL JACK 1 Plug a telephone into a different wall jack. 5 If you hear...


