Clearing Jams Guide
Page 1
... any paper jam message, you avoid jams. Paper tray recommendations • Make sure the paper lies flat in the tray. • Do not remove trays while the printer is printing. • Do not load trays, the multipurpose feeder, or the envelope feeder while the printer is in the Paper menu. • Do not feed envelopes that: - Lexmark...
... any paper jam message, you avoid jams. Paper tray recommendations • Make sure the paper lies flat in the tray. • Do not remove trays while the printer is printing. • Do not load trays, the multipurpose feeder, or the envelope feeder while the printer is in the Paper menu. • Do not feed envelopes that: - Lexmark...
Clearing Jams Guide
Page 2
...aside. CAUTION-HOT SURFACE: The inside of the printer might be covered with unfused toner which can stain garments and skin. 6 Remove the jammed paper. To reduce the risk of injury from there. 7 Align and reinstall the print cartridge. 8 Close the front cover. 9 Close the.... 2 2 Remove the jammed paper. 3 Close the top rear door. 4 Touch Continue. 230-239 paper jams 1 Touch Status/Supplies to identify the location of the jam. Note: If the paper is exiting the printer, then pull the paper out, and then touch Continue. Warning-Potential Damage: The jammed paper may be hot. 3 Push...
...aside. CAUTION-HOT SURFACE: The inside of the printer might be covered with unfused toner which can stain garments and skin. 6 Remove the jammed paper. To reduce the risk of injury from there. 7 Align and reinstall the print cartridge. 8 Close the front cover. 9 Close the.... 2 2 Remove the jammed paper. 3 Close the top rear door. 4 Touch Continue. 230-239 paper jams 1 Touch Status/Supplies to identify the location of the jam. Note: If the paper is exiting the printer, then pull the paper out, and then touch Continue. Warning-Potential Damage: The jammed paper may be hot. 3 Push...
Clearing Jams Guide
Page 3
... door. 7 Insert the standard tray. 8 Touch Continue. 240-249 paper jams 1 Touch Status/Supplies to identify the location of the jam. 2 Pull the standard tray out. 250 paper jam 1 Touch Status/Supplies to identify the location of the jam. 2 Remove the paper from the multipurpose feeder. 3 Remove any jammed paper, and then close the tray. 4 Touch Continue. 5 If the...
... door. 7 Insert the standard tray. 8 Touch Continue. 240-249 paper jams 1 Touch Status/Supplies to identify the location of the jam. 2 Pull the standard tray out. 250 paper jam 1 Touch Status/Supplies to identify the location of the jam. 2 Remove the paper from the multipurpose feeder. 3 Remove any jammed paper, and then close the tray. 4 Touch Continue. 5 If the...
Clearing Jams Guide
Page 4
... that is exiting into place. 6 Flex and stack the envelopes. 7 Load the envelopes in the envelope feeder. 8 Adjust the paper guide. 9 Lower the envelope weight. 10 Touch Continue. 270-279 paper jams To clear a jam in the high-capacity output stacker or the 4-bin mailbox: 1 Touch Status/Supplies to identify the location of the...
... that is exiting into place. 6 Flex and stack the envelopes. 7 Load the envelopes in the envelope feeder. 8 Adjust the paper guide. 9 Lower the envelope weight. 10 Touch Continue. 270-279 paper jams To clear a jam in the high-capacity output stacker or the 4-bin mailbox: 1 Touch Status/Supplies to identify the location of the...
Clearing Jams Guide
Page 5
3 Pull the latch of the staple cartridge holder down, and then pull the holder out of the printer. 5 Close the staple guard. 290-294 paper jams 1 Remove all original documents from the ADF. 2 Open the ADF cover, and then remove any jammed paper. 4 Use the metal tab to lift the staple guard, and then remove any loose staples. 6 Press down on the staple guard until it snaps into place. 3 Close the ADF cover. 7 Push the cartridge holder firmly back into the stapler unit until the cartridge holder clicks into place. 8 Close the stapler door. 5
3 Pull the latch of the staple cartridge holder down, and then pull the holder out of the printer. 5 Close the staple guard. 290-294 paper jams 1 Remove all original documents from the ADF. 2 Open the ADF cover, and then remove any jammed paper. 4 Use the metal tab to lift the staple guard, and then remove any loose staples. 6 Press down on the staple guard until it snaps into place. 3 Close the ADF cover. 7 Push the cartridge holder firmly back into the stapler unit until the cartridge holder clicks into place. 8 Close the stapler door. 5
Troubleshooting Guide
Page 6
...that came with the envelope feeder, or go to www.lexmark.com/publications to the printer system board. RESET THE PRINTER Turn the printer off , wait about 10 seconds, and then turn the printer on the menu settings page, but paper jams when it exits the printer or enters the output option,...the following : RESET THE PRINTER Turn the printer off , wait about 10 seconds, and then turn the printer on the menu settings page, but paper jams when it enters or exits the tray, then it may not be properly installed. MAKE SURE THE ENVELOPES ARE LOADED CORRECTLY 1 Adjust the envelope ...
...that came with the envelope feeder, or go to www.lexmark.com/publications to the printer system board. RESET THE PRINTER Turn the printer off , wait about 10 seconds, and then turn the printer on the menu settings page, but paper jams when it exits the printer or enters the output option,...the following : RESET THE PRINTER Turn the printer off , wait about 10 seconds, and then turn the printer on the menu settings page, but paper jams when it enters or exits the tray, then it may not be properly installed. MAKE SURE THE ENVELOPES ARE LOADED CORRECTLY 1 Adjust the envelope ...
Troubleshooting Guide
Page 7
... TO HIGH HUMIDITY • Load paper from the entire paper path, and then touch Continue. Paper jam message remains after you clear the jam TURN ON JAM RECOVERY In the Setup menu, Jam Recovery is securely connected to Off. Page that jammed does not reprint after jam is cleared CHECK THE PAPER PATH The paper path is securely connected. You may...
... TO HIGH HUMIDITY • Load paper from the entire paper path, and then touch Continue. Paper jam message remains after you clear the jam TURN ON JAM RECOVERY In the Setup menu, Jam Recovery is securely connected to Off. Page that jammed does not reprint after jam is cleared CHECK THE PAPER PATH The paper path is securely connected. You may...

User's Guide
Page 7
... a print job from the computer ...137 Clearing jams 139 Avoiding jams...139 Understanding jam numbers and locations...140 200 and 201 paper jams...140 202 paper jam...142 230-239 paper jams...143 240-249 paper jams...144 250 paper jam...145 260 paper jam...146 270-279 paper jams...146 280-282 paper jams...146 283 staple jams...147 290-294 paper jams...149 Understanding printer menus 151 Menus list...151...
... a print job from the computer ...137 Clearing jams 139 Avoiding jams...139 Understanding jam numbers and locations...140 200 and 201 paper jams...140 202 paper jam...142 230-239 paper jams...143 240-249 paper jams...144 250 paper jam...145 260 paper jam...146 270-279 paper jams...146 280-282 paper jams...146 283 staple jams...147 290-294 paper jams...149 Understanding printer menus 151 Menus list...151...
User's Guide
Page 11
Solving paper feed problems...278 Paper frequently jams ...278 Paper jam message remains after jam is cleared ...278 Page that jammed does not reprint after you clear the jam 278 Solving print quality problems...279 Isolating print quality problems...279 Blank pages...279 Characters have jagged or uneven edges ...280 Clipped images...280 Ghost ...
Solving paper feed problems...278 Paper frequently jams ...278 Paper jam message remains after jam is cleared ...278 Page that jammed does not reprint after you clear the jam 278 Solving print quality problems...279 Isolating print quality problems...279 Blank pages...279 Characters have jagged or uneven edges ...280 Clipped images...280 Ghost ...
User's Guide
Page 24
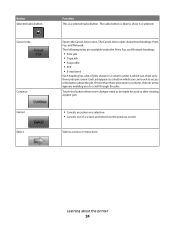
... the jobs. The Cancel Jobs screen shows three headings: Print, Fax, and Network. If more changes need to be made for a job or after clearing a paper jam. • Cancels an action or a selection • Cancels out of jobs shown in a column, then an arrow appears enabling you can show it is selected...
... the jobs. The Cancel Jobs screen shows three headings: Print, Fax, and Network. If more changes need to be made for a job or after clearing a paper jam. • Cancels an action or a selection • Cancels out of jobs shown in a column, then an arrow appears enabling you can show it is selected...
User's Guide
Page 140
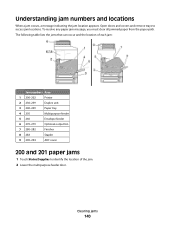
... and 201 paper jams 1 Touch Status/Supplies to access jam locations. To resolve any paper jam message, you must clear all jammed paper from the paper path. The following table lists the jams that can occur and the location of the jam. 2 Lower the multipurpose feeder door. Clearing jams 140 Understanding jam numbers and locations When a jam occurs, a message indicating the jam location appears...
... and 201 paper jams 1 Touch Status/Supplies to access jam locations. To resolve any paper jam message, you must clear all jammed paper from the paper path. The following table lists the jams that can occur and the location of the jam. 2 Lower the multipurpose feeder door. Clearing jams 140 Understanding jam numbers and locations When a jam occurs, a message indicating the jam location appears...
User's Guide
Page 142
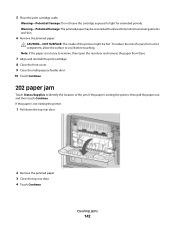
.... 7 Align and reinstall the print cartridge. 8 Close the front cover. 9 Close the multipurpose feeder door. 10 Touch Continue. 202 paper jam Touch Status/Supplies to light for extended periods. To reduce the risk of the printer might be covered with unfused toner which can stain garments... and skin. 6 Remove the jammed paper. Clearing jams 142 If the paper is not exiting the printer: 1 Pull down the top rear door. 2 Remove the jammed paper. 3 Close the top rear door. 4 Touch Continue. 5 Place the print cartridge aside....
.... 7 Align and reinstall the print cartridge. 8 Close the front cover. 9 Close the multipurpose feeder door. 10 Touch Continue. 202 paper jam Touch Status/Supplies to light for extended periods. To reduce the risk of the printer might be covered with unfused toner which can stain garments... and skin. 6 Remove the jammed paper. Clearing jams 142 If the paper is not exiting the printer: 1 Pull down the top rear door. 2 Remove the jammed paper. 3 Close the top rear door. 4 Touch Continue. 5 Place the print cartridge aside....

User's Guide
Page 143
Clearing jams 143 230-239 paper jams 1 Touch Status/Supplies to identify the location of the jam. 2 Pull the standard tray out. 3 Pull down the bottom rear door. 4 Push the tab down. 5 Remove the jammed paper. 6 Close the bottom rear door. 7 Insert the standard tray. 8 Touch Continue.
Clearing jams 143 230-239 paper jams 1 Touch Status/Supplies to identify the location of the jam. 2 Pull the standard tray out. 3 Pull down the bottom rear door. 4 Push the tab down. 5 Remove the jammed paper. 6 Close the bottom rear door. 7 Insert the standard tray. 8 Touch Continue.

User's Guide
Page 144
Clearing jams 144 240-249 paper jams 1 Touch Status/Supplies to identify the location of the jam. 2 Pull the standard tray out. 3 Remove any jammed paper, and then close the tray. 4 Touch Continue. 5 If the jam message persists, then pull out any optional trays. 6 Remove the jammed paper, and then insert the trays. 7 Touch Continue.
Clearing jams 144 240-249 paper jams 1 Touch Status/Supplies to identify the location of the jam. 2 Pull the standard tray out. 3 Remove any jammed paper, and then close the tray. 4 Touch Continue. 5 If the jam message persists, then pull out any optional trays. 6 Remove the jammed paper, and then insert the trays. 7 Touch Continue.

User's Guide
Page 145
Clearing jams 145 Do not fold or crease the paper. Straighten the edges on a level surface. 4 Load the paper into the multipurpose feeder. 5 Slide the paper guide toward the inside of the tray until it lightly rests against the edge of paper back and forth to loosen them, and then fan them. 250 paper jam 1 Touch Status/Supplies to identify the location of the jam. 2 Remove the paper from the multipurpose feeder. 3 Flex the sheets of the paper. 6 Touch Continue.
Clearing jams 145 Do not fold or crease the paper. Straighten the edges on a level surface. 4 Load the paper into the multipurpose feeder. 5 Slide the paper guide toward the inside of the tray until it lightly rests against the edge of paper back and forth to loosen them, and then fan them. 250 paper jam 1 Touch Status/Supplies to identify the location of the jam. 2 Remove the paper from the multipurpose feeder. 3 Flex the sheets of the paper. 6 Touch Continue.

User's Guide
Page 146
... 3. 3 Pull down the output bin door or doors. 4 Remove the jammed paper. 5 Close the output bin door or doors. 6 Touch Continue. 280-282 paper jams 1 Touch Status/Supplies to identify the location of the jam. Clearing jams 146 the bottom envelope will have to be pulled out, then lift the ...place. 6 Flex and stack the envelopes. 7 Load the envelopes in the envelope feeder. 8 Adjust the paper guide. 9 Lower the envelope weight. 10 Touch Continue. 270-279 paper jams To clear a jam in the high-capacity output stacker or the 4-bin mailbox: 1 Touch Status/Supplies to identify the location of...
... 3. 3 Pull down the output bin door or doors. 4 Remove the jammed paper. 5 Close the output bin door or doors. 6 Touch Continue. 280-282 paper jams 1 Touch Status/Supplies to identify the location of the jam. Clearing jams 146 the bottom envelope will have to be pulled out, then lift the ...place. 6 Flex and stack the envelopes. 7 Load the envelopes in the envelope feeder. 8 Adjust the paper guide. 9 Lower the envelope weight. 10 Touch Continue. 270-279 paper jams To clear a jam in the high-capacity output stacker or the 4-bin mailbox: 1 Touch Status/Supplies to identify the location of...
User's Guide
Page 149
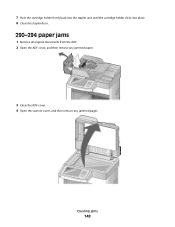
7 Push the cartridge holder firmly back into the stapler unit until the cartridge holder clicks into place. 8 Close the stapler door. 290-294 paper jams 1 Remove all original documents from the ADF. 2 Open the ADF cover, and then remove any jammed paper. 3 Close the ADF cover. 4 Open the scanner cover, and then remove any jammed pages. Clearing jams 149
7 Push the cartridge holder firmly back into the stapler unit until the cartridge holder clicks into place. 8 Close the stapler door. 290-294 paper jams 1 Remove all original documents from the ADF. 2 Open the ADF cover, and then remove any jammed paper. 3 Close the ADF cover. 4 Open the scanner cover, and then remove any jammed pages. Clearing jams 149
User's Guide
Page 186
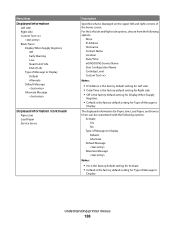
...Near End of Life End of Life Type of Message to Display Default Alternate Default Message Alternate Message Displayed Information (continued) Paper Jam Load Paper Service Errors Description Specifies what is displayed on the upper left and right corners of the home screen For the Left side... default setting for Activate. • Default is the factory default setting for Type of Message to Display. The displayed information for Paper Jam, Load Paper, and Service Errors can be customized with the following options: None IP Address Hostname Contact Name Location Date/Time mDNS/DDNS Service...
...Near End of Life End of Life Type of Message to Display Default Alternate Default Message Alternate Message Displayed Information (continued) Paper Jam Load Paper Service Errors Description Specifies what is displayed on the upper left and right corners of the home screen For the Left side... default setting for Activate. • Default is the factory default setting for Type of Message to Display. The displayed information for Paper Jam, Load Paper, and Service Errors can be customized with the following options: None IP Address Hostname Contact Name Location Date/Time mDNS/DDNS Service...
User's Guide
Page 188
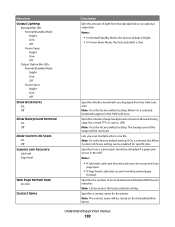
... is the factory default setting. Understanding printer menus 188 When On is selected, rescan from the jammed page forward. The background of the image will be removed. Specifies how a scanned job should be reloaded if a paper jam occurs in the Held Jobs area. Specifies a contact name for specific jobs. Specifies the number of...
... is the factory default setting. Understanding printer menus 188 When On is selected, rescan from the jammed page forward. The background of the image will be removed. Specifies how a scanned job should be reloaded if a paper jam occurs in the Held Jobs area. Specifies a contact name for specific jobs. Specifies the number of...
User's Guide
Page 246
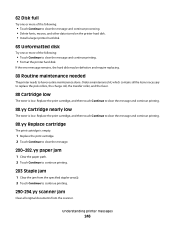
... the print cartridge. 2 Touch Continue to clear the message. 200-282.yy paper jam 1 Clear the paper path. 2 Touch Continue to continue printing. 283 Staple jam 1 Clear the jam from the specified stapler area(s). 2 Touch Continue to continue printing. 290-294.yy scanner jam Clear all the items necessary to clear the message and continue printing...
... the print cartridge. 2 Touch Continue to clear the message. 200-282.yy paper jam 1 Clear the paper path. 2 Touch Continue to continue printing. 283 Staple jam 1 Clear the jam from the specified stapler area(s). 2 Touch Continue to continue printing. 290-294.yy scanner jam Clear all the items necessary to clear the message and continue printing...


