Troubleshooting Guide
Page 1
Printer control panel display is supported. The Print dialog appears. 3 Select Print as image. 4 Click OK. For information regarding tested and approved USB flash memory devices, visit the Lexmark Web site at www.lexmark.com. MAKE SURE YOU ARE USING A RECOMMENDED USB, SERIAL, OR ETHERNET CABLE For more information, see the setup documentation that you are using a USB port, make sure they are possible solutions. This often fixes the problem. If Ready does not appear, then turn the printer off , wait...
Printer control panel display is supported. The Print dialog appears. 3 Select Print as image. 4 Click OK. For information regarding tested and approved USB flash memory devices, visit the Lexmark Web site at www.lexmark.com. MAKE SURE YOU ARE USING A RECOMMENDED USB, SERIAL, OR ETHERNET CABLE For more information, see the setup documentation that you are using a USB port, make sure they are possible solutions. This often fixes the problem. If Ready does not appear, then turn the printer off , wait...
Troubleshooting Guide
Page 3
... • Unexpected characters • White lines in the tray: 1 From the printer control panel, check the Paper Size setting from the Paper menu. 2 Before sending the job to print, specify the correct size setting: • For Windows users, specify the size from Print Properties. • For Macintosh users, specify the size from the Page Setup dialog. TEXT IS LIGHT OR DISAPPEARING • On the Copy screen, touch the Text icon. • Decrease the background removal setting. • Increase the contrast...
... • Unexpected characters • White lines in the tray: 1 From the printer control panel, check the Paper Size setting from the Paper menu. 2 Before sending the job to print, specify the correct size setting: • For Windows users, specify the size from Print Properties. • For Macintosh users, specify the size from the Page Setup dialog. TEXT IS LIGHT OR DISAPPEARING • On the Copy screen, touch the Text icon. • Decrease the background removal setting. • Increase the contrast...
Troubleshooting Guide
Page 7
... chapter about installing software for the paper size loaded. CHECK THE CABLE Make sure you clear the jam TURN ON JAM RECOVERY In the Setup menu, Jam Recovery is securely connected. Isolating print quality problems To help you use it is set to the correct connector. Solving print quality problems The information in the tray. 3 Hold down arrow until you solve print quality problems. If these are using the correct cable and that requires adjustment or replacement. The print quality test pages print. 7 Touch...
... chapter about installing software for the paper size loaded. CHECK THE CABLE Make sure you clear the jam TURN ON JAM RECOVERY In the Setup menu, Jam Recovery is securely connected. Isolating print quality problems To help you use it is set to the correct connector. Solving print quality problems The information in the tray. 3 Hold down arrow until you solve print quality problems. If these are using the correct cable and that requires adjustment or replacement. The print quality test pages print. 7 Touch...

Troubleshooting Guide
Page 11
... TONER IS SMEARED Select another tray or feeder to feed paper for the job: • From the printer control panel, select the Default Source from the Paper Menu. • For Windows users, select the paper source from Print Properties. • For Macintosh users, select the paper source from side to side to cool before touching. Solid color pages These are possible solutions. THE PRINT CARTRIDGE IS DEFECTIVE Replace the print cartridge. THE PAPER PATH MAY NOT BE CLEAR Check the paper...
... TONER IS SMEARED Select another tray or feeder to feed paper for the job: • From the printer control panel, select the Default Source from the Paper Menu. • For Windows users, select the paper source from Print Properties. • For Macintosh users, select the paper source from side to side to cool before touching. Solid color pages These are possible solutions. THE PRINT CARTRIDGE IS DEFECTIVE Replace the print cartridge. THE PAPER PATH MAY NOT BE CLEAR Check the paper...
User's Guide
Page 15
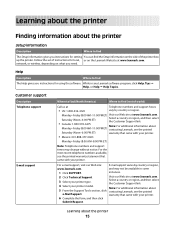
... e-mail support, visit our Web site: E-mail support varies by country or region. and may change without notice. warranty that came with your printer model. For the most recent telephone numbers available, see the printed e-Mail Support. Help Description Where to find The Help gives you instructions for setting You can find the Setup information on the side of world) Call us at www.lexmark.com...
... e-mail support, visit our Web site: E-mail support varies by country or region. and may change without notice. warranty that came with your printer model. For the most recent telephone numbers available, see the printed e-Mail Support. Help Description Where to find The Help gives you instructions for setting You can find the Setup information on the side of world) Call us at www.lexmark.com...
User's Guide
Page 46
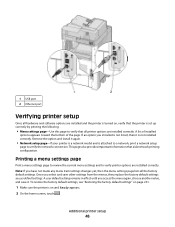
... printing the following: . • Menu settings page-Use this page to verify that aids network printing configuration. 1 USB port 2 Ethernet port Verifying printer setup Once all hardware and software options are installed and the printer is turned on and Ready appears. 2 On the home screen, touch . Once you access the menu again, choose another value, and save other settings from the menus, they replace the factory default settings as user default settings. A list of installed options appears toward the bottom of the page. Remove the option and install...
... printing the following: . • Menu settings page-Use this page to verify that aids network printing configuration. 1 USB port 2 Ethernet port Verifying printer setup Once all hardware and software options are installed and the printer is turned on and Ready appears. 2 On the home screen, touch . Once you access the menu again, choose another value, and save other settings from the menus, they replace the factory default settings as user default settings. A list of installed options appears toward the bottom of the page. Remove the option and install...
User's Guide
Page 59
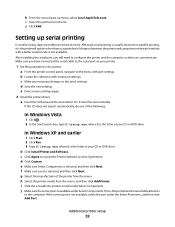
... Add Port. g Select the manufacturer of the printer from the list. After installing the serial port, you have connected the serial cable to the serial port on your printer. 1 Set the parameters in the printer: a From the printer control panel, navigate to the menu with port settings. Additional printer setup 59 i Select the printer from the menu. e Print a menu settings page. 2 Install the printer driver: a Insert the Software and Documentation CD. d Click Custom. j Make sure the correctport is selected, and then click Next. b Click Install Printer and Software. f Make...
... Add Port. g Select the manufacturer of the printer from the list. After installing the serial port, you have connected the serial cable to the serial port on your printer. 1 Set the parameters in the printer: a From the printer control panel, navigate to the menu with port settings. Additional printer setup 59 i Select the printer from the menu. e Print a menu settings page. 2 Install the printer driver: a Insert the Software and Documentation CD. d Click Custom. j Make sure the correctport is selected, and then click Next. b Click Install Printer and Software. f Make...
User's Guide
Page 103
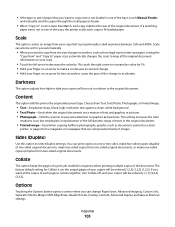
...1%; Collate This option keeps the pages of a print job stacked in sequence when printing multiple copies of the document. Options Touching the Options button opens a screen where you can print copies on one or two sides, make two-sided copies (duplex) of two-sided original documents, make two-sided copies from one-sided original documents, or make a continuous increment change Paper Saver, Advanced Imaging, Custom Job, Separator Sheets, Margin Shift, Edge Erase, Header/Footer, Overlay, Content, Advanced Duplex, and Save as documents printed on a laser printer, or pages from a magazine...
...1%; Collate This option keeps the pages of a print job stacked in sequence when printing multiple copies of the document. Options Touching the Options button opens a screen where you can print copies on one or two sides, make two-sided copies (duplex) of two-sided original documents, make two-sided copies from one-sided original documents, or make a continuous increment change Paper Saver, Advanced Imaging, Custom Job, Separator Sheets, Margin Shift, Edge Erase, Header/Footer, Overlay, Content, Advanced Duplex, and Save as documents printed on a laser printer, or pages from a magazine...
User's Guide
Page 174
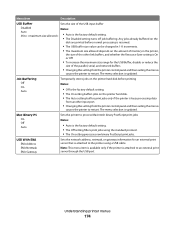
... printed before printing Notes: • Off is the factory default setting. • The On setting buffers jobs on the amount of memory in 1-K increments. • The maximum size allowed depends on the printer hard disk. • The Auto setting buffers print jobs only if the printer is attached to an external print server through the USB port. Menu item Description USB Buffer Sets the size of the parallel, serial, and network buffers. • Changing this setting from the printer control panel...
... printed before printing Notes: • Off is the factory default setting. • The On setting buffers jobs on the amount of memory in 1-K increments. • The maximum size allowed depends on the printer hard disk. • The Auto setting buffers print jobs only if the printer is attached to an external print server through the USB port. Menu item Description USB Buffer Sets the size of the parallel, serial, and network buffers. • Changing this setting from the printer control panel...
User's Guide
Page 240
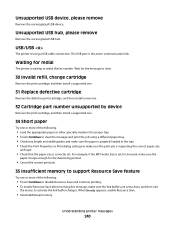
The USB port is correctly set to Auto, and then exit the menus to redial the fax number. Unsupported USB hub, please remove Remove the unrecognized USB hub. Waiting for redial The printer is properly loaded in the proper tray. • Touch Continue to clear the message and print the job using a USB cable connection. When Ready appears, enable Resource Save. • Install additional memory. USB/USB The printer is using a different paper tray. • Check tray length and width guides and make sure the paper is...
The USB port is correctly set to Auto, and then exit the menus to redial the fax number. Unsupported USB hub, please remove Remove the unrecognized USB hub. Waiting for redial The printer is properly loaded in the proper tray. • Touch Continue to clear the message and print the job using a USB cable connection. When Ready appears, enable Resource Save. • Install additional memory. USB/USB The printer is using a different paper tray. • Check tray length and width guides and make sure the paper is...
User's Guide
Page 261
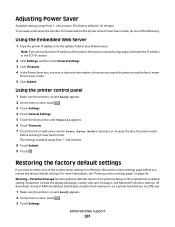
Adjusting Power Saver Available settings range from 1-240 minutes. 8 Touch Submit. 9 Touch . Using the printer control panel 1 Make sure the printer is on and Ready appears. 2 On the home screen, touch . 3 Touch Settings. Exceptions include the display language, custom sizes and messages, and Network/Port menu settings. Administrative support 261 For more information, see "Printing a menu settings page" on a printer hard disk are deleted. Warning-Potential Damage: Restoring factory defaults returns most printer settings to retain a list of your Web browser. All downloads ...
Adjusting Power Saver Available settings range from 1-240 minutes. 8 Touch Submit. 9 Touch . Using the printer control panel 1 Make sure the printer is on and Ready appears. 2 On the home screen, touch . 3 Touch Settings. Exceptions include the display language, custom sizes and messages, and Network/Port menu settings. Administrative support 261 For more information, see "Printing a menu settings page" on a printer hard disk are deleted. Warning-Potential Damage: Restoring factory defaults returns most printer settings to retain a list of your Web browser. All downloads ...
User's Guide
Page 308
... Scanner Service Error 247 88 Cartridge low 246 88.yy Cartridge nearly low 246 88.yy Replace cartridge 246 900-999 Service 247 Symbols "scan to computer" screen options 127, 128, 129 A Active NIC menu 166 address book, fax using 114 ADF copying using 93 ADF maintenance kit ordering 255 ADF pick assembly ordering 256 ADF separator roll ordering 256 Answering 231 AppleTalk menu 171 attaching cables 45 B Bin Setup menu 163 brightness, adjusting 260 Busy 231 buttons, home screen 20 buttons, printer control panel 19 buttons...
... Scanner Service Error 247 88 Cartridge low 246 88.yy Cartridge nearly low 246 88.yy Replace cartridge 246 900-999 Service 247 Symbols "scan to computer" screen options 127, 128, 129 A Active NIC menu 166 address book, fax using 114 ADF copying using 93 ADF maintenance kit ordering 255 ADF pick assembly ordering 256 ADF separator roll ordering 256 Answering 231 AppleTalk menu 171 attaching cables 45 B Bin Setup menu 163 brightness, adjusting 260 Busy 231 buttons, home screen 20 buttons, printer control panel 19 buttons...
User's Guide
Page 309
... adjusting 98 improving 105 copy screen options 102, 103 Copy Settings menu 191 copy troubleshooting copier does not respond 267 partial document or photo copies 269 poor copy quality 267 poor scanned image quality 270 scanner unit does not close 267 copying adding a date and time stamp 101 adding an overlay message 101 adjusting quality 98 canceling a copy job 102 collating copies 98 custom job (job build) 100 document containing mixed paper sizes 96 enlarging 97 from Windows 130 duplexing 97 E Embedded Web Server 259 administrator settings 259 checking device status...
... adjusting 98 improving 105 copy screen options 102, 103 Copy Settings menu 191 copy troubleshooting copier does not respond 267 partial document or photo copies 269 poor copy quality 267 poor scanned image quality 270 scanner unit does not close 267 copying adding a date and time stamp 101 adding an overlay message 101 adjusting quality 98 canceling a copy job 102 collating copies 98 custom job (job build) 100 document containing mixed paper sizes 96 enlarging 97 from Windows 130 duplexing 97 E Embedded Web Server 259 administrator settings 259 checking device status...
User's Guide
Page 310
... from Windows 134 Help menu 229 holding faxes 119 home screen buttons 20 HTML menu 228 I Image menu 229 Insert staple cartridge 233 Insert Tray 233 Install bin 234 Install envelope feeder 234 Install tray 234 installation wireless network 50, 51 installing options in driver 48 printer software 47 Index 310 installing printer software adding options 48 Internal Solutions Port installing 33 troubleshooting 277 Internal Solutions Port, network changing port settings 57 Invalid PIN 234 IPv6 menu 170 J jams avoiding 139 locating doors and trays 140 locations 140 numbers 140 jams, clearing 200...
... from Windows 134 Help menu 229 holding faxes 119 home screen buttons 20 HTML menu 228 I Image menu 229 Insert staple cartridge 233 Insert Tray 233 Install bin 234 Install envelope feeder 234 Install tray 234 installation wireless network 50, 51 installing options in driver 48 printer software 47 Index 310 installing printer software adding options 48 Internal Solutions Port installing 33 troubleshooting 277 Internal Solutions Port, network changing port settings 57 Invalid PIN 234 IPv6 menu 170 J jams avoiding 139 locating doors and trays 140 locations 140 numbers 140 jams, clearing 200...
User's Guide
Page 311
... Port 33 memory card 29 memory cards 26 networking 26 ports 26 printer hard disk 39 options, touch-screen copy 102, 103 e-mail 110, 111 fax 117, 118 FTP 123, 124 scan to computer 127, 128, 129 ordering ADF maintenance kit 255 ADF pick assembly 256 ADF separator roll 256 charge rolls 255 fuser 255 maintenance kit 254 pick rollers 255 staple cartridges 256 transfer roller 255 ordering supplies 253 output file type changing 109 P paper...
... Port 33 memory card 29 memory cards 26 networking 26 ports 26 printer hard disk 39 options, touch-screen copy 102, 103 e-mail 110, 111 fax 117, 118 FTP 123, 124 scan to computer 127, 128, 129 ordering ADF maintenance kit 255 ADF pick assembly 256 ADF separator roll 256 charge rolls 255 fuser 255 maintenance kit 254 pick rollers 255 staple cartridges 256 transfer roller 255 ordering supplies 253 output file type changing 109 P paper...
User's Guide
Page 312
... paper sizes supported by the printer 89 Paper Texture menu 156 paper type custom 84 paper types duplex support 91 supported by finisher 91 supported by printer 91 where to load 91 Paper Weight menu 158 paper weights supported by finisher 91 Parallel menu 175 PCL Emul menu 225 PDF menu 224 photos copying 94 pick rollers ordering 255 port settings configuring 57 PostScript menu 225 Power Saver adjusting 261 print job canceling from Macintosh 137 canceling from Windows 137 print quality cleaning the scanner glass 249 print quality test pages, printing 136 print quality troubleshooting blank...
... paper sizes supported by the printer 89 Paper Texture menu 156 paper type custom 84 paper types duplex support 91 supported by finisher 91 supported by printer 91 where to load 91 Paper Weight menu 158 paper weights supported by finisher 91 Parallel menu 175 PCL Emul menu 225 PDF menu 224 photos copying 94 pick rollers ordering 255 port settings configuring 57 PostScript menu 225 Power Saver adjusting 261 print job canceling from Macintosh 137 canceling from Windows 137 print quality cleaning the scanner glass 249 print quality test pages, printing 136 print quality troubleshooting blank...
User's Guide
Page 313
... 234 Install envelope feeder 234 Install tray 234 Invalid PIN 234 Job stored for delayed transmission 234 Line busy 234 Load with 235 Load manual feeder with adapter 277 high capacity output expander 277 Internal Solutions Port 277 memory card 277 option not working 275 paper trays 275 StapleSmart finisher 277 printer problems, solving basic 263 printing directory list 136 from flash drive 135 from Macintosh 130 from Windows 130 installing printer software 47 menu settings page 46 network setup page 47 print quality test pages 136 printing...
... 234 Install envelope feeder 234 Install tray 234 Invalid PIN 234 Job stored for delayed transmission 234 Line busy 234 Load with 235 Load manual feeder with adapter 277 high capacity output expander 277 Internal Solutions Port 277 memory card 277 option not working 275 paper trays 275 StapleSmart finisher 277 printer problems, solving basic 263 printing directory list 136 from flash drive 135 from Macintosh 130 from Windows 130 installing printer software 47 menu settings page 46 network setup page 47 print quality test pages 136 printing...
User's Guide
Page 315
... print quality test pages 279 repeating defects 283 skewed print 284 solid black streaks 284 solid color pages 287 solid white streaks 284 streaked vertical lines 287 toner fog or background shading 288 toner rubs off 288 toner specks 289 troubleshooting, printer options 2000-sheet tray 276 4-bin mailbox 277 envelope feeder 276 flash memory card 277 hard disk with adapter 277 high capacity output expander 277 Internal Solutions Port 277 memory card 277 option not working 275 paper trays...
... print quality test pages 279 repeating defects 283 skewed print 284 solid black streaks 284 solid color pages 287 solid white streaks 284 streaked vertical lines 287 toner fog or background shading 288 toner rubs off 288 toner specks 289 troubleshooting, printer options 2000-sheet tray 276 4-bin mailbox 277 envelope feeder 276 flash memory card 277 hard disk with adapter 277 high capacity output expander 277 Internal Solutions Port 277 memory card 277 option not working 275 paper trays...
Help Menu Pages
Page 1
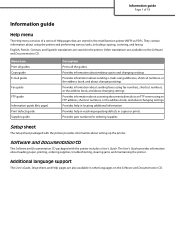
... support The User's Guide, Setup sheet, and Help pages are also available in the multifunction printer (MFP) as PDFs. They contain information about loading paper, printing, ordering supplies, troubleshooting, clearing jams, and maintaining the printer. Other translations are available on the Software and Documentation CD. Menu item Print all guides Copy guide E-mail guide Fax guide FTP guide Information guide (this page) Print defects guide Supplies guide Description Prints all the guides Provides information about making copies and changing settings Provides information about sending...
... support The User's Guide, Setup sheet, and Help pages are also available in the multifunction printer (MFP) as PDFs. They contain information about loading paper, printing, ordering supplies, troubleshooting, clearing jams, and maintaining the printer. Other translations are available on the Software and Documentation CD. Menu item Print all guides Copy guide E-mail guide Fax guide FTP guide Information guide (this page) Print defects guide Supplies guide Description Prints all the guides Provides information about making copies and changing settings Provides information about sending...
Help Menu Pages
Page 4
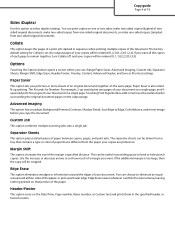
... the Options button opens a screen where you copy the document. Custom Job This option combines multiple scanning jobs into a single job. The N stands for Collate is different from two-sided original documents. Edge Erase erases whatever is within the selected area, leaving nothing printed on that is on a single page. You can change Paper Saver, Advanced Imaging, Custom Job, Separator Sheets, Margin Shift, Edge Erase, Header/Footer, Overlay, Content, Advanced Duplex, and Save...
... the Options button opens a screen where you copy the document. Custom Job This option combines multiple scanning jobs into a single job. The N stands for Collate is different from two-sided original documents. Edge Erase erases whatever is within the selected area, leaving nothing printed on that is on a single page. You can change Paper Saver, Advanced Imaging, Custom Job, Separator Sheets, Margin Shift, Edge Erase, Header/Footer, Overlay, Content, Advanced Duplex, and Save...


