User's Guide
Page 4
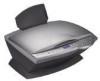
... in a scanned document using Optical Character Recognition 47 Enlarge or reduce documents 47 Printing 50 Print a document 50 Print collated copies 50 Print more than one page on a sheet of paper 51 Print an image as a multi-page poster 51 Print last page first 51 Print repeating images 52 Print two images on one page 52 Print a banner 53 Faxing 55 Receive a fax 55 Send a fax 57 Send a fax from your PC 61 Customize a fax job 62 Networking 75 Maintaining your All-In-One 76 Replace the print cartridges 76...
... in a scanned document using Optical Character Recognition 47 Enlarge or reduce documents 47 Printing 50 Print a document 50 Print collated copies 50 Print more than one page on a sheet of paper 51 Print an image as a multi-page poster 51 Print last page first 51 Print repeating images 52 Print two images on one page 52 Print a banner 53 Faxing 55 Receive a fax 55 Send a fax 57 Send a fax from your PC 61 Customize a fax job 62 Networking 75 Maintaining your All-In-One 76 Replace the print cartridges 76...
User's Guide
Page 9
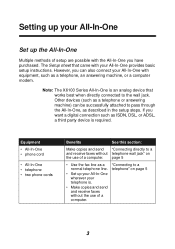
...-In-One Set up the All-In-One Multiple methods of a computer. Other devices (such as a telephone or answering machine) can also connect your telephone is. • Make copies and send and receive faxes without telephone wall jack" on page 5 3 page 5 • Use the fax line as ISDN, DSL, or ADSL, a third party device is an analog device that came with equipment, such as described in the setup steps. "Connecting to...
...-In-One Set up the All-In-One Multiple methods of a computer. Other devices (such as a telephone or answering machine) can also connect your telephone is. • Make copies and send and receive faxes without telephone wall jack" on page 5 3 page 5 • Use the fax line as ISDN, DSL, or ADSL, a third party device is an analog device that came with equipment, such as described in the setup steps. "Connecting to...
User's Guide
Page 15
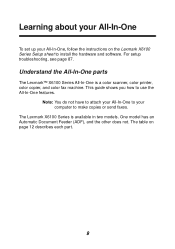
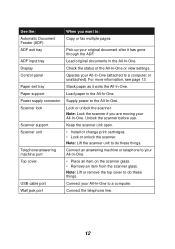
The Lexmark X6100 Series is a color scanner, color printer, color copier, and color fax machine. One model has an Automatic Document Feeder (ADF), and the other does not. The table on the Lexmark X6100 Series Setup sheet to install the hardware and software. Note: You do not have to attach your All-In-One to your All-In-One, follow the instructions on page 12 describes each part. 9 This guide shows you how to make copies or send faxes. For setup troubleshooting, see page 87. Understand...
The Lexmark X6100 Series is a color scanner, color printer, color copier, and color fax machine. One model has an Automatic Document Feeder (ADF), and the other does not. The table on the Lexmark X6100 Series Setup sheet to install the hardware and software. Note: You do not have to attach your All-In-One to your All-In-One, follow the instructions on page 12 describes each part. 9 This guide shows you how to make copies or send faxes. For setup troubleshooting, see page 87. Understand...
User's Guide
Page 18
... do these things. Connect the telephone line. 12 Note: Lift the scanner unit to the All-In-One. For more information, see page 13. Connect your All-In-One. • Place an item on the scanner glass. • Remove an item from the scanner glass. Use the: Automatic Document Feeder (ADF) ADF exit tray ADF input tray Display Control panel Paper exit tray Paper support Power supply connector Scanner lock Scanner support Scanner unit Telephone/answering machine port Top cover USB cable port Wall jack port When you are...
... do these things. Connect the telephone line. 12 Note: Lift the scanner unit to the All-In-One. For more information, see page 13. Connect your All-In-One. • Place an item on the scanner glass. • Remove an item from the scanner glass. Use the: Automatic Document Feeder (ADF) ADF exit tray ADF input tray Display Control panel Paper exit tray Paper support Power supply connector Scanner lock Scanner support Scanner unit Telephone/answering machine port Top cover USB cable port Wall jack port When you are...
User's Guide
Page 19
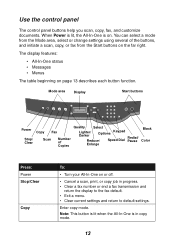
...8226; Cancel a scan, print, or copy job in copy mode. 13 Enter copy mode. Mode area Display Start buttons Power Stop/ Clear Copy Fax Scan Number of the buttons, and initiate a scan, copy, or fax from the Mode area, select or change settings using several of Copies Quality Select Lighter/ Darker Options Keypad Reduce/ Speed Dial Redial/ Pause Enlarge Black Color Press: Power Stop/Clear Copy To: • Turn your All-In-One on page 13 describes each button function. Use the control panel The control panel buttons help you scan, copy, fax, and customize documents.
...8226; Cancel a scan, print, or copy job in copy mode. 13 Enter copy mode. Mode area Display Start buttons Power Stop/ Clear Copy Fax Scan Number of the buttons, and initiate a scan, copy, or fax from the Mode area, select or change settings using several of Copies Quality Select Lighter/ Darker Options Keypad Reduce/ Speed Dial Redial/ Pause Enlarge Black Color Press: Power Stop/Clear Copy To: • Turn your All-In-One on page 13 describes each button function. Use the control panel The control panel buttons help you scan, copy, fax, and customize documents.

User's Guide
Page 20
...: Enter scan mode (possible when the All-In-One is attached to fax mode. 14 Select Options Right arrow Speed Dial Choose the option that appears on the display. Use the speed dial feature while the All-In-One is in copy or scan mode, the All-In-One will automatically switch to a computer). Customize the size of menu headings (see page 15). • Increase a number. • Scroll through a list on the display. Lighten or darken a copy...
...: Enter scan mode (possible when the All-In-One is attached to fax mode. 14 Select Options Right arrow Speed Dial Choose the option that appears on the display. Use the speed dial feature while the All-In-One is in copy or scan mode, the All-In-One will automatically switch to a computer). Customize the size of menu headings (see page 15). • Increase a number. • Scroll through a list on the display. Lighten or darken a copy...
User's Guide
Page 24
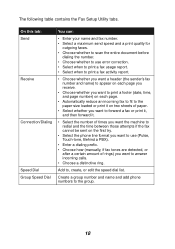
... contains the Fax Setup Utility tabs. Create a group number and name and add phone numbers to , create, or edit the speed dial list. On this tab: Send Receive Connection/Dialing Speed Dial Group Speed Dial You can: • Enter your name and fax number. • Select a maximum send speed and a print quality for outgoing faxes. • Choose whether to scan the entire document before dialing the number. • Choose whether to use error correction. • Select when to print a fax usage report. •...
... contains the Fax Setup Utility tabs. Create a group number and name and add phone numbers to , create, or edit the speed dial list. On this tab: Send Receive Connection/Dialing Speed Dial Group Speed Dial You can: • Enter your name and fax number. • Select a maximum send speed and a print quality for outgoing faxes. • Choose whether to scan the entire document before dialing the number. • Choose whether to use error correction. • Select when to print a fax usage report. •...
User's Guide
Page 39
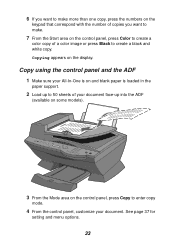
... on the control panel, press Color to create a color copy of your document face-up into the ADF (available on some models). 3 From the Mode area on the control panel, press Copy to create a black and white copy. Copying appears on and blank paper is loaded in the paper support. 2 Load up to 50 sheets of a color image or press Black to enter copy mode. 4 From the control panel, customize your document. See page 37 for setting and menu options. 33 Copy using the control panel and the ADF 1 Make sure your...
... on the control panel, press Color to create a color copy of your document face-up into the ADF (available on some models). 3 From the Mode area on the control panel, press Copy to create a black and white copy. Copying appears on and blank paper is loaded in the paper support. 2 Load up to 50 sheets of a color image or press Black to enter copy mode. 4 From the control panel, customize your document. See page 37 for setting and menu options. 33 Copy using the control panel and the ADF 1 Make sure your...

User's Guide
Page 67
... faxes will print from your computer program using the soft copy fax feature appear in the program that launches. Note: You cannot receive soft copy faxes, only send them. To send a fax from your document open, click File Print. 2 In the printer list, select the Fax Lexmark X6100 Series printer. 3 To send a soft copy fax, follow the instructions in Fine resolution. 61 Send a fax from your PC You can create a soft copy document on your desktop, double-click the Lexmark X6100 Series All-In-One Center...
... faxes will print from your computer program using the soft copy fax feature appear in the program that launches. Note: You cannot receive soft copy faxes, only send them. To send a fax from your document open, click File Print. 2 In the printer list, select the Fax Lexmark X6100 Series printer. 3 To send a soft copy fax, follow the instructions in Fine resolution. 61 Send a fax from your PC You can create a soft copy document on your desktop, double-click the Lexmark X6100 Series All-In-One Center...
User's Guide
Page 77
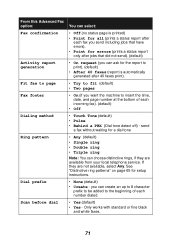
... Fax option: Fax confirmation Activity report generation Fit fax to page Fax footer Dialing method Ring pattern Dial prefix Scan before dial You can select: • Off (no status page is printed) • Print for all (prints a status report after each fax you send including jobs that have errors). • Print for errors (prints a status report only after jobs that did not send). (default) • On request (you can ask for the report to print). (default) • After 40 faxes (report is automatically generated after 40 faxes print...
... Fax option: Fax confirmation Activity report generation Fit fax to page Fax footer Dialing method Ring pattern Dial prefix Scan before dial You can select: • Off (no status page is printed) • Print for all (prints a status report after each fax you send including jobs that have errors). • Print for errors (prints a status report only after jobs that did not send). (default) • On request (you can ask for the report to print). (default) • After 40 faxes (report is automatically generated after 40 faxes print...
User's Guide
Page 94
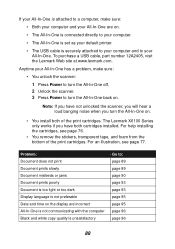
... computer Black and white copy quality is not preferable Date and time on . • You install both cartridges installed. For help installing the cartridges, see page 77. For an illustration, see page 76. • You remove the stickers, transparent tape, and foam from the bottom of the print cartridges. To purchase a USB cable, part number 12A2405, visit the Lexmark Web site at www.lexmark.com. Problem: Document does not print Document prints slowly Document misfeeds or jams Document prints poorly Document is too light...
... computer Black and white copy quality is not preferable Date and time on . • You install both cartridges installed. For help installing the cartridges, see page 77. For an illustration, see page 76. • You remove the stickers, transparent tape, and foam from the bottom of the print cartridges. To purchase a USB cable, part number 12A2405, visit the Lexmark Web site at www.lexmark.com. Problem: Document does not print Document prints slowly Document misfeeds or jams Document prints poorly Document is too light...

User's Guide
Page 101
... All-In-Ones, the Lexmark X6100 Series cannot print in the extreme left, right, top, or bottom edges of the Printing Control Program. • Use a different color setting. Date and time on the display are faded or not printing completely • Check the ink level graphic on the display, press Select to scroll through the list of languages. 3 When your preferred language appears on the Cartridges tab of a page. Print quality...
... All-In-Ones, the Lexmark X6100 Series cannot print in the extreme left, right, top, or bottom edges of the Printing Control Program. • Use a different color setting. Date and time on the display are faded or not printing completely • Check the ink level graphic on the display, press Select to scroll through the list of languages. 3 When your preferred language appears on the Cartridges tab of a page. Print quality...
User's Guide
Page 105
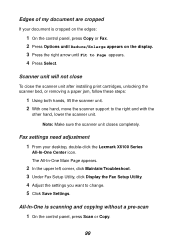
... the scanner unit after installing print cartridges, unlocking the scanner bed, or removing a paper jam, follow these steps: 1 Using both hands, lift the scanner unit. 2 With one hand, move the scanner support to change. 5 Click Save Settings. Fax settings need adjustment 1 From your document is scanning and copying without a pre-scan 1 On the control panel, press Scan or Copy. 99 The All-In-One Main Page appears. 2 In the upper left corner, click Maintain/Troubleshoot. 3 Under Fax Setup Utility, click Display the Fax Setup Utility. 4 Adjust the settings you...
... the scanner unit after installing print cartridges, unlocking the scanner bed, or removing a paper jam, follow these steps: 1 Using both hands, lift the scanner unit. 2 With one hand, move the scanner support to change. 5 Click Save Settings. Fax settings need adjustment 1 From your document is scanning and copying without a pre-scan 1 On the control panel, press Scan or Copy. 99 The All-In-One Main Page appears. 2 In the upper left corner, click Maintain/Troubleshoot. 3 Under Fax Setup Utility, click Display the Fax Setup Utility. 4 Adjust the settings you...
User's Guide
Page 106
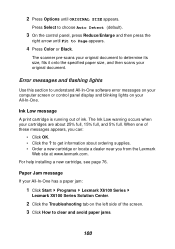
... Page appears. 4 Press Color or Black. Ink Low message A print cartridge is running out of the screen. 3 Click How to determine its size, fits it onto the specified paper size, and then scans your original document to clear and avoid paper jams. 100 For help installing a new cartridge, see page 76. Paper Jam message If your All-In-One has a paper jam: 1 Click Start Programs Lexmark X6100 Series Lexmark X6100 Series Solution Center. 2 Click the Troubleshooting tab on your cartridges are about ordering supplies. • Order a new cartridge or locate...
... Page appears. 4 Press Color or Black. Ink Low message A print cartridge is running out of the screen. 3 Click How to determine its size, fits it onto the specified paper size, and then scans your original document to clear and avoid paper jams. 100 For help installing a new cartridge, see page 76. Paper Jam message If your All-In-One has a paper jam: 1 Click Start Programs Lexmark X6100 Series Lexmark X6100 Series Solution Center. 2 Click the Troubleshooting tab on your cartridges are about ordering supplies. • Order a new cartridge or locate...
User's Guide
Page 110
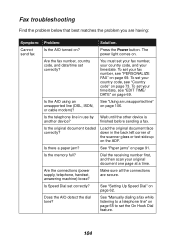
... set your fax number, your country code, and your fax number, see "Country code" on ? finished before sending a fax. Fax troubleshooting Find the problem below that best matches the problem you are secure. The power light comes on page 69. Are the connections (power supply, telephone, handset, answering machine) loose? See "Setting Up Speed Dial" on page 91. You must set your original document one page at a time. See "Paper jams" on page 62. Dial the receiving number first, and then scan your time/date, see "EDIT TIME/ DATE...
... set your fax number, your country code, and your fax number, see "Country code" on ? finished before sending a fax. Fax troubleshooting Find the problem below that best matches the problem you are secure. The power light comes on page 69. Are the connections (power supply, telephone, handset, answering machine) loose? See "Setting Up Speed Dial" on page 91. You must set your original document one page at a time. See "Paper jams" on page 62. Dial the receiving number first, and then scan your time/date, see "EDIT TIME/ DATE...
User's Guide
Page 111
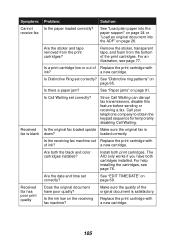
... set correctly? Received fax has poor print quality Does the original document have both cartridges installed. Is there a paper jam? loaded correctly. Install both the black and color cartridges installed? See "EDIT TIME/DATE" on page 65. Since Call Waiting can disrupt fax transmissions, disable this feature before sending or receiving a fax. Are the sticker and tape removed from the bottom of ink? Are both print cartridges. Is the receiving fax machine out Replace the print cartridge with of the print cartridges. a new cartridge. The AIO only works...
... set correctly? Received fax has poor print quality Does the original document have both cartridges installed. Is there a paper jam? loaded correctly. Install both the black and color cartridges installed? See "EDIT TIME/DATE" on page 65. Since Call Waiting can disrupt fax transmissions, disable this feature before sending or receiving a fax. Are the sticker and tape removed from the bottom of ink? Are both print cartridges. Is the receiving fax machine out Replace the print cartridge with of the print cartridges. a new cartridge. The AIO only works...
User's Guide
Page 113
... may be connected to a telephone line. You will disable alarm equipment, consult your telephone company or a qualified installer. See the previous paragraph for more information. It is also compliant. This equipment uses the RJ-11C Universal Service Order Code (USOC) jack. See page 3 for contact information. Excessive RENs on the label. On the back of this device is causing...
... may be connected to a telephone line. You will disable alarm equipment, consult your telephone company or a qualified installer. See the previous paragraph for more information. It is also compliant. This equipment uses the RJ-11C Universal Service Order Code (USOC) jack. See page 3 for contact information. Excessive RENs on the label. On the back of this device is causing...
User's Guide
Page 117
...14 Speed Dial 14 Stop/Clear 13 C cable, USB part numbers 86 cards loading 27 cartridges, print aligning 81 cleaning 82 installing 76 ordering 86 part numbers 76 preserving 85 removing 77 replacing 76 clean scanner glass 85 cleaning print cartridge nozzles 82 closing scanner unit 99 Color (Start) button 15 color print cartridge part number 86 connecting AIO to answering machine 7 computer modem 8 telephone 5 telephone wall jack 5 control panel 13 copying with 31, 33, 36 scanning with 40, 44, 45 using 13 Control panel menus Copy 37 Scan 48 control panel, sending a fax with 57 Copy (Select mode...
...14 Speed Dial 14 Stop/Clear 13 C cable, USB part numbers 86 cards loading 27 cartridges, print aligning 81 cleaning 82 installing 76 ordering 86 part numbers 76 preserving 85 removing 77 replacing 76 clean scanner glass 85 cleaning print cartridge nozzles 82 closing scanner unit 99 Color (Start) button 15 color print cartridge part number 86 connecting AIO to answering machine 7 computer modem 8 telephone 5 telephone wall jack 5 control panel 13 copying with 31, 33, 36 scanning with 40, 44, 45 using 13 Control panel menus Copy 37 Scan 48 control panel, sending a fax with 57 Copy (Select mode...
User's Guide
Page 118
... 22 Maintenance 23 Printer Status 22 Troubleshooting 23 M Maintain/Troubleshoot tab 22 maintenance 76 margins 95 media loading 27 specialty 27 menu headings 37, 48 messages, error Cartridge Error 50C 102 Hardware Error 401 101 Hardware Error 502 102 Ink Low 100 Paper Jam 100 Paper Out 101 more than one page on a sheet of paper 51 multi-page poster 51 multiple images 46 N Networking 75 nozzles print cartridges 83 Number of Copies button 14 O opening the scanner unit 76 Optical Character Recognition (OCR) 23 Options button 14...
... 22 Maintenance 23 Printer Status 22 Troubleshooting 23 M Maintain/Troubleshoot tab 22 maintenance 76 margins 95 media loading 27 specialty 27 menu headings 37, 48 messages, error Cartridge Error 50C 102 Hardware Error 401 101 Hardware Error 502 102 Ink Low 100 Paper Jam 100 Paper Out 101 more than one page on a sheet of paper 51 multi-page poster 51 multiple images 46 N Networking 75 nozzles print cartridges 83 Number of Copies button 14 O opening the scanner unit 76 Optical Character Recognition (OCR) 23 Options button 14...
User's Guide
Page 119
... button 14 reinstall software 103 removing print cartridges 77 repeating images 52 replacing the print cartridges 76 right arrow button 14 S safety information ii, 109, 110 save an image on your computer 47 Scan (Select mode) button 14 Scan mode 14 scanner glass cleaning 85 loading documents 30 scanner lock 12 scanner support 12 scanner unit 12 scanning 40 control panel 40, 44, 45 software 42 scanning multiple images 46 Select button 14 send a fax 57 Setup troubleshooting 87 software Fax Setup Utility 16 Lexmark All-In-One Center 19 Lexmark Photo Editor 21 Lexmark X6100 Series Solution Center...
... button 14 reinstall software 103 removing print cartridges 77 repeating images 52 replacing the print cartridges 76 right arrow button 14 S safety information ii, 109, 110 save an image on your computer 47 Scan (Select mode) button 14 Scan mode 14 scanner glass cleaning 85 loading documents 30 scanner lock 12 scanner support 12 scanner unit 12 scanning 40 control panel 40, 44, 45 software 42 scanning multiple images 46 Select button 14 send a fax 57 Setup troubleshooting 87 software Fax Setup Utility 16 Lexmark All-In-One Center 19 Lexmark Photo Editor 21 Lexmark X6100 Series Solution Center...


