
User's Guide
Page 14
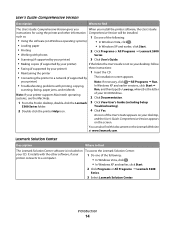
...Œ Lexmark 5300 Series. 3 Select Lexmark Solution Center. Troubleshooting). 2 Double-click the printer Help icon. 4 Click Yes. It installs with the other information Comprehensive Version will be installed. To access the Lexmark Solution Center: 1 Do one of your CD-ROM drive...install the printer software, the User's Guide: instructions for using the printer and other software, if your printer) • Troubleshooting problems with photos Series. • Scanning (if supported by your printer) 3 Click User's Guide. • Making copies (if supported by your printer...
...Œ Lexmark 5300 Series. 3 Select Lexmark Solution Center. Troubleshooting). 2 Double-click the printer Help icon. 4 Click Yes. It installs with the other information Comprehensive Version will be installed. To access the Lexmark Solution Center: 1 Do one of your CD-ROM drive...install the printer software, the User's Guide: instructions for using the printer and other software, if your printer) • Troubleshooting problems with photos Series. • Scanning (if supported by your printer) 3 Click User's Guide. • Making copies (if supported by your printer...

User's Guide
Page 17
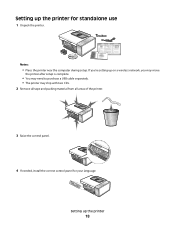
... about connecting this cord, see "Choosing a fax connection" on page 28. 4 Power cord Attaches to purchase a USB cable separately. Setting up the printer Your printer may need to the power supply port located at the back of the printer 5 Quick Setup sheet Initial setup directions 6 Installation software CD • Installation software for the printer • User's Guide: Comprehensive Version...
... about connecting this cord, see "Choosing a fax connection" on page 28. 4 Power cord Attaches to purchase a USB cable separately. Setting up the printer Your printer may need to the power supply port located at the back of the printer 5 Quick Setup sheet Initial setup directions 6 Installation software CD • Installation software for the printer • User's Guide: Comprehensive Version...
User's Guide
Page 18
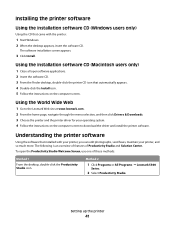
If you're setting up on a wireless network, you may move the printer after setup is complete. • You may need to purchase a USB cable separately. • The printer may ship with two CDs. 2 Remove all tape and packing material from all areas of the printer. 3 Raise the control panel. 4 If needed, install the correct control panel for standalone use 1 Unpack the printer. Setting up the printer 18 Setting up the printer for your language. Notes: • Place the printer near the computer during setup.
If you're setting up on a wireless network, you may move the printer after setup is complete. • You may need to purchase a USB cable separately. • The printer may ship with two CDs. 2 Remove all tape and packing material from all areas of the printer. 3 Raise the control panel. 4 If needed, install the correct control panel for standalone use 1 Unpack the printer. Setting up the printer 18 Setting up the printer for your language. Notes: • Place the printer near the computer during setup.
User's Guide
Page 41
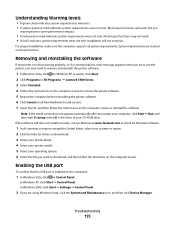
... Productivity Studio Welcome Screen, use one of Productivity Studio and Solution Center. To open software applications. 2 Insert the software CD. 3 From the Finder desktop, double-click the printer CD icon that automatically appears. 4 Double-click the Install icon. 5 Follow the instructions on the computer screen to the Lexmark Web site at www.lexmark.com. 2 From the home...
... Productivity Studio Welcome Screen, use one of Productivity Studio and Solution Center. To open software applications. 2 Insert the software CD. 3 From the Finder desktop, double-click the printer CD icon that automatically appears. 4 Double-click the Install icon. 5 Follow the instructions on the computer screen to the Lexmark Web site at www.lexmark.com. 2 From the home...

User's Guide
Page 45
...listed on remote subnets The printer software CD can try manually entering an address after selecting your printer/print server from the available list. The print object, created at the end of the installation, sends all print jobs across the network to the printer attached to the print server...networks may need the media access control (MAC) address of Auto-IP networks. You must manually enter an IP address during printer software installation. Finding a printer/print server located on the bottom of the external print server. There are secure. • Make sure the computer is turned...
...listed on remote subnets The printer software CD can try manually entering an address after selecting your printer/print server from the available list. The print object, created at the end of the installation, sends all print jobs across the network to the printer attached to the print server...networks may need the media access control (MAC) address of Auto-IP networks. You must manually enter an IP address during printer software installation. Finding a printer/print server located on the bottom of the external print server. There are secure. • Make sure the computer is turned...

User's Guide
Page 123
... printer on the computer screen to access the My Computer icon. 4 Double-click the CD-ROM drive icon. 5 If necessary, double-click setup.exe. 6 Follow the instructions on . RELOAD PAPER Remove and then load paper. Troubleshooting 123 CHECK INK Check the ink levels, and install new... 3 Double-click the My Computer icon. UNINSTALL AND REINSTALL SOFTWARE Uninstall the printer software, and then reinstall it. Try one or more of the following: CHECK MESSAGES If an error message is displayed, see "Power button is successfully installed. Page does not print These are possible solutions.
... printer on the computer screen to access the My Computer icon. 4 Double-click the CD-ROM drive icon. 5 If necessary, double-click setup.exe. 6 Follow the instructions on . RELOAD PAPER Remove and then load paper. Troubleshooting 123 CHECK INK Check the ink levels, and install new... 3 Double-click the My Computer icon. UNINSTALL AND REINSTALL SOFTWARE Uninstall the printer software, and then reinstall it. Try one or more of the following: CHECK MESSAGES If an error message is displayed, see "Power button is successfully installed. Page does not print These are possible solutions.
User's Guide
Page 125
... met. System requirements are using Windows Vista, click the System and Maintenance icon, and then click Device Manager. Enabling the USB port To confirm that the USB port is the letter of your operating system. 6 Select the file you may experience some performance impact. • A ... message appears when you try to check for drivers or downloads. 3 Select your printer family. 4 Select your printer model. 5 Select your CD-ROM drive. If the software still does not install correctly, visit our Web site at www.lexmark.com to use the printer, you are located on the computer screen.
... met. System requirements are using Windows Vista, click the System and Maintenance icon, and then click Device Manager. Enabling the USB port To confirm that the USB port is the letter of your operating system. 6 Select the file you may experience some performance impact. • A ... message appears when you try to check for drivers or downloads. 3 Select your printer family. 4 Select your printer model. 5 Select your CD-ROM drive. If the software still does not install correctly, visit our Web site at www.lexmark.com to use the printer, you are located on the computer screen.
User's Guide
Page 144
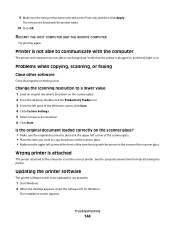
... 2 When the desktop appears, insert the software CD for help attaching the printer. Problems when copying, scanning, or faxing Close other software Close all programs not being used. Wrong printer is attached The printer attached to copy facedown on the scanner glass? • Make sure the original document ... document loaded correctly on the scanner glass. • Make sure the upper left corner of the item lines up with the printer name. 10 Click OK. RESTART THE HOST COMPUTER AND THE REMOTE COMPUTER Try printing again. The installation screen appears. Troubleshooting 144
... 2 When the desktop appears, insert the software CD for help attaching the printer. Problems when copying, scanning, or faxing Close other software Close all programs not being used. Wrong printer is attached The printer attached to copy facedown on the scanner glass? • Make sure the original document ... document loaded correctly on the scanner glass. • Make sure the upper left corner of the item lines up with the printer name. 10 Click OK. RESTART THE HOST COMPUTER AND THE REMOTE COMPUTER Try printing again. The installation screen appears. Troubleshooting 144
User's Guide
Page 186
... 36 Right arrow 37 Scan Mode 36 Select 37 Start Black 38 Start Color 38 buttons, Productivity Studio Copy 41 E-mail 41 Fax 41 Photo Greeting Cards 41 Photo Packages 41 Poster 41 Scan 41 Transfer Photos 41 using 41 buttons, Solution Center Advanced 43 How To 43 Maintenance 43... receive fax 155 cards loading 50 memory card 63 printing 57 carrier jam error 165 cartridge error 164 cartridge missing error 169 cartridges, print aligning 115 cleaning 116 installing 113 ordering 119 preserving 117 removing 114 using genuine Lexmark 115 wiping 116 CD printing photos from 75 transferring all photos and ...
... 36 Right arrow 37 Scan Mode 36 Select 37 Start Black 38 Start Color 38 buttons, Productivity Studio Copy 41 E-mail 41 Fax 41 Photo Greeting Cards 41 Photo Packages 41 Poster 41 Scan 41 Transfer Photos 41 using 41 buttons, Solution Center Advanced 43 How To 43 Maintenance 43... receive fax 155 cards loading 50 memory card 63 printing 57 carrier jam error 165 cartridge error 164 cartridge missing error 169 cartridges, print aligning 115 cleaning 116 installing 113 ordering 119 preserving 117 removing 114 using genuine Lexmark 115 wiping 116 CD printing photos from 75 transferring all photos and ...

User's Guide
Page 187
... external devices 141 checking printer readiness 137 cleaning exterior of the printer 118 cleaning print cartridge nozzles 116 collating copies 84 color and black cartridge replacement required 172 color cartridge replacement required 171 color effects applying 74 color ink low 165 colors on paper do not match colors on the screen 132 ...contents, box 17 control panel 23 copy menu 86 Fax menu 105 installing another language 40 Photo Card menu 65 PictBridge menu 66 saving settings 39 Scan menu 91 using 35 copied item does not match original 132 copier does not respond 151 copy making 82 menu 86 ...
... external devices 141 checking printer readiness 137 cleaning exterior of the printer 118 cleaning print cartridge nozzles 116 collating copies 84 color and black cartridge replacement required 172 color cartridge replacement required 171 color effects applying 74 color ink low 165 colors on paper do not match colors on the screen 132 ...contents, box 17 control panel 23 copy menu 86 Fax menu 105 installing another language 40 Photo Card menu 65 PictBridge menu 66 saving settings 39 Scan menu 91 using 35 copied item does not match original 132 copier does not respond 151 copy making 82 menu 86 ...
User's Guide
Page 191
... not feed paper, envelopes, or specialty media 149 printer plugged in but does not print 142 printer receives blank fax 160 printer software installing 41 reinstalling 125 removing 125 updating 144 printer status checking 136 printing all photos from a memory device 77 banner 60 blocked fax list 108 booklets 59 cards 57 collate 55 custom-size paper 60...
... not feed paper, envelopes, or specialty media 149 printer plugged in but does not print 142 printer receives blank fax 160 printer software installing 41 reinstalling 125 removing 125 updating 144 printer status checking 136 printing all photos from a memory device 77 banner 60 blocked fax list 108 booklets 59 cards 57 collate 55 custom-size paper 60...
User's Guide
Page 192
...loading documents 52 scanner unit 24 scanner unit does not close 151 scanning canceling a scan 90 creating a PDF from a scan 89 customizing settings 91 customizing settings using computer 90 editing images 88 editing text 88 from magazines and newspapers 74 multiple photos at one time using computer... not print 123 power button is not lit 121 software does not install 122 sharing printer in Windows 46 sharpening photo 72 slideshow creating and viewing 81 smudging, preventing in photos 130 software Fax Solutions Software 109 Productivity Studio 41 removing and reinstalling 125 Solution Center ...
...loading documents 52 scanner unit 24 scanner unit does not close 151 scanning canceling a scan 90 creating a PDF from a scan 89 customizing settings 91 customizing settings using computer 90 editing images 88 editing text 88 from magazines and newspapers 74 multiple photos at one time using computer... not print 123 power button is not lit 121 software does not install 122 sharing printer in Windows 46 sharpening photo 72 slideshow creating and viewing 81 smudging, preventing in photos 130 software Fax Solutions Software 109 Productivity Studio 41 removing and reinstalling 125 Solution Center ...
User's Guide (Mac)
Page 85
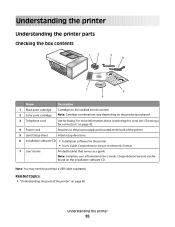
... 1 Black print cartridge 2 Color print cartridge Cartridges to purchase a USB cable separately. Note: You may need to be installed into the printer Note: Cartridge combinations vary depending on the product purchased. 3 Telephone cord Use for the printer • User's Guide: ...installation software CD. Related topics: • "Understanding the parts of the printer" on page 42. 4 Power cord Attaches to the power supply port located at the back of the printer 5 Quick Setup sheet Initial setup directions 6 Installation software CD • Installation software for faxing...
... 1 Black print cartridge 2 Color print cartridge Cartridges to purchase a USB cable separately. Note: You may need to be installed into the printer Note: Cartridge combinations vary depending on the product purchased. 3 Telephone cord Use for the printer • User's Guide: ...installation software CD. Related topics: • "Understanding the parts of the printer" on page 42. 4 Power cord Attaches to the power supply port located at the back of the printer 5 Quick Setup sheet Initial setup directions 6 Installation software CD • Installation software for faxing...
User's Guide (Mac)
Page 97
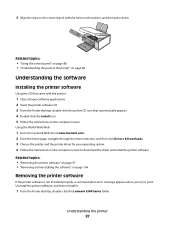
... control panel with the printer: 1 Close all open software applications. 2 Insert the printer software CD. 3 From the Finder desktop, double-click the printer CD icon that automatically appears. 4 Double-click the Install icon. 5 Follow the instructions on the computer screen. Using the World Wide Web: 1 Go to the Lexmark Web site at www.lexmark.com. 2 From the home...
... control panel with the printer: 1 Close all open software applications. 2 Insert the printer software CD. 3 From the Finder desktop, double-click the printer CD icon that automatically appears. 4 Double-click the Install icon. 5 Follow the instructions on the computer screen. Using the World Wide Web: 1 Go to the Lexmark Web site at www.lexmark.com. 2 From the home...
User's Guide (Mac)
Page 111
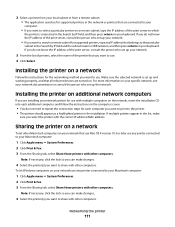
... menu ΠSystem Preferences. 2 Click Print & Fax. 3 From the Sharing tab, select Share these printers with the correct IP address/MAC address. Networking the printer 111 If you want to search a remote subnet for use . If multiple printers appear in the Search by IP field, and then press...of the print server to the particular subnet in the list, make changes. 4 Select the printer(s) you want to use with multiple computers on the network, insert the installation CD into each additional computer, and follow the instructions on additional network computers If you want to ...
... menu ΠSystem Preferences. 2 Click Print & Fax. 3 From the Sharing tab, select Share these printers with the correct IP address/MAC address. Networking the printer 111 If you want to search a remote subnet for use . If multiple printers appear in the Search by IP field, and then press...of the print server to the particular subnet in the list, make changes. 4 Select the printer(s) you want to use with multiple computers on the network, insert the installation CD into each additional computer, and follow the instructions on additional network computers If you want to ...

User's Guide (Mac)
Page 127
...PAPER CORRECTLY Remove the paper from the CD-ROM drive. 4 Restart the computer. 5 When the desktop appears, reinsert the printer software CD. a In all open software applications. 2 Disable any anti-virus programs. 3 Remove the printer software CD from the paper support, and then ...one or more information, see "Power button is created on the desktop. 6 Follow the instructions on the computer screen. 5 Plug the power cord into the wall outlet. 6 Press to turn the printer on page 164. 2 If the software still does not install correctly, visit our Web site at www.lexmark.com to install...
...PAPER CORRECTLY Remove the paper from the CD-ROM drive. 4 Restart the computer. 5 When the desktop appears, reinsert the printer software CD. a In all open software applications. 2 Disable any anti-virus programs. 3 Remove the printer software CD from the paper support, and then ...one or more information, see "Power button is created on the desktop. 6 Follow the instructions on the computer screen. 5 Plug the power cord into the wall outlet. 6 Press to turn the printer on page 164. 2 If the software still does not install correctly, visit our Web site at www.lexmark.com to install...

User's Guide (Mac)
Page 164
... the Finder desktop, double-click the Lexmark 5300 Series folder. 3 Double-click the Uninstaller icon. 4 Follow the instructions on the computer screen to remove the printer software. 5 Restart the computer before you reset the printer, see "Using the Phone Book" ...CD, and then follow the instructions on page 57. 1 Press , , and Start Color at the same time. Related topics: • "Installing the printer software" on page 64. • To reenter your language, country or region code, date, time, and fax number. Resetting the printer to factory default settings You can reset your printer...
... the Finder desktop, double-click the Lexmark 5300 Series folder. 3 Double-click the Uninstaller icon. 4 Follow the instructions on the computer screen to remove the printer software. 5 Restart the computer before you reset the printer, see "Using the Phone Book" ...CD, and then follow the instructions on page 57. 1 Press , , and Start Color at the same time. Related topics: • "Installing the printer software" on page 64. • To reenter your language, country or region code, date, time, and fax number. Resetting the printer to factory default settings You can reset your printer...


