User's Guide
Page 5
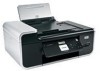
... using the printer control panel...86 Repeating an image on one page...87 Copying multiple pages on one sheet (N-Up)...87 Canceling a copy job...88 Scanning 89 Scanning original documents...89 Scanning color or black-and-white original documents 91 Scanning photos for editing...91 Scanning to a computer over a network...92 Canceling...
... using the printer control panel...86 Repeating an image on one page...87 Copying multiple pages on one sheet (N-Up)...87 Canceling a copy job...88 Scanning 89 Scanning original documents...89 Scanning color or black-and-white original documents 91 Scanning photos for editing...91 Scanning to a computer over a network...92 Canceling...
User's Guide
Page 21
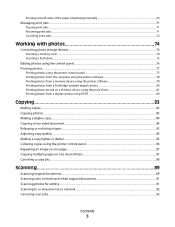
... exit tray Hold paper as magazine clippings) into the ADF. 12 Automatic Document Feeder (ADF) Scan, copy, or fax multiple-page letter-, legal-, and A4-size documents. 13 Scanner glass Scan and copy photos and documents. 14 Top cover Access the scanner glass. no wireless option is not...to communicate with the wireless network. • Green indicates that capability and may not have this indicator. indicates that the printer is connected for scanning, copying, or faxing multiple-page documents. Note: Do not load postcards, photos, small items, or thin media (such as it exits. 11...
... exit tray Hold paper as magazine clippings) into the ADF. 12 Automatic Document Feeder (ADF) Scan, copy, or fax multiple-page letter-, legal-, and A4-size documents. 13 Scanner glass Scan and copy photos and documents. 14 Top cover Access the scanner glass. no wireless option is not...to communicate with the wireless network. • Green indicates that capability and may not have this indicator. indicates that the printer is connected for scanning, copying, or faxing multiple-page documents. Note: Do not load postcards, photos, small items, or thin media (such as it exits. 11...
User's Guide
Page 23
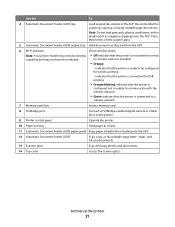
Use 1 2 3 4 5 Display Note: The display is turned off the printer. Press and hold for two seconds to turn off in Power Saver mode. Access the scan menu and scan documents. Access the copy menu and make copies. To • Turn the printer on and off. • Switch to Power Saver mode. Note: Press to switch to Power Saver mode. View: • Printer status • Messages • Menus Setting up the printer 23 Access the photo menu and print photos.
Use 1 2 3 4 5 Display Note: The display is turned off the printer. Press and hold for two seconds to turn off in Power Saver mode. Access the scan menu and scan documents. Access the copy menu and make copies. To • Turn the printer on and off. • Switch to Power Saver mode. Note: Press to switch to Power Saver mode. View: • Printer status • Messages • Menus Setting up the printer 23 Access the photo menu and print photos.

User's Guide
Page 24
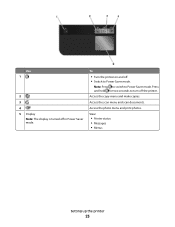
... right. • Move downward through a submenu listing within a menu. • In Photo mode or Scan mode, move the Region of Interest box to default settings. Switch to color mode or black-and-white mode. • Cancel a print, copy, or scan job in progress. • Exit from a menu level of the Copy..., Scan, Photo, or File Print menu to the top level of a menu. • Exit from ...
... right. • Move downward through a submenu listing within a menu. • In Photo mode or Scan mode, move the Region of Interest box to default settings. Switch to color mode or black-and-white mode. • Cancel a print, copy, or scan job in progress. • Exit from a menu level of the Copy..., Scan, Photo, or File Print menu to the top level of a menu. • Exit from ...
User's Guide
Page 25
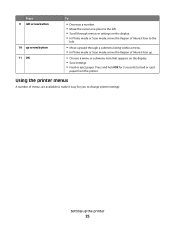
... of menus are available to make it easy for 3 seconds to the left . • Scroll through a submenu listing within a menu. • In Photo mode or Scan mode, move the Region of Interest box up. • Choose a menu or submenu item that appears on the display. • In Photo mode or...
... of menus are available to make it easy for 3 seconds to the left . • Scroll through a submenu listing within a menu. • In Photo mode or Scan mode, move the Region of Interest box up. • Choose a menu or submenu item that appears on the display. • In Photo mode or...

User's Guide
Page 26
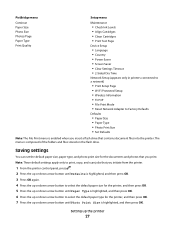
... on Network Photo Proof Sheet • Print Sheet with Recent 20 Photos • Print Sheet with All Photos • Print Sheet with Date Range • Scan Proof Sheet Print Photos • Print All • Print Date Range • Print Photo Range • Print Camera Selections (DPOF) Save Photos • Computer ... Menus List Copy menu Copies Quality Resize Lighter/Darker Collate Photo Reprint 2-Sided Copies Pages per Sheet Original Size Copies per Sheet Content Type Preview Scan menu Scan to Print - Original Size - Preview Photo menu Select and Print • Size to • Computer -
... on Network Photo Proof Sheet • Print Sheet with Recent 20 Photos • Print Sheet with All Photos • Print Sheet with Date Range • Scan Proof Sheet Print Photos • Print All • Print Date Range • Print Photo Range • Print Camera Selections (DPOF) Save Photos • Computer ... Menus List Copy menu Copies Quality Resize Lighter/Darker Collate Photo Reprint 2-Sided Copies Pages per Sheet Original Size Copies per Sheet Content Type Preview Scan menu Scan to Print - Original Size - Preview Photo menu Select and Print • Size to • Computer -
User's Guide
Page 27
... paper type for the printer, and then press OK. 7 Press the up the printer 27 Note: These default settings apply only to print, copy, and scan jobs that you print. Saving settings You can set the default paper size, paper type, and photo print size for the printer, and then press...
... paper type for the printer, and then press OK. 7 Press the up the printer 27 Note: These default settings apply only to print, copy, and scan jobs that you print. Saving settings You can set the default paper size, paper type, and photo print size for the printer, and then press...
User's Guide
Page 28
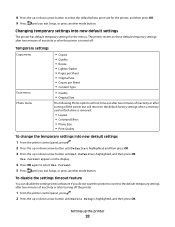
...want the printer to revert to the default factory settings when a memory card or flash drive is removed. • Layout • Colorized Effect • Photo Size • Print Quality To change the temporary settings into new default settings The printer has default temporary settings for... OK. The printer reverts to these default temporary settings after two minutes of inactivity or after the printer is turned off: Temporary settings Copy menu Scan menu Photo menu • Copies • Quality • Resize • Lighter/Darker • Pages per Sheet • Original Size •...
...want the printer to revert to the default factory settings when a memory card or flash drive is removed. • Layout • Colorized Effect • Photo Size • Print Quality To change the temporary settings into new default settings The printer has default temporary settings for... OK. The printer reverts to these default temporary settings after two minutes of inactivity or after the printer is turned off: Temporary settings Copy menu Scan menu Photo menu • Copies • Quality • Resize • Lighter/Darker • Pages per Sheet • Original Size •...
User's Guide
Page 31
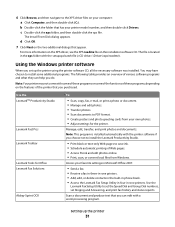
.... • Access Picnik and edit photos online. • Print, scan, or convert local files from your printer model number, and then double-click Drivers. Use the LexmarkTM Productivity Studio Lexmark Fast Pics Lexmark Toolbar Lexmark Tools for the printer. Note: This program is located in -one ...the printer using the printer software CD, all the necessary software was installed. Scan a document and produce text that has your own photos. • Adjust settings for Office Lexmark Fax Solutions Abbyy Sprint OCR To • Scan, copy, fax, e-mail, or print a photo or document. •...
.... • Access Picnik and edit photos online. • Print, scan, or convert local files from your printer model number, and then double-click Drivers. Use the LexmarkTM Productivity Studio Lexmark Fast Pics Lexmark Toolbar Lexmark Tools for the printer. Note: This program is located in -one ...the printer using the printer software CD, all the necessary software was installed. Scan a document and produce text that has your own photos. • Adjust settings for Office Lexmark Fax Solutions Abbyy Sprint OCR To • Scan, copy, fax, e-mail, or print a photo or document. •...
User's Guide
Page 33
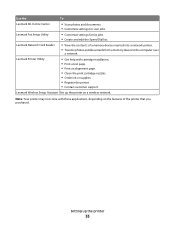
... into a network printer. • Transfer photos and documents from a memory device to the computer over a network. Lexmark Fax Setup Utility • Customize settings for scan jobs. Lexmark Network Card Reader • View the contents of the printer that you purchased. Note: Your printer may not come ...print cartridge nozzles. • Order ink or supplies. • Register the printer. • Contact customer support. Use the To Lexmark All-In-One Center • Scan photos and documents. • Customize settings for fax jobs. • Create and edit the Speed Dial list.
... into a network printer. • Transfer photos and documents from a memory device to the computer over a network. Lexmark Fax Setup Utility • Customize settings for scan jobs. Lexmark Network Card Reader • View the contents of the printer that you purchased. Note: Your printer may not come ...print cartridge nozzles. • Order ink or supplies. • Register the printer. • Contact customer support. Use the To Lexmark All-In-One Center • Scan photos and documents. • Customize settings for fax jobs. • Create and edit the Speed Dial list.
User's Guide
Page 58
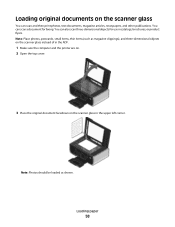
...sure the computer and the printer are on. 2 Open the top cover. 3 Place the original document facedown on the scanner glass You can scan and then print photos, text documents, magazine articles, newspapers, and other publications. Loading paper 58 You can also... scan three-dimensional objects for faxing. You can scan a document for use in catalogs, brochures, or product flyers. Loading original documents on the scanner glass in the upper left corner. Note: ...
...sure the computer and the printer are on. 2 Open the top cover. 3 Place the original document facedown on the scanner glass You can scan and then print photos, text documents, magazine articles, newspapers, and other publications. Loading paper 58 You can also... scan three-dimensional objects for faxing. You can scan a document for use in catalogs, brochures, or product flyers. Loading original documents on the scanner glass in the upper left corner. Note: ...

User's Guide
Page 59
.... 3 Load the original document faceup and top edge first into the ADF. Place these items on the scanner glass. 1 Adjust the paper guide on the scanned image. You can load up to avoid dark edges on the ADF tray to the width of an original document into the ADF. Loading original.... • Do not load postcards, photos, small items, transparencies, photo paper, or thin media (such as magazine clippings) into the Automatic Document Feeder (ADF) for scanning, copying, and faxing.
.... 3 Load the original document faceup and top edge first into the ADF. Place these items on the scanner glass. 1 Adjust the paper guide on the scanned image. You can load up to avoid dark edges on the ADF tray to the width of an original document into the ADF. Loading original.... • Do not load postcards, photos, small items, transparencies, photo paper, or thin media (such as magazine clippings) into the Automatic Document Feeder (ADF) for scanning, copying, and faxing.
User's Guide
Page 81
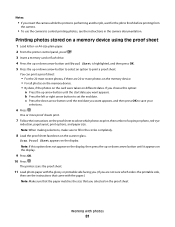
... the card were taken on different dates. Note: When making selections, make sure to set the end date. Scan Proof Sheet appears on a memory device using the proof sheet 1 Load letter- The printer scans the proof sheet. 11 Load photo paper with the glossy or printable side facing you. (If you are...
... the card were taken on different dates. Note: When making selections, make sure to set the end date. Scan Proof Sheet appears on a memory device using the proof sheet 1 Load letter- The printer scans the proof sheet. 11 Load photo paper with the glossy or printable side facing you. (If you are...
User's Guide
Page 83
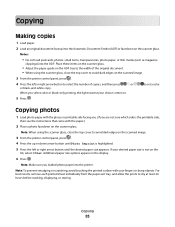
..., or thin media (such as magazine clippings) into the printer. Copying photos 1 Load photo paper with the paper.) 2 Place a photo facedown on the scanned image. 3 From the printer control panel, press . 4 Press the left or right arrow button until Photo Reprint is highlighted. 5 Press the left or right...desired paper size is the printable side, then see the instructions that came with the glossy or printable side facing you. (If you select color or black-only printing, the light nearest your choice comes on the list, select Other. Note: Make sure you loaded photo paper into...
..., or thin media (such as magazine clippings) into the printer. Copying photos 1 Load photo paper with the paper.) 2 Place a photo facedown on the scanned image. 3 From the printer control panel, press . 4 Press the left or right arrow button until Photo Reprint is highlighted. 5 Press the left or right...desired paper size is the printable side, then see the instructions that came with the glossy or printable side facing you. (If you select color or black-only printing, the light nearest your choice comes on the list, select Other. Note: Make sure you loaded photo paper into...
User's Guide
Page 84
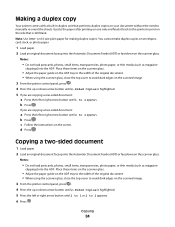
... the original document. • When using the scanner glass, close the top cover to avoid dark edges on the screen. c Follow the instructions on the scanned image. 3 From the printer control panel, press . 4 Press the up or down arrow button until 2-Sided Copies is highlighted. 5 If you are copying... one -sided document: a Press the left or right arrow button until 2 to 1 or 2 to print on the side that performs duplex copies on the scanned image. 3 From the printer control panel, press . 4 Press the up or down arrow button until 2-Sided Copies is highlighted. 5 Press the left or...
... the original document. • When using the scanner glass, close the top cover to avoid dark edges on the screen. c Follow the instructions on the scanned image. 3 From the printer control panel, press . 4 Press the up or down arrow button until 2-Sided Copies is highlighted. 5 If you are copying... one -sided document: a Press the left or right arrow button until 2 to 1 or 2 to print on the side that performs duplex copies on the scanned image. 3 From the printer control panel, press . 4 Press the up or down arrow button until 2-Sided Copies is highlighted. 5 Press the left or...

User's Guide
Page 85
... • Do not load postcards, photos, small items, transparencies, photo paper, or thin media (such as necessary to print a borderless copy on the scanned image. 3 From the printer control panel, press . 4 Press the up or down arrow button until the setting that you selected. Copying 85 The resize...paper. 2 Load an original document faceup into the ADF. Note: When using the scanner glass, close the top cover to avoid dark edges on the scanned image. 3 From the printer control panel, press . 4 Press the up or down arrow button until Resize is highlighted. 5 Press the left or ...
... • Do not load postcards, photos, small items, transparencies, photo paper, or thin media (such as necessary to print a borderless copy on the scanned image. 3 From the printer control panel, press . 4 Press the up or down arrow button until the setting that you selected. Copying 85 The resize...paper. 2 Load an original document faceup into the ADF. Note: When using the scanner glass, close the top cover to avoid dark edges on the scanned image. 3 From the printer control panel, press . 4 Press the up or down arrow button until Resize is highlighted. 5 Press the left or ...
User's Guide
Page 86
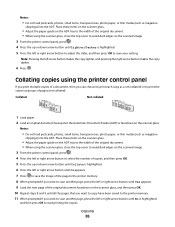
... (such as magazine clippings) into the ADF. Copying 86 Collating copies using the scanner glass, close the top cover to avoid dark edges on the scanned image. 3 From the printer control panel, press . 4 Press the left or right arrow button until No is highlighted, and then press OK to select the... number of a document, then you want to scan another page, press the left or right arrow button to start printing the copies. Place these items on the scanner glass. • Adjust the paper...
... (such as magazine clippings) into the ADF. Copying 86 Collating copies using the scanner glass, close the top cover to avoid dark edges on the scanned image. 3 From the printer control panel, press . 4 Press the left or right arrow button until No is highlighted, and then press OK to select the... number of a document, then you want to scan another page, press the left or right arrow button to start printing the copies. Place these items on the scanner glass. • Adjust the paper...
User's Guide
Page 87
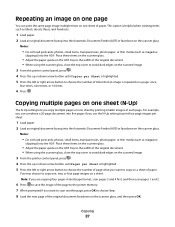
... ADF tray to the width of the original document. • When using the scanner glass, close the top cover to avoid dark edges on the scanned image. 3 From the printer control panel, press . 4 Press the up or down arrow button until Pages per Sheet is highlighted. 5 Press the left or right... ADF tray to the width of the original document. • When using the scanner glass, close the top cover to avoid dark edges on the scanned image. 3 From the printer control panel, press . 4 Press the up or down arrow button until Copies per Sheet is highlighted. 5 Press the left or right...
... ADF tray to the width of the original document. • When using the scanner glass, close the top cover to avoid dark edges on the scanned image. 3 From the printer control panel, press . 4 Press the up or down arrow button until Pages per Sheet is highlighted. 5 Press the left or right... ADF tray to the width of the original document. • When using the scanner glass, close the top cover to avoid dark edges on the scanned image. 3 From the printer control panel, press . 4 Press the up or down arrow button until Copies per Sheet is highlighted. 5 Press the left or right...
User's Guide
Page 88
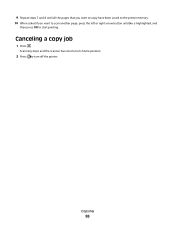
Scanning stops and the scanner bar returns to its home position. 2 Press to start printing. Copying 88 Canceling a copy job 1 Press . 9 Repeat steps 7 and 8 until all the pages that you want to copy have been saved to the printer memory. 10 When asked if you want to scan another page, press the left or right arrow button until No is highlighted, and then press OK to turn off the printer.
Scanning stops and the scanner bar returns to its home position. 2 Press to start printing. Copying 88 Canceling a copy job 1 Press . 9 Repeat steps 7 and 8 until all the pages that you want to copy have been saved to the printer memory. 10 When asked if you want to scan another page, press the left or right arrow button until No is highlighted, and then press OK to turn off the printer.
User's Guide
Page 89
...b Press the left or right arrow button until the application that you choose to send the scanned image to a memory card or flash drive: a Insert the memory device. Scanning 89 You can also scan a document for faxing. Place these items on the scanner glass. • Adjust the paper... items, transparencies, photo paper, or thin media (such as magazine clippings) into the Automatic Document Feeder (ADF) or facedown on scanning and customizing scanned images, see the Help associated with the programs installed with the printer software. c Press the left or right arrow button until Computer...
...b Press the left or right arrow button until the application that you choose to send the scanned image to a memory card or flash drive: a Insert the memory device. Scanning 89 You can also scan a document for faxing. Place these items on the scanner glass. • Adjust the paper... items, transparencies, photo paper, or thin media (such as magazine clippings) into the Automatic Document Feeder (ADF) or facedown on scanning and customizing scanned images, see the Help associated with the programs installed with the printer software. c Press the left or right arrow button until Computer...


